Tag: htaccess

  • How to block spam comments on blog using htaccess ?

    If someone is continuously spamming on your website, you feel like hitting that spammer with baseball bat. Relax! Don’t do that as I have an easy way to block spam on website for you.

    Block SpammerRecently, I shared an article on to block spam using Akismet Plugin on WordPress. Akismet plugin’s Spam filter is though very strong but sometimes people submit spam comments in genuine way to get back links. Being dependent on the Plugin, we are left with nothing to do but manually delete spam comments or you can use htaccess to block user to comment.

    Why htaccess is useful ?

    As we all are aware of htaccess file which adds security attributes to web directory where every browser reads htaccess file before loading website on client end. For instance if you want to disable web directory or password protect web directory is possible using Htaccess method. Similarly if you want to block IP Address to restrict visiting website, we will have to use htaccess method. And in this scenario we will be using htaccess code to block comment.

    htaccess code to Block Spam Comment

    When someone comments on your website, you can trace that person using IP Address. And if someone is spamming on website, then you can simply restrict user to access website using IP Address. Below is a simple procedure to block spam comment using htaccess.

    • Login to your WordPress Admin Area and Navigate to Dashboard > Comments.
    • In the list of comments you can get the IP Address of the users, just like in the screenshot below.
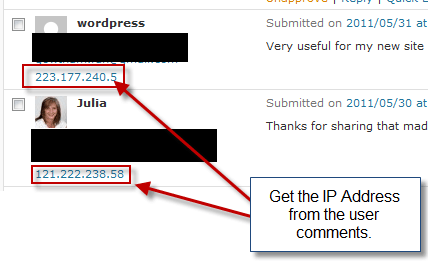
    Get IP Address from User comment
    IP Address from User comment
    • Once we have the IP address, we are ready to create htaccess file.
    • Go to root directory of website using FTP and look for HTACCESS file. (In some hosting it is hidden, so make sure you tweak the visibility in your FTP Client)

    NOTE: Make sure you take backup of htaccess before modifying it.

    • If there is no HTACCESS file present, then you can simply create a new text file and rename it as “.htaccess”.
    • Now open HTACCESS file in any text editor and add below code to block spam comment user.

    [php]

    order allow,deny
    deny from 121.222.238.58
    deny from 223.177.240.5
    allow from all

    [/php]

    The above code will block two IP Address that is 121.222.238.58 and 223.177.240.5. Sometimes, spammers use a whole of a series like 121.222.238.23, 121.222.238.24 and so on. In this case you can simply use the below code.

    [php]

    order allow,deny
    deny from 121.222.238.
    allow from all

    [/php]

    Now, the above code will block whole series of IP address starting from 121.222.238.2 to 121.222.238.254

    • Once you have added the code in HTACCESS file, save it and we are done.

    We’re Done!

    Stopping spam comments on website has always been a challenge for administrator and it will always be a ping-pong game. Let us know what measures do you use, to stop spam comments on website ? by posting a comment below.

    If you have any query or further assistance is required, you can post comment as your feedback.
  • Tutorial to Password Protect Website directory using htaccess

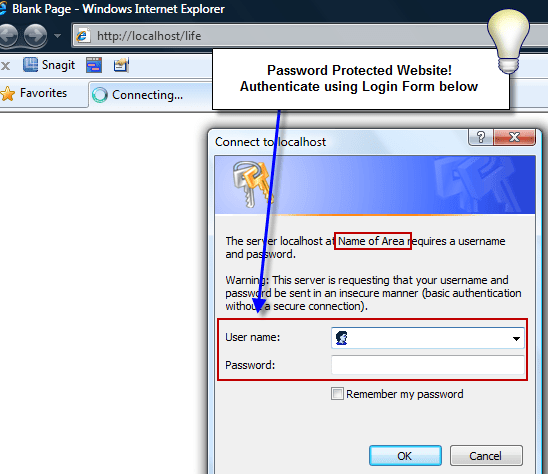
    As web technology is growing and making advancements, vulnerabilities are also increasing with the same rate. Website security is a major concern today and planning effective strategy is the resolution. If your website has confidential content or premium content, which needs to be limited within a scope of few users, then you can simply password protect premium content on website. All visits made to that content will be prompted to enter username and password to gain access to premium content, just like in the screenshot below.

    password protect website using htaccess
    Login Screen: Access to Protected Area on website

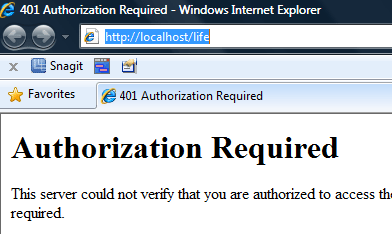
    And if a failure to login happens, visitor is redirected to 401 error page, just like the below screenshot.

    401-error-password-protect-website-using-htaccess
    401 Error Page: Failed to Access Protected Area

    How to Password Protect Website ?

    If your website is hosted on Apache web server, then website or website directory can be password protected using the htaccess method. In previous article I explained about protecting website by disabling directory browsing, if you missed it, then  you can read it here: Disable directory browsing to protect website using htaccess method.

    HTACCESS file sets security attributes to the web directory which you want to protect. In order to set password on website, HTPASSWD file will created which will store all usernames and followed with the passwords. For instance, if username is aky and password is joe, then it will be written as  “aky : joe”.

    How to create HTPASSWD file ?

    HTPASSWD is the file which contains usernames as well the passwords for the HTACCESS file to validate during authentication.

    • Using any ftp client, login to the web directory of your website.
    • Create a simple text file using any text editor and add the below code snippet precisely.

    [php]

    aky : joe
    username2:password2
    username3:password3

    [/php]

    • The above code contains username and passwords. Any word before colon (:) is username, while word after colon (:) is password.
    • Once done, save the file as “.htpasswd” and upload it to the root of the directory.

    How to create HTACCESS file ?

    HTACCESS file sets security attributes on a web directory for user accessibility. HTACCESS file can be created using any text editor like a notepad and should be save as….htaccess” (without quotes). To create htaccess file to password protect website directory, follow basic steps below:

    Make sure before modifying file for any changes, I recommend you to backup all the website data.

    • Using any ftp client, login to the website directory, you will find .htaccess file located in the root of your directory.
    • Open .htaccess file to edit it using a text editor and add below code snippet precisely.

    [php]

    AuthUserFile /path/to/file/.htpasswd
    AuthName "Premium Content Area"
    AuthType Basic
    require valid-user

    [/php]

    • On line 1 in the above code, specify the location of the HTPASSWD file, which we created in the section above. Once done, save the file as “.htaccess” and upload it to the web directory which is to be password protected. For instance, if the web directory is “www.yourwebsite.com/secure/” then browse into this directory using ftp client and place the HTACCESS file in secure web directory.

    Now open the webpage or website, for instance “www.yourwebsite.com/secure”, will prompt you to login to gain access to protected area, else it is redirected to 401 Authorization Required Exception Page. Now that your content is password protected, and is safe from the vulnerabilities and hackers. Make sure you don’t share your password with anyone.

    Here we come to end of this tutorial, if you have any queries for require any further assistance, post comment as your feedback.

  • Disable directory browsing to protect website using htaccess method

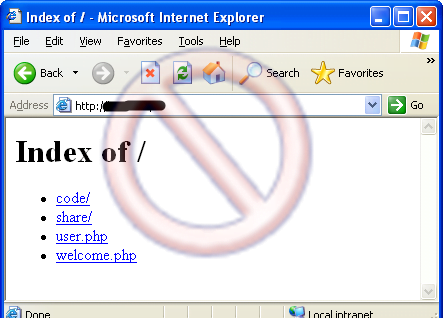
    If your website is hosted on a Apache Web Server, then you should know that directory browsing feature is enabled by default. When a default file or index.html file is not present, server list downs all directory contents.  In order to protect website from hackers or other unwanted vulnerabilities, one should disable directory listing on the Apache server.

    Disable Directory browsing using htaccess
    Disable Directory browsing

    How to disable directory browsing ?

    Directory browsing can be disabled by two ways, one is by editing the .htaccess file and add security to website which is located in root of the directory. Other method is by editing the httpd.conf file, which is the apache server file.

    In my previous article How to improve website performance by Image Caching using htaccess, I explained about improving website performance and this article will cover a tip about website security.

    Make sure before modifying file for any changes, I recommend you to backup all the website data.

    • Using any ftp client, login to the website directory, you will find .htaccess file located in the root of your directory.
    • Open .htaccess file to edit it using a text editor.
    • Find “Options-Indexes” in the text editor, you can use Ctrl+F to search for exact match. In case no “Options-Indexes” line exists, add “Options-Indexes” without quotes in the new line of htaccess file.
    • Once done, save the file and upload to root directory of website.

    Once htaccess file is uploaded, refresh the website / url, which is listing directory content. I hope this tutorial will secure your website. If you have any queries or any further assistance is required, you can post comment below, as your feedback.

  • How to improve website performance by Image Caching using htaccess

    A website or a blog, usually are designed using images which looks creative but increases page load time. Sometimes it gets annoying for daily visitors and it leaves a bad impression for the website. With the advancements in technology and WWW, now web browsers have image cache feature, which has resolved many problems for websites like page load problem for photo blogs.

    enable-image-cache-using-htaccessThe analogy behind browser cache states that when a page is loaded, all the images are saved in a cache pool of browser itself. And when a visitor visits the site again, finds no delay while opening a page, as the images are pulled locally from the browser. Hence, enabling image cache for a website, decrease page load time. In the this article, you will learn how to enable image cache for website using htaccess method.

    How htaccess file improve website performance?

    htaccess file improve website performance
    Improve performance by enabling Image Cache

    htaccess is a file to add security attributes to root directory or to any other specified directory. Every browser reads .htaccess file, and further reads header information of the website. On the complementary, browser check for attributes whether to save image in cache pool or any media which also specify the expiration time and a cookies are created accordingly. For instance, if cookies are created for an image which specify it to expire in 2 weeks, and after two weeks, browser will clear image from the cache pool, and browser will have to reload image again. Hence, this states image caching also save website bandwidth.

    How to enable image cache ?

    Below is the tutorial, to enable image cache for wordpress blog or website.

    Make sure before modifying file for any changes, I recommend you to backup all the website data.

    • Using any ftp client, login to the website directory, you will find .htaccess file located in the root of your directory.
    • Open the .htaccess file using text editor. In case there is no htaccess file, create a new text file and save is as “.htaccess” (Make sure you don’t miss the “. (DOT) access”).
    • Further add the below code snippet in the text file.

    Code:

    [css]
    # Image and Flash content Caching for One Month
    <FilesMatch ".(flv|gif|jpg|jpeg|png|ico|swf)$">
    Header set Cache-Control "max-age=2592000"
    </FilesMatch>
    [/css]

    Be very precise with the code you copy and paste in the file, else your website may not be accessible.

    • After pasting the code in htaccess file, review it and save it. Once done, it will turn on the image caching for one month, as the ‘max-age’ parameter value equals 2592000 seconds. If you want that image caching never expires, edit “max-age=29030400”, as 29030400 seconds = 1 year.

    As we come to the end of this simple, yet beneficial tutorial to improve website using htaccess method . Do let us know what methods did you apply to improve website performance ?

    If you have any queries or any further assistance is required, you can post comment below, as your feedback.