Tag: photoshop tutorials

  • Design a Creative Facebook Business Cover page with Exact Dimensions [Updated]

    Facebook updated it’s Business Page Cover dimensions and they are 828 X 351 pixels.

    Last year December, Facebook Timeline was announced/launched for its users. Facebook Timeline organizes your profile just like a vertical scrapbook. It displays, a reverse chronological order of your statuses, photos, videos and links posted by you or tagged by your friends. I really like this feature overruling the thought, a lot of people not liking it. Duh! A change would do you good! 🙂

    design facebook business cover page
    Draw Facebook Cover Page

    Few days back, Facebook updated Timeline feature on Business Page as well, which actually made me think of this article. Well, creating a Facebook cover is no Big Deal if you upload a sunset, a pet or bunch of gorillas. Such casual and lazy efforts looks good on Personal Pages but talking of a business page, you might have to screw keep pets, nature and folks aside. Yes, to impress facebook page fans, you will have to draw some straight lines. Mmmm… we have an objective here to design Facebook business cover page precisely.

    Lets quickly summarize this article for better understanding. The article has been divided into three parts: Basic Requirement, Set Cover Page Layout and Design Business Cover Page. And here we go…

    Basic Requirement

    Here is a list of items you need, to design Facebook Cover Page:

    • Image Editor (We will be using Photoshop in this tutorial)
    • Business Page Theme (Business Website, Graphic Banner or Company Logo)
    • Cool Fonts (optional)

    Set Facebook Cover Page Layout

    In this step,  we will prepare Cover Page Layout to match exact dimension and it is recommended for Best results. Follow a simple procedure below:

    • Open image editor and Create a New PhotoShop Document with Width: 851 pixels and Height: 315 pixels. For Facebook cover page exact dimensions refer to screenshot below.
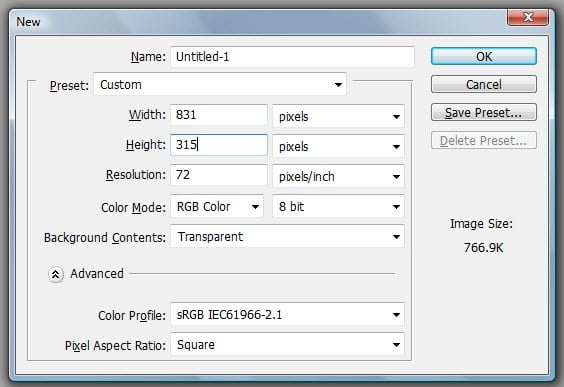
    Set Facebook Cover Page Layout
    Set Facebook Cover Page Layout
    • Cover page requires three guidelines for accurate layout. Set first guideline at 24 pixels from Left, set the second guideline at 159 pixels from Left and set the third guideline at 224 pixels from Top. (Refer to screenshot below)
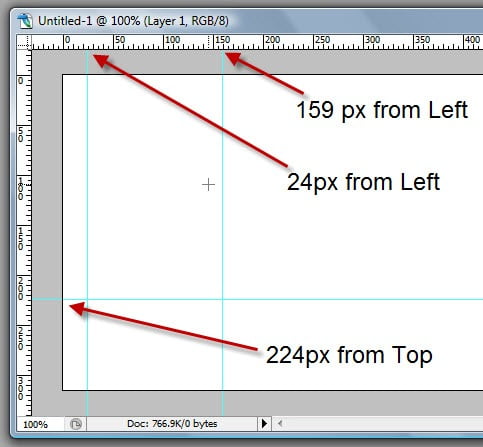
    Set Guidelines Cover Page Layout
    Set Guidelines Cover Page Layout
    • Save the Document and we are all set with the Cover Page Layout.

    Design Facebook Business Cover Page

    We are just a step away from your Awesome Business Page Design. Are you ready with your Theme ? If not, then give it a thought or you can also refer our article to Create Twitter Background. Once ready with Business Theme, with no further delay lets go ahead with Facebook Cover Page design.

    1. PLACE THEME ELEMENTS – BE CREATIVE

    Depending upon our Business place elements, like banner, slogan, punch line, logo or services in the Cover page. Feel free to express your creativity in this step, don’t forget to refer screenshot for usable and unusable area.
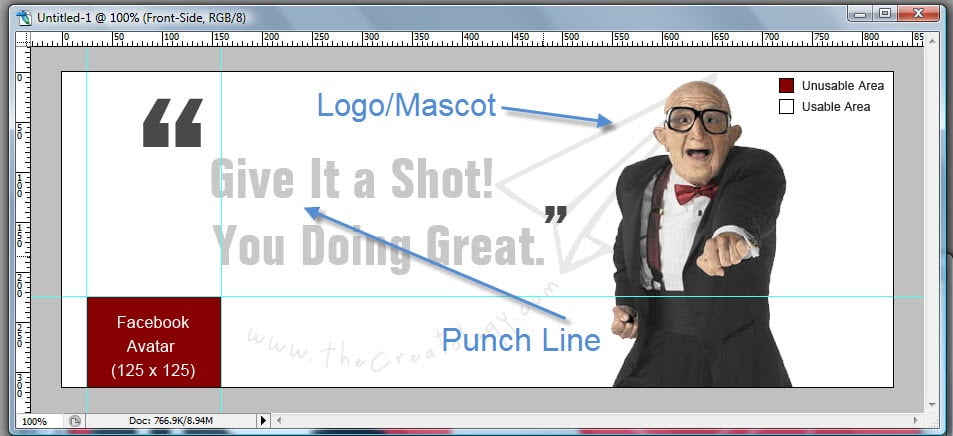
    Place Facebook Cover Elements
    Place Facebook Cover Elements

    2. FACEBOOK AVATAR SIZE

    Facebook avatar, so called Profile Picture is also part of Facebook Cover page. Facebook Avatar Image size is 160 x 160 pixels along with 4 pixels white border and dark 1 pixel outline around, making the Avatar Image Box as 170 x 170 pixels. (Refer to the screenshot)
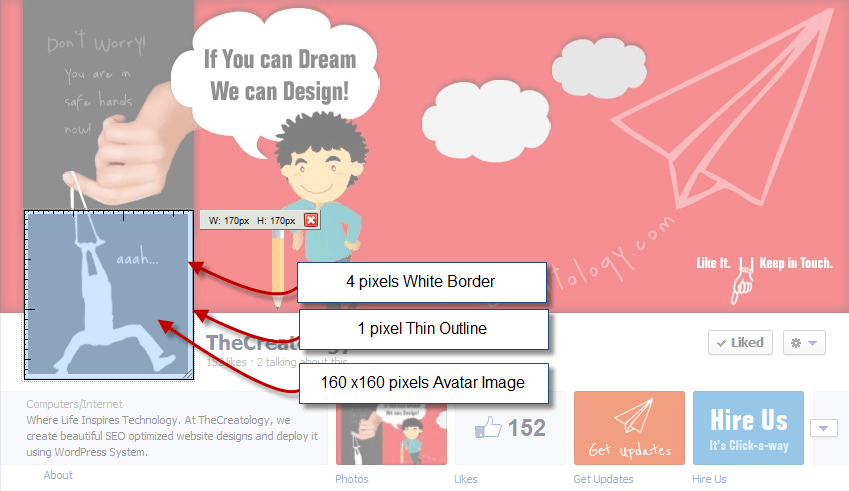
    Facebook Avatar Image Sizes
    Facebook Avatar Image Sizes

    Already done with above two steps ? Yes: Bravo, No: Keep Working! Designing is a never ending activity and should never stop, until you are done.

    You can see a Demo TheCreatology Facebook Page.

    Wasn’t It fun?

    I am sure it was, but its your time to express now and think with creative mind. What do you think about this article ?

    Share it with friends, if it was helpful! Any doubts, use the comment box below. 😉

    Why this update?

    This post is updated with new Facebook Fan Page Cover Size and Dimensions, as Facebook changed Cover page dimensions.

    Published on: Apr 07, 2012
    Revised on: Aug 03, 2012
    Revised on: Aug 17, 2016

  • Quick-n-Easy way to Create Twitter Background – Part 1 [Design Layout]

    You must be thinking why am I writing this article, when Mashable already has explained about Twitter Backgrounds 2.5 years back. Well, reply to this thought, is this article in which you will learn Quick way to create custom Twitter Background. If you are tired of changing or have spent a lot of bucks in getting a Custom Twitter Background, then this article is for you.

    Twitter-Custom-Background-TheCreatology

    Last December 2011, Twitter changed its User Interface layout for the second time. Well, it happened for good, as Twitter adapted new html5 features. It sure is surprising for Tweeple (people who tweet), whereas annoying for few, who paid so much to get Custom Twitter Background done and it needs rework again.

    Don’t worry, I have a tutorial for you below which will help you to create twitter background easily. The tutorial is divided into three parts: Basic Requirements, Prepare Theme & Design Twitter Background Layout.

    Basic Requirements

    Here is a list of items you need, to create custom Twitter background:

    • Image Editor (eg. Photoshop)
    • Internet Browser with screenshot plugin (optional)
    • Cool Fonts to Impress (optional)

    Prepare Theme

    This is an important part of the tutorial, where we will prepare and collect information to design custom twitter page. To do so, lets go through few points below:

    • Expression: The page should reflect Who You Are? a blogger, a photographer or a biker. What You Like? a Apple iPhone or a Ducati 848. It should reflect your interest and help people to know more about you.
    • Branding: The social branding conforms to have your bio, photo or avatar and contact information.
    • Show Time: After all its your page, so give it a shot. Of-course use your mad skills here. 😉

    Design Twitter Background Layout

    Now that we know what we want in our theme, lets start with the layout design. Check out easy steps below:

    Create Latest Twitter Layout. Best way to find out the latest twitter background layout is itself twitter, check how…

    • Set your monitor resolution for the most optimized version, For Instance, in this tutorial we will be using 1366px X 768px screen resolution which also is commonly used resolution.
    • Once done, open your twitter page in any browser and Press “Prnt Scrn” on your keyboard. In case if you have a screenshot plugin installed in your browser then quickly take a rough screenshot of the visible area of your twitter page.
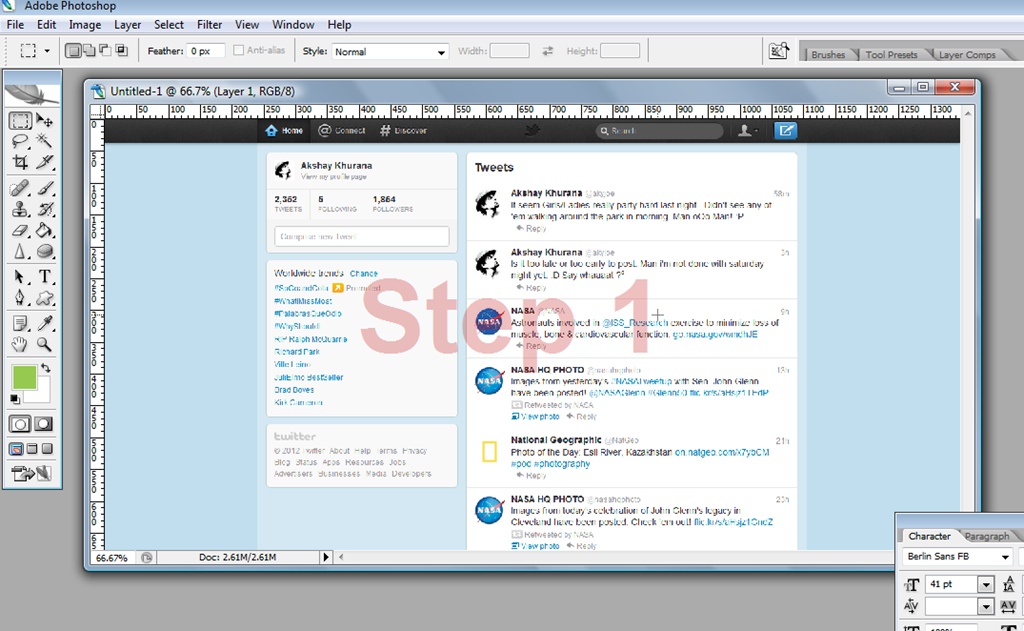
    • Next, open Adobe Photoshop and paste/import the screenshot file, just as in the image below.
    Create-Twitter-New-Layout-Step1
    Step 1 – Latest Twitter Screenshot
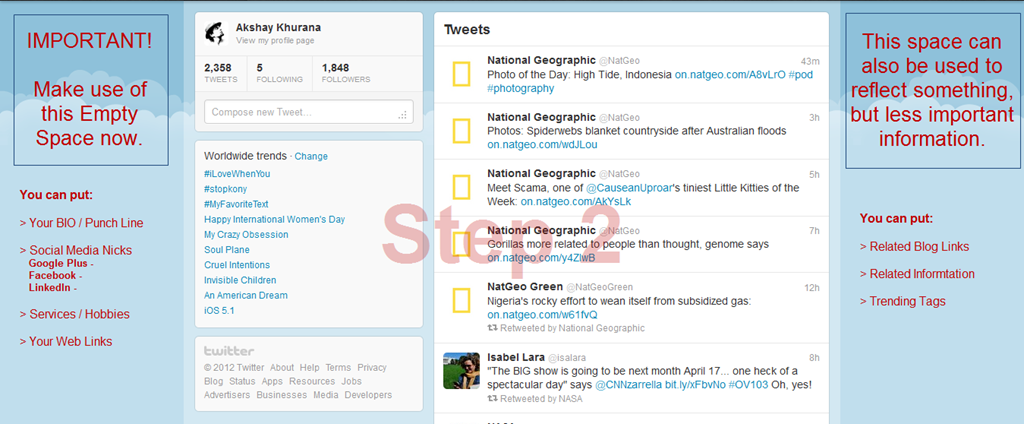
    • Now that you can easily make out in the screenshot above, usable area which is in blue color background as shown in the screenshot below.
    Create Twitter New Layout-Step2
    Step 2 – Prepare Twitter Theme
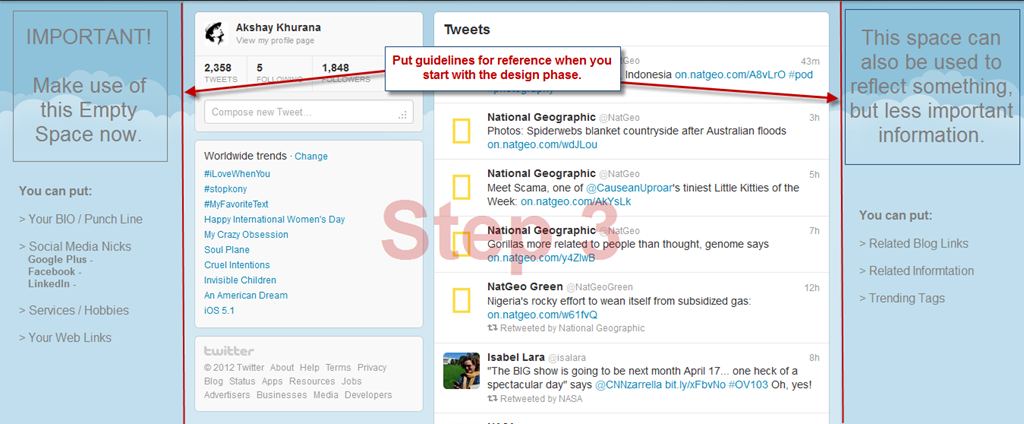
    • Next step is to setup guidelines, which will be a reference, when we will start with the design phase in tutorial [Part 2]. (Refer the screenshot below)
    Create Twitter New Layout-Step3
    Step 3 – Setup Guidelines for Design Phase
    • Save the PSD file, once you are done with setup of guidelines for new twitter background.
    • Take a break, for the work accomplished, Yes I am Serious we are done!

    Now wasn’t that easy of a tutorial, just with hit of “PrntScrn” key and here we got latest twitter layout ready. Well now that we are all set with new twitter background layout and we shall proceed for the design phase. Leave your comments, incase you have any feedback, queries or doubt in your head.

    PS. > Design Phase Article Link will be available shortly here. (Keep in touch via twitter or subscribe to our blog)

  • Design glass button image sprite for website in Photoshop

    Are you looking for glossy button design for website, similar to the image below ? Then you can design glass button by yourself in simple steps using photoshop.

    glass button image sprite for website
    Glass button image sprite for website

    In this article, I will use Adobe Photoshop to create glass button sprite. Image sprites are purposely used by CSS developer to design mouse over image, function smoothly and efficiently. Here is the tutorial to design glass button image sprite for website in photoshop.

    Step 1: Create Simple Button Base

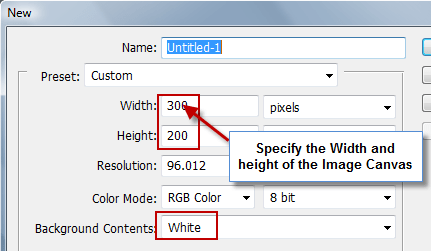
    To start from scratch, Open Photoshop and create new image canvas with approximate pixels for width  and height. If you want create transparent website button then choose Transparent in Background Contents, or you can stick with White background as well. (Refer to the screenshot below)

    Step1-1 design glass button image sprite for website
    Step1-1 Create New Image Canvas

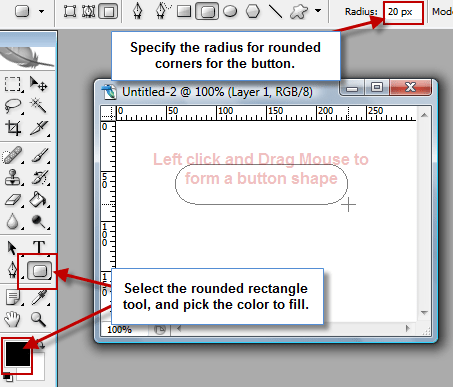
    Create a new layer and name it as button. On the button layer, select Rounded rectangle Tool and give it a desired radius, for instance I give it 20px in this example. Now left click and draw out a rectangle on the canvas. (Refer to the screenshot below)

    Step1-2 design glass button image sprite for website
    Step1-2: Draw Rounded Rectangle base

    Now that we have created base for the button, so we now proceed to our next step 2 to add glossy effect.

    Step 2: Apply Glass Effect to Button

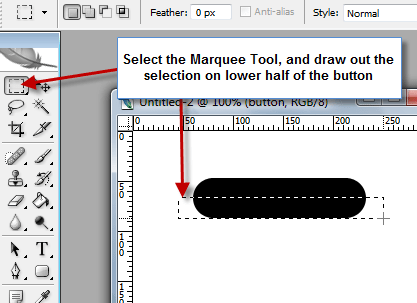
    In order to add glass effect, create another layer and name it as a glass. Select the marquee tool and draw a selection over the lower half of the button. (Refer to the screenshot below)

    Step2-1 design glass button image sprite for website
    Step2-1 Select Marquee Tool

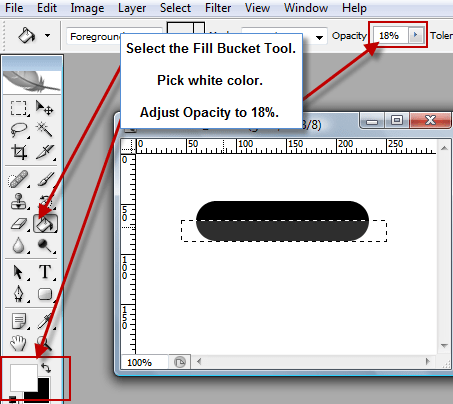
    Now select the Fill Bucket Tool and with white color #ffffff and opacity level adjusted to 18%, fill the selected area. And it should look something like this.

    Step2-2 design glass button image sprite for website
    Step2-2: Fill lower half of the rectangle

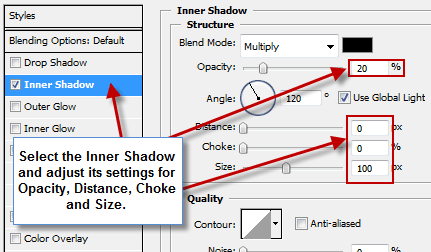
    Now right click on the button layer, open Blending Options and adjust the settings for the following:

    Inner Shadow

    Step2-3 design glass button image sprite for website
    Step2-3 Inner Shadow Adjustment

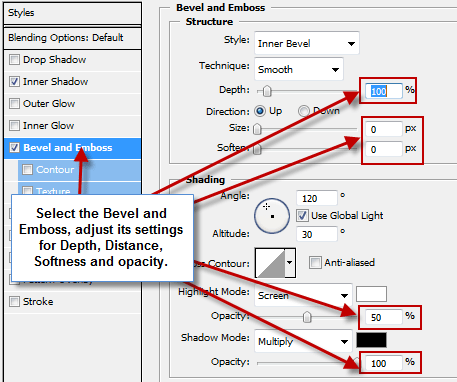
    Bevel and Emboss

    Step2-4 design glass button image sprite for website
    Step2-4 Bevel and Emboss Adjustment

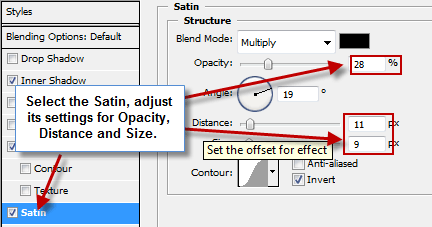
    Satin

    Step2-5 design glass button image sprite for website
    Step2-5 Satin Adjustment

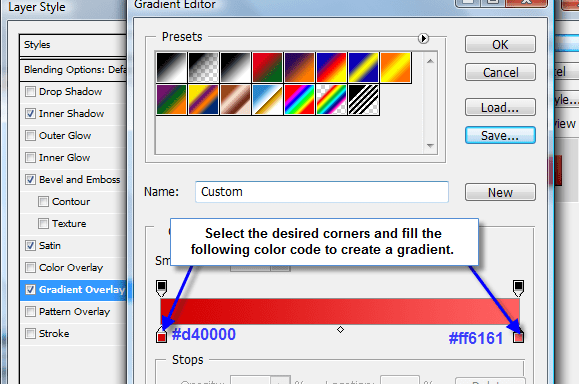
    Gradient Overlay

    Step2-6 design glass button image sprite for website
    Step2-6 Gradient Overlay Adjustment

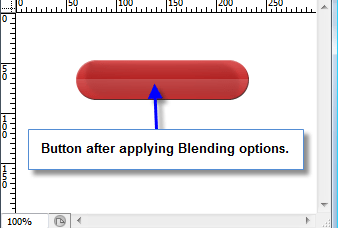
    After adjusting the blending options, the button should look like this.

    Step2-7 design glass button image sprite for website
    Step2-7 Button with Glossy effect

    Step 3: Button Text and Finalize

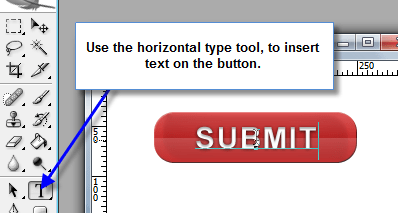
    As in Step 2, we have created the glass button, now we have to add Text and finalize it. To insert text to the button, use the Horizontal Type Tool and add text to the button.

    Step3 design glass button image sprite for website
    Step3 Adding text to the Button

    After adding the text, and nudging a bit we will get the final image. In order to create another button, simply repeat step 1 and then adjust different colors in step 2 to create multiple buttons, just like below.

    glass button image sprite for website
    Multiple Glass button Designs

    Here I come to the end of this tutorial, I’m sure that these glass web buttons will add elegance on your website. If you have any query or further assistance is required, post comment as your feedback.

  • Create transparent background post box for a website

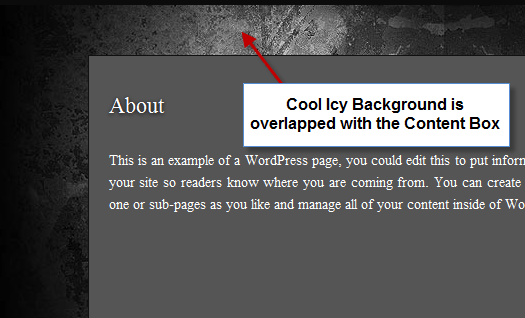
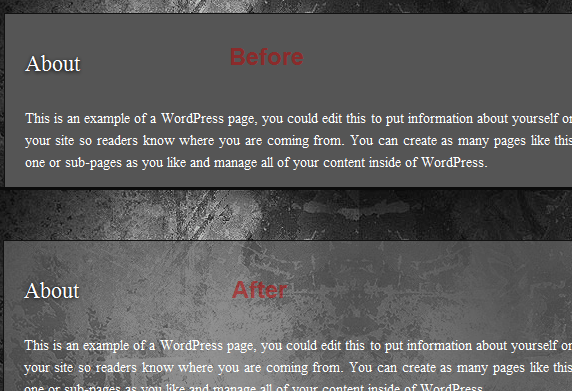
    Are you looking for a Transparent content box for website ? It can be very useful in case you have a creative background for website, and it is overlapped by the content box or post box of website. Have a look at the image, which will clear you a bit more.

    Create transparent background post box
    Non-Transparent background post box

    And if you have spent lot of bucks for the attractive background image, then it is just a waste of money. But there is a resolution for it, and by applying transparency to background, it will give website a fresh look.

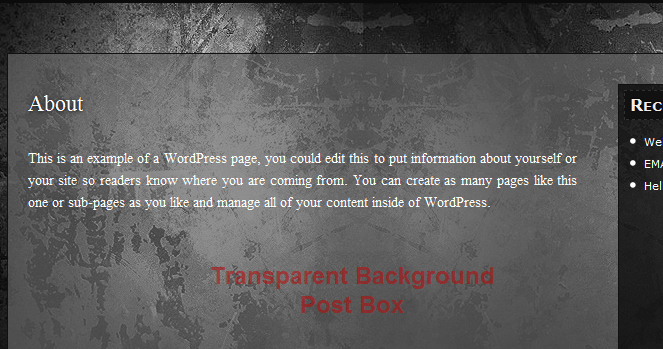
    In this article I will guide you how to restyle post box with transparency, and hence it will create transparent background post box for a website. Just like in a screenshot below:

    Transparent background post box
    Transparent background post box

    Below is a three step procedure to give transparency effect on website.

    Step 1: Pick background Color Code of Post Box

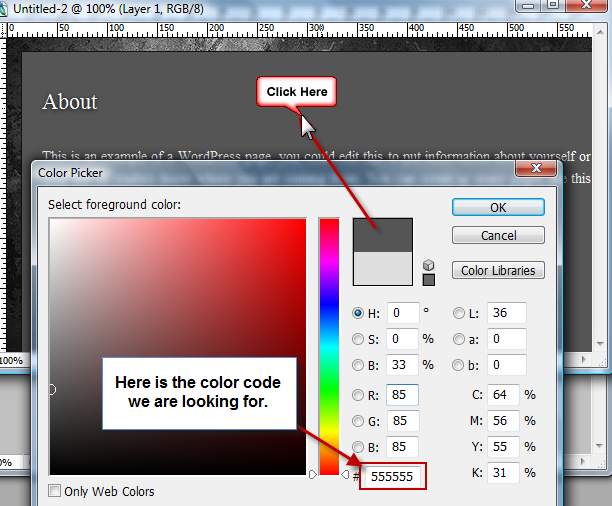
    The initial step of the tutorial is to pick the background color code of the post box. If you already know the background color code post box, then you can skip to Step 2. If you don’t know the background color code, find it using:

    • Firefox ColorZilla Addon
    • Firefox Firebug Addon
    • Print Screen key, and pasting it on any image editor and picking the color code from there. Refer to the screenshot below, I’m using Adobe Photoshop’s Color Picker tool.
    Step1 Create transparent background post box
    Step1 Create transparent background post box

    Once you have the background color code, proceed to Step 2.

    Step 2: Create Transparent Image Pixel

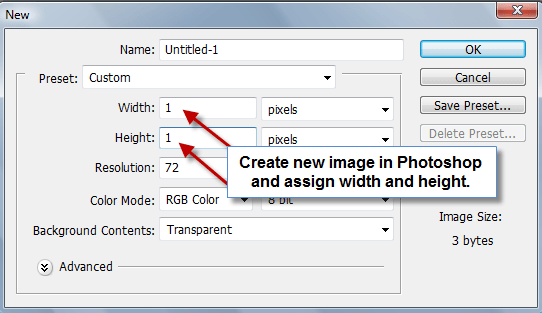
    In this step we will create a new image file using adobe photoshop. To create new image, open Photoshop and navigate to File > New or you can also use Ctrl+N. Specify the width and height as 1 pixel, as we will use CSS, which I will explain you in Step 3. You can also refer to the screenshot below:

    Step2 Create transparent background post box
    Step2-1 Create transparent background post box

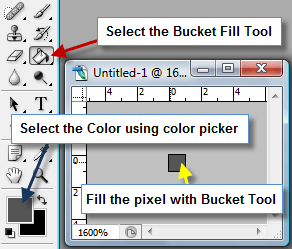
    After creating the new file, we will now fill the image pixel with color code we find in Step 1. Below screenshot will explain you to how to fill the pixel.

    Step2-2 Create transparent background post box
    Step2-2 Create transparent background post box

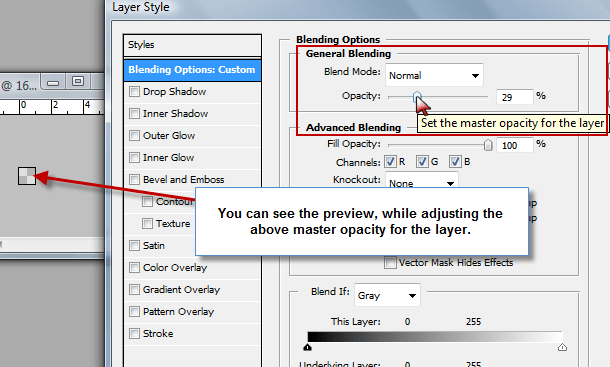
    Now, once we have the pixel filled, we will now apply transparency effect to it. For applying transparency effect, we will use the Blending options of the layer. Refer to the screenshot below:

    Step2-3 Create transparent background post box
    Step2-3 Create transparent background post box

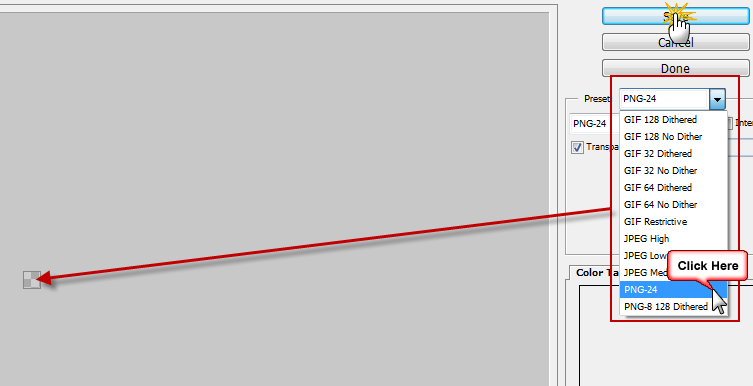
    When you are satisfied with the preview, click Ok button to apply the blending options. As our image is ready to be used, we will have to export the image as PNG format, as it is the only type of format with supports transparency without loosing any pixel. In order to save image as PNG navigate to File > Save for Web… or you can also use Ctrl+Alt+Shift+S. It will open a new window with different options to export the image. Choose PNG-24 option from the drop down list as explained in the image below and save the file in your theme directory.

    Step2-4 Create transparent background post box
    Step2-4 Create transparent background post box

    Step 3: Add transparency to post box

    This is final step of this tutorial, in other words we say final touch up for transparent website. In this step we will edit the CSS code for the post box which we want to apply the transparent effect. Locate the code for the post box in the CSS file and replace it with below code snippet.

    Please Note: This is a syntax code, where you will have to replace “#your-post-box-div” and “transparent-image-path-location.png” with real values which will vary as per your scenario.

    [css]

    #your-post-box-div {

    background: url("transparent-image-path-location.png") repeat;

    }

    [/css]

    After editing the CSS file, upload the transparent image as well as the updated CSS onto your web server. Now refresh to the website to see the effect, as I have in below screenshot:

    Step3 Create transparent background post box
    Demo Transparent background post box

    What do you think after seeing the image above? It did made the site look different now, as the background on the website is visible. If you ain’t satisfied with the transparency effect then, you can repeat the Step 2 and Step 3 again until it meets the satisfaction level.

    With this we come to the end of this tutorial, if you have any query or need further assistance you can simply post comments below as the feedback.