Tag: Quick-n-Easy

  • Hands on Thesis 2: Head Editor, Skin Editor, Boxes & Packages

    Thesis 2.0 theme is unique and highly inflammable interactive. I say this, ’cause of its navigation menu covers every bit of your WordPress template. But, guess what? There is no proper Thesis 2 documentation available/ready yet, so end-user is not aware of theme capabilities.

    Hands on Thesis 2 is a series of articles and requests from potential clients who are eager to handle new Thesis Theme. This tutorial explains about Thesis Head Editor, Skin Editor, Boxes & Packages which will help you build even better websites. I strongly recommend this article to people, who are new to Thesis 2.0 theme.

    Thesis 2 Navigation Menu
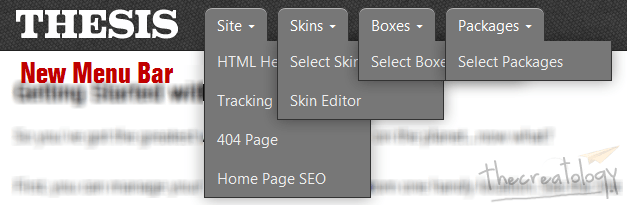
    New Thesis 2 Menu Bar
    New Thesis 2 Navigation Menu

    The new Thesis 2 navigation menu consists of 4 major items, that is Head Editor, Skin Editor, Boxes and Packages. Let’s learn about these in detail, below:

    Website HTML Head Editor

    HTML Head editor lets you manage < head > output of the website. HTML Head section is responsible for Website SEO, Page loading & other web analysis.
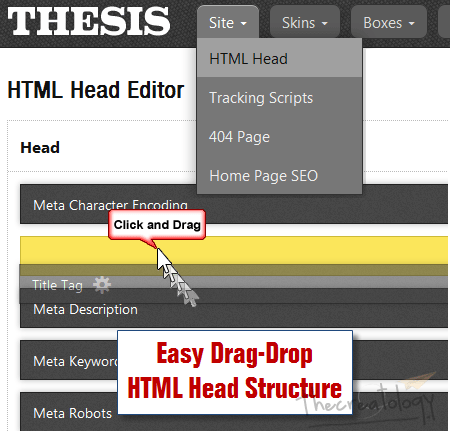
    Thesis html Head Editor
    Thesis HTML Head Editor

    Thesis HTML Head Editor lets you manage, the following:

    • Add / Upload Favicon
    • Set RSS feed link
    • Webmaster Site Vertification
    • Google Rel Authorship
    • Embed Header Scripts

    Thesis 2 Skin Editor

    Skin editor is the most important, Ajax-Driven component of Thesis 2. New Thesis framework works on Parent-Child architecture where we work upon child themes, also known as skins. Skin editor lets you manage core WordPress templates, like index.php, single.php, archive.php etc. with drag-drop feature. You can now customize a WordPress website without writing any PHP code.
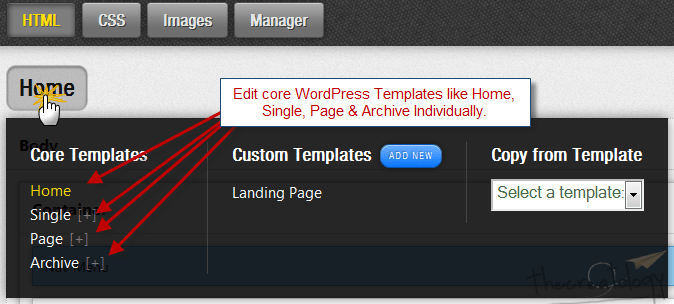
    Thesis Skin Editor Part 1
    Skin Editor: Edit Core Templates from WP-Admin

    On any selected template, for instance Home, drag-drop boxes in Skin editor to create HTML structure of website. Drag-drop what? Arrrh! I know Skin editor is a bit tricky to grab in one-go. But, if you understand this, then things will be really handy.

    Check out the info-graphic, explaining about Thesis Skin Editor – HTML Markup Structure, below:
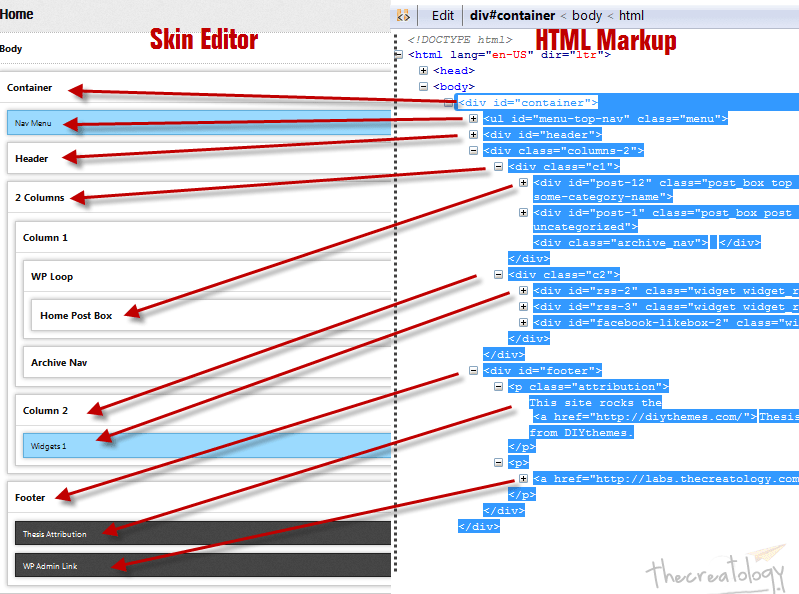
    Thesis Skin Editor Working Part 2
    Thesis Skin Editor – HTML Markup Structure

    In the above image, left pane shows the hierarchy of boxes in skin editor, where right pane shows HTML output generated by Thesis (view from firebug). Moreover, arrow points to a respective box in Skin editor, which is responsible for its HTML output.

    To understand better, you should play around with default Thesis Classic skin which loads automatically when you install Thesis 2.

    Thesis 2 Amazing Boxes

    Thesis theme can extended by means of small modules, called boxes. Thesis Box functions like a plugin which can be reused anywhere in the website with drag-drop ease.

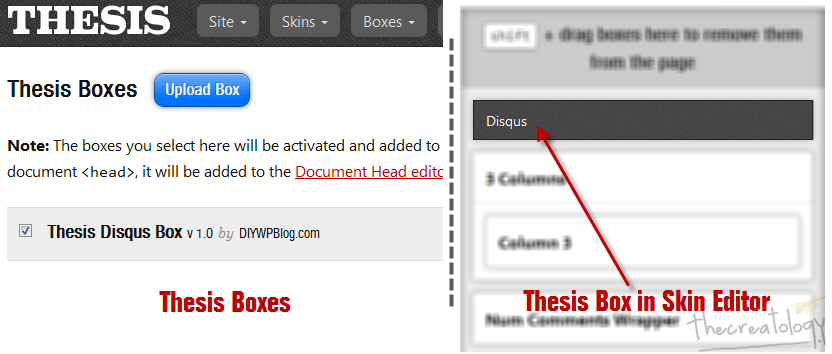
    For instance, we have uploaded a Disqus Comment Thesis Box in the example below:
    Thesis Amazing Disqus Comment Box
    Thesis Disqus Comment Box

    If we upload or select a box, it automatically gets added in Template editor. In this example, Disqus Comment box designed is for use in single template and hence it appears as a black-box in the skin editor’s sidebar. This is also a bug fix for Thesis 2 + Disqus Comment System.

    Thesis CSS Packages

    Packages, works similar to Boxes, are modules which help you to style font-family, width, height, background, color etc. Basically, Thesis boxes are PHP modules, where Thesis Packages are CSS modules. To be frank, Thesis Packages are required for advanced level blog development and multiple WordPress sites.

    There are many other features in Thesis 2 which will be covered in Hands on Thesis 2 series of articles, so keep in touch via Twitter, Facebook or RSS updates.

    That’s all folks!

    For any query or further help required post your feedback as comments below.

  • Jetpack 2.0 Post by Email: Quickly Publish Article on WordPress using Email

    Have you ever heard of Publishing article directly from email? Sounds crazy, ‘eh? Well, a new feature of Jetpack plugin, Post by Email, allows you to publish articles on WordPress Blog  just by sending email.

    Jetpack 2 Post by Email Feature
    Jetpack 2 Post by Email Feature

    WordPress Mobile App is limited only to IOS and Android supported devices. Whereas, with Post by Email feature, you can quickly post articles from any mobile device supporting email. Double benefit for smart phones!

    In this article, we will learn to Publish article by Email on WordPress blog.

    Jetpack 2: Post by Email Working Analogy

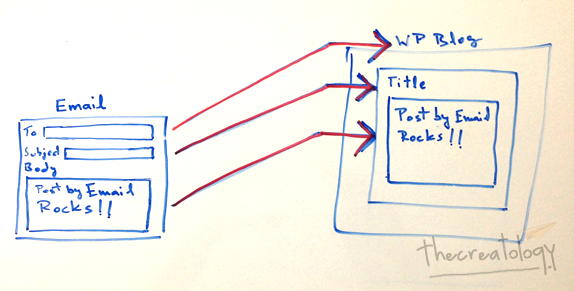
    Check the illustration explaining post by email feature working, below:

    Jetpack Post by Email Analogy
    Jetpack Post by Email feature working explained

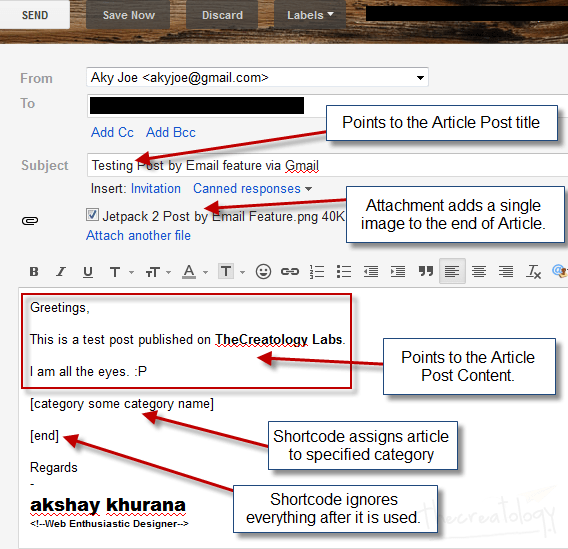
    Above illustration explains the following:

    • To field containing Secret Email Address points to WordPress Blog
    • Subject field points to Title of WordPress Post
    • Body field points to Content of WordPress Post

    Generate Secret Email Address for Blog

    Secret email address bridges between Email client and WordPress blog. A special email address generates every time you enable Post by Email feature on your Blog. It is an unique email address and must be kept secret unless you want other people to publish articles on your blog.

    Below is procedure to generate secret email address:

    Note: Make sure you have enabled Post by Email feature under Jetpack Dashboard settings.

    • Navigate to Dashboard > Users > Your Profile.
    • Scroll down till you see Post by Email.
    Jetpack 2 Enable Post by Email Feature
    Enable Post by Email Feature
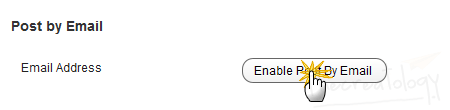
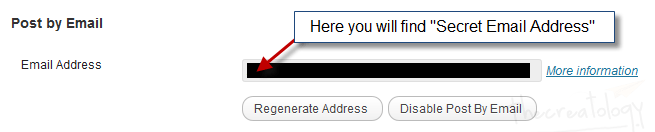
    • Click the Enable Post by Email button. Once done, you will see something similar to screenshot below.
    Jetpack 2 Secret Email Address
    Secret Email Address
    • Don’t disclose your Secret Email Address with anyone.
    • Whereas, if you experience any fraud then use Regenerate Address button or Disable Post by Email button.

    Compose Email to Post on WordPress

    Now that we have generated secret email address for blog, let’s get started. Check out the info graphic about writing an email to publish article on WordPress, below:

    Compose Email to Post on WordPress
    Compose Email to Post on WordPress

    Refer to Post by Email working analogy explained above. Also, there are some post formatting options and short-codes available here, for advanced blogging.

    Note: Make sure you proof-read before sending email, as there is no option to update post.

    Once done, send email to the secret email address.

    Post Published from Email

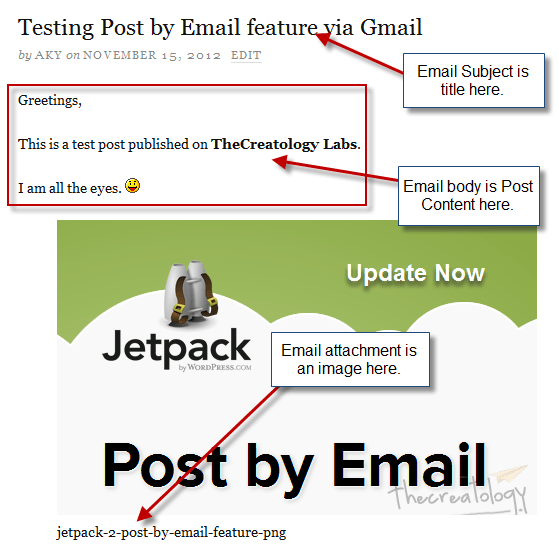
    Let’s see the post published via email on WordPress test site.

    Post Published by Email
    Post Published by Email

    Looks good!

    What else?

    Post by Email feature can be effective for bloggers covering news, live events and press conferences etc. They can draft email templates before hand to save more time for proof-reading content.

    What do you think about Jetpack Post by Email feature? Do let us know by posting a comment below.

  • Hands on Thesis 2: How to Get Started with New Thesis Theme 2.0?

    Thesis 2 theme on WordPress blog will drive you & me crazy. Yes, it has newly constructed engine and thrilling dynamics which will make you feel like riding a 1000 cc super-bike. So, much power man!

    I like the fact that Thesis 2.0 no longer support hooks and filters, as it is hard to remember all of them at once.

    How to Install Thesis 2 on WordPress
    How to Install Thesis 2 on WordPress

    Hands on Thesis 2 is a series of articles and also request from my potential clients who wish to experience new Thesis Theme. This article explains How to Get Started with New Thesis Theme for WordPress in easy steps below.

    Download New Thesis Theme

    We have already covered this in our previous article. Click here to read, if you missed it somehow.

    Get Started with New Thesis 2

    If you are new to Thesis Theme then your journey will be amazing. Whereas, if you choose to upgrade old Thesis theme to Thesis 2, then you should consider my suggestions below.

    Do Not Install Thesis 2, if

    • Thesis 1.x theme designed using custom skin, then DO NOT INSTALL!
    • Thesis website developed using Open Hook plugin, then DO NOT INSTALL!
    • You like mountains but not hiking, then DO NOT INSTALL!

    Are you confused? Well, reverting back to old Thesis 1.x from Thesis 2.0 is absolutely normal.

    Install Thesis 2.0 Theme

    Now that you are logically ready, lets kick-start your Thesis 2.0 journey. Follow quick steps to install Thesis 2:

    • Navigate to Dashboard > Appearances > Themes.
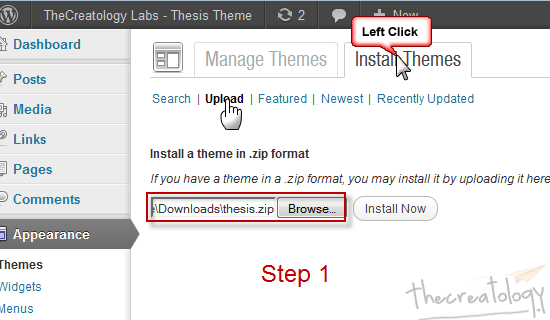
    • Select Install Themes Tab and click on Upload text link visible in blue just like in screenshot below.
    Step1-Upload Thesis 2 Theme
    Step1: Upload Thesis 2 Theme
    • On hitting Install Now button, will take you to theme activation status screen. You can either click to activate theme or choose to do it later.
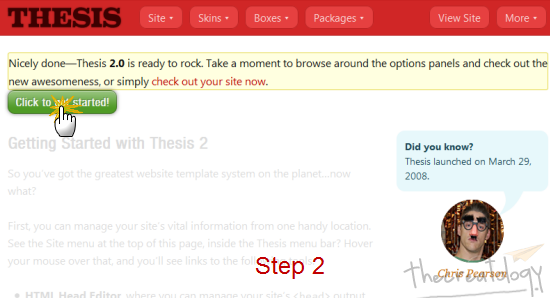
    • On activating Thesis 2, you will see a welcome page with greeting message. This page is personally designed for Chris Pearson and Missieur (his dog). 😛
    Step2- Thesis 2 Welcome Page Get Started
    Step2- Thesis 2 Welcome Page Get Started
    • Click green Get Started Button as soon as you activate thesis theme, else your website will show nothing but a white blank template.
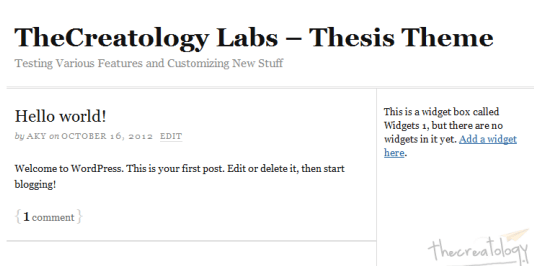
    • Once done, refresh your website and you will see something similar to screenshot below.
    Thesis Theme with Classic Skin
    Thesis Theme with Classic Skin
    • Tada…here it is, the new Thesis Theme loaded with classic skin.

    What’s Amazing about Thesis 2?

    New Thesis looks similar to older one, but is 10 times powerful in terms of flexibility and extensibility. Check out something amazing about Thesis 2.0, especially for lazy bloggers:

    • Design skins and customize from WordPress admin panel. No FTP!
    • Ease by Drag-drop HTML structure. No Coding!
    • Built-in CSS Packages. No Coding!
    • Missieur (Chris’s dog) tips about SEO, broken links & 404 error pages. The doggie style!

    There are many other features in Thesis 2 which will be covered in Hands on Thesis 2 series of articles, so keep in touch via Twitter, Facebook or RSS updates.

    That’s all folks!

    For any query or further help required post your feedback as comments below.
  • Easily Customize Website Header using Thesis Theme Hooks

    Most WordPress themes come with nice header layout design where some theme frameworks, like Thesis Theme have a sketched layout printed on white screen. Such themes allow N number of customizing options totally depending on the need.

    If you are a developer then you can easily customize the website header, but what if it’s not your cuppa tea. Either you will hire a developer or look up online for some WordPress tutorials and try to fix website header. Don’t worry if you are using WordPress Thesis Theme, as in this tutorial you will learn to customize website header using basic thesis hooks.

    Getting Started: Update Thesis Theme

    To make sure that we are sailing on the same ship, I recommend you to update Thesis Theme. No sure about it,  refer to article Safely upgrade to latest version Thesis 1.8. If you don’t have Thesis Theme Copy then you can also Download Thesis Theme.

    Thesis Header Hooks

    Thesis theme framework has been strongly build leaving many options to override default functions, we call these functions as thesis hooks. You can play around with these hooks to customize different blocks (header, content, sidebar or footer) in website . But, be careful while editing custom_functions.php file, as any wrong code can crash your website.

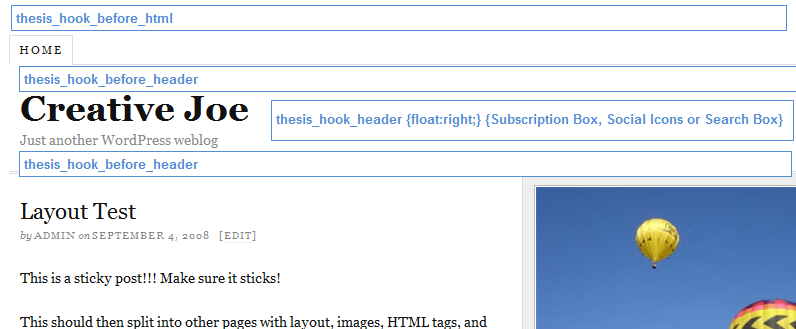
    To customize thesis header you may need the following hooks:

    1. thesis_hook_before_html
    2. thesis_hook_before_header
    3. thesis_hook_header
    4. thesis_hook_after_header

    Here is a quick visual reference of the above mentioned hooks:

    thesis header hook implementation
    Thesis header hooks implementation

    Add Thesis Hook in Custom_Functions.php

    You can take control of your website using Thesis hooks but before that you should know how to implement thesis hooks. Each Thesis installation has a custom directory in Thesis Theme. Custom directory, is where you do all thesis customizations, has the following files:

    1. custom.css (where we style and override default stylesheet)
    2. custom_functions.php (where we define hooks and override default functions)

    To define a basic Thesis header hook, open custom_functions.php in editor use the following code snippet:

    [php]
    function first_hook_before_header() { ?>
    <p style="border:1px solid #ddd;color:#d00; margin:5px; padding:3px;">This is Thesis Hook Before Header</p>
    <?php }
    add_action(‘thesis_hook_before_header’,’first_hook_before_header’);
    [/php]

    The above code adds a paragraph styled in a grey border box before thesis theme header. In similar way you can implement other hooks to define your actions as needed.

    Cool Thesis Header Examples

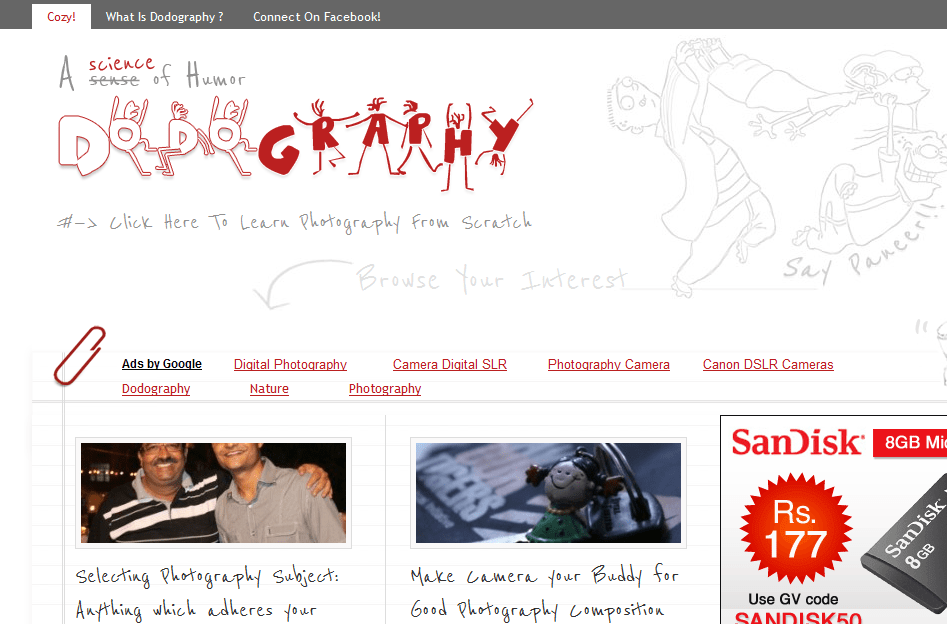
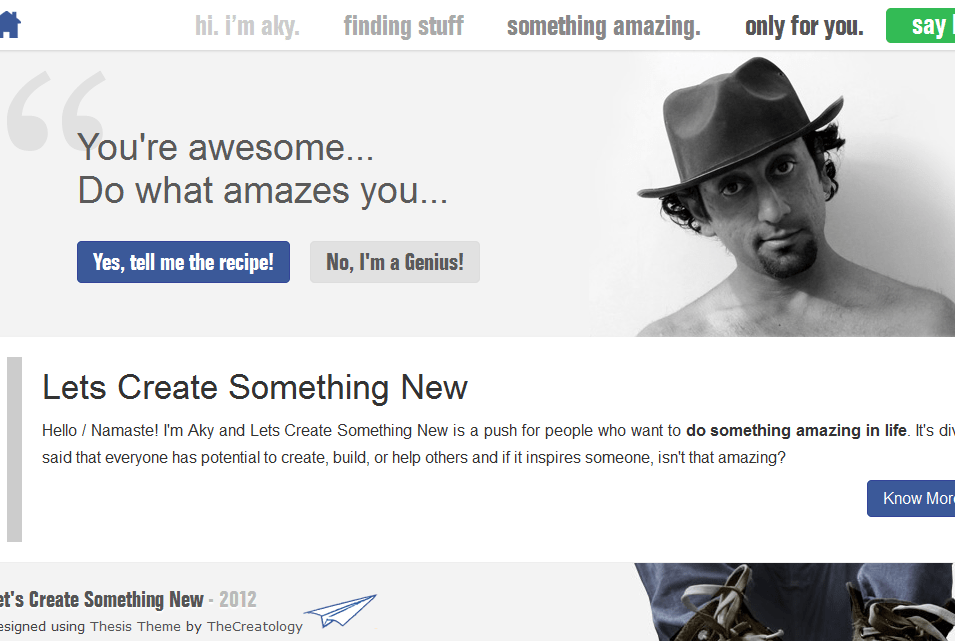
    Here are few inspiring header designs customized using Thesis theme:

    Cool Website Header Dodography
    Cool Website Header – Dodography
    Cool Website Header ImieBelanger
    Website Header – ImieBelanger
    Cool Website Header LetsCreateSomethingNew
    Website Header – LetsCreateSomethingNew
    Cool Website Header ShoutMeLoud
    Website Header – ShoutMeLoud

    What’s Next?

    You must be excited now to customize your website header after this handy tutorial. If you have any queries or need any assistance,  then post it using comment form below.

  • How to Add New Ad Slot in WordPress Theme using Adrotate Plugin

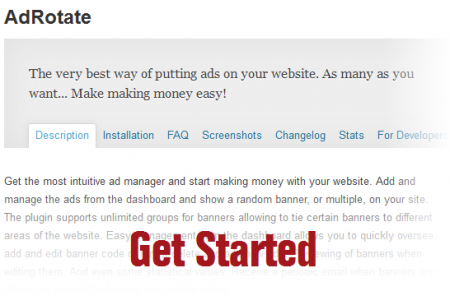
    An Advertisement-Ready Website, a recent project by TheCreatology, was configured with Adrotate Plugin. The plugin has extensive features for Ad management, Click Tracking & Campaign Management etc. with detailed reporting, which also we will be using in our Tutorial. This tutorial is a request from a client, which is Quick-n-Easy tutorial, as we will learn to add new advertisement slot using adrotate in WordPress theme.

    Get Started - Add Ad Slot Using Adrotate
    Add New Ad Slot Using Adrotate

    For your ease, I have divided this tutorial into three sections: 1) Add/Install Adrotate Plugin, 2) Add/Create New Ads with Adrotate & 3) Display Ad Slot Code in Theme

    Step 1: Add/Install Adrotate Plugin

    To install WordPress Adrotate plugin, login to WordPress dashboard:

    • Navigate to Dashboard > Plugins > Add new Plugin.
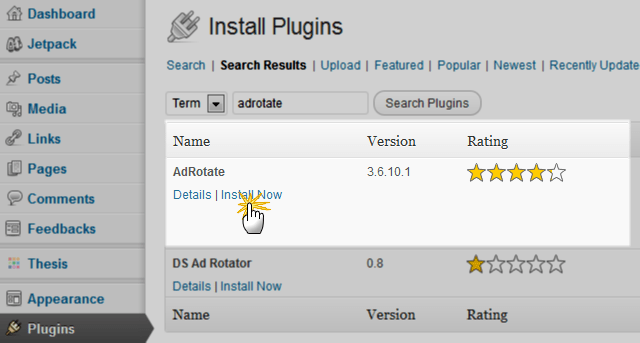
    • Search for Adrotate plugin and click to install it.(Refer to screenshot below)
    Step1 Install adrotate plugin
    Install Adrotate WordPress Plugin
    • Once the plugin is installed, click on Activate link to complete the installation of plugin.

    Now that we are done with the installation of plugin, we can move on to create new ad banners.

    Step 2: Add/Create New Ad Banner with Adrotate

    Adding new ads is just a click-a-way thing and a bit of focus is required. Follow quick steps below:

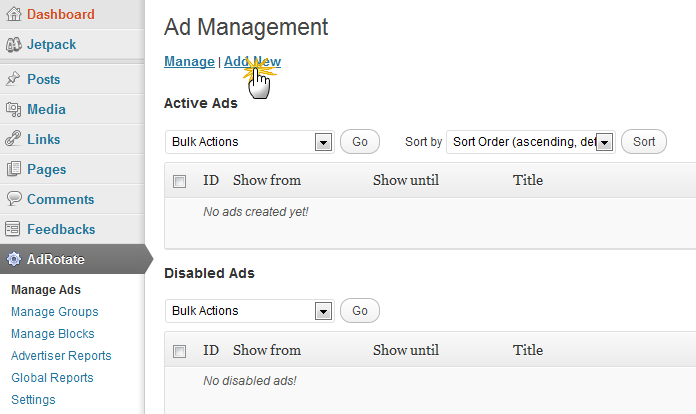
    • Login to WordPress Dashboard and navigate to Dashboard > Adrotate
    • Click on Add New to add ad banner just like in the screenshot below.
    Step2-1 Add New Ad in Adrotate
    Navigate to Adrotate Management Screen
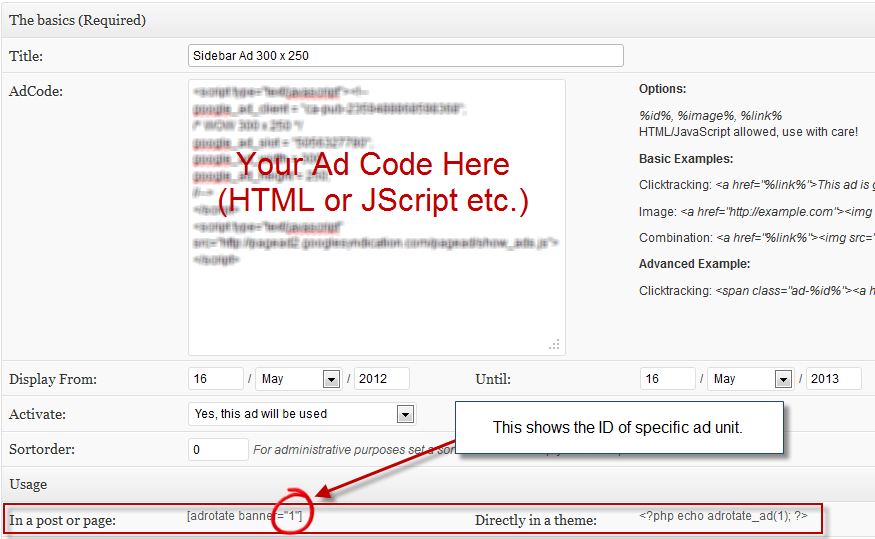
    • In next screen, you will see a form prompting about new Ad details. Fill the required fields that is Title, Ad Code & Display Period. (Note: Advance Settings are optional, depending upon your requirement.)
    • For your reference, you can memorize Ad unit ID, which will be required in Step 3 (refer the screenshot).
    Step2-2 Add New Ad in Adrotate
    Add new Ad unit
    • Hit Save Ad button once done.

    Step 3: Display Ad Slot in Theme

    In our previous step, we added Ad Unit, where as this step will integrate Ad Code in theme. Adrotate Ad Unit can be displayed in two ways: 1) Using Adrotate Widget & 2) Using Short Code or PHP Code

    USING ADROTATE WIDGET

    This is an easy method and recommended option for people who don’t like to code. Follow simple steps below to display ad slot using adrotate widget:

    • Login to WordPress Admin and Navigate to Dashboard > Appearances > Widgets.
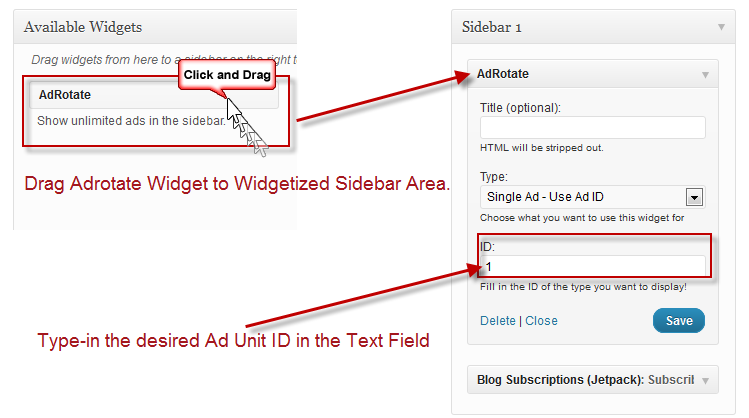
    • In the available widgets, Drag Adrotate Widget to the Widgetized Area, just like in screenshot below.
    Step3-1 Display Ad Using Adrotate Widget
    Display Ad in Sidebar using Adrotate
    • Type-in, the desired Ad unit ID, which you memorized while creating Ad Unit in Step 2. If you are not sure about the ID, simply Navigate to Dashboard > Adrotate and find the Ad Slot ID
    • Hit Save button to update the changes.

    USING pHp CODE

    A bit complex method, as you either need to have developer skill-set or a developer to fix it, as a slight mistake may end up breaking theme layout or crash the website. The method comparatively is more flexible than Adrotate Widget method, as you can display any size Ad Unit anywhere in your Theme. To do so, follow steps below to display ad slot using php code:

    • Login to WordPress Admin and Navigate to Dashboard > Adrotate.
    • Click the desired Ad unit you want to embed in your Theme.
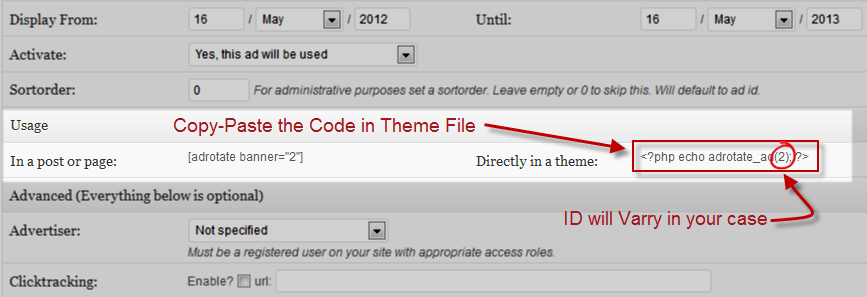
    • Scroll down a bit till you see Usage section similar to screenshot below.
    Step3-2 Display Ad Using PHP Code
    Adrotate Ad unit PHP code
    • Copy the php code <?php echo adrotate_ad(#WILL VARY IN YOUR CASE#); ?>
    • Paste, the code in your theme layout file, for instance header.php or single.php as desired.
    • Save & upload file to server using FTP.

    We’re Done

    Now that you have added ad unit code in the theme, refresh webpage to preview the ad slot. Works fine ? Bravo, we are done with the tutorial.

    Not Working ‘eh ? Recheck the codes, make sure you have uploaded the right file and clear cache, in case you are using cache plugins. Go through the Step 2 & Step 3 again, till you see the ad unit live in action. 😉

    In this tutorial we learned about adding a new ad slot in WordPress Theme using Adrotate Plugin. If you have any queries or further assistance is required, post us your feedback using the comment form below.

  • Design a Creative Facebook Business Cover page with Exact Dimensions [Updated]

    Facebook updated it’s Business Page Cover dimensions and they are 828 X 351 pixels.

    Last year December, Facebook Timeline was announced/launched for its users. Facebook Timeline organizes your profile just like a vertical scrapbook. It displays, a reverse chronological order of your statuses, photos, videos and links posted by you or tagged by your friends. I really like this feature overruling the thought, a lot of people not liking it. Duh! A change would do you good! 🙂

    design facebook business cover page
    Draw Facebook Cover Page

    Few days back, Facebook updated Timeline feature on Business Page as well, which actually made me think of this article. Well, creating a Facebook cover is no Big Deal if you upload a sunset, a pet or bunch of gorillas. Such casual and lazy efforts looks good on Personal Pages but talking of a business page, you might have to screw keep pets, nature and folks aside. Yes, to impress facebook page fans, you will have to draw some straight lines. Mmmm… we have an objective here to design Facebook business cover page precisely.

    Lets quickly summarize this article for better understanding. The article has been divided into three parts: Basic Requirement, Set Cover Page Layout and Design Business Cover Page. And here we go…

    Basic Requirement

    Here is a list of items you need, to design Facebook Cover Page:

    • Image Editor (We will be using Photoshop in this tutorial)
    • Business Page Theme (Business Website, Graphic Banner or Company Logo)
    • Cool Fonts (optional)

    Set Facebook Cover Page Layout

    In this step,  we will prepare Cover Page Layout to match exact dimension and it is recommended for Best results. Follow a simple procedure below:

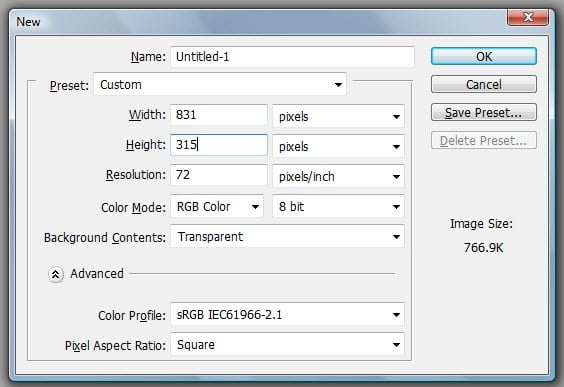
    • Open image editor and Create a New PhotoShop Document with Width: 851 pixels and Height: 315 pixels. For Facebook cover page exact dimensions refer to screenshot below.
    Set Facebook Cover Page Layout
    Set Facebook Cover Page Layout
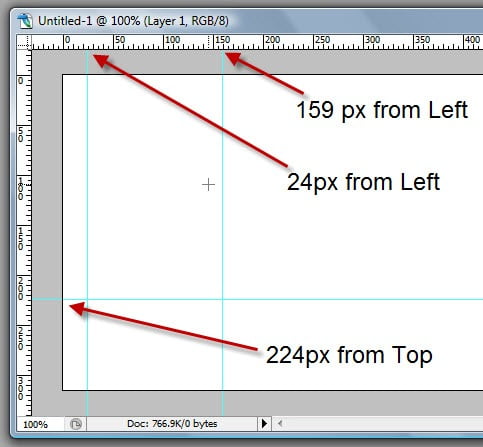
    • Cover page requires three guidelines for accurate layout. Set first guideline at 24 pixels from Left, set the second guideline at 159 pixels from Left and set the third guideline at 224 pixels from Top. (Refer to screenshot below)
    Set Guidelines Cover Page Layout
    Set Guidelines Cover Page Layout
    • Save the Document and we are all set with the Cover Page Layout.

    Design Facebook Business Cover Page

    We are just a step away from your Awesome Business Page Design. Are you ready with your Theme ? If not, then give it a thought or you can also refer our article to Create Twitter Background. Once ready with Business Theme, with no further delay lets go ahead with Facebook Cover Page design.

    1. PLACE THEME ELEMENTS – BE CREATIVE

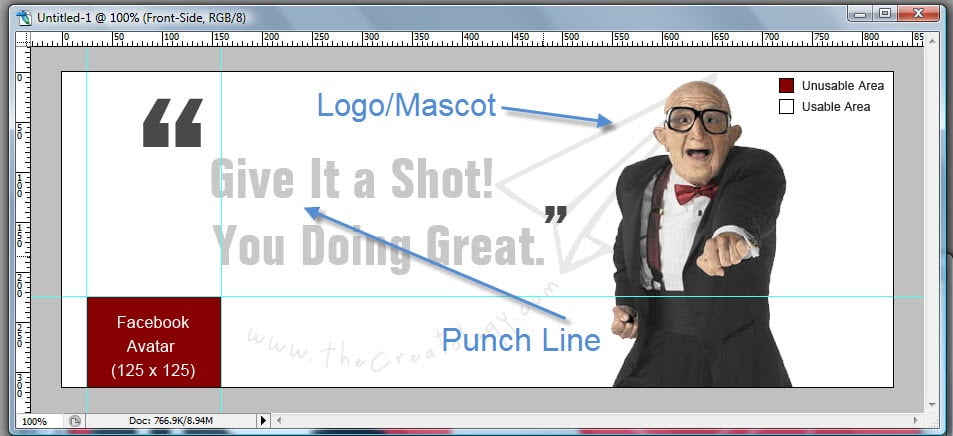
    Depending upon our Business place elements, like banner, slogan, punch line, logo or services in the Cover page. Feel free to express your creativity in this step, don’t forget to refer screenshot for usable and unusable area.

    Place Facebook Cover Elements
    Place Facebook Cover Elements

    2. FACEBOOK AVATAR SIZE

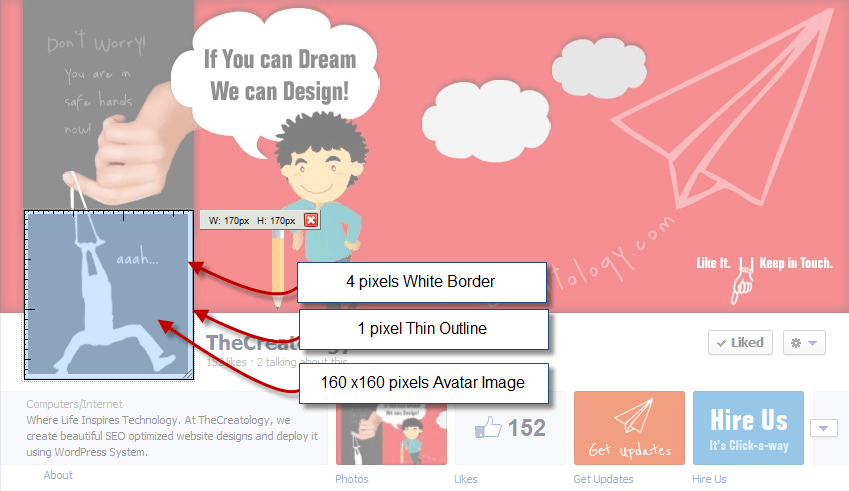
    Facebook avatar, so called Profile Picture is also part of Facebook Cover page. Facebook Avatar Image size is 160 x 160 pixels along with 4 pixels white border and dark 1 pixel outline around, making the Avatar Image Box as 170 x 170 pixels. (Refer to the screenshot)

    Facebook Avatar Image Sizes
    Facebook Avatar Image Sizes

    Already done with above two steps ? Yes: Bravo, No: Keep Working! Designing is a never ending activity and should never stop, until you are done.

    You can see a Demo TheCreatology Facebook Page.

    Wasn’t It fun?

    I am sure it was, but its your time to express now and think with creative mind. What do you think about this article ?

    Share it with friends, if it was helpful! Any doubts, use the comment box below. 😉

    Why this update?

    This post is updated with new Facebook Fan Page Cover Size and Dimensions, as Facebook changed Cover page dimensions.

    Published on: Apr 07, 2012
    Revised on: Aug 03, 2012
    Revised on: Aug 17, 2016

  • Quick-n-Easy way to Create Twitter Background – Part 1 [Design Layout]

    You must be thinking why am I writing this article, when Mashable already has explained about Twitter Backgrounds 2.5 years back. Well, reply to this thought, is this article in which you will learn Quick way to create custom Twitter Background. If you are tired of changing or have spent a lot of bucks in getting a Custom Twitter Background, then this article is for you.

    Twitter-Custom-Background-TheCreatology

    Last December 2011, Twitter changed its User Interface layout for the second time. Well, it happened for good, as Twitter adapted new html5 features. It sure is surprising for Tweeple (people who tweet), whereas annoying for few, who paid so much to get Custom Twitter Background done and it needs rework again.

    Don’t worry, I have a tutorial for you below which will help you to create twitter background easily. The tutorial is divided into three parts: Basic Requirements, Prepare Theme & Design Twitter Background Layout.

    Basic Requirements

    Here is a list of items you need, to create custom Twitter background:

    • Image Editor (eg. Photoshop)
    • Internet Browser with screenshot plugin (optional)
    • Cool Fonts to Impress (optional)

    Prepare Theme

    This is an important part of the tutorial, where we will prepare and collect information to design custom twitter page. To do so, lets go through few points below:

    • Expression: The page should reflect Who You Are? a blogger, a photographer or a biker. What You Like? a Apple iPhone or a Ducati 848. It should reflect your interest and help people to know more about you.
    • Branding: The social branding conforms to have your bio, photo or avatar and contact information.
    • Show Time: After all its your page, so give it a shot. Of-course use your mad skills here. 😉

    Design Twitter Background Layout

    Now that we know what we want in our theme, lets start with the layout design. Check out easy steps below:

    Create Latest Twitter Layout. Best way to find out the latest twitter background layout is itself twitter, check how…

    • Set your monitor resolution for the most optimized version, For Instance, in this tutorial we will be using 1366px X 768px screen resolution which also is commonly used resolution.
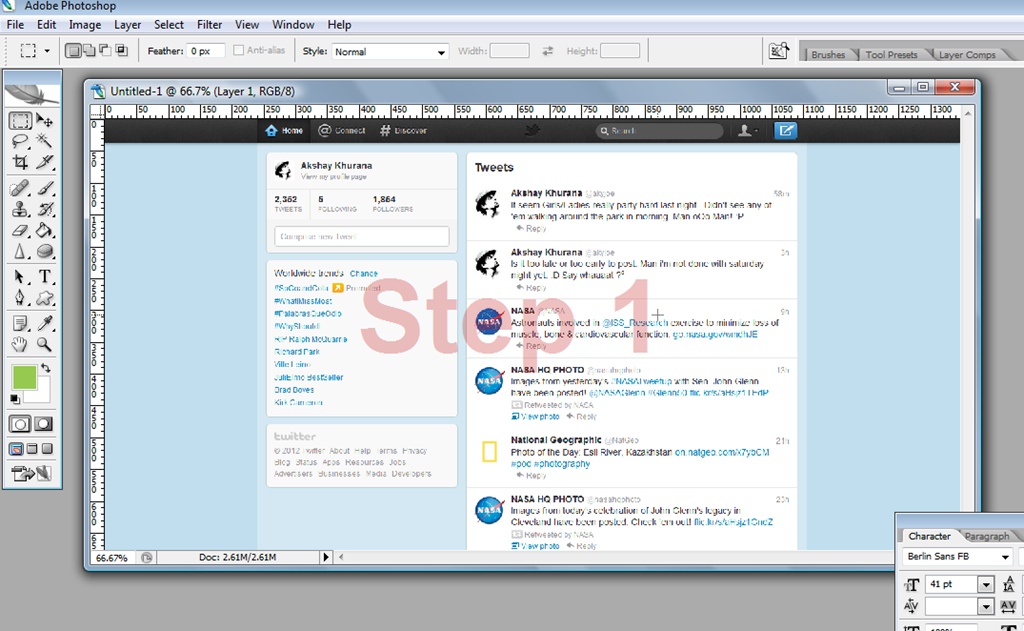
    • Once done, open your twitter page in any browser and Press “Prnt Scrn” on your keyboard. In case if you have a screenshot plugin installed in your browser then quickly take a rough screenshot of the visible area of your twitter page.
    • Next, open Adobe Photoshop and paste/import the screenshot file, just as in the image below.
    Create-Twitter-New-Layout-Step1
    Step 1 – Latest Twitter Screenshot
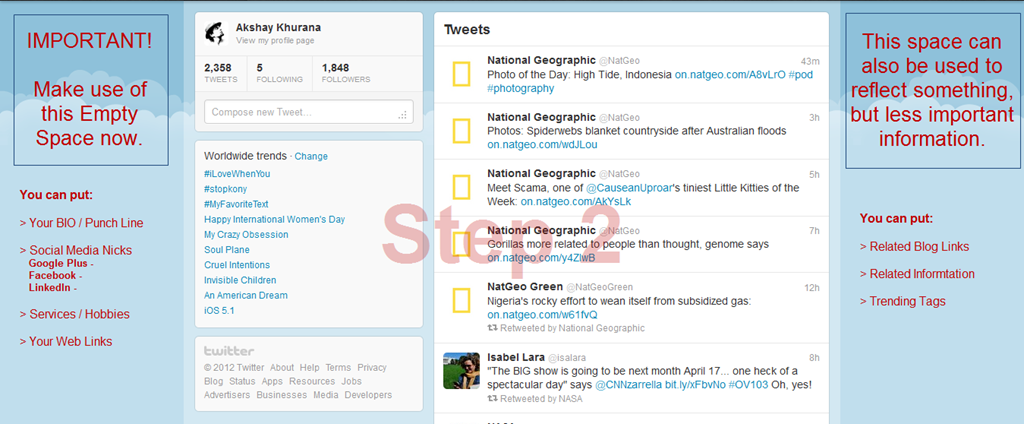
    • Now that you can easily make out in the screenshot above, usable area which is in blue color background as shown in the screenshot below.
    Create Twitter New Layout-Step2
    Step 2 – Prepare Twitter Theme
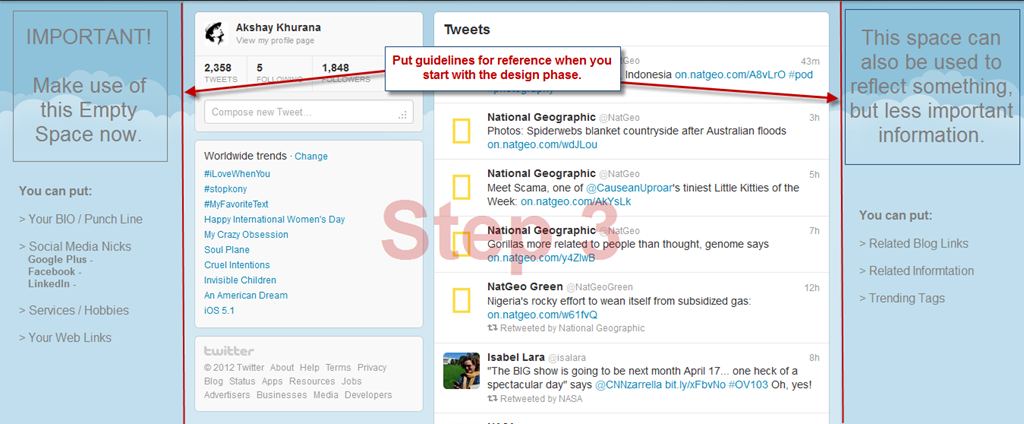
    • Next step is to setup guidelines, which will be a reference, when we will start with the design phase in tutorial [Part 2]. (Refer the screenshot below)
    Create Twitter New Layout-Step3
    Step 3 – Setup Guidelines for Design Phase
    • Save the PSD file, once you are done with setup of guidelines for new twitter background.
    • Take a break, for the work accomplished, Yes I am Serious we are done!

    Now wasn’t that easy of a tutorial, just with hit of “PrntScrn” key and here we got latest twitter layout ready. Well now that we are all set with new twitter background layout and we shall proceed for the design phase. Leave your comments, incase you have any feedback, queries or doubt in your head.

    PS. > Design Phase Article Link will be available shortly here. (Keep in touch via twitter or subscribe to our blog)