Tag: thesis

  • Multiple Navigation menus using WordPress Menu 3.0 with Thesis Theme

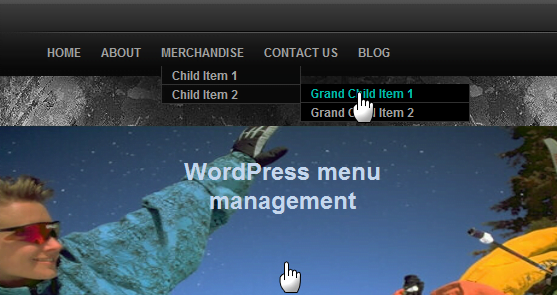
    Since WordPress 3.0 has evolved, Creating Menu for blog has relieved headaches for many, as WordPress 3.0 menu gives user ability to create and organize custom menu structure.
    Multiple Navigation menus using WordPress
    Multiple Navigation menus using WordPress

    Drop-down or nested menus was complex to code for a novice user, till Thesis Premium Theme was out in market. Thesis theme features to add custom menu structure for a WordPress blog. But, Thesis Theme allows to add one navigation menu only, hence its a limitation for a blog to add multiple menus. This limitation was soon resolved when WordPress 3.0 menu was launched. In this article I will guide you to use WordPress menu with Thesis Theme. The tutorial requires updated versions of WordPress and Thesis Theme. If you are using old version of Thesis then you can refer to article Safely upgrade to latest version Thesis 1.8 ?

    In this article, I will add two navigation menus in thesis theme, one referring the pages and other menu will refer the categories. I have divided the procedure in three steps that is register menu, create menu and finally display menu. Below is procedure to add navigation menu using WordPress 3.0 Menu.

    Step 1: Register Menu in Thesis Theme

    Menus are supported by almost every WordPress theme, some themes has it preinstalled while, other themes like thesis we have to register them before. Below is the code snippet and it will register two menu locations in Thesis Theme:

    [php]

    //Register WordPress Menus
    function joe_register_menu() {
    register_nav_menus(array(‘primary’=>’Navbar1’, ‘secondary’=>’Navbar2’));
    }
    add_action( ‘init’ , ‘joe_register_menu’ );

    [/php]

    Make sure you copy-paste the code precisely, otherwise erroneous code will  crash the website / blog.

    Add the above code in custom_functions.php of Thesis Custom Folder and save / upload the file. Once done, we move to next step to Create menu in WordPress.

    Step 2: Create Menu in WordPress

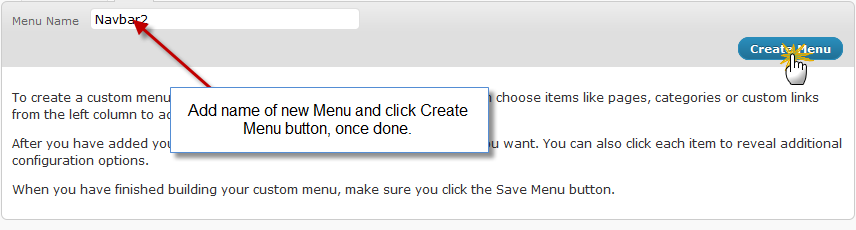
    WordPress menu management is click-a-way and easy to use. In step 1 we registered two menu locations in custom_functions.php file, so that we can differentiate theme locations of the multiple navigation menus in WordPress. In this step we will create navigation menus and assign theme locations. Login to WordPress Dashboard and navigate to Appearance > Menus. Now create new menu depending upon the requirement. For instance, I have created two menus Navbar1 and Navbar2. (Refer to the screenshot below)
    step1-Multiple Navigation menus using WordPress
    Step1: Create Menu in WordPress


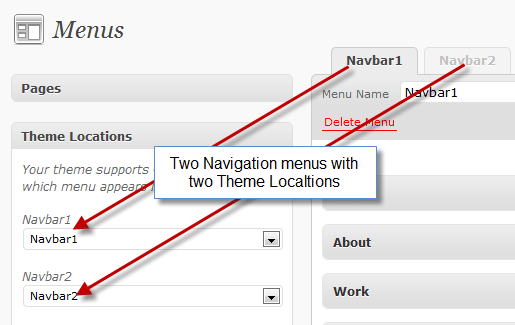
    After creating menus, you can drag drop the menu items and save menu. Next, important step is assigning menus the appropriate locations. On the Menus page find Theme Location Widget, and using the Drop down list, select appropriate Theme Locations. (Refer to the screenshot below)
    step2-Multiple Navigation menus using WordPress
    Assign Theme Locations

    Click on save button right below it, once done selecting the appropriate Theme Locations. And now we move on to next step, where we will display these menus.

    Step 3: Display Menu on Blog

    With Step 2, we are done with the backend part, and now we will publish menus on the blog. Referring to the WordPress Codex for Menus, we will once again edit custom_functions.php file. Copy-Paste the below code snippet in the custom_functions.php file, as we did in Step 1.

    [php]

    // Remove Default Header and Navigation Menu

    remove_action(‘thesis_hook_before_header’, ‘thesis_nav_menu’);
    remove_action(‘thesis_hook_header’, ‘thesis_default_header’);

    // Custom header created with multiple navigation menus
    function joe_header() { ?>
    <div id="joeheader">
    <div id="pages"><?php wp_nav_menu(‘theme_location=primary’);  ?></div>
    <div id="logo">
    <h1><a href="<?php bloginfo(‘url’); ?>" title="<?php bloginfo(‘description’); ?>"></a></h1>
    <h2> <?php bloginfo(‘description’); ?> </h2>
    </div>
    <div id="cats"><?php wp_nav_menu(‘theme_location=secondary’);  ?></div>
    </div>
    <?php }
    add_action(‘thesis_hook_before_html’,’joe_header’);

    [/php]

    Make sure you copy-paste the code precisely, otherwise erroneous code will  crash the website / blog.

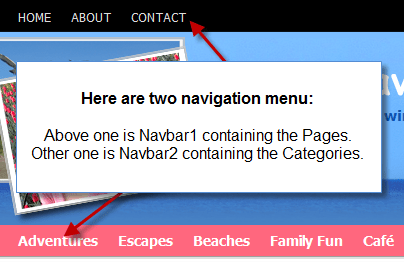
    Save and update the custom_functions.php file once done with editing the code. In the above code we have called wp_nav_menu() twice but with different parameters. First instance under displays the Navbar1 menu while the second instance displays the Navbar2. On refreshing the site you will find something like, as in the below screenshot.
    step3-Multiple Navigation menus using WordPress
    Multiple menus on WordPress Blog Demo


    In order to style WordPress menu, you can refer to my post Ease with Thesis WordPress Theme Design options panel or you can custom code in Custom.CSS and save it.

    With this we come to end of this tutorial, I’m sure you will find using menu with Thesis theme, more efficient and flexible. If you have any query or need any further assistance, post your feedback as comments below.

    If your WordPress blog is currently using a custom theme, then you can redesign it using the Thesis Theme Services.
  • How to safely upgrade to latest version Thesis 1.8 ?

    Latest version of Thesis WordPress theme was launched last year, which enhanced Design Options for flexibility in content management. In my recent post, I explained the Ease with Thesis WordPress Theme Design options panel, which you will find it in the latest version of Thesis theme.

    Though upgrading to Thesis 1.8 is a click-a-way work, but sometimes a bit of lag can ruin a website or blog for functionality or SEO, which costs you an extra overhead. In this tutorial, I will guide you through about how to safely upgrade to Thesis 1.8 ?

    Below is the procedure to upgrade thesis theme:

    Step 1: Download latest Thesis 1.8

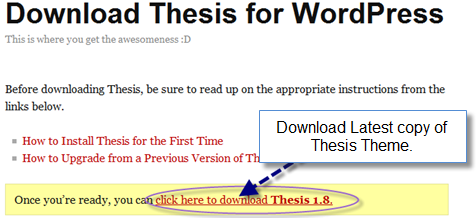
    Thesis 1.8 version is available at DIY Theme Thesis admin area, where you can download the latest copy of Thesis Theme. Once you login to the admin area, you can click “Download Thesis for WordPress” and you will be redirected to the download page. On the download page, click to “download Thesis 1.8” and save the file to your computer, when prompted. You can also refer to the screenshot below:

    admin-area-upgrade-to-thesis-18
    Download Thesis 1.8 Version

    After saving  the file, open it and cross check the Zip archive for CRC errors, which usually occurs when transferring files from internet.

    Step 2: Backup Database and Settings

    To stay at safer side, I suggest you to always backup your website’s database while making any updates or modifications in WordPress backend. You can simply use WordPress Export Tool (Dashboard Admin > Tools > Export) to download all Posts, Pages, Categories etc. in a XML file to your computer.

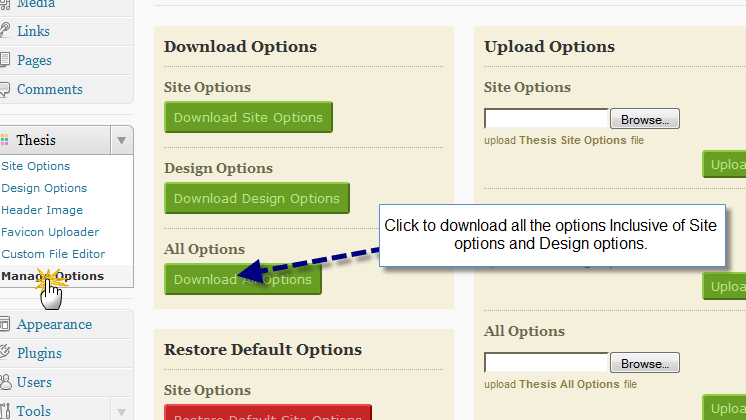
    Though Thesis retains its options comprising Site Options and Design Options, after upgrading to Thesis 1.8, but you can backup them as well by using the Thesis Download Options (Dashboard Admin > Thesis > Manage Options) and save them to your computer. You can also refer to screenshot below:

    backup-thesis-upgrade-to-thesis-18
    Backup Thesis Options

    Step 3: Backup Custom Folder

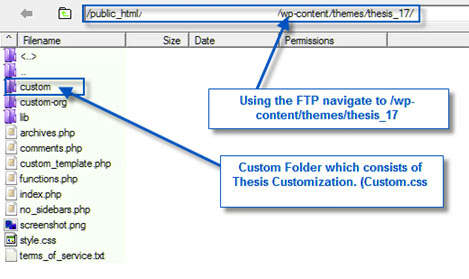
    Once your are done with backup of database, another important step is to backup Custom folder Thesis theme. Custom folder contains all of the customization related to styling and functionality of the blog. In order to take backup of custom folder, login to your ftp client and navigate to path /public_html/wp-content/themes/thesis_17/ and further download the custom folder to your computer. Below screenshot shows the location of custom folder under thesis theme.

    custom-folder-upgrade-to-th
    Backup Custom Folder Thesis Theme

    Step 4: Installing Thesis 1.8

    After taking the backup of database, thesis settings and custom folder, we move on to install latest Thesis version. As I have already explained in my Tutorial to Install Thesis Theme on a WordPress Blog in 3 steps, so you always go through the article and come back here.

    After you have installed thesis theme, you can now restore the custom folder of old Thesis theme downloaded in Step 3. In order to restore it, login to your ftp client and navigate to path /public_html/wp-content/themes/thesis_18/ and add the custom folder in the current directory.

    Once done with uploading the custom folder, you can check out your blog/website now, which is powered with latest version of Thesis theme. And with this we also come to the end of our tutorial, if you have any query or further assistance is required, you can post your comments as your feedback, or you can use the Thesis Theme Services for the upgrading Thesis for you.

  • Ease with Thesis WordPress Theme Design options panel

    Thesis v1.8 is so far the best version up till now and waiting for the next update of thesis theme, that is Thesis v2.0. If you haven’t bought the copy of Thesis yet, click on the link here to Download Thesis Theme.

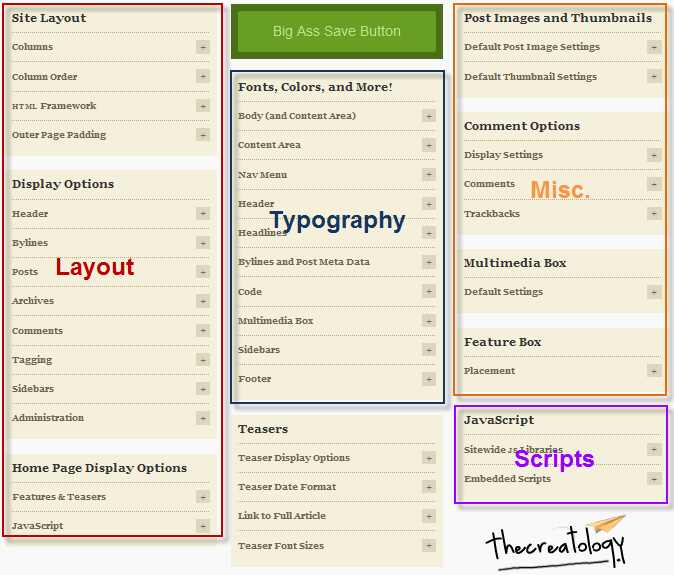
    About thesis wordpress theme, great SEO and flexibility is not all, Thesis has a lot of inbuilt design options panel for enhancing the typography as well as the layout of the blog. In this article, I will give you a quick overview of the Thesis WordPress Theme Design options panel. Thesis Design options are sorted into different sections like layout, typography, Scripts and other Miscellaneous options. You can also refer to the screen shot below:

    Thesis-Theme-Design-Options-thcreatology

    Thesis theme design options panel will ease you in organizing the website content in an efficient way. Here under, I will explain you about the Layout, Typography, Scripts and Misc. options.

    Layout

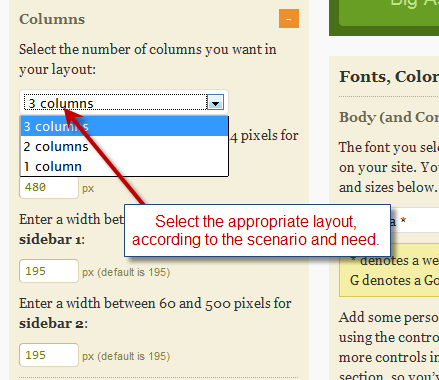
    Layout of the website is what matters the most, and it depends upon the nature of the website. For instance a 3 column layout website  is effective where there is more of content to be published, like a magazine style WordPress theme has. Thesis Theme has an option to switch between 3-column, 2-column or 1-column. Below is a screenshot which shows the layout selection in Thesis Theme.

    Layout-Thesis-Theme-Design-Options

    Typography

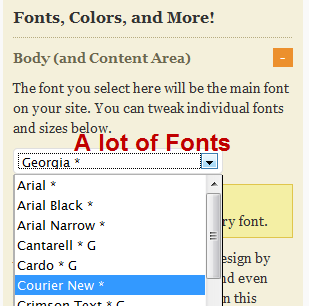
    Fonts play a vital role in presentation of the content on website. Thesis Theme has variety of options to enhance and customize Typography of a blog. There are a lot of fonts, comprising the Gothic, Typewriter, Old english style etc… We can also vary the different fonts in different parts of the website, for instance assigning Arial to Navigation Menu, Georgia to Post Title and Verdana to Body content. Below is a screenshot for selecting the fonts in thesis theme.

    Fonts-Thesis-Theme-Design-Options

    Scripts

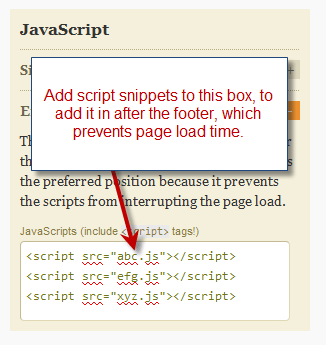
    Everyone of us are aware of JavaScript and jQuery codes which enhances the usability of the websites. There is a drawback of using these scripts as they take time to load in browser depending upon the network and system. Usually scripts snippets were added in header which on parsing by browser increases load time of the website. Yet another benefit of Thesis Theme is that it allows you add scripts in a preferred position, so that it doesn’t affect the page load time. Refer to the screenshot below:

    Scripts-Thesis-Theme-Design-Options

    Miscellaneous

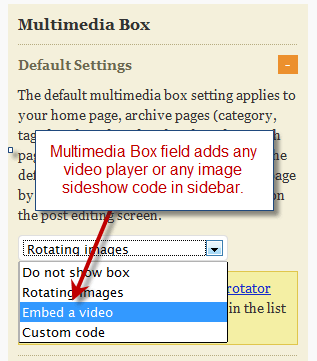
    A website is incomplete without multimedia presentation or a content slider or may be a video in it. Thesis Theme has a multimedia box widget for sidebar, which can embed video player, image sideshow or any other multimedia content. It also has a custom code option in the list, which can add any code snippet likely a flash or a Javascript. Refer the screenshot below:

    Miscellaneous-Thesis-Theme-Design-Options

    There are still a lot of options in Thesis Design Options, as I chose to brief you about essential ones. I will summarize the essential points discussed above for the ease of Thesis WordPress Theme Design options panel, before ending this article.

    Summary of Thesis Design options:

    1. Select Layout Option depending upon the need (3-column, 2-column or 1-column).
    2. Select fonts and vary fonts in different parts of website to enhance Typography.
    3. Add code snippet in order to prevent page load time.
    4. Add multimedia content for effective presentation in website.

    For any queries or assistance required, post comment as your feedback. If your WordPress blog is currently using a custom theme, then you can also redesign it using the Thesis Theme Services.