Tag: wordpress development

  • From MCP to Your Desk: Connecting Claude to Everyday Business Tools

    From MCP to Your Desk: Connecting Claude to Everyday Business Tools

    It is 2031. Aisha runs a mid-sized textile export business in Surat. She wakes to find her digital chief of staff has already drafted the week’s blog post, answered nine customer queries on WhatsApp, and flagged a supplier delay before her first cup of chai.

    This is not science fiction. It is a straight line forward from one afternoon in 2026, when we connected Claude to our own WordPress blog for the first time.

    A Morning Five Years From Now

    Picture a business where the website, the inbox, the calendar, and the inventory system all speak the same language, and an AI assistant moves fluently between them. Nothing gets typed twice. Nothing waits in a queue overnight.

    That world sounds distant. However, the infrastructure underneath it is being built right now, one connection at a time.

    Why We Started With WordPress

    We could have picked a more impressive first project. Instead, we connected Claude to our own blog, because the pitch made itself.

    Everyone in the room already understood WordPress. Consequently, nobody needed convincing that an AI assistant reading and drafting posts was useful. The risk was low, the value was visible immediately, and the whole team could see the result within a single afternoon.

    That ease of pitching matters more than it first appears. Ambitious AI projects often stall because nobody can picture the payoff. A blog, in contrast, is something everybody already understands.

    The Compounding Logic Behind Small Connections

    Here is the pattern we have noticed: each tool you connect does two things at once. It saves time today, and it teaches your organisation how to trust an AI with real work.

    That second effect compounds. A team that has watched Claude draft, revise, and safely publish a blog post grows comfortable handing over the next task, then the next. Five years from now, the businesses ahead of the curve will not simply own more AI tools. They will have built an operating rhythm where delegation to AI feels ordinary.

    Consequently, the real advantage of starting today is not the WordPress integration itself. It is everything your team learns about working alongside AI while building it.

    From Our Blog to Aisha’s Chief of Staff

    The Model Context Protocol connecting Claude to our WordPress site today is the same category of technology that will, eventually, connect Aisha’s AI assistant to her inventory, her supplier relationships, and her customer conversations.

    The difference between now and 2031 is not the underlying idea. It is simply the number of connections, and the years of accumulated trust behind them.

    Start With the Easiest Pitch in the Room

    You do not need a five-year roadmap to begin. You need one connection that everyone in your business already understands, much like ours was.

    Start there. Build the trust. Then, connection by connection, work towards the morning Aisha will eventually take for granted.
  • Image Caption Box Alignment Problem after WordPress 3.4 Update [With Thesis Fix]

    Images not aligning properly in article after upgrading to WordPress 3.4 ? If Not, then you are lucky and can skip this post. If Yes, then it is because of a recent WordPress 3.4 update which came out  few days back. Even, I got aware of this issue after posting an article earlier today, where I found all images aligned to left automatically with a broken caption box.

    Image Alignment in WordPress 3-4

    Though WordPress 3.4 Update has some nice improvements, but it has affected a lot of WordPress themes and frameworks. Here is what WordPress 3.4 Codex for image caption shortcode states… (important for developers)

    Change the image caption shortcode format to {caption shortcode}{anchor tag}{image tag}caption text + html{close anchor tag}{close caption shortcode} that way HTML tags in captions are better supported and the shortcode wouldn’t break when using the wrong quotes.

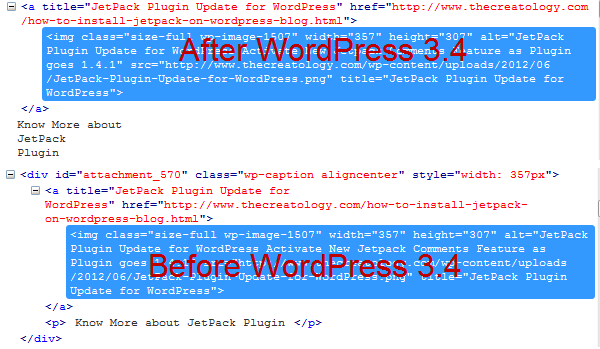
    When I saw markup in firebug, of a recently posted article after upgrading to WordPress 3.4, I found that image caption shortcode didn’t generate the div tag to form caption box. Check out the screenshot below:

    Markup Difference in WP 3-4
    Markup Difference in WordPress 3.4 Version

    Got the difference? Yes, the div tag is missing in after WordPress 3.4 clipping and hence breaking image caption box.

    How to fix Image Caption Issue

    There hasn’t been a proper solution to overcome image caption box issue, but you can:

    • Makes changes in Theme CSS file,
    • Manually add caption html tags or
    • Avoid usage of image caption shortcode

    Thesis Theme Users – Update to Thesis 1.8.5

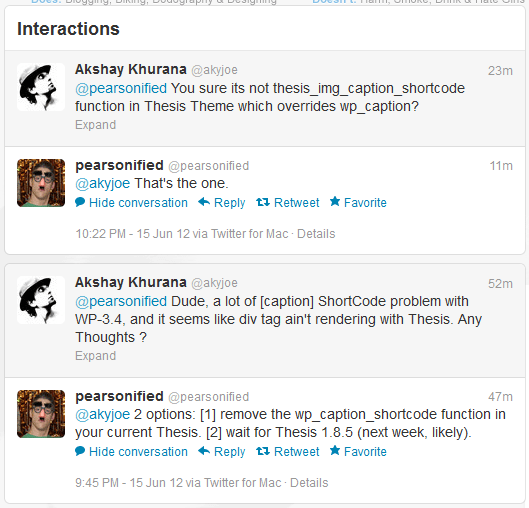
    An update for Thesis Theme will be available for its users by next week, as said by Chris Pearson. He has also suggested 2 options for Thesis users which you can check out in a Conversation with Chris on Twitter, in screenshot below:

    chat with chris thesis owner
    Interaction with Chris for Thesis Update

    I chose to wait for Thesis 1.8.5, as it’s not recommended to mess with Thesis core files.

    Thesis 1.8.5 is Available now ?

    Yes, new version of Thesis Theme is available for download now. Click here or the image below saying Thesis 1.8.5

    Thesis 1-8-5 bug fix release
    Get Thesis Theme 1.8.5

    (Post Updated on 19/06/2012)

    Whats next ?

    Have a similar problem with Image Caption Box Alignment after WordPress 3.4 Update ? Ask your theme developer now, for a fix. Whereas if you have a proper solution to it, then share it with us here, by posting a comment below.

  • Add Multiple Image Upload Button using WordPress Uploader in Theme

    WordPress core development is real learning and challenging especially when needed for an internal or a client project. I came across to this requirement of adding Media Upload Button in Metabox, while working on a client’s project. Hereby sharing my first Core WordPress Development Tutorial  to Add Multiple Image Upload Button using WordPress Uploader in Theme.

    Use Default WordPress Uploader

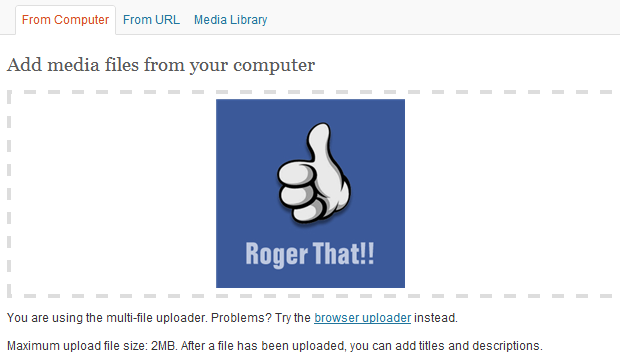
    WordPress Media Upload Box
    WordPress Media Upload Box

    No doubt, WordPress has an awesome media upload thickbox, in which you can even drag-drop images. In this tutorial we will use default WordPress Uploader to insert link in Metabox. For your ease, I have divided this article into three steps: 1) Multiple Image Upload Button Code, 2) Custom Uploader jQuery Code & 3) Call WordPress Media Upload Function.

    Here we go:

    Step1: Multiple Image Upload Button Code

    It is though easy to implement the code if you are familiar with WordPress Basics. No worries, if you are a beginner, just add below code snippet in functions.php or  custom_function.php file if you are using Thesis Theme.

    NOTE: Make sure you take full backup of functions.php file or custom_functions.php file using FTP before modifying the original file or you can also refer to the article about how to safely edit custom_functions.php.

    [php]

    <div style="margin:10px;">
    <label style="float:left; margin: 5px 5px 0 0;">Image 1:</label>
    <input type="text" id="image_1" name="image_1" value="" style="width: 550px; float:left; margin:0 5px;"/>
    <input id="_btn" class="upload_image_button" type="button" value="Upload Image" />
    </div>
    <div style="margin:10px;">
    <label style="float:left; margin: 5px 5px 0 0;">Image 2:</label>
    <input type="text" id="image_2" name="image_2" value="" style="width: 550px; float:left; margin:0 5px;"/>
    <input id="_btn" class="upload_image_button" type="button" value="Upload Image" />
    </div>
    <div style="margin:10px;">
    <label style="float:left; margin: 5px 5px 0 0;">Image 3:</label>
    <input type="text" id="image_3" name="image_3" value="" style="width: 550px; float:left; margin:0 5px;"/>
    <input id="_btn" class="upload_image_button" type="button" value="Upload Image" />
    </div>

    [/php]

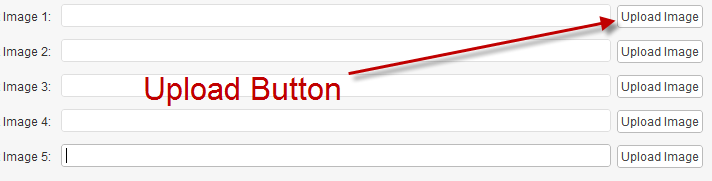
    After adding multiple upload image buttons, save the file and you will see something similar to screenshot below:

    Multiple Image Upload Buttons
    Multiple Image Upload Buttons

    Step2: Custom Uploader jQuery Code

    Now that our HTML part is ready, its time to do some action. Create a new JS file custom_uploader.js and insert the below code snippet in it.

    [php]

    jQuery(document).ready(function() {
    var formfield;
    jQuery(‘.upload_image_button’).click(function() {
    jQuery(‘html’).addClass(‘Image’);
    formfield = jQuery(this).prev().attr(‘name’);
    tb_show(”, ‘media-upload.php?type=image&amp;TB_iframe=true’);
    return false;
    });
    window.original_send_to_editor = window.send_to_editor;
    window.send_to_editor = function(html){
    if (formfield) {
    fileurl = jQuery(‘img’,html).attr(‘src’);
    jQuery(‘#’+formfield).val(fileurl);
    tb_remove();
    jQuery(‘html’).removeClass(‘Image’);
    } else {
    window.original_send_to_editor(html);
    }
    };
    });

    [/php]

    Above code will invokes the WordPress Uploader function, so make sure you copy the code very precisely.

    Step3: Call WordPress Media Upload Function

    Action time, as we will trigger Media Upload Button function en-queuing some default scripts. So, copy/paste the code in functions.php or  custom_function.php file, in case if its Thesis Theme.

    NOTE: Make sure you take full backup of functions.php file or custom_functions.php file using FTP before modifying the original file or you can also refer to the article about how to safely edit custom_functions.php.

    [php]
    function joe_admin_scripts() {
    wp_enqueue_script(‘media-upload’);
    wp_enqueue_script(‘thickbox’);
    wp_register_script(‘my-upload’, ###ADD JAVASCRIPT LOCATION HERE###/custom_uploader.js’, array(‘jquery’,’media-upload’,’thickbox’));
    wp_enqueue_script(‘my-upload’);
    }
    function my_admin_styles() {
    wp_enqueue_style(‘thickbox’);
    }
    add_action(‘admin_print_scripts’, ‘joe_admin_scripts’);
    add_action(‘admin_print_styles’, ‘joe_admin_styles’);
    [/php]

    Above code will get Media Upload Box Stylesheet and jQuery files. Don’t forget to insert the location of custom_uploader.js file which we created in Step 2 in line number 4.

    Once done, try inserting/uploading files by clicking respective upload buttons use insert into post to fill input field with and you will find similar to screenshot below:

    Image Upload Button Demo
    Image Upload Button Demo

    We’re Done

    I hope it wasn’t drain bamaging! Lol!  Its your time to do some action and make the most of this cool development, as you can add Multiple Image Upload Buttons in Gallery Themes or Portfolio Themes.

    Any queries for further assistance, kindly use the comment box below for your feedback.