Category: Blog

The Blog is the central hub for insights on digital design, development, online strategy and emerging web technologies. It brings together practical tutorials, opinion pieces, industry observations and hands‑on guides to help creators and businesses strengthen their online presence.

This section spans a broad range of topics — from website optimisation and performance enhancements to design thinking, user experience and platform updates. Its aim is to distil complex ideas into clear, actionable knowledge that can be applied immediately.

Whether you are learning a new skill, revisiting best practice, or keeping abreast of industry developments, the Blog provides context‑driven content grounded in experience. Articles are written with an emphasis on long‑term value rather than short‑lived trends.

  • How to install Akismet to block spam comments on blog

    WordPress has some great features and plugins to maximize blogging potential. You can also read Why you should prefer WordPress for your website ? to know more about WordPress. In that article, one extended feature of WordPress is to block spam on blog. For spam protection, there are many WordPress plugins available which help restrict spammers to comment on your blog.

    No-Spam using akismet
    No Spam Comments Anymore

    Akismet is one great Plugin which comes by default in all WordPress installations. But Akismet is not capable of working of its own, so you will have to install and configure Akismet plugin. In the article we will guide you how to install Akismet to protect your blog against spam.

    Below is a simple procedure, you just need to focus a bit.

    Step 1: Install-Activate Akismet Plugin

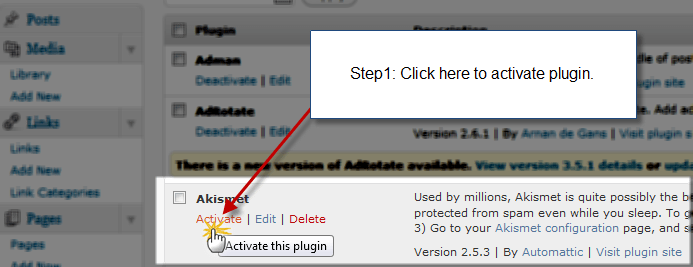
    As mentioned above, Akismet plugin comes pre-installed with the WordPress Installations. So we are just required to Activate the Plugin, and you can do so by Navigating to WP Dashboard > Plugins. You will find Akismet Plugin in All listed Plugins, Click the Activate button, similar to screenshot below.
    step1-activate akismet plugin on wordpress
    Activate Plugin

    Great! You have now activated the plugin.

    Step 2: Get Akismet API Key

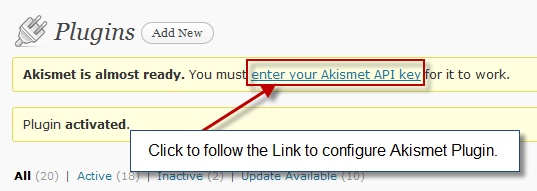
    On activating the Plugin, you will see a Yellow highlighted message on the top of the Dashboard saying “Enter you WordPress.com API Key”, very similar to screenshot below.
    step1-configure akismet plugin on wordpress
    Akismet Configuration Alert

    Click on the link, an it will direct you to Akismet Configuration where you will be required to enter API key. You can get API key from Akismet by registering an account with them. It’s free for personal blogs! 🙂
    Get Akismet API key
    Get Akismet API key

    Alternative way is if you have saved your old WordPress.com API key then you can use that as well. Once you have the API key, proceed to Step 3.

    Step 3: Configure Akismet to Block Spam

    Now that we have the API key, we are all set to configure Akismet to Block spam commenting.

    • Click on the “Enter you Akismet API key” highlighted message, once again.
    • On Akismet Configuration Page, paste your Akismet Key in text box, and click Update Options button.
    • Now, once the options are saved, your API key will be verified, and if API key is valid you will see Green Signal, similar to screenshot below.
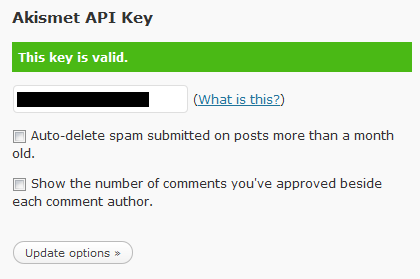
    step3-API key Valid akismet plugin on wordpress
    API key is Valid, Akismet Configured!
    • If Akismet key is not valid, then you go to Step 2 and get a valid API key.

    Congrats, we have successfully configured Akismet on WordPress blog.

    We’re Done!

    Setting up Akismet Plugin is though easy task, but Akismet is a powerful plugin to block spam comments. Installation of Akismet and other essential plugins for WordPress, we offer to setup for you in WordPress Free Setup package.

    Which plugin are you using to protect spam on your blog ? If you have any query with the article, you can send you feedback by posting comment below.

  • How to add Twitter @Anywhere Hovercard on WordPress Blog ?

    Keeping itself active in Social Media World, Twitter has its development kit ready for your WordPress Blog. Just like the facebook like button, twitter now allows to integrate their features on WordPress website. The feature is known as @Anywhere, and can be implemented using a few lines of JavaScript Code.

    anywhere twitter hovercard for wordpress
    @Anywhere Twitter Features

    In the article, we will learn to implement @Anywhere feature and add twitter hovercard on WordPress blog. I should not make you wait, just follow the simple steps below:

    Step1: Register Twitter Application

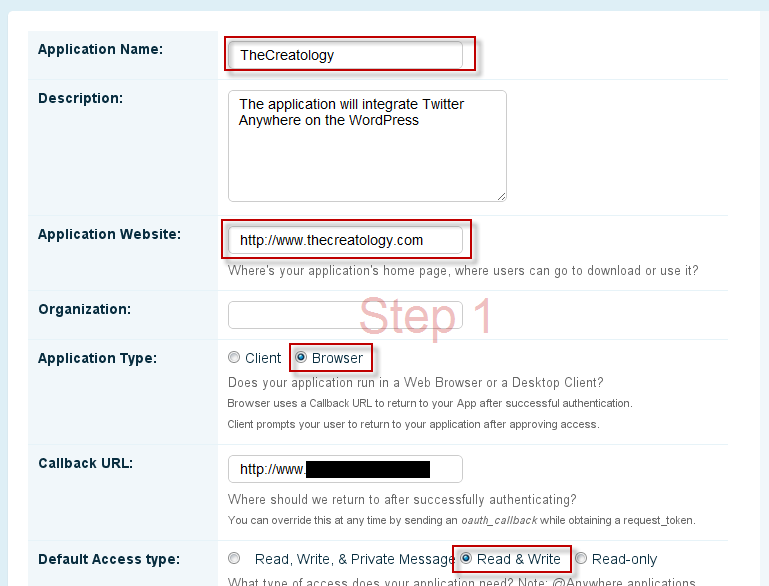
    In order to integrate @anywhere feature on website, you will be required to register an application. On register an @Anywhere application page you will have to fill-in details for Name of the Application, Website URL etc. You can also refer to the screenshot below:

    step1-create application
    Step1: Register an Application

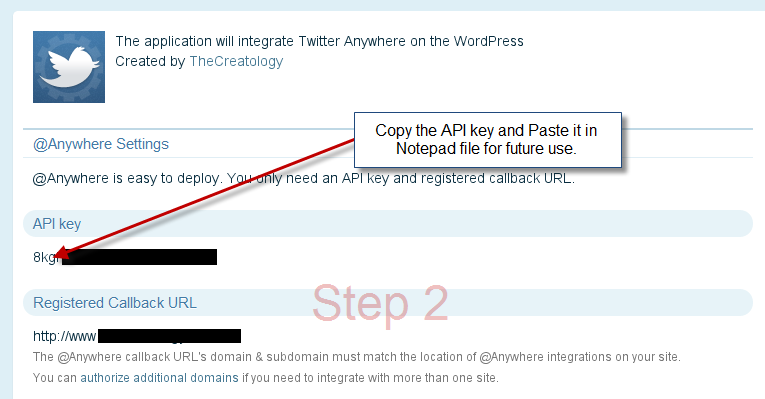
    Submit the Application by clicking Register Application button, and further it will be redirected to the application page. In this page, you will find all details about the Application like API key and Registered Callback URL, similar to the screenshot below.

    step2-get api key
    Step2: Get Twitter API key

    Keep the API key of twitter application handy, as we will be using it in Step2.

    Step2: Adding @Anywhere in WordPress

    To add @Anywhere feature in WordPress blog, twitter provides a Javascript code which should be placed in HEAD Tag in header.php file. Incase you are using Thesis Theme then you can add the code using Thesis Site Options. (If you are concerned about Page Load time, then you can also add code right before the closing of BODY Tag in footer.php file.)

    Below is the twitter @anywhere code snippet, which you can add it in your Custom Theme or Thesis WordPress theme. Make sure you take backup of Header.php or Footer.php before adding the code snippet.

    [php]

    <script src="http://platform.twitter.com/anywhere.js?id=YOUR-API-KEY-GOES-HERE&v=1"></script>
    <script type="text/javascript">
    twttr.anywhere(function (T) {
    T.hovercards({ expanded: true });
    });
    </script>

    [/php]

    For Thesis Theme you and paste the above code in Site Options under “Stat and Tracking Scripts”.

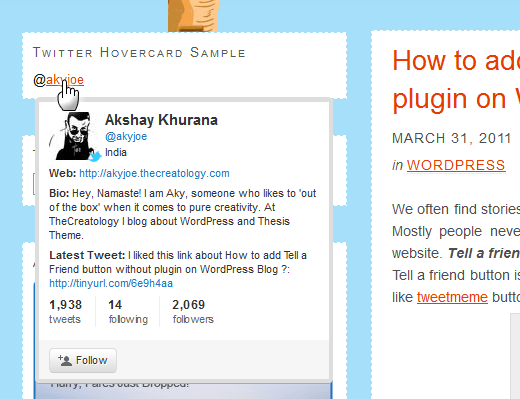
    Once you have added the code, it will enable Twitter username Auto linking and Hovercard feature on your website, that is, it will auto link Twitter usernames anywhere on website, to their twitter profiles. For instance, you can add Text Widget and put twitter username  with “@” symbol just like this “@akyjoe”. Once done, refresh the website and you will find something similar to the screenshot below:

    Twitter Hovercard Demo
    Demo: @Anywhere Hovercard Feature

    We’re done

    @Anywhere Hovercard feature can be effective, if there is a twitter feed on your website. As twitter feed will contain usernames which will be auto linked and will display twitter profile by Hovercard feature.

    What do you think about @Anywhere Hovercard feature ? You can share your opinions here by posting a comment below.

    If you have any query or further assistance is required, post comment as your feedback.

  • Auto Blog Website Designed for Steeroids using Thesis Theme on WordPress

    Steeroids is an Auto Blog designed on Thesis Theme powered by WordPress. Steeroids is for Auto enthusiastic people, around NCR and India. The blog covers news and information about Automotive happening, Automotive Reviews, Modified Cars and Latest Trends in Car Industry. The Founder of Steeroids contacted thecreatology for the website design services. The project package included customization of  thesis theme, configuring  social media plugins and other basic SEO settings.

    Automotive blog design reflects sporty and modern touch, so keeping that in mind a rough sketch was prepared. After couple of refinements, blog design was finalized. In the below screenshot you can see Steeroids Blog Design:

    STEEROIDS-auto-blog
    Mockup Design for Steeroids

    Featured Content Slider for auto blog was an extra advantage for showcasing various Car Modifications. Thesis Design options, made everything so easy and less time-consuming and with no further delays, Auto blog thesis skin was developed and published online.

    Click here to visit Steeroids website live in action and let us know your perspective, about the design, by posting a comment below. If you want something similar for your company website design, you can contact us, by filling the contact form below.

  • Style post tags in single post WordPress to decrease bounce rate of blog

    I have already covered few articles to decrease bounce rate of blog, like by creating 404 error pages or styling previous next links in WordPress. In the following article I will explain how beneficial Post Tags are in WordPress and how we can style tags in single posts to decrease bounce rate of blog.

    Why WordPress Tags are useful ?

    TheCreatology Post Tags
    Image Credit: AkyJoe

    Post Tags play a vital role in WordPress as they group similar articles together. Tags works as multiple categories for a blog entry which can be reused in future as an archive of articles. Another reason why I say why WordPress tags are important, is that they describe a visitor, what the article is about.

    How to Style Post Tags in WordPress?

    Usually every WordPress Theme like Thesis Theme has Post Tags enabled in Single Post Entries. You can always style Post Tags using CSS to increase Call to Action. For Instance, you can see the screenshot below, where you can see the post tags in blue.

    TheCreatology Post Styling on WordPress
    TheCreatology Post Styling on WordPress

    Below is the post tags style code which you can add it in style.css or custom.css in case of Thesis Theme.

    Make sure you take backup of style.css or custom.css using FTP, before adding the code in it.

    [css]

    .custom .post_tags a {
    background-color: #e33e00 !important; /*Change Background Color*/
    color: #FFFFFF; /*Change Text Color*/
    line-height: 40px;
    margin: 2px;
    padding: 7px !important;
    text-decoration: none !important;
    }

    [/css]

    The above code is for Thesis Theme Post Tags Styling only. In case of custom WordPress Theme you can simply replace the class according to your Theme. You can play around with the background color and text color, as I have mentioned in the code.

    We’re Done!

    Once you have added the code, refresh on any single post entry to see the effect and you will find something like the screenshot below:

    Style Post Tags for WordPress
    Demo: Post Tags

    WordPress post tags though are optional, but I would recommend people to use WordPress to its best. Winking smile Do you use Post Tags ? Let us know with a simple feedback, by posting comment below.


  • How to add Facebook Send Button in Thesis Theme ?

    You must be aware of latest development from Facebook, that is New Send Button. The Send button allows user to directly share favorite link with friend/s on Email. Recently I explained in the article to add Facebook Send button on WordPress Blog. In the following article we will learn to add Facebook Send Button in Thesis WordPress Theme.

    Facebook Send Button for Thesis Theme

    new-facebook-send-button-on-thesis
    Add Send Button on Thesis

    As we all know about Thesis Theme and its content management with SEO capabilities. Though it is a raw wordpress theme, allowing endless customization for wordpress blog. If you don’t have a copy of Thesis Theme then you can download thesis theme here.  If you are using an old version of Thesis Theme then I recommend you to safely upgrade thesis theme.

    Standalone Send Button in Single Post

    As we all know that Thesis customization is done using thesis hooks which are the overriding functions. To show send button in single post, copy-paste the code snippet in the custom_functions.php.

    Make sure you take full backup of custom_functions.php file using FTP before modifying it.

    [php]
    function joe_adds_send_btn ()  {
    if (is_single()) { ?>
    <div style="float:right; margin:0 10px;">
    <div id="fb-root"></div><script src="http://connect.facebook.net/en_US/all.js#xfbml=1"></script>
    <fb:send href="<?php echo get_permalink(); ?>" font=""></fb:send>
    </div>
    <?php
    }}
    add_action(‘thesis_hook_before_headline’,’joe_adds_send_btn’);
    [/php]

    Facebook Like with Send Button Code

    As mentioned in article add Facebook Send button on WordPress Blog standalone placement for Facebook send button is not that effective. Below is the code to add like with send button in thesis, copy-paste the code snippet in the custom_functions.php.

    Make sure you take full backup of custom_functions.php file using FTP before modifying it.

    [php]
    function joe_adds_send_btn ()  {
    if (is_single()) { ?>
    <div style="float:right; margin:0 10px;">
    <div id="fb-root"></div><script src="http://connect.facebook.net/en_US/all.js#xfbml=1"></script>
    <fb:like href="<?php echo get_permalink(); ?>" send="true" layout="button_count" width="300" show_faces="true" font=""></fb:like></div>
    <?php
    }}
    add_action(‘thesis_hook_before_headline’,’joe_adds_send_btn’);
    [/php]

    We’re Done

    Once we have added the code, now you can refresh any single page entry and you will find it similar to screenshot below:

    Facebook Send button on Thesis
    Facebook Send Button Demo on Single Post

    You can now test the new facebook send button on your Thesis Theme, like playing with different hooks in Thesis Theme and let us know your opinion, which placement is effective for facebook send button, by posting a comment below.

  • How to add Google Analytics Code in WordPress using Thesis Theme ?

    Google Analytics is a Web Analysis Tool, which gives insight of Page Visits and Daily Traffic. Google Team is improving Analytic Product day-by-day, to present more precise and accurate  reports.

    Google analytics for wordpress
    Google Analytics

    In the article we will learn to add Google Analytics Code in WordPress using Thesis Theme. But before that, we will have to setup Google Analytics Profile.

    How to Setup Google Analytics Profile ?

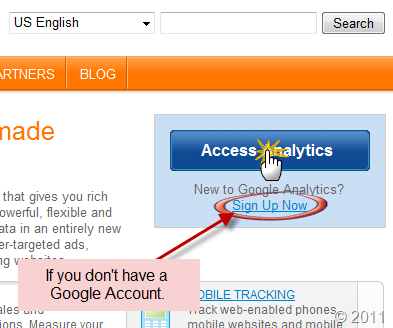
    Setting up Google analytics profile is not a big deal, all you need is a Google Account. If you are using Gmail or any other Google Product, then it clears that you have a Google Account associated. Login into your Gmail or any other Google account, and click here to Access Analytics. You will find something like below as in screenshot:

    Add google analytics to wordpress
    Google Analytics Login Page

    Once we gain access to Google Analytics account, we will have to setup a profile for our website.

    • Click to add new profile on Dashboard.
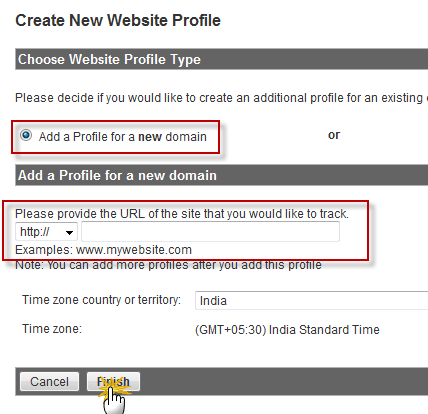
    • Next screen, enter domain name and select country. You may also refer to screenshot below:
    setup new google analytics profile
    New Google Analytics Profile
    • Once done, click Finish button and we have created the Website Profile.

    Get Google Analytics Code

    Now that we have created our profile we will now, get Google Analytics Code to Verify website.

    • On the Google Analytics Dashboard, click to Edit your listed profile.
    • Next, Click on Tracking Status or Check Status Link.
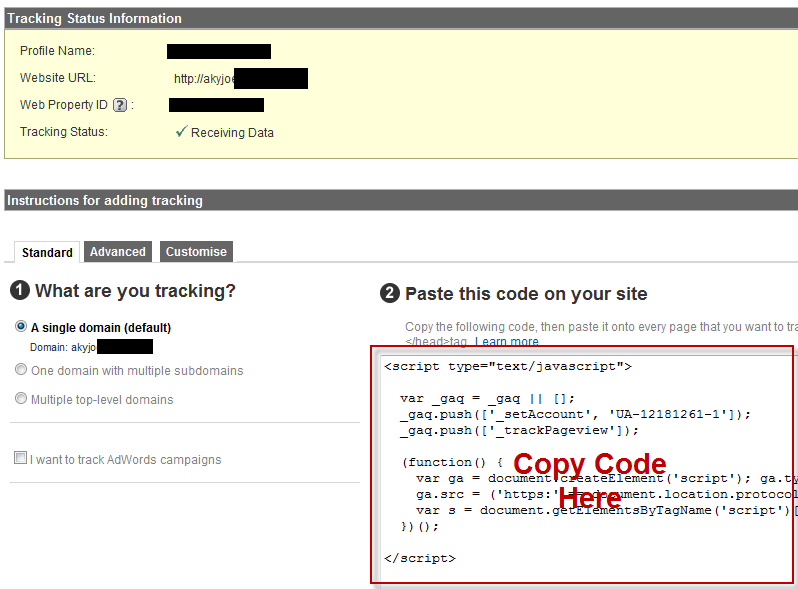
    • In the next screen it will show you instruction to add tracking code on your website. Grab the Google Analytics Code and paste is on a Notepad file for future reference. (Refer to Screenshot Below)
    Get Google Analytics Code for website
    Grab Google Analytics Code

    Add Analytics Code in WordPress Thesis Theme

    Adding Tracking Code in Thesis Theme is a click-a-way job. Here is how we will be going to do that:

    • Navigate to WordPress Dashboard Admin Panel > Thesis > Site Options.
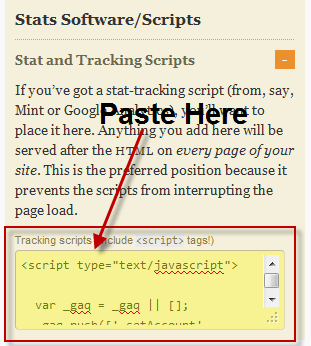
    • In site options, look for Stats Software/Scripts. Now expand the item and insert the Tracking Code in the Text Area similar to what you can see in the screenshot below:
    add tracking code in thesis theme
    Add Analytics Code in Thesis Site Options
    • Once done, click the Big Green Save Button and we are done.

    We Are Done!

    Now, that we have installed the tracking code on our website, you can now Verify Google Analytics Profile so that Google bots can crawl website, and track each-n-every activity on your website.

    If you have any queries for further help is required you can post comment as your opinion.

  • How to add Pagination in WordPress Blog using Thesis Theme

    Does your blog show Previous-Next Links on home page ? The reason behind the question is the missing swift feature on blog. As we know that, Previous-Next links in Thesis Theme is less prominent, hence they increase bounce rate and pagination is not that effective too. In my previous article, I mentioned about how we can Style Previous Next Links in WordPress to decrease bounce rate. In the following article we will learn to add Pagination on blog to increase efficient paging.

    how to add pagination in wordpress blog
    Efficient Paging

    How to add Pagination in WordPress Blog ?

    Pagination adds an advantage in a blog as making smart navigation on website. In this article we will use WordPress Plugin WP-PageNavi to add pagination on WordPress. But, before we proceed to add pagination in Thesis Theme,  I recommend you to safely upgrade thesis theme.

    Below is a simple 2-Step procedure to add Pagnavi in WordPress blog:

    Step 1: Install PageNavi Plugin

    • Navigate to WordPress Admin Panel > Plugins > Add New.
    • Search for plugin “wp-pagenavi” and install the plugin. Or you can also download the plugin here.
    • Once the plugin is installed, activate it.

    Step 2: Add PageNavi in Thesis Theme

    In order to add pagination on blog page, edit custom_functions.php file and copy-paste the below code snippet.

    Make sure you take full backup of custom_functions.php file using FTP before modifying it.

    [php]

    // Page Navigation
    function joe_adds_page_navi(){
    if (!is_single() && !is_page()){ ?>
    <div id="pagenavi"><?php if(function_exists(‘wp_pagenavi’)) { wp_pagenavi(); } ?></div>
    <?php }}
    add_action(‘thesis_hook_after_content’,’joe_adds_page_navi’);

    [/php]

    We Are Done!

    After adding the code, we are done with the adding pagination to blog page. Once done, refresh the blog page and you will find it similar to screenshot below.

    pagination demo screenshot
    Page Navigation Demo

    Thesis WordPress is a great theme and adding Pagination, just makes it perfect. It is believed that the next version of Thesis Theme will have Pagination preinstalled. Since there is no exact date when it will going to happen, but by that time we can add Pagination manually to Thesis Theme.

    If you have any query or any further assistance is required, you can post comment as your feedback.

  • Tutorial to add Facebook Send Button on WordPress Blog ?

    In a recent update from Facebook which now allow publishers to add Send button on website or blog. Almost everyone on internet has a facebook account and too have a social circle around the globe. Using a new send button user can share information in their network. In a recent post I explained about the Tell a friend button for WordPress, and facebook send button is quite similar to it. In the article we will learn to add new Facebook Send Button on WordPress blog.

    Facebook Send Button on WordPress
    Facebook Send button for WordPress

    How Facebook Send Button Works ?

    The new facebook send button allows users to share your content with their friend using an email to any email address or inbox them on Facebook. A user can also mention the name of the Group and post the URL on the group wall.

    Facebook Send Button Code

    In WordPress blog, effective placement for send button is on single post, as usually a visitor will only share it after go through the post. Below is the send button code for WordPress to add facebook send button on single post and you can add the code in single.php file.

    Make sure you take full backup of single.php file using FTP before modifying it.

    [php]
    <div id="fb-root"></div><script src="http://connect.facebook.net/en_US/all.js#xfbml=1"></script>
    <fb:send href="<?php echo get_permalink(); ?>" font=""></fb:send>
    [/php]

    Is that it ?

    No it is not. The above code snippet will just add Send button on your WordPress blog, but so far I believe this method will not be that effective, as Stand Alone Send button will be less prominent. But, if we combine and add a Facebook Like  Button with Send Button and it will increase your Like Counter as well. Below is the code snippet to add facebook send and like button together, and you can add the code in single.php file.

    Make sure you take full backup of single.php file using FTP before modifying it.

    [php]

    <div id="fb-root"></div><script src="http://connect.facebook.net/en_US/all.js#xfbml=1"></script>
    <fb:like href="<?php echo get_permalink(); ?>" send="true" layout="button_count" width="300" show_faces="true" font=""></fb:like>

    [/php]

    Now, the above code will add Like button followed by new send button. I hope facebook send button will be effective for visitors and sharing information around their networks will be flexible now. Let us know about this new development from facebook by posting a comment below.

    If you have any query or require further assistance, you can post comment as your feedback.

  • Community Website Redesign using Thesis Theme WordPress

    A community website consists of photo galleries, events, newsletter subscriptions and blog.  To make website efficient & productive, TheCreatology in partnership with our Project Manager Ms. Imie Belanger was contacted for designing community website using Thesis Theme with SEO advantage. The package included customizing thesis theme, featured content slider and other essential SEO settings.

    Website was redesigned as per the approved mockup and thereafter was developed and made live. Few references like Thesis Design options and Featured Content Slider for Thesis Theme made it look easy and quite knowledgeable too.

    Below you can see a screenshot of the Community Website:

    PIDCToronto-Screenshot
    Click to Zoom

    If you want something similar for your community website design, you can either hire me or you can use the contact form below and I will get back to you asap!

  • Style Previous Next Links in WordPress to decrease bounce rate

    Everyone is digging deep for blogs tips and WordPress tutorials, on internet, to improve blog performance and efficiency. Most of the Search engine traffic, lands on Single Post of blog and mostly a visitor escapes, if it couldn’t find anything relevance after reading the article. This is annoying for a blogger as it increases Bounce Rate of blog.

    Bounce-Rate-TheCreatology
    Bounce Rate

    In my previous article I explained about how 404 error page helps to decrease bounce rate. But, as mentioned above, that the search engine traffic redirects visitors on single page entries of the blog, hence by styling single post entry will lower bounce rate of blog. In the article we will learn to style Previous Next Links in Thesis Theme. Previous-Next Links adds single post entry pages a navigation so that flow of reading is not affected.

    Previous-Next-Single-Post-Tutorial
    Previous Next Post Links

    Previous Next Links in Thesis Theme

    In thesis theme design options allows to enable and disable previous next on single entry pages. Since in this article we are manually customizing previous next links so we will be using Thesis Hook to configure it. But before we proceed further I recommend you to safely upgrade thesis theme.

    Below is a simple procedure to add and style previous next post in WordPress.

    Add Previous Next Links in WordPress

    In order to add custom previous next links in single entry pages, edit custom_functions.php file and copy-paste the below code snippet.

    Make sure you take full backup of custom_functions.php file using FTP before modifying it.

    [php]
    //Author: AkyJoe
    // Custom Previous Next Links
    function show_previous_next_links() {
    if (is_single()) { ?>
    <div id="prev-next">
    <div class="previous-post"><?php previous_post_link(‘%link’, ‘Previous Post’, TRUE); ?></div>
    <div class="next-post"><?php next_post_link(‘%link’, ‘Next Post’, TRUE); ?></div>
    <div style="clear:both;"></div>
    </div>
    <?php } }
    add_action(‘thesis_hook_after_post’, ‘show_previous_next_links’);
    [/php]

    Style Previous Next Links on Single Post

    Now as we have added the previous next links using the Thesis Hook in single entry page, but in order to make it eye catchy and prominent, we will have to style it by adding the below CSS code snippet in custom.css file.

    [css]
    /*Previous Next Post*/
    #prev-next{font-size:40px; font-family:Arial;border-top: 2px dotted #EEE;}
    #prev-next a{color:#5d9800; display:block;}
    #prev-next a:hover{ text-decoration:underline;}
    .previous-post{background:url(‘images/previous-post-arrow.png’) no-repeat left center; float:left; padding:30px 0 30px 70px;}
    .next-post{background:url(‘images/next-post-arrow.png’) no-repeat right center;float:right; padding:30px 70px 30px 0;}
    [/css]

    Add Image to Previous Next Links

    To make the navigation look more prominent, we can add the below images. Download the images and save upload them under the Thesis Theme custom/images folder.

    next-post-arrow previous-post-arrow

    We Are Done!

    After adding the code and the images, we are done with the styling of next previous links. Once done, refresh any single entry post and you will find it similar to screenshot below.

    Previous-Next-Single-Post-Tutorial
    Final Output: Previous Next Links

    Here we come to the end of this tutorial, where we learned to Style Previous Next Links in WordPress. If you have any query or any assistance is required, feel free to post comment as your feedback.