A security breach detected in a commonly used plugin Jetpack, as a result makes the WordPress site vulnerable to hackers. However, this serious bug in Jetpack plugin, lets hacker to mess around with website database and gain full site access as well. Wake-Up!
If you’re not aware of Jetpack plugin version, then contact your web administrators and ask them to update Jetpack plugin to 2.9.3 version it for you. If you choose to DIY, then:
Update Jetpack Plugin from Dashboard
Login to your WordPress Dashboard.
Navigate to Dashboard > Plugins
In the list of installed plugins, find Jetpack by WordPress.com and check the version number below it.
If you’re using an older version < 2.9.3, then there shall be an update message below the plugin itself, saying “There is a new version of Jetpack by WordPress.com available. View version 2.9.3 details or update now.”
Click on Update Now and it will redirect to update plugin page.
WordPress 3.7, is next release by Automatic and they’ve nothing much to amaze, except few unnoticeable features. Well, one of the amazing feature is its ability to Auto Install WordPress Update just like your Smartphone. Isn’t that cool for the Lazy Admins? Haha…I’m just saying. Well, there are few more features which you will find later in this article on WordPress 3.7 Update Release.
Features for Blogger / User
There’s nothing much to amaze you guys, but there’s no harm in knowing some of the hidden features of WordPress 3.7. They’re listed below:
Automatic Background Updates: Explained below.
New Password Strength Meter: To overcome WordPress hacks, the password strength meter’s enhanced to avoid common mistakes. It recognizes the keyboard patterns, references, dates & names.
Enhanced WordPress Search: With the improved search your audience will get more relevant and efficient results now.
Features for Developers
New filters added to control background updates.
New function to list all network sites
Fixed dashboard UI bugs & bad styling
New Classes for background updates, date queries etc.
New Functions introduced, like get_previous_post_link and get_next_post_link.
The WordPress version 3.7 includes background updates feature. So, when a security or maintenance update’s released, the WordPress Background Update feature silently installs the new update available. This feature only functions for the minor updates, like Version 3.7.1 and doesn’t for the major updates, like Version 3.8. The reason is, a lot of Theme and Plugin dependencies may or may not fully support the major release and break your WordPress site layout.
Is Upgrading to WP 3.7 Safe?
WordPress 3.7 is absolutely a stable release, so you can upgrade from WordPress 3.6.1 to 3.7 fearlessly.
Do let us know, if you face any bug while upgrading to WordPress 3.7, by posting a comment below.
HTML5 Pattern works on the principle of regular expression, set of code defining a pattern.This htm5 pattern attribute helps in form validation and 99% accurate data input from user. In this tutorial, we will create a regular expression to validate URL field.
Html5 Pattern Attribute
What is Regular Expression?
Regular expression is a set of characters which defines pattern to validates an expression. It helps in searching a word/character/letter in a given expression and returns true or false. For instance, a regular expression can extract “feel” word or “very lucky” words from “I am feeling very lucky today”.
In this tutorial, we will validate various input fields to accept Youtube, Facebook, Twitter urls.
Above expression checks for a valid Youtube, Facebook & Twitter URL with protocols, either http or https.
Demo
Valid:
Invalid:
What’s Next?
If you are looking to validate a custom name, then simply replace the words Youtube with your custom name. Such kinda validations are helpful for precise data input such as registration forms or contact forms.
If you have any queries or need any assistance, then post them using the comment form below.
Are you afraid of Content Thieves or your WordPress blog has a lot of copyrighted images and you don’t want just people to copy content. Believe me there is no full proof way to stop stealing stuff, however you can still lock the doors for people. Doesn’t Amaze you ? Here check out this tutorial to disable right click on website.
Disable Right Click on WordPress
You must have tried your luck with a lot JavaScript solutions and plugins, but they didn’t work with your WordPress Blog. Hmmm! Don’t worry, follow this 2-step thesis tutorial to disable right click on WP blog:
Below is the working JS code to disable right click on WordPress blog. Add the code snippet in custom_functions.php in Thesis Theme.
NOTE: Make sure you take full backup of custom_functions.php file using FTP before modifying it or you can also refer to the article about how to safely edit custom_functions.php
Done adding above code? Save the custom_functions.php file and upload it to server using FTP. The above code will not only disable right click but will also disable highlight text on WordPress Blog.
Disable Right Click Demo
I hope you are not waiting for some fireworks, TRY TO RIGHT CLICK anywhere on your WordPress Page. 😉
Are we done ?
Yes, I hope the above demo made your mind.
One of my client’s requirement was to disable right click only on single posts. In such cases, you can use WordPress Conditional Tags with Code above in Step2.
With this we come to end of this article to disable right click to protect content copying on WordPress blog using Thesis Theme. If you have any query or further assistance is required, post feedback as comment below.
I am wondering why there is no update from DIY Themes about new version of Thesis Theme as timthumb file is making Thesis Theme Websites vulnerable to hackers. It has been reported that certain version of Timthumb script http://code.google.com/p/timthumb/issues/detail?id=212 holds security hole and Thesis Theme uses Timthumb.php file for re-sizing an image. I have no clue when new Thesis version will arrive, hence being on safer side why don’t we just update Timthumb file manually. 😉
Timthumb file prone to hackers
Therefore this vulnerability may also exist in your WordPress Theme or a Thesis Theme. For people who have followed this article How to auto generate thumbnail in Thesis Theme without Plugin, I strongly recommend you to update timthumb.php file, before a hacker ruins your morning, or make your sleepless nights.
In this article, you will learn how to update TimThumb file in WordPress Theme.
Step 1: Get Latest Timthumb.php for WordPress
As mentioned about the security flaws with the timthumb.php, so our first step will be to get the latest version thumb file. You can download Timthumb.php source code from here. Another option, is to copy entire source code and edit existing Timthumb.php file. Move on to the next step which is to find timthumb file location.
Step 2: How to find Timthumb file location ?
As mentioned above about timthumb.php, which is a script used by developers to resize post images / slider images, so it can be found within the Theme/Plugin Directory. Depending upon various plugin and theme developers, name of the file can be either thumb.php or timthumb.php.
For Thesis users, location of timthumb file in thesis theme is wp-content/thesis_18/lib/scripts/thumb.php
Step 3: Why wait, replace new timthumb file asap!
If you know the location of timthumb.php file, without any further delays, just replace timthumb with its newer version and upload it on server using ftp. Once done, take a breather and relax! What next ?
Did you check other web directories ?
Analyse all web directories
Well, I just told you to relax but we are not done yet. Make sure that you have not skipped any inactive themes directory or plugins, as this vulnerability applies to each timthumb file, regardless of whether it is active or executed by the server. I recommend you to delete all inactive themes and update existing ones to the latest versions.
Phew! And with this you have saved your valuable asset from being hacked, but not until next time. 😛
If you have any query or further assistance required then you can leave your comments below.
Spamming on WordPress blogs has become vital, just kidding, increasing day-by-day. You must be here looking up for solution to stop spam on your blog as well. To stop spam comments, I have covered two articles on How to Block Spam using HTACCESS and using Akismet Plugin. But these tutorials will only help you to stop spam commenting on your blog but not on contact forms. For a spammer, it’s just a Submit button required to do all the action.
If your WordPress Blog is using Contact Form 7 plugin, then beware that you can be spammer’s next target. Recently, I received few spam comments on my Email via Contact form 7 on thecreatology and it got worst with count of 50+. Annoying! Below is screenshot of the Inbox:
Spam Messages from Contact Form 7
I tried tracking IP Address of all emails and the origin, but it was hard to block spammer access because they used a random IP Address every time. So, I had to install CAPTCHA in Contact Form 7 settings. In this tutorial, you will learn how to add CAPTCHA in Contact Form 7 Plugin to block Spam on Website.
Block Spam using CAPTCHA
CAPTCHA is an automated scripts made to validate forms submission. CAPTCHA reforms a word every time it refreshes. This makes it complex for spam bot to read CAPTCHA letters and auto submit form. To add CAPTCHA in WordPress Contact form, you will be required to install Really Simple CAPTCHA plugin. Below is stepwise procedure to add CAPTCHA in Contact form 7.
Step 1: Install Really Simple CAPTCHA Plugin
To install WordPress CAPTCHA plugin, login to WordPress dashboard:
Navigate to Dashboard > Plugins > Add new Plugin.
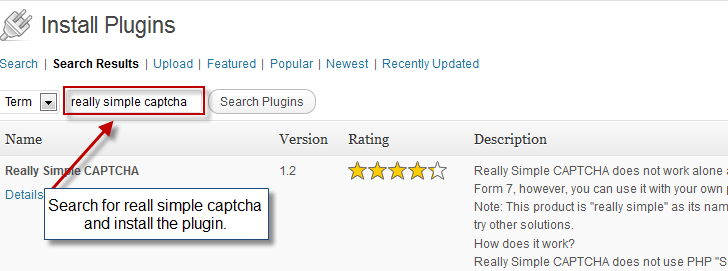
Search for Really Simple CAPTCHA plugin and click to install it. Refer to screenshot below.
Install CAPTCHA plugin
One the plugin is installed, activate it.
Are done with installation of plugin? Move on to configure Contact Form 7.
Step 2: Add CAPTCHA to Contact Form 7
You can add CAPTCHA in contact form in few easy clicks. Follow the procedure below:
Login to WordPress Dashboard and navigate to Dashboard > Contact.
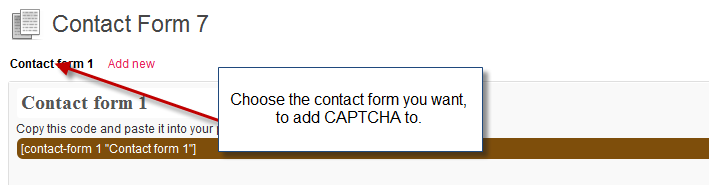
Select the contact form to edit it, refer to the screenshot below.
Select Contact Form To add CAPTCHA
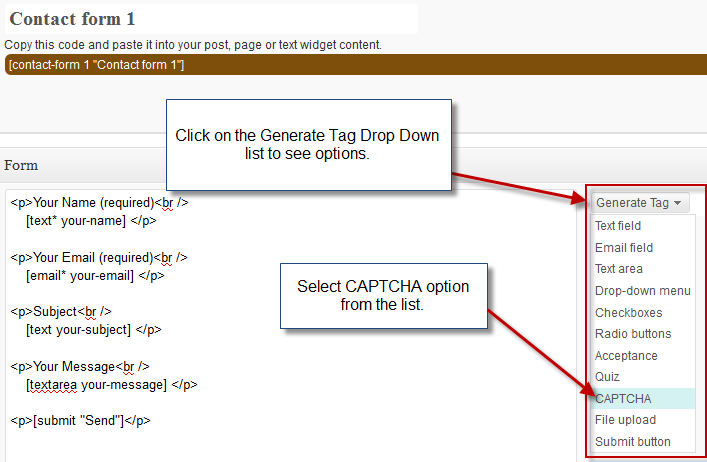
To add CAPTCHA, click on the Generate Tag drop down list on right, and select CAPTCHA option in the list, just like in the screenshot below:
Generate CAPTCHA Tag for Contact Form
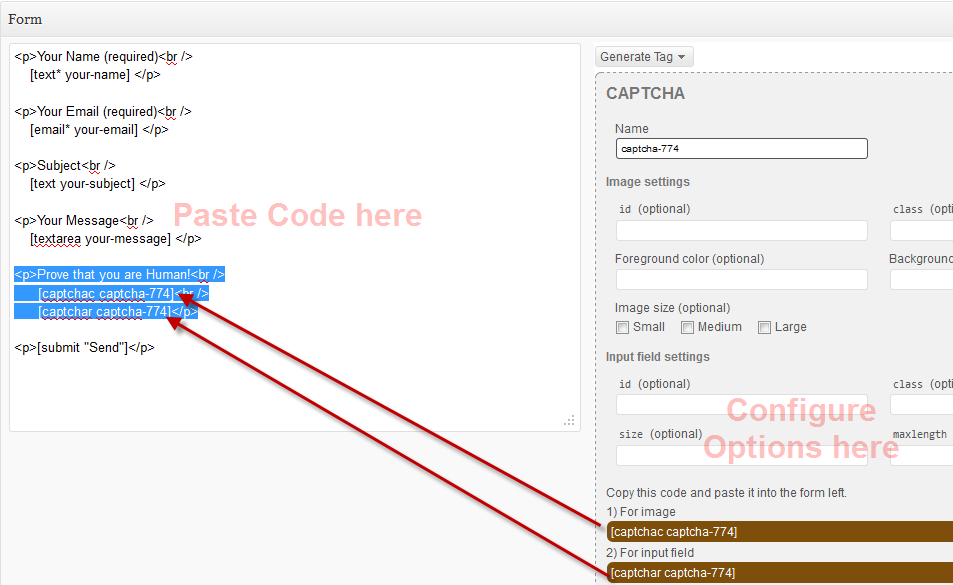
After you click on the CAPTCHA option, CPATCHA setting options will appear under the Generate Tag drop down list. Now, configure the options and copy-paste the code on the left side of the window. Refer to screenshot below:
Add CAPTCHA to contact form code
Once done, hit the Save button on top right and We’re Done! 😉
We’re Done
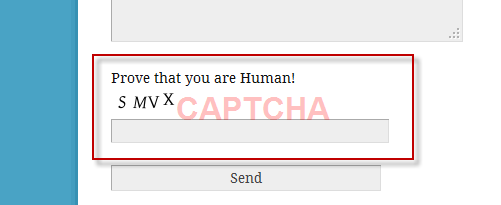
Now that you have added the code, refresh the contact form page and check it out, it will look similar to screenshot below:
Demo: CAPTCHA on WordPress Blog
Adding CAPTCHA will violate bots to submit spam on website. In a way you can focus more on blogging rather administering your blog.
In this article, we learned to add CAPTCHA in Contact Form 7 WordPress Plugin to block spam. If you have any queries or require any assistance, you can post a feedback using comment form below.
If someone is continuously spamming on your website, you feel like hitting that spammer with baseball bat. Relax! Don’t do that as I have an easy way to block spam on website for you.
Recently, I shared an article on to block spam using Akismet Plugin on WordPress. Akismet plugin’s Spam filter is though very strong but sometimes people submit spam comments in genuine way to get back links. Being dependent on the Plugin, we are left with nothing to do but manually delete spam comments or you can use htaccess to block user to comment.
Why htaccess is useful ?
As we all are aware of htaccess file which adds security attributes to web directory where every browser reads htaccess file before loading website on client end. For instance if you want to disable web directory or password protect web directory is possible using Htaccess method. Similarly if you want to block IP Address to restrict visiting website, we will have to use htaccess method. And in this scenario we will be using htaccess code to block comment.
htaccess code to Block Spam Comment
When someone comments on your website, you can trace that person using IP Address. And if someone is spamming on website, then you can simply restrict user to access website using IP Address. Below is a simple procedure to block spam comment using htaccess.
Login to your WordPress Admin Area and Navigate to Dashboard > Comments.
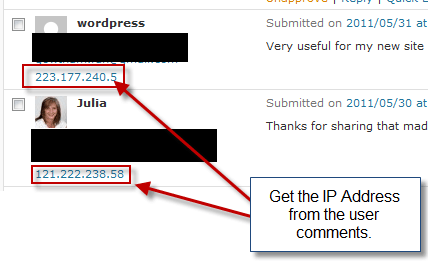
In the list of comments you can get the IP Address of the users, just like in the screenshot below.
IP Address from User comment
Once we have the IP address, we are ready to create htaccess file.
Go to root directory of website using FTP and look for HTACCESS file. (In some hosting it is hidden, so make sure you tweak the visibility in your FTP Client)
NOTE: Make sure you take backup of htaccess before modifying it.
If there is no HTACCESS file present, then you can simply create a new text file and rename it as “.htaccess”.
Now open HTACCESS file in any text editor and add below code to block spam comment user.
[php]
order allow,deny
deny from 121.222.238.58
deny from 223.177.240.5
allow from all
[/php]
The above code will block two IP Address that is 121.222.238.58 and 223.177.240.5. Sometimes, spammers use a whole of a series like 121.222.238.23, 121.222.238.24 and so on. In this case you can simply use the below code.
[php]
order allow,deny
deny from 121.222.238.
allow from all
[/php]
Now, the above code will block whole series of IP address starting from 121.222.238.2 to 121.222.238.254
Once you have added the code in HTACCESS file, save it and we are done.
We’re Done!
Stopping spam comments on website has always been a challenge for administrator and it will always be a ping-pong game. Let us know what measures do you use, to stop spam comments on website ? by posting a comment below.
If you have any query or further assistance is required, you can post comment as your feedback.
WordPress has some great features and plugins to maximize blogging potential. You can also read Why you should prefer WordPress for your website ? to know more about WordPress. In that article, one extended feature of WordPress is to block spam on blog. For spam protection, there are many WordPress plugins available which help restrict spammers to comment on your blog.
No Spam Comments Anymore
Akismet is one great Plugin which comes by default in all WordPress installations. But Akismet is not capable of working of its own, so you will have to install and configure Akismet plugin. In the article we will guide you how to install Akismet to protect your blog against spam.
Below is a simple procedure, you just need to focus a bit.
Step 1: Install-Activate Akismet Plugin
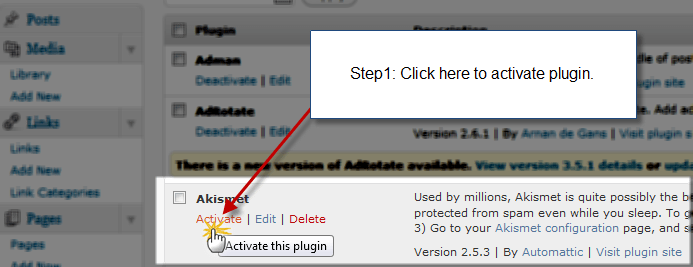
As mentioned above, Akismet plugin comes pre-installed with the WordPress Installations. So we are just required to Activate the Plugin, and you can do so by Navigating to WP Dashboard > Plugins. You will find Akismet Plugin in All listed Plugins, Click the Activate button, similar to screenshot below.
Activate Plugin
Great! You have now activated the plugin.
Step 2: Get Akismet API Key
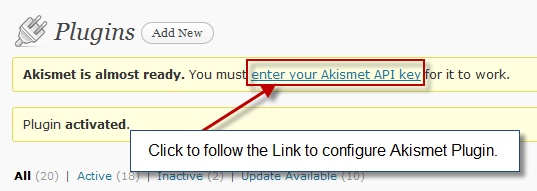
On activating the Plugin, you will see a Yellow highlighted message on the top of the Dashboard saying “Enter you WordPress.com API Key”, very similar to screenshot below.
Akismet Configuration Alert
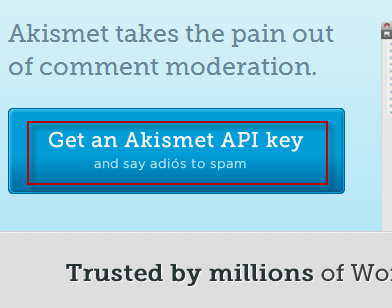
Click on the link, an it will direct you to Akismet Configuration where you will be required to enter API key. You can get API key from Akismet by registering an account with them. It’s free for personal blogs! 🙂
Get Akismet API key
Alternative way is if you have saved your old WordPress.com API key then you can use that as well. Once you have the API key, proceed to Step 3.
Step 3: Configure Akismet to Block Spam
Now that we have the API key, we are all set to configure Akismet to Block spam commenting.
Click on the “Enter you Akismet API key” highlighted message, once again.
On Akismet Configuration Page, paste your Akismet Key in text box, and click Update Options button.
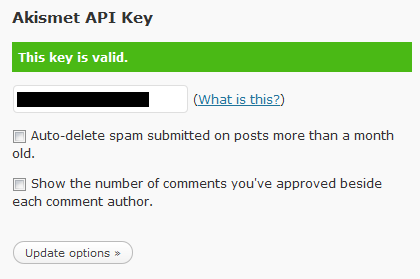
Now, once the options are saved, your API key will be verified, and if API key is valid you will see Green Signal, similar to screenshot below.
API key is Valid, Akismet Configured!
If Akismet key is not valid, then you go to Step 2 and get a valid API key.
Congrats, we have successfully configured Akismet on WordPress blog.
We’re Done!
Setting up Akismet Plugin is though easy task, but Akismet is a powerful plugin to block spam comments. Installation of Akismet and other essential plugins for WordPress, we offer to setup for you in WordPress Free Setup package.
Which plugin are you using to protect spam on your blog ? If you have any query with the article, you can send you feedback by posting comment below.
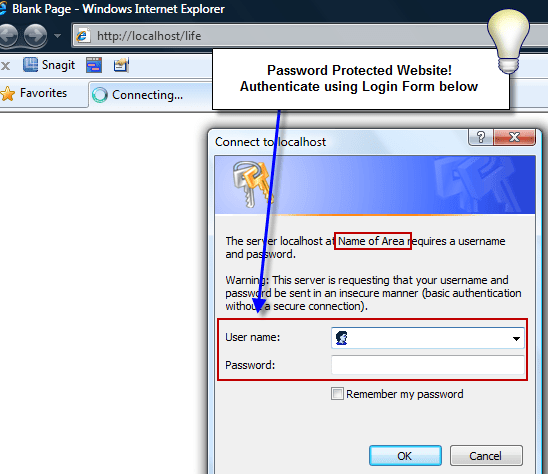
As web technology is growing and making advancements, vulnerabilities are also increasing with the same rate. Website security is a major concern today and planning effective strategy is the resolution. If your website has confidential content or premium content, which needs to be limited within a scope of few users, then you can simply password protect premium content on website. All visits made to that content will be prompted to enter username and password to gain access to premium content, just like in the screenshot below.
Login Screen: Access to Protected Area on website
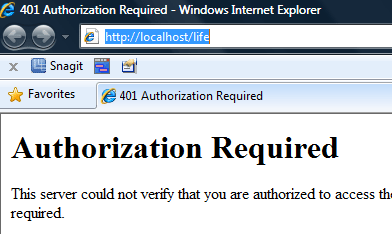
And if a failure to login happens, visitor is redirected to 401 error page, just like the below screenshot.
401 Error Page: Failed to Access Protected Area
How to Password Protect Website ?
If your website is hosted on Apache web server, then website or website directory can be password protected using the htaccess method. In previous article I explained about protecting website by disabling directory browsing, if you missed it, then you can read it here: Disable directory browsing to protect website using htaccess method.
HTACCESS file sets security attributes to the web directory which you want to protect. In order to set password on website, HTPASSWD file will created which will store all usernames and followed with the passwords. For instance, if username is aky and password is joe, then it will be written as “aky : joe”.
How to create HTPASSWD file ?
HTPASSWD is the file which contains usernames as well the passwords for the HTACCESS file to validate during authentication.
Using any ftp client, login to the web directory of your website.
Create a simple text file using any text editor and add the below code snippet precisely.
[php]
aky : joe
username2:password2
username3:password3
[/php]
The above code contains username and passwords. Any word before colon (:) is username, while word after colon (:) is password.
Once done, save the file as “.htpasswd” and upload it to the root of the directory.
How to create HTACCESS file ?
HTACCESS file sets security attributes on a web directory for user accessibility. HTACCESS file can be created using any text editor like a notepad and should be save as… “.htaccess” (without quotes). To create htaccess file to password protect website directory, follow basic steps below:
Make sure before modifying file for any changes, I recommend you to backup all the website data.
Using any ftp client, login to the website directory, you will find .htaccess file located in the root of your directory.
Open .htaccess file to edit it using a text editor and add below code snippet precisely.
On line 1 in the above code, specify the location of the HTPASSWD file, which we created in the section above. Once done, save the file as “.htaccess” and upload it to the web directory which is to be password protected. For instance, if the web directory is “www.yourwebsite.com/secure/” then browse into this directory using ftp client and place the HTACCESS file in secure web directory.
Now open the webpage or website, for instance “www.yourwebsite.com/secure”, will prompt you to login to gain access to protected area, else it is redirected to 401 Authorization Required Exception Page. Now that your content is password protected, and is safe from the vulnerabilities and hackers. Make sure you don’t share your password with anyone.
Here we come to end of this tutorial, if you have any queries for require any further assistance, post comment as your feedback.
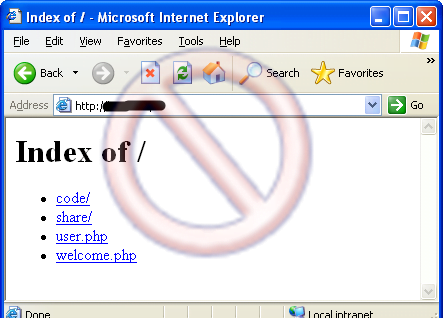
If your website is hosted on a Apache Web Server, then you should know that directory browsing feature is enabled by default. When a default file or index.html file is not present, server list downs all directory contents. In order to protect website from hackers or other unwanted vulnerabilities, one should disable directory listing on the Apache server.
Disable Directory browsing
How to disable directory browsing ?
Directory browsing can be disabled by two ways, one is by editing the .htaccess file and add security to website which is located in root of the directory. Other method is by editing the httpd.conf file, which is the apache server file.
Make sure before modifying file for any changes, I recommend you to backup all the website data.
Using any ftp client, login to the website directory, you will find .htaccess file located in the root of your directory.
Open .htaccess file to edit it using a text editor.
Find “Options-Indexes” in the text editor, you can use Ctrl+F to search for exact match. In case no “Options-Indexes” line exists, add “Options-Indexes” without quotes in the new line of htaccess file.
Once done, save the file and upload to root directory of website.
Once htaccess file is uploaded, refresh the website / url, which is listing directory content. I hope this tutorial will secure your website. If you have any queries or any further assistance is required, you can post comment below, as your feedback.




 If your WordPress Blog is using Contact Form 7 plugin, then beware that you can be spammer’s next target. Recently, I received few spam comments on my Email via Contact form 7 on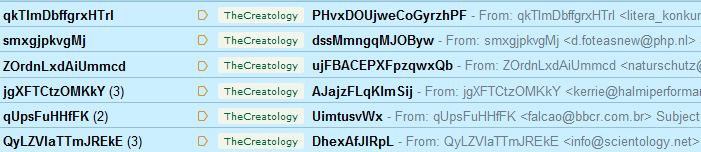
 Recently, I shared an article on to