Tag: WordPress

  • Tutorial to add Twitter Share Retweet Button on WordPress Blog

    Twitter has been statistically growing with social media market, and allowing bloggers to share article on twitter. I believe adding social share buttons on blog is as vital as oxygen and water for survival. I’m sure you must have seen a popular blogs with share count buttons, and if you haven’t then you are certainly missing something on your blog.

    add-retweet-button-for-wordpress
    Retweet Button for WordPress Blog

    After reading an article or post on blog, if visitor finds it interesting can share it on social media like twitter, facebook etc… For an effective placement of share button, a retweet button should be placed before the post page. In this article, we will learn to add retweet button on wordpress Blog.

    Choose your Retweet Button!

    There are two types of retweet button depending upon the size, one is large retweet button and other one is compact retweet button. You can choose the button which fits best for your layout of the website. Desired Code for the both buttons are as under:

    Add large retweet button:

    [php]
    <script type="text/javascript">
    tweetmeme_source = ‘thecreatology’;
    </script>
    <script type="text/javascript" src="http://tweetmeme.com/i/scripts/button.js"></script>
    [/php]

    Add compact reweet button:

    [php]
    <script type=’text/javascript’>
    tweetmeme_style = "compact";
    tweetmeme_source = ‘thecreatology’;
    </script>
    <script type="text/javascript" src="http://tweetmeme.com/i/scripts/button.js"></script>
    [/php]

    In the above code make sure you change tweetmeme_source with your twitter username or twitter handle. You can add the above code snippet in your Theme file, for instance for post page you can add the above code by editing single.php file.

    I’m sure retweeting will give your blog a great exposure which will increase visits and hits on your blog. If you have any query or need further assistance, you can post comment below as your feedback.
  • Unable to generate Thumbnail using TimThumb issue with Hostgator

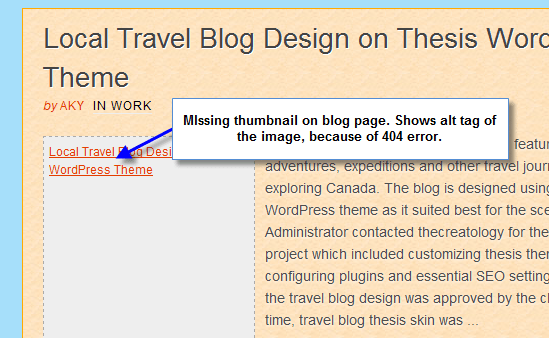
    Recently during the analysis of the website TheCreatology, I found that there was no thumbnail image on blog page, instead  it was the image alt text. When I looked at the markup using firebug and I found that the auto thumbnail image generated using timthumb returns 404 error.

    No Thumbnail using TimThumb issue with Hostgator
    No Thumbnail using TimThumb issue with Hostgator

    TheCreatology is using TimThumb script to auto generate thumbnail as in the article How to auto generate thumbnail in Thesis Theme without Plugin. But, everything seemed to be okay according to the procedure, and also I tested it on a local test server. Finally, I realized that timthumb script fails to execute on server, and returns 404 error. The website is hosted on Hosgator, so I logged in and contacted technician to resolve this issue for me. Below is what I exactly did to solve timthumb issue with hosgator:

    1. Login to the Hostgator Cpanel and click on the Live Chat Support. Further select Technician in drop down list (as it being a technical issue), and Enter your name, your website’s Url and the question.
    2. Once you are connected to the chat support, ask the technician to whitelist timthumb file used for thumbnail generation for mod_security. Since this is a known issue with Hostgator WordPres hosting, so they will recognize the problem easily.
    3. In order to whitelist the Thumbnail file, the technician will ask you to verify your identity with the billing info, so just keep the details handy with you.
    4. Once verification is done, technician will ask you to check for the Files and Folders’ permission. Make sure all folder’s permission is set to 755 and all file’s permission is set to 644, especially the timthumb.php file should be set to 644. Once done, confirm the technician about permission is set.
    5. You will get the confirmation from the technician in few minutes, and the problem will be resolved soon after it.

    I had a long conversation with the technician and asked him how to solve timthumb error, but couldn’t get a better solution than this. But I was happy to get the thumbnails back on the site, as the blog looked incomplete without thumbnails.

    If you are so stuck or unable to resolve this issue, then you can post your feedback as comment below and I will get back to you as soon as possible.

  • Tweak to remove the dotted outline around a link

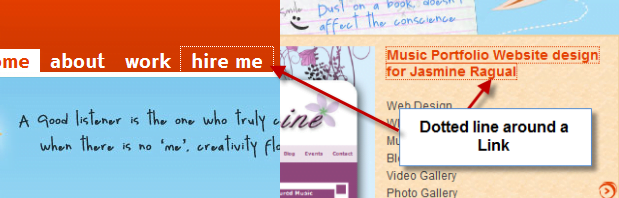
    Are you annoyed of the dotted outline around link when it gains focus or get active? Well, most of us use Firefox, and by default Anchor links have dotted outline around them, when they get active or gain focus. Below screenshot which will clear you more:

    Remove Dotted outllines around link
    Dotted outlline around link

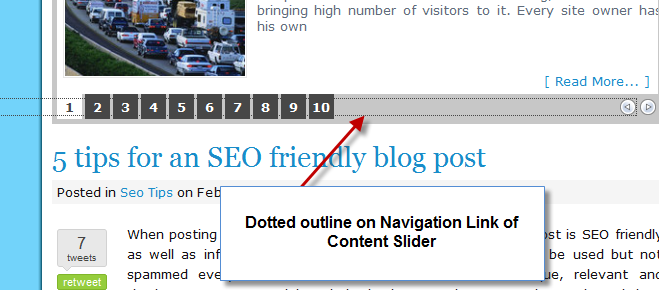
    Usually outlines around small size links don’t get in notice, but if a link is “h1” heading then it really affects the readability. Also the websites which are using content sliders, you will notice the navigation arrows have big dotted lines around them and floated from left which looks more ugly and. Just like one in the screenshot below:

    Remove Dotted Line on Content Slilder
    Dotted Line on Content Slilder

    How to remove ?

    Many instances we find these outline important as they justify us about the link, but few instances like the content sliders or floated items, it really looks undesired. In this article, I will share a simple tweak to override the browser’s default css, and it will remove dotted outline around all links.

    [css]
    a {
    outline: 0;
    }
    [/css]

    Copy-Paste the above code snippet in the Style.css file of the website or blog. If we don’t want to remove outline completely, for instance active state of links should have outline enabled and removed for focus and mouseover states. The code for the scenario will look like as give below:

    [css]
    a: hover, a:focus {
    outline: 0;
    }
    [/css]

    Copy-Paste the above code snippet in the Style.css file of the website or blog. Further save and refresh to see the effect, you will find the outline is not visible while links gaining focus.

    We come to the end of this article, though it was a three line code and but important for many of us. If you have any query or any further assistance required post comments as your feedback.

  • How to safely upgrade to latest version Thesis 1.8 ?

    Latest version of Thesis WordPress theme was launched last year, which enhanced Design Options for flexibility in content management. In my recent post, I explained the Ease with Thesis WordPress Theme Design options panel, which you will find it in the latest version of Thesis theme.

    Though upgrading to Thesis 1.8 is a click-a-way work, but sometimes a bit of lag can ruin a website or blog for functionality or SEO, which costs you an extra overhead. In this tutorial, I will guide you through about how to safely upgrade to Thesis 1.8 ?

    Below is the procedure to upgrade thesis theme:

    Step 1: Download latest Thesis 1.8

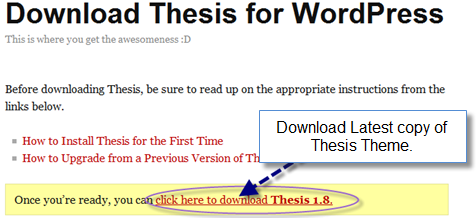
    Thesis 1.8 version is available at DIY Theme Thesis admin area, where you can download the latest copy of Thesis Theme. Once you login to the admin area, you can click “Download Thesis for WordPress” and you will be redirected to the download page. On the download page, click to “download Thesis 1.8” and save the file to your computer, when prompted. You can also refer to the screenshot below:

    admin-area-upgrade-to-thesis-18
    Download Thesis 1.8 Version

    After saving  the file, open it and cross check the Zip archive for CRC errors, which usually occurs when transferring files from internet.

    Step 2: Backup Database and Settings

    To stay at safer side, I suggest you to always backup your website’s database while making any updates or modifications in WordPress backend. You can simply use WordPress Export Tool (Dashboard Admin > Tools > Export) to download all Posts, Pages, Categories etc. in a XML file to your computer.

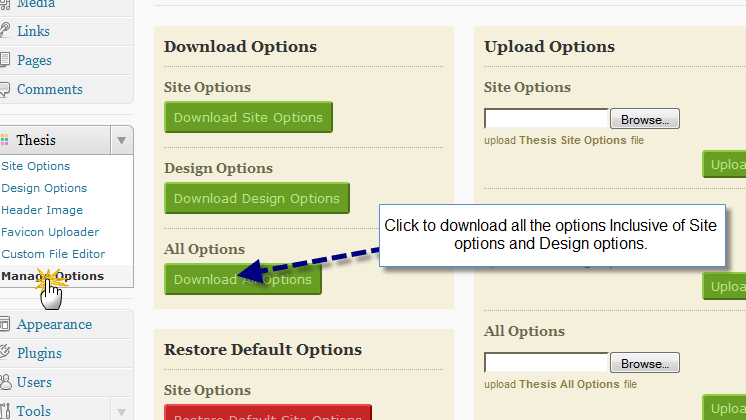
    Though Thesis retains its options comprising Site Options and Design Options, after upgrading to Thesis 1.8, but you can backup them as well by using the Thesis Download Options (Dashboard Admin > Thesis > Manage Options) and save them to your computer. You can also refer to screenshot below:

    backup-thesis-upgrade-to-thesis-18
    Backup Thesis Options

    Step 3: Backup Custom Folder

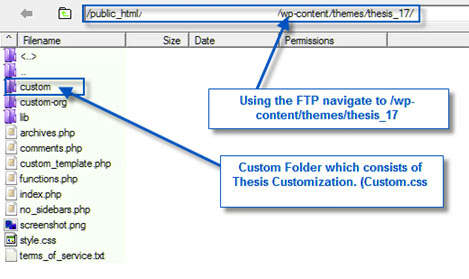
    Once your are done with backup of database, another important step is to backup Custom folder Thesis theme. Custom folder contains all of the customization related to styling and functionality of the blog. In order to take backup of custom folder, login to your ftp client and navigate to path /public_html/wp-content/themes/thesis_17/ and further download the custom folder to your computer. Below screenshot shows the location of custom folder under thesis theme.

    custom-folder-upgrade-to-th
    Backup Custom Folder Thesis Theme

    Step 4: Installing Thesis 1.8

    After taking the backup of database, thesis settings and custom folder, we move on to install latest Thesis version. As I have already explained in my Tutorial to Install Thesis Theme on a WordPress Blog in 3 steps, so you always go through the article and come back here.

    After you have installed thesis theme, you can now restore the custom folder of old Thesis theme downloaded in Step 3. In order to restore it, login to your ftp client and navigate to path /public_html/wp-content/themes/thesis_18/ and add the custom folder in the current directory.

    Once done with uploading the custom folder, you can check out your blog/website now, which is powered with latest version of Thesis theme. And with this we also come to the end of our tutorial, if you have any query or further assistance is required, you can post your comments as your feedback, or you can use the Thesis Theme Services for the upgrading Thesis for you.

  • 3 best ways to style blockquote for your blog

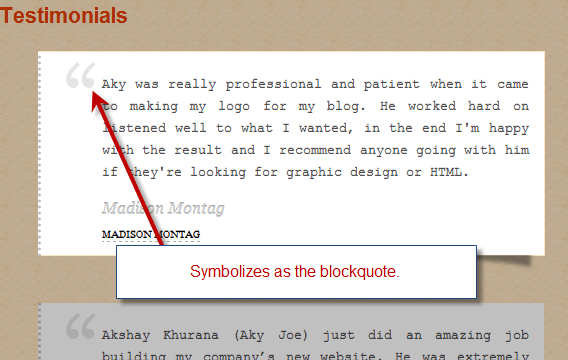
    A blockquote is a XHTML tag which is purposely used element in an article. The basic usage of blockquote in an article is when an author wants to post a thought, or a long piece of sentence from another resources or another author. Just like I did on my testimonials page, where the text posted is in voice of a different author, and hence I wrapped it between a blockquote tag. Screenshot below might just clear you a bit.

    thecreatology-blockquote-design

    A blockquote usually highlights a text and break it apart from main content. For idealistic authors blockquote is tool to make an article more interesting for the reader. A double quote character (“ This is my thought! “) represents the content as a phrase, quote or a thought.

    Usually every web browser has a default styling for Blockquotes, but we can always refine a default styling with something in relevance with theme, or may be out of the box design. In this article, I will share 3 best ways to style blockquote for your blog, using CSS.

    Style 1: Blockquote styling with Images

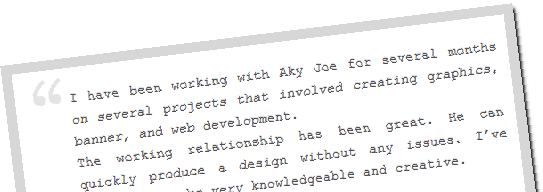
    With CSS, we are no just limited to color, we can always use background images so as to make blockquote distinct with content. Adding image to blockquote will make it eye-catchy and elegant. We will also have to add left padding, so that text doesn’t overlap the image. Screenshot below will make it more clear:

    thecreatology-blockquote-image-design

    Below, is the CSS code to add an image to blockquote which you can append in theme’s stylesheet, STYLE.CSS or CUSTOM.CSS (for Thesis Theme):

    [css]

    blockquote{
    background:url(‘blockquote.png’) no-repeat;
    padding: 5px 5px 5px 20px;
    border:3px solid #ddd;
    }

    [/css]

    Style 2: Blockquote styling with Drop Caps

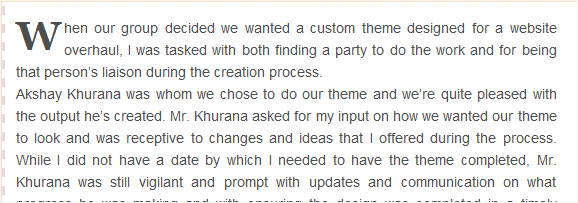
    Adding Drop caps to a content, is a Latin initialis typographic approach, which means standing at the beginning. Drop cap is decorating the initial letter of a paragraph and making it more attractive. In this example, I have added drop cap to blockquote, using the pseudo class to increase the size of the first letter in the paragraph. You can also refer the screenshot below, to add drop cap in blockquote:

    thecreatology-blockquote-dropcaps-design

    Below, is the CSS code to add an image to blockquote which you can append in theme’s stylesheet, STYLE.CSS or CUSTOM.CSS (for Thesis Theme):

    [css]

    blockquote{
    background:#fff;
    padding: 10px;

    border-left:2px dashed #ddd;

    }

    blockquote p:first-letter {
    float: left;
    margin: 5px 3px 1px 0;
    font-family: Georgia;
    font-size: 40px;
    font-weight: bold;
    }

    [/css]

    Style 3: Blockquote styling with Fonts & Colors

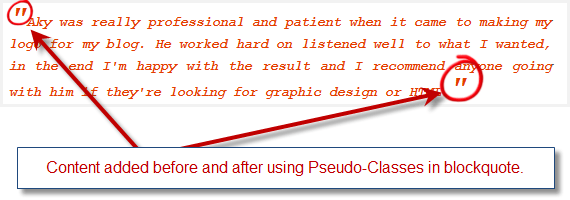
    If you find above styles, like using images and drop caps, a bit complex then you can consider another way which is simple yet highly effective style for blockquote. Font property itself has so many attributes for styling, for instance font-style (italics) or font-variant (small-caps). In this example, will require the use of pseudo-classes in order to insert content before and after the blockquote. Screenshot will clear it more:

    thecreatology-blockquote-fonts-design

    Below, is the CSS code to add an image to blockquote which you can append in theme’s stylesheet, STYLE.CSS or CUSTOM.CSS (for Thesis Theme):

    [css]
    blockquote {
    color: #e33e00;
    font-style: italic;
    font-family:’Courier New’, Courier, monospace;
    padding:20px;
    background:#fff;
    }
    blockquote p:before {
    content: ‘"’;
    font-size: 30px;
    }
    blockquote p:after {
    content: ‘"’;
    font-size: 30px;
    }
    [/css]

    I am using blockquote styling for my blog as well, and you can see the demo as below.

    Blockquote Style Demo:

    A body makes his own luck, be it good or bad.

    If you have seen any other example or have an idea to style a blockquote, I would like to hear from you. If you have any queries or if further assistance is required in regard of the article, post comment as your feedback.

  • Tutorial to Install Thesis Theme on a WordPress Blog in 3 steps

    When it comes to great features, Thesis WordPress Theme is what comes in my mind for a WordPress Blog or website. Being a Thesis Developer, I believe Thesis Theme is highly SEO optimized with many other flexible options.

    In this tutorial, I will guide you to install Thesis theme on a WordPress Blog. If you haven’t bought a Thesis Theme yet, then you can buy/download your thesis copy now by visiting the link: Download Thesis Theme

    After buying, login to the Thesis Theme account on DIYThemes, where you can have a fresh copy of Thesis WordPress Theme and it will be in a Zip format. (Save the zip file on your hard disk for future reference)

    Once you have the thesis theme, follow the procedure below:

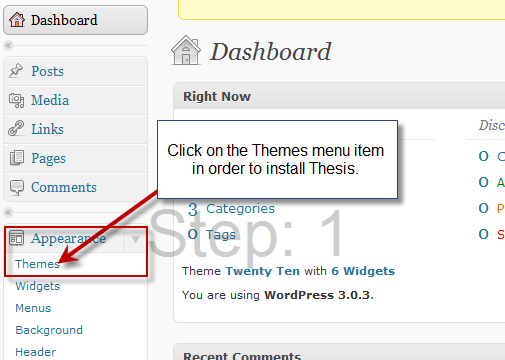
    • Step #1: Login to the WordPress Dashboard  Admin and navigate to Appearances > Themes. (you can also refer the screen shot below)

    step1-install-thesis-theme-tutorial

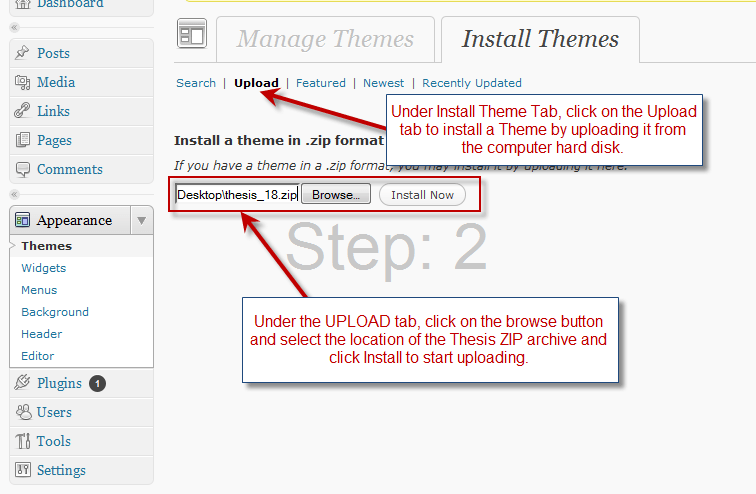
    • Step #2: On clicking the Themes menu item under Appearance, we land to Theme Management for WordPress. Select the Install Themes Tab and further click on Upload link. Using the Browse button navigate and select the thesis_18.zip file on the hard disk. Now, click the Install Now button to upload it.  (you can also refer the screen shot below)

    step2-install-thesis-theme-tutorial

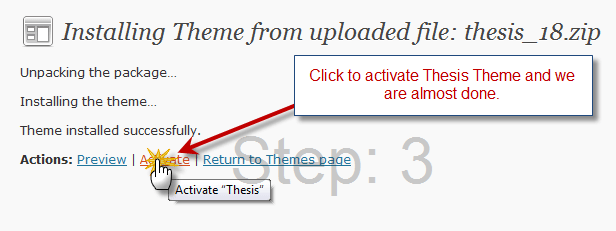
    • Step #3: On next screen, click on Activate button to apply Thesis as your WordPress Blog Theme now. If not now, we can also skip this step, by clicking on the Return to Theme page button.  (you can also refer the screen shot below)

    step3-install-thesis-theme-tutorial

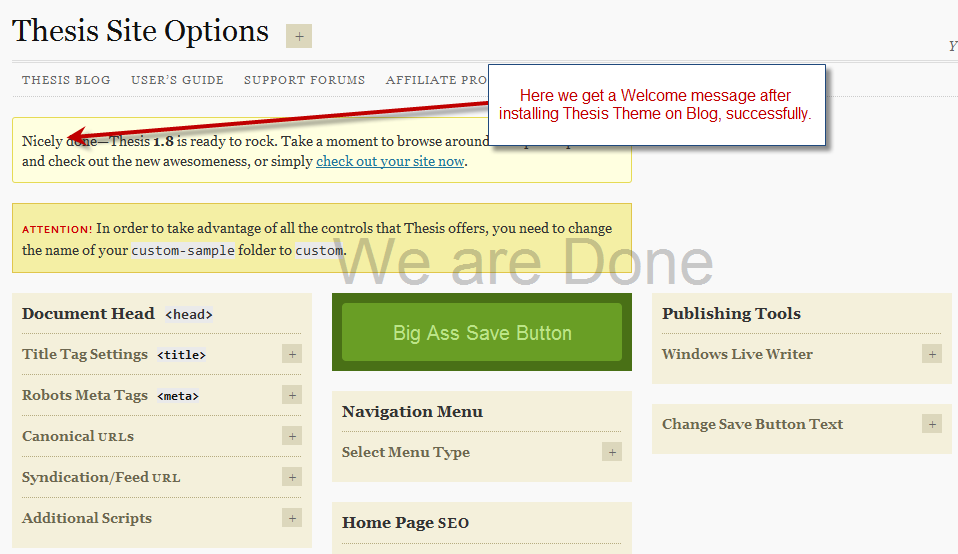
    • We are done: On activating Thesis theme in the above step, you will be redirected to the Thesis Site Options Page and greeted with a welcome message, which indicates that the Installation of Thesis theme was successful. (you can also refer the screen shot below)

    step4-install-thesis-theme-tutorial

    With this we come to end of this tutorial, but you can look up or play around with Thesis Options. For any query or further assistance required post your feedback as comments below.

    I will come up with more articles on Thesis Options and Customizations soon. If your WordPress blog is currently using a custom theme, then you can redesign it using the Thesis Theme Services.