Tag: wordpress blog design

  • How to Add New Ad Slot in WordPress Theme using Adrotate Plugin

    An Advertisement-Ready Website, a recent project by TheCreatology, was configured with Adrotate Plugin. The plugin has extensive features for Ad management, Click Tracking & Campaign Management etc. with detailed reporting, which also we will be using in our Tutorial. This tutorial is a request from a client, which is Quick-n-Easy tutorial, as we will learn to add new advertisement slot using adrotate in WordPress theme.

    Get Started - Add Ad Slot Using Adrotate
    Add New Ad Slot Using Adrotate

    For your ease, I have divided this tutorial into three sections: 1) Add/Install Adrotate Plugin, 2) Add/Create New Ads with Adrotate & 3) Display Ad Slot Code in Theme

    Step 1: Add/Install Adrotate Plugin

    To install WordPress Adrotate plugin, login to WordPress dashboard:

    • Navigate to Dashboard > Plugins > Add new Plugin.
    • Search for Adrotate plugin and click to install it.(Refer to screenshot below)
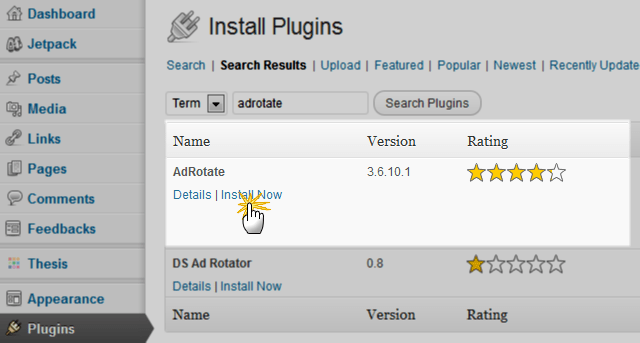
    Step1 Install adrotate plugin
    Install Adrotate WordPress Plugin
    • Once the plugin is installed, click on Activate link to complete the installation of plugin.

    Now that we are done with the installation of plugin, we can move on to create new ad banners.

    Step 2: Add/Create New Ad Banner with Adrotate

    Adding new ads is just a click-a-way thing and a bit of focus is required. Follow quick steps below:

    • Login to WordPress Dashboard and navigate to Dashboard > Adrotate
    • Click on Add New to add ad banner just like in the screenshot below.
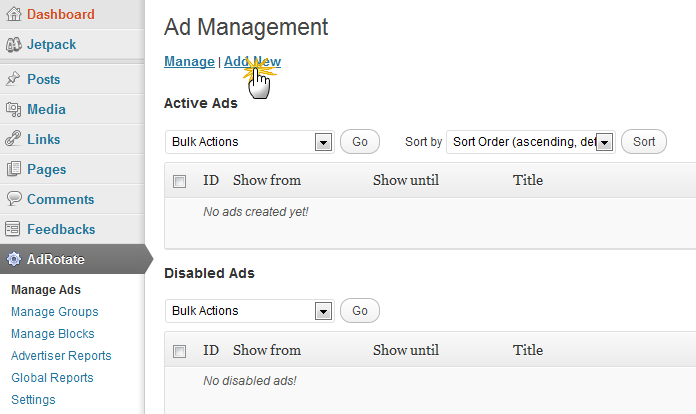
    Step2-1 Add New Ad in Adrotate
    Navigate to Adrotate Management Screen
    • In next screen, you will see a form prompting about new Ad details. Fill the required fields that is Title, Ad Code & Display Period. (Note: Advance Settings are optional, depending upon your requirement.)
    • For your reference, you can memorize Ad unit ID, which will be required in Step 3 (refer the screenshot).
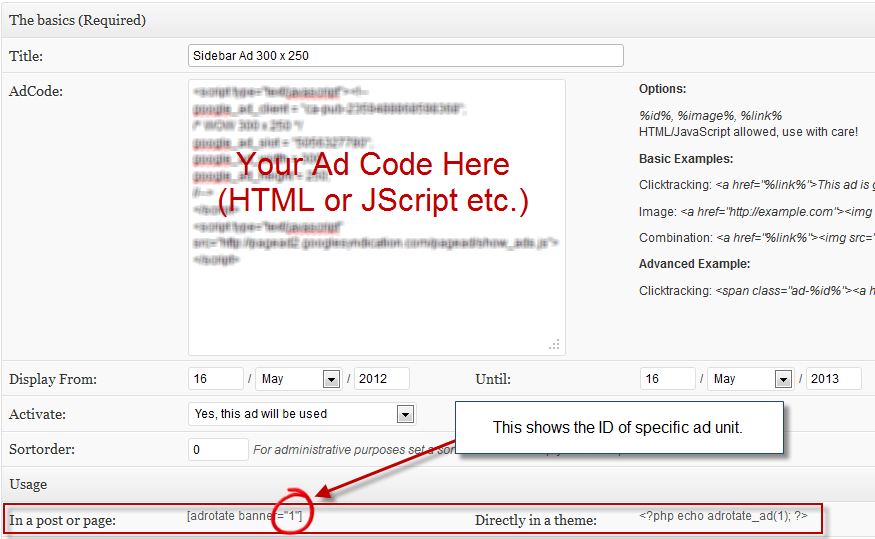
    Step2-2 Add New Ad in Adrotate
    Add new Ad unit
    • Hit Save Ad button once done.

    Step 3: Display Ad Slot in Theme

    In our previous step, we added Ad Unit, where as this step will integrate Ad Code in theme. Adrotate Ad Unit can be displayed in two ways: 1) Using Adrotate Widget & 2) Using Short Code or PHP Code

    USING ADROTATE WIDGET

    This is an easy method and recommended option for people who don’t like to code. Follow simple steps below to display ad slot using adrotate widget:

    • Login to WordPress Admin and Navigate to Dashboard > Appearances > Widgets.
    • In the available widgets, Drag Adrotate Widget to the Widgetized Area, just like in screenshot below.
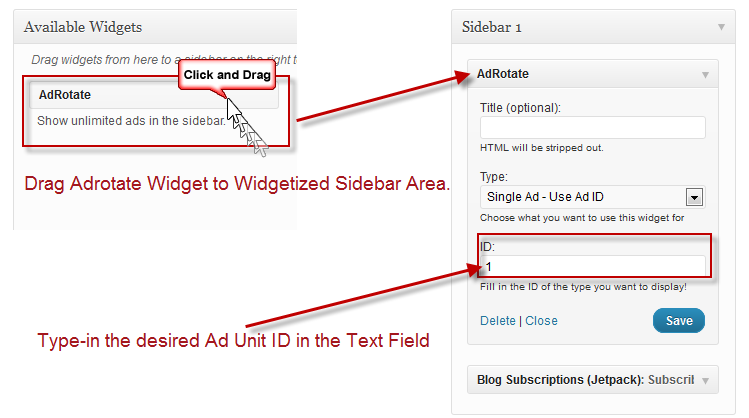
    Step3-1 Display Ad Using Adrotate Widget
    Display Ad in Sidebar using Adrotate
    • Type-in, the desired Ad unit ID, which you memorized while creating Ad Unit in Step 2. If you are not sure about the ID, simply Navigate to Dashboard > Adrotate and find the Ad Slot ID
    • Hit Save button to update the changes.

    USING pHp CODE

    A bit complex method, as you either need to have developer skill-set or a developer to fix it, as a slight mistake may end up breaking theme layout or crash the website. The method comparatively is more flexible than Adrotate Widget method, as you can display any size Ad Unit anywhere in your Theme. To do so, follow steps below to display ad slot using php code:

    • Login to WordPress Admin and Navigate to Dashboard > Adrotate.
    • Click the desired Ad unit you want to embed in your Theme.
    • Scroll down a bit till you see Usage section similar to screenshot below.
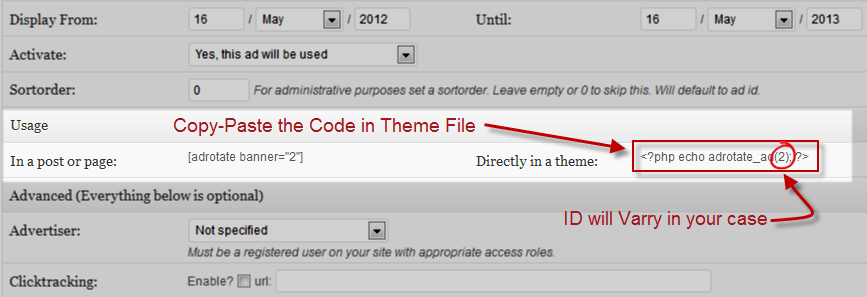
    Step3-2 Display Ad Using PHP Code
    Adrotate Ad unit PHP code
    • Copy the php code <?php echo adrotate_ad(#WILL VARY IN YOUR CASE#); ?>
    • Paste, the code in your theme layout file, for instance header.php or single.php as desired.
    • Save & upload file to server using FTP.

    We’re Done

    Now that you have added ad unit code in the theme, refresh webpage to preview the ad slot. Works fine ? Bravo, we are done with the tutorial.

    Not Working ‘eh ? Recheck the codes, make sure you have uploaded the right file and clear cache, in case you are using cache plugins. Go through the Step 2 & Step 3 again, till you see the ad unit live in action. 😉

    In this tutorial we learned about adding a new ad slot in WordPress Theme using Adrotate Plugin. If you have any queries or further assistance is required, post us your feedback using the comment form below.


  • Add Social Share Count Buttons in Thesis Theme Teaser without Plugin

    Share Count buttons are tires on website, giving its content a smooth ride around the world. If don’t have social share buttons yet on your WordPress Blog, then I strongly recommend you to have them right away. Best way to add social button is either on the Article Landing Page or on the Blog Summary Page which we also call them as post teasers. Check out the screenshot below showing share button on teaser post.

    teaser-share-count-buttons
    Share Button in Thesis Theme Teaser

    I have already written an article about Social Media share buttons for WordPress. If you haven’t read it, then you can check it out here. There are also plugin available for adding share count buttons, but if you are Thesis Theme owner then its far easier and no plugin dependency, ofcourse.

    Here is a quick tutorial which will help you to add share count buttons in without plugin in Thesis Theme.

    Step 1: Update Theme Theme

    Before we begin with the article, I recommend you to safely upgrade thesis theme, whereas if you don’t have a copy of Thesis Theme then you can download thesis theme here. Move to next step, if you already have updated Thesis Theme Version.

    Step 2: Share Button Code

    Already decided which all Share button to add in blog summary page ? If not, then you can visit the link below to do so:

    Social Share Button Code for WordPress Blog

    In this example, we will add Facebook Like button and Twitter Share Button in Thesis Teaser. If you have selected button codes, then move to Step 3.

    Step 3: Add Share Button in Thesis Teaser

    All set for the action, below code will add social button in thesis teaser, copy-paste the code snippet in the custom_functions.php file.

    Make sure you take full backup of custom_functions.php file using FTP before modifying it.

    [php]

    /*
    Code: Share Buttons in Thesis Teaser
    Author: Aky Joe
    URL: cms.thecreatology.com/
    */
    function share_button_joe(){?>
    <?php if(!is_single() || !is_page()){?>
    <div class="share-button">
    <div data-href="<?php the_permalink(); ?>" data-send="false" data-layout="button_count" data-width="100" data-show-faces="false" data-action="like" data-font="verdana"></div>
    <a href="https://twitter.com/share" data-url="<?php the_permalink(); ?>" data-via="thecreatology" data-related="akyjoe">Tweet</a>
    </div>
    <?php }}
    add_action('thesis_hook_after_teaser','share_button_joe');

    function footer_scripts_joe(){ ?>
    <div id="fb-root"></div>
    <script>(function(d, s, id) {
    var js, fjs = d.getElementsByTagName(s)[0];
    if (d.getElementById(id)) return;
    js = d.createElement(s); js.id = id;
    js.src = "//connect.facebook.net/en_GB/all.js#xfbml=1&appId=390363454310194";
    fjs.parentNode.insertBefore(js, fjs);
    }(document, 'script', 'facebook-jssdk'));</script>
    <script>!function(d,s,id){var js,fjs=d.getElementsByTagName(s)[0];if(!d.getElementById(id)){js=d.createElement(s);js.id=id;js.src="//platform.twitter.com/widgets.js";fjs.parentNode.insertBefore(js,fjs);}}(document,"script","twitter-wjs");</script>
    <?php }
    add_action('thesis_hook_after_html','footer_scripts_joe');

    [/php]

    Note: Make sure you replace @thecreatology with your twitter account.

    Function name share_buttons_joe() embeds share buttons in Thesis Teaser whereas the function name footer_scripts_joe() are html5 scripts for share buttons.

    In case you have your own list of share buttons, then simply put the code between the div container class tag share-button.

    We’re Done

    Once done updating custom_functions.php file, refresh your blog page to see the effect. You can also see demo site below.

    Demo Site: Lets Create Something New

    With this we come to end of this quick tutorial to add social share count buttons in Thesis Theme without Plugin. If you have any query, then post your feedback as comments below.

  • Add Slim Subscription Box in Header to Increase Blog Readers

    Not getting enough readers for your blog ? It doesn’t matter if blog content is unique or covers latest news, tRUth is that, a reader will come, read the content or will exit away and never return. While going through thecreatology stats, I analyzed that RSS Subscription was not performing well because of its placement in footer. Guess what, you can now see another slim subscription box above content box on thecreatology blog. It looks similar to the screenshot below:

    Slim Subscription Box TheCreatology
    Slim Subscription Box TheCreatology

    The point is that, if you offer FREE Subscription of Blog Updates and maintain a subscriber list then it will certainly help you to get loyal visitors on blog. Well, if you want to add attractive subscription box in WordPress blog, then you can follow rest of the article.

    In this article, we will learn to Add Slim Subscription Box in Header to Increase Blog Readers. Below are quick steps for the same:

    Getting Started

    Before we start with the tutorial, I want you to make sure that your WordPress, Plugins and Theme are updated with latest versions. If you are using Thesis Theme then you can Safely upgrade to latest version Thesis.

    Add Subscription Box in Header

    In this example, we are going to add RSS Subscription box which I believe is most commonly used and FREE too. Find the code for RSS Subscription box below and paste in single.php or  header.php file of the currently activated theme. If you are using Thesis Theme, then paste the code in custom_functions.php file using thesis hook before content. PHP code is as under:

    NOTE: Make sure you take full backup of functions.php file or custom_functions.php file using FTP before modifying the original file or you can also refer to the article about how to safely edit custom_functions.php.

    [php]
    <!–Do not remove this line
    Designed by TheCreatology–>
    <div id="slim-subscribe">
    <span>Need Blog Updates?</span>
    <form action="http://feedburner.google.com/fb/a/mailverify" method="post" target="popupwindow" onsubmit="window.open(‘http://feedburner.google.com/fb/a/mailverify?uri=thecreatology’, ‘popupwindow’, ‘scrollbars=yes,width=550,height=520’);return true">
    <h4>Subscribe to TheCreatology via <a href="http://feeds.feedburner.com/thecreatology" target="_blank" rel="nofollow">RSS</a> | <a href="http://feedburner.google.com/fb/a/mailverify?uri=thecreatology">Email</a></h4>
    <input type="text" name="email" value="Your e-Mail address…" onblur="if (this.value == ”) {this.value = ‘Your e-Mail address…’;}" onfocus="if (this.value == ‘Your e-Mail address…’) {this.value = ”;}">
    <input type="hidden" value="thecreatology" name="uri"/>
    <input type="hidden" name="loc" value="en_US"/>
    <input type="submit" value="Subscribe">
    </form>
    </div>
    <!–Designed by TheCreatology, Author: Aky Joe–>
    [/php]

    Style Subscription Box CSS Code

    After adding the HTML part, we definitely require to add CSS code to make it look attractive. Subscription box style code is as under:

    NOTE: Make sure you take full backup of style.css or custom.css file using FTP before modifying the original file.

    [css]

    /*
    Author: Aky Joe
    URL: http://akyjoe.thecreatology.com
    */
    #slim-subscribe{ background:#E2F7A8; border: 1px dashed #A6DFFA; height: 70px; margin: 20px 0 0; font-family: Arial;}
    #slim-subscribe span{color: #f60; text-decoration: none; font-family: comic Sans MS; font-size: 26px; line-height: 65px; margin: 0 0 0 20px;}
    #slim-subscribe h4{font-size: 12px; margin:5px 0;}
    #slim-subscribe h4 a:hover{text-decoration: underline;}
    #slim-subscribe form{float: right; margin: 5px 20px 5px 0;}
    .txt-blog,.txt-blog:focus{background:#fff; border: 1px solid #b7cb80; border-radius:5px; padding: 6px 10px; width: 180px; font-size: 15px; color: #888;}
    .btn-blog,.btn-blog:focus{background:#555; border: 0; border-radius:5px; padding: 6px 10px; font-size: 15px; color: #fff; text-shadow:1px 0 2px #333;}
    .btn-blog:hover{background:#333;}

    [/css]

    Did you Play with the Code ?

    Did you copy the code as it is ? Well, if yes then I recommend you to replace HTML part saying “thecreatology” with your RSS feedburner ID. Also you can play with the CSS to change background color of box and font color matching blog theme. Don’t change its size as fat body covers a lot of space, so let it be slim like me mine. 😉

    We’re Done!

    Wow subscription box looks good now, ‘eh ? If not, I would say NEVER STOP PLAYING. And here we come to the end of tutorial add subscription box in header to increase blog readers. I hope it was easy, if not? you can also hire me to add-style subscription box for you. If you have any query or further assistance is required, post your feedback as a comment below.

  • How to Extend Contact Details of Author Profile in WordPress

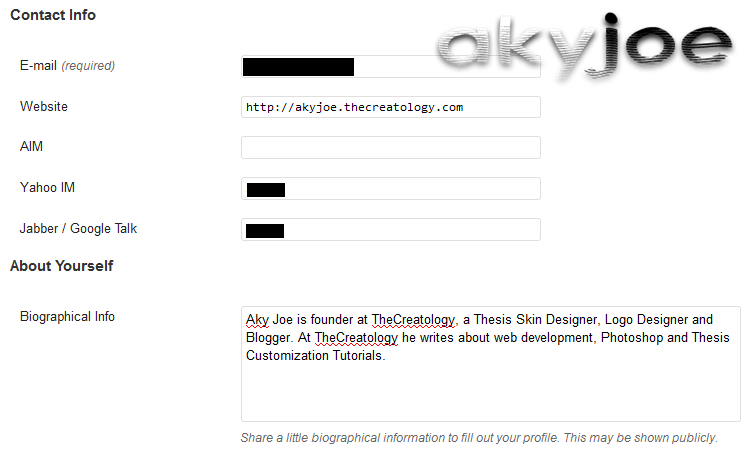
    Do you think WordPress has a user-friendly interface ? Of-course I do, not just because of its interface, but its ability to extend features to meet the required needs. For instance, in WordPress user profile editor under Contact Info section you can add E-mail, Website, AIM, Yahoo IM & Google Talk.

    wordpress admin default contact details
    Default Contact Options in WordPress

    WAIT! What if you need to add Twitter account in user profile or may be Facebook account in WordPress user profile ? Well, by default there is no space made by WordPress developers yet. I really wonder why do they ignore Twitter and Facebook or may be they don’t bother. Anyway, you don’t have to worry as WordPress is capable of extending its features, hence you can extend Contact Info of author profile. In this article, we will learn How to Extend Contact details of Author Profile in WordPress blog.

    Getting Started

    Before we start with the tutorial, I want you to make sure that your WordPress, Plugins and Theme are updated with latest versions. If you are using Thesis Theme then you can Safely upgrade to latest version Thesis.

    Add Contact Options in User Profile

    WordPress uses filters to override its default functions, and to extend WordPress Contact options it requires to create a filter. Find the code below and paste contact info filter in function.php file of the currently activated theme. If you are using Thesis Theme, then paste the code in custom_functions.php file. PHP code is as under:

    NOTE: Make sure you take full backup of functions.php file or custom_functions.php file using FTP before modifying the original file or you can also refer to the article about how to safely edit custom_functions.php.

    [php]
    /*
    * Author: Aky Joe
    * Edit Custom Author Fields
    */
    function extend_author_profile_joe( $joefields )
    {
    $joefields[‘twitter’] = ‘Twitter’;
    return $joefields;
    }
    add_filter(‘user_contactmethods’,’extend_author_profile_joe’,10,1);
    [/php]

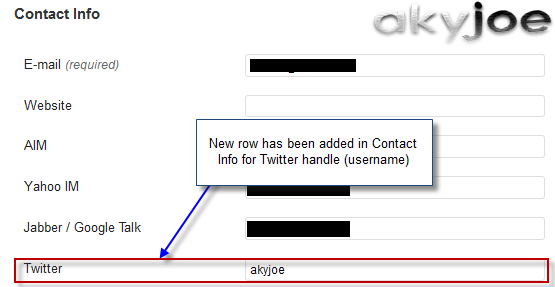
    Above code will add Twitter option field in user profile under Dashboard Admin. Once you have added the code, save the file and upload it to server using FTP. Navigate to Dashboard Admin > Users > Your Profile and look for Twitter under contact info, similar to the screenshot below:

    extend wordpress contact option twitter
    Twitter Option added in User Profile

    Embed Contact option in Theme

    In a WordPress blog, Contact Info options are often used in Single Posts, for instance in Author Bio, Bylines & etcetera. To show Contact Info option in Theme requires, a PHP code to be added within the Post Loop in Single.php. Thesis Theme users can refer to Add Author Bio below single post in Thesis WordPress Theme. PHP Code to embed contact option is as under:

    [php]
    < ?php the_author_meta( ‘twitter’ ); ?>
    [/php]

    Was that easy ?

    I hope it was and in similar fashion you can extend contact details in WordPress. You can play or innovate the above code to meet your requirements, like adding facebook account in user profile, custom image urls in user profile and so on.

    Can’t figure out a word above ? then you can also hire me to do extend Contact Options for WordPress. Else if you have any query or further assistance is required, post your feedback as a comment below.

  • How to style Sidebar Widget with different color in Thesis Theme ?

    Couple months back, a blogger friend who is also thecreatology blog follower, requested a Thesis Theme tutorial for styling sidebar widgets. As we all know that sidebar is an important element of blog, where we put advertisements, social media promotions and subscriptions. Hence, by making sidebar widgets eye catchy will increase blog hits and decreases bounce rate. For instance, you can check out the screenshot below (click to enlarge the image):

    thecreatology sidebar widget design
    TheCreatology Widget Styling

    As you can see in the above screenshot, the sidebar is on left side, whereas in most blogs you will find it one on right side. But doesn’t matter if it is on left or right, all what matter is that sidebar should be made eye catchy. In this article you will learn how to style sidebar widget with different color in Thesis Theme.

    Getting Started: Update Thesis Theme

    To make sure that we are sailing on the same ship, I recommend you to update Thesis Theme. Don’t know how to do that ? Well, just refer to article Safely upgrade to latest version Thesis 1.8 ? If you don’t have Thesis Theme Copy then you can also Download Thesis Theme.

    How to style sidebar widget ?

    Thesis Theme is no ghost, so you can always play around with its customization. Customizing sidebar in thesis theme can be done by applying CSS code, rest I leave it on your skills. I know you will not let me down. (Giggle)

    A sidebar may contain different types widgets, for instance a text widget or a recent post list widget and etcetera. So, make sure you analyze your need, before copying the code.

    CSS Code to Style Thesis Sidebar

    Hmm! So we have reached the ammunition, where will not find any armory or magazine, but the CSS code to style sidebar widget. Find the CSS code below:

    Make sure you take full backup of custom.css file using FTP before modifying the original file.

    Sidebar List Widget  CSS Code

    [css]

    .custom .sidebar ul li ul li a{background:#E5ECF9;border: 1px solid #AABCE0;border-radius: 7px; color: #FFF; display: block;font-size: 13px; padding: 4px 10px; margin:2px 0;}

    .custom .sidebar ul li ul li a:hover{background:#D3DCED;}

    [/css]

    Thesis Killer Recent Entries CSS Code

    [css]

    .custom #widget_killer_recent_entries-2{background:#BFE2F2; border:10px solid #77D6FF;}
    .custom #widget_killer_recent_entries-2 h3{padding: 5px 0; margin: 10px 0; font-size: 18px; font-weight: bold; text-align: center; color:#fff;}
    .custom #widget_killer_recent_entries-2 ul { font-size: 14px; font-weight: bold; list-style: decimal; margin: 0 0 0 20px;}
    .custom #widget_killer_recent_entries-2 ul li { border-bottom: 1px solid #ddd;margin: 0; padding: 5px 0;}
    .custom #widget_killer_recent_entries-2 ul li a { color: #333; display:block; font-size: 12px; font-weight: normal; background: transparent; padding: 0;}
    .custom #widget_killer_recent_entries-2 ul li a:hover {color:#e33e00;}

    [/css]

    Did you copy the right code ? This is just to remind you about the code which you analyzed before coming to this step.

    We’re Done!

    After that you have copied the correct code, save custom.css file and upload it on server. And if, you are using custom file editor from your dashboard admin then just hit Big Ass Save Button. Once done, refresh the website and check out sidebar styling and if you are not satisfied then you can play around with CSS code.

    With this we come to the end of tutorial to style sidebar widgets in Thesis Theme. I hope it was easy, if not? you can also hire me to do style sidebar widgets for you. If you have any query or further assistance is required, post your feedback as a comment below.

  • Easy way to add MailChimp Subscription Form on WordPress Blog

    If you are an Email Marketer then you must be knowing about MailChimp, no big deal if you don’t know What MailChimp is ? MailChimp is one of the best Email marketing service on web, which helps you to circulate Newsletters, Notices & other promotional media amongst your subscriber list. Doesn’t flatter your mind ? Go ahead and sign up for MailChimp for FREE Trial Account Now! 🙂

    Free-MailChimp-AccountOnce you have MailChimp account, you would want to see things in action, probably by embedding MailChimp form on WordPress Blog/website. MailChimp features you to embed form in two ways either using Html/JS code or using WordPress Plugin. Out of these two option, I found WordPress Plugin to be the easier way to integrate MailChimp form on website. Hence, in the article we will learn how to add MailChimp subscription form using WordPress plugin.

    I have divided this tutorial into four sections that is Installation, Configuration, Styling and Embedding form in Sidebar.

    Install MailChimp Plugin in WordPress Blog

    As MailChimp plugin is free to use, so our basic step will be to install MailChimp Subscribe List Plugin.

    • Login to WordPress Admin and Navigation to Dashboard > Plugins > Add New Plugin.
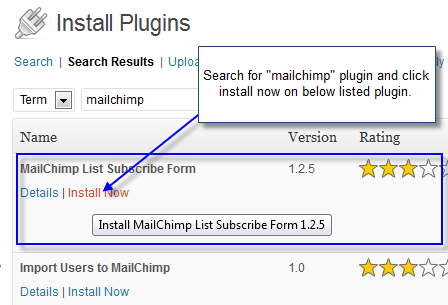
    • Search with “mailchimp” keyword and find “MailChimp List Subscribe Form” and click Install Now.
    MailChimp-Install-Plugin
    Install MailChimp Plugin
    • Once the plugin is installed, click activate button.

    Configure MailChimp Plugin Settings

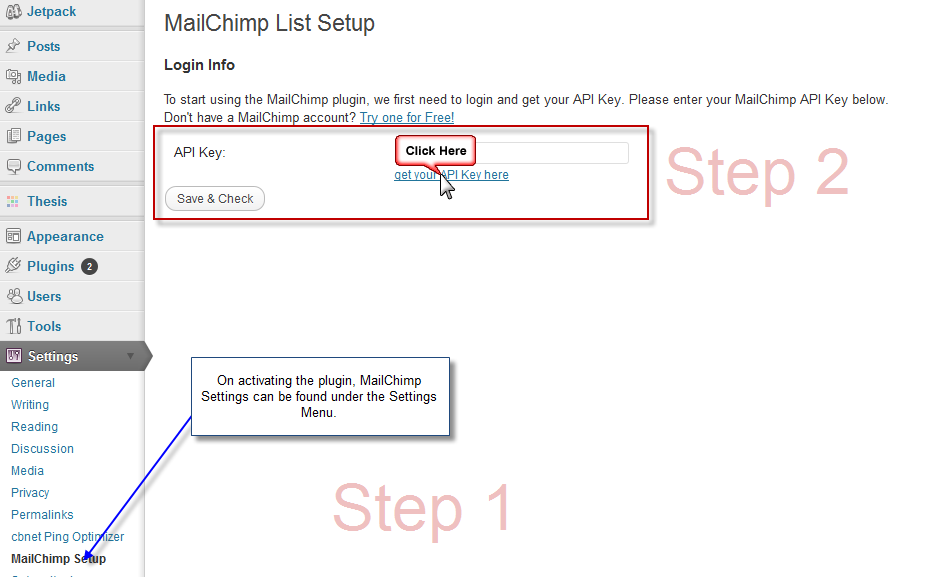
    When you will activate the plugin, MailChimp Settings will appear in Settings tab.

    • Click on MailChimp Settings to configure Subscription form settings, similar to screenshot below.
    MailChimp-Settings-Plugin
    MailChimp Plugin Settings

    Note: In above screenshot Step 2: Plugin prompts to synchronize MailChimp account with WordPress, which requires a secret API key.

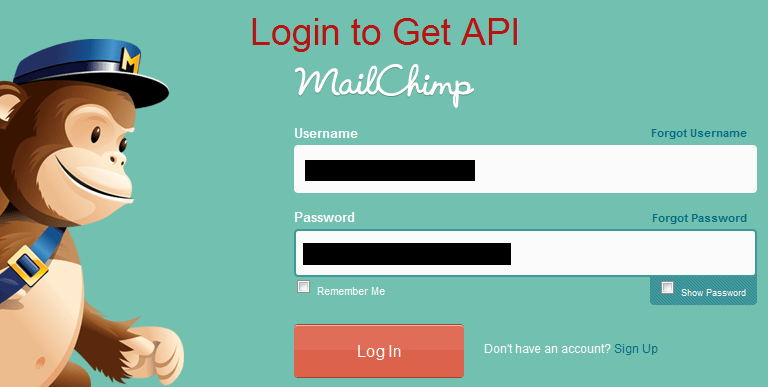
    • Click on the blue link which says “get your API key here” and you will be directed to MailChimp login screen, similar to screenshot below.
    Get-API-Key-Screen-1
    MailChimp Login Screen
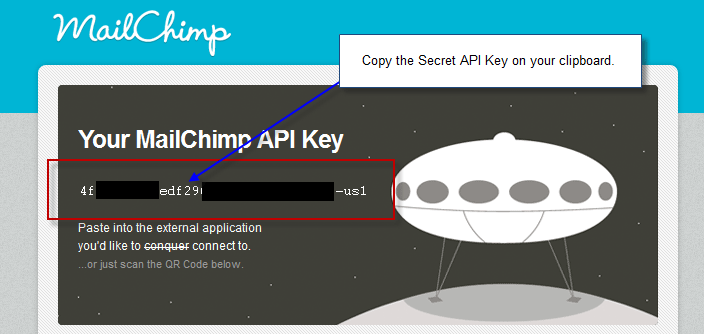
    • On successful login, you will get to see Your MailChimp API Key. Copy the key and save it for future usage.
    Get-API-Key-Screen-2
    MailChimp API Key Screen
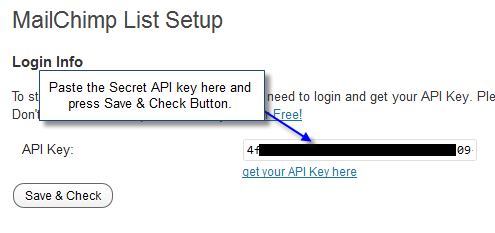
    • Once you have the key, go back to MailChimp Plugin Settings window and paste API key in text-field. Also press Save & Check Button to see some action.
    Save-API-Key-WordPress
    Save MailChimp API Key
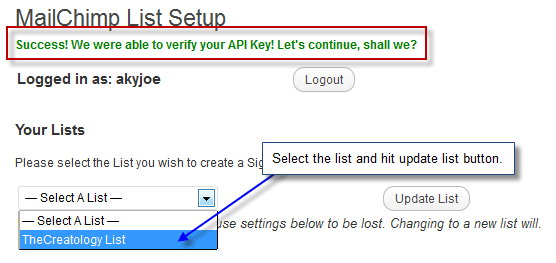
    • If API key gets validated, you will see Green Text saying “Success! We were able to verify your API Key! Lets continue, shall we?”.
    • Further, with successful synchronization, plugin will list all mailing lists created under that MailChimp account. You can select any one list from the dropdown and hit the Update List button on right. (Refer to the below screenshot)
    Valid-MailChimp-API-Key-Message
    Valid MailChimp API Key Message
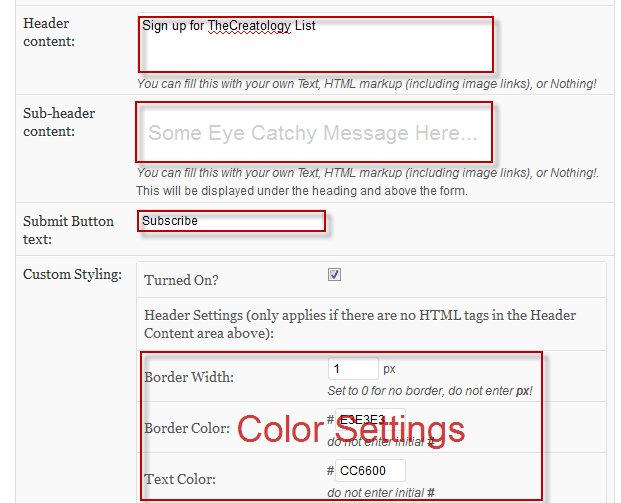
    • On updating the list, you will see a lot of options below to customize and style the subscription form.

    How to style MailChimp form in WordPress ?

    As we know subscription forms should be eye catchy to attract more subscribers. You can do so by using the MailChimp Settings to style MailChimp subscription form.

    • Refer to the screenshot below which explains about styling and customization of MailChimp form.
    MailChimp-Configuration-Plugin
    Customize Subscription Form
    • Once done, click on Update List Form Settings Button to save all changes. We are now all set to display subscription form in Sidebar.

    How to Embed MailChimp form in Sidebar ?

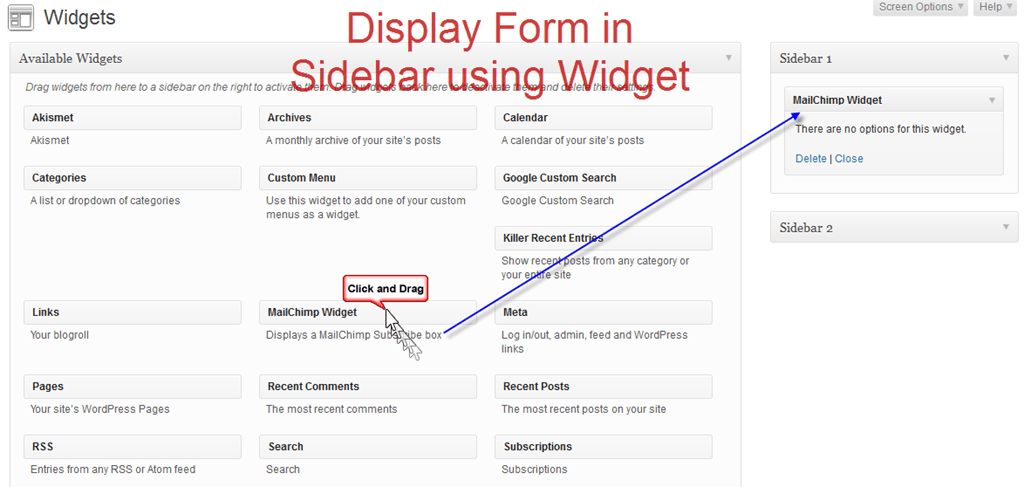
    MailChimp Subscribe List Plugin creates a widget, which can be found in Appearances > Widgets.

    • Simply drag from the MailChimp Widget to the desired position in the sidebar, you can also refer to the screenshot below.
    Display MailChimp Form in Sidebar
    Embed MailChimp form in sidebar
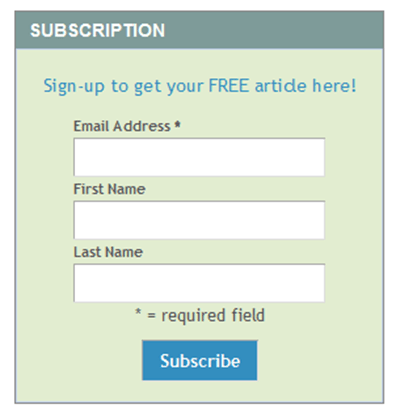
    • Once done, refresh the website to check MailChimp form in sidebar of WordPress Site.

    MailChimp Form Sidebar WordPressSomehow if you don’t like your MailChimp form styling, you can go back to the Step-3 and redesign subscription form again, with some new colors, till you satisfy yourself. 🙂

    Seems to be Easy ‘eh ?

    Well, this tutorial may look too lengthy, but believe me it just saved you from the Nightmares and Ghosts Coding and CSS Styling. LOL! Secondly, MailChimp power ease in managing Email subscription list and builds database of your contacts.

    With this we come to the end of this tutorial on Easy way to add MailChimp Subscription Form on WordPress Blog. If you have any query or further assistance is required, you can post comment below as your feedback.

  • Style post tags in single post WordPress to decrease bounce rate of blog

    I have already covered few articles to decrease bounce rate of blog, like by creating 404 error pages or styling previous next links in WordPress. In the following article I will explain how beneficial Post Tags are in WordPress and how we can style tags in single posts to decrease bounce rate of blog.

    Why WordPress Tags are useful ?

    TheCreatology Post Tags
    Image Credit: AkyJoe

    Post Tags play a vital role in WordPress as they group similar articles together. Tags works as multiple categories for a blog entry which can be reused in future as an archive of articles. Another reason why I say why WordPress tags are important, is that they describe a visitor, what the article is about.

    How to Style Post Tags in WordPress?

    Usually every WordPress Theme like Thesis Theme has Post Tags enabled in Single Post Entries. You can always style Post Tags using CSS to increase Call to Action. For Instance, you can see the screenshot below, where you can see the post tags in blue.

    TheCreatology Post Styling on WordPress
    TheCreatology Post Styling on WordPress

    Below is the post tags style code which you can add it in style.css or custom.css in case of Thesis Theme.

    Make sure you take backup of style.css or custom.css using FTP, before adding the code in it.

    [css]

    .custom .post_tags a {
    background-color: #e33e00 !important; /*Change Background Color*/
    color: #FFFFFF; /*Change Text Color*/
    line-height: 40px;
    margin: 2px;
    padding: 7px !important;
    text-decoration: none !important;
    }

    [/css]

    The above code is for Thesis Theme Post Tags Styling only. In case of custom WordPress Theme you can simply replace the class according to your Theme. You can play around with the background color and text color, as I have mentioned in the code.

    We’re Done!

    Once you have added the code, refresh on any single post entry to see the effect and you will find something like the screenshot below:

    Style Post Tags for WordPress
    Demo: Post Tags

    WordPress post tags though are optional, but I would recommend people to use WordPress to its best. Winking smile Do you use Post Tags ? Let us know with a simple feedback, by posting comment below.

  • How to add Google Analytics Code in WordPress using Thesis Theme ?

    Google Analytics is a Web Analysis Tool, which gives insight of Page Visits and Daily Traffic. Google Team is improving Analytic Product day-by-day, to present more precise and accurate  reports.

    Google analytics for wordpress
    Google Analytics

    In the article we will learn to add Google Analytics Code in WordPress using Thesis Theme. But before that, we will have to setup Google Analytics Profile.

    How to Setup Google Analytics Profile ?

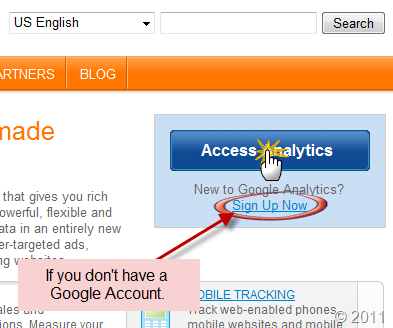
    Setting up Google analytics profile is not a big deal, all you need is a Google Account. If you are using Gmail or any other Google Product, then it clears that you have a Google Account associated. Login into your Gmail or any other Google account, and click here to Access Analytics. You will find something like below as in screenshot:

    Add google analytics to wordpress
    Google Analytics Login Page

    Once we gain access to Google Analytics account, we will have to setup a profile for our website.

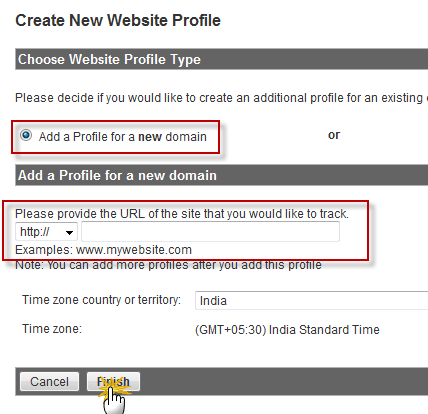
    • Click to add new profile on Dashboard.
    • Next screen, enter domain name and select country. You may also refer to screenshot below:
    setup new google analytics profile
    New Google Analytics Profile
    • Once done, click Finish button and we have created the Website Profile.

    Get Google Analytics Code

    Now that we have created our profile we will now, get Google Analytics Code to Verify website.

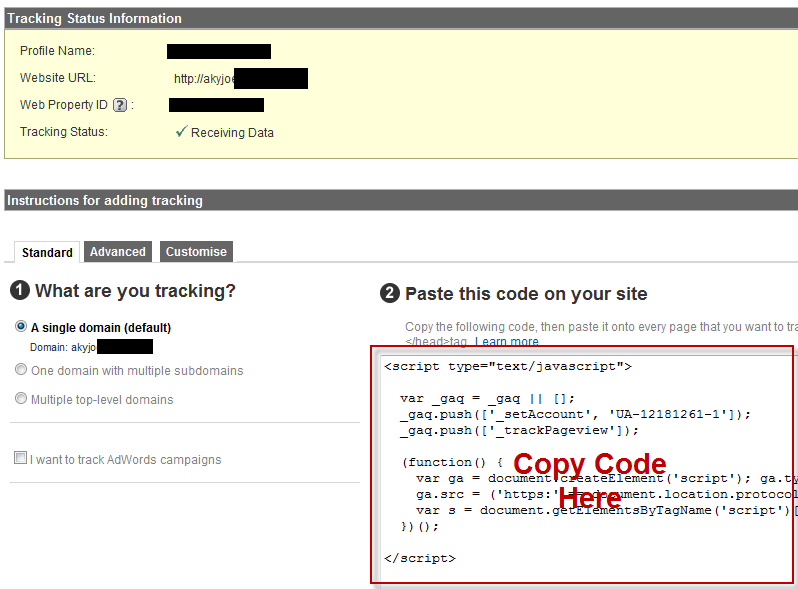
    • On the Google Analytics Dashboard, click to Edit your listed profile.
    • Next, Click on Tracking Status or Check Status Link.
    • In the next screen it will show you instruction to add tracking code on your website. Grab the Google Analytics Code and paste is on a Notepad file for future reference. (Refer to Screenshot Below)
    Get Google Analytics Code for website
    Grab Google Analytics Code

    Add Analytics Code in WordPress Thesis Theme

    Adding Tracking Code in Thesis Theme is a click-a-way job. Here is how we will be going to do that:

    • Navigate to WordPress Dashboard Admin Panel > Thesis > Site Options.
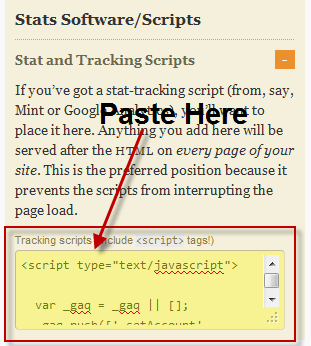
    • In site options, look for Stats Software/Scripts. Now expand the item and insert the Tracking Code in the Text Area similar to what you can see in the screenshot below:
    add tracking code in thesis theme
    Add Analytics Code in Thesis Site Options
    • Once done, click the Big Green Save Button and we are done.

    We Are Done!

    Now, that we have installed the tracking code on our website, you can now Verify Google Analytics Profile so that Google bots can crawl website, and track each-n-every activity on your website.

    If you have any queries for further help is required you can post comment as your opinion.

  • How to add Pagination in WordPress Blog using Thesis Theme

    Does your blog show Previous-Next Links on home page ? The reason behind the question is the missing swift feature on blog. As we know that, Previous-Next links in Thesis Theme is less prominent, hence they increase bounce rate and pagination is not that effective too. In my previous article, I mentioned about how we can Style Previous Next Links in WordPress to decrease bounce rate. In the following article we will learn to add Pagination on blog to increase efficient paging.

    how to add pagination in wordpress blog
    Efficient Paging

    How to add Pagination in WordPress Blog ?

    Pagination adds an advantage in a blog as making smart navigation on website. In this article we will use WordPress Plugin WP-PageNavi to add pagination on WordPress. But, before we proceed to add pagination in Thesis Theme,  I recommend you to safely upgrade thesis theme.

    Below is a simple 2-Step procedure to add Pagnavi in WordPress blog:

    Step 1: Install PageNavi Plugin

    • Navigate to WordPress Admin Panel > Plugins > Add New.
    • Search for plugin “wp-pagenavi” and install the plugin. Or you can also download the plugin here.
    • Once the plugin is installed, activate it.

    Step 2: Add PageNavi in Thesis Theme

    In order to add pagination on blog page, edit custom_functions.php file and copy-paste the below code snippet.

    Make sure you take full backup of custom_functions.php file using FTP before modifying it.

    [php]

    // Page Navigation
    function joe_adds_page_navi(){
    if (!is_single() && !is_page()){ ?>
    <div id="pagenavi"><?php if(function_exists(‘wp_pagenavi’)) { wp_pagenavi(); } ?></div>
    <?php }}
    add_action(‘thesis_hook_after_content’,’joe_adds_page_navi’);

    [/php]

    We Are Done!

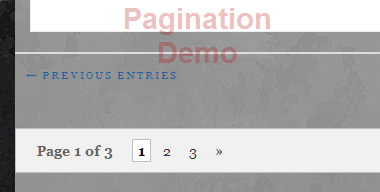
    After adding the code, we are done with the adding pagination to blog page. Once done, refresh the blog page and you will find it similar to screenshot below.

    pagination demo screenshot
    Page Navigation Demo

    Thesis WordPress is a great theme and adding Pagination, just makes it perfect. It is believed that the next version of Thesis Theme will have Pagination preinstalled. Since there is no exact date when it will going to happen, but by that time we can add Pagination manually to Thesis Theme.

    If you have any query or any further assistance is required, you can post comment as your feedback.

  • Style Previous Next Links in WordPress to decrease bounce rate

    Everyone is digging deep for blogs tips and WordPress tutorials, on internet, to improve blog performance and efficiency. Most of the Search engine traffic, lands on Single Post of blog and mostly a visitor escapes, if it couldn’t find anything relevance after reading the article. This is annoying for a blogger as it increases Bounce Rate of blog.

    Bounce-Rate-TheCreatology
    Bounce Rate

    In my previous article I explained about how 404 error page helps to decrease bounce rate. But, as mentioned above, that the search engine traffic redirects visitors on single page entries of the blog, hence by styling single post entry will lower bounce rate of blog. In the article we will learn to style Previous Next Links in Thesis Theme. Previous-Next Links adds single post entry pages a navigation so that flow of reading is not affected.

    Previous-Next-Single-Post-Tutorial
    Previous Next Post Links

    Previous Next Links in Thesis Theme

    In thesis theme design options allows to enable and disable previous next on single entry pages. Since in this article we are manually customizing previous next links so we will be using Thesis Hook to configure it. But before we proceed further I recommend you to safely upgrade thesis theme.

    Below is a simple procedure to add and style previous next post in WordPress.

    Add Previous Next Links in WordPress

    In order to add custom previous next links in single entry pages, edit custom_functions.php file and copy-paste the below code snippet.

    Make sure you take full backup of custom_functions.php file using FTP before modifying it.

    [php]
    //Author: AkyJoe
    // Custom Previous Next Links
    function show_previous_next_links() {
    if (is_single()) { ?>
    <div id="prev-next">
    <div class="previous-post"><?php previous_post_link(‘%link’, ‘Previous Post’, TRUE); ?></div>
    <div class="next-post"><?php next_post_link(‘%link’, ‘Next Post’, TRUE); ?></div>
    <div style="clear:both;"></div>
    </div>
    <?php } }
    add_action(‘thesis_hook_after_post’, ‘show_previous_next_links’);
    [/php]

    Style Previous Next Links on Single Post

    Now as we have added the previous next links using the Thesis Hook in single entry page, but in order to make it eye catchy and prominent, we will have to style it by adding the below CSS code snippet in custom.css file.

    [css]
    /*Previous Next Post*/
    #prev-next{font-size:40px; font-family:Arial;border-top: 2px dotted #EEE;}
    #prev-next a{color:#5d9800; display:block;}
    #prev-next a:hover{ text-decoration:underline;}
    .previous-post{background:url(‘images/previous-post-arrow.png’) no-repeat left center; float:left; padding:30px 0 30px 70px;}
    .next-post{background:url(‘images/next-post-arrow.png’) no-repeat right center;float:right; padding:30px 70px 30px 0;}
    [/css]

    Add Image to Previous Next Links

    To make the navigation look more prominent, we can add the below images. Download the images and save upload them under the Thesis Theme custom/images folder.

    next-post-arrow previous-post-arrow

    We Are Done!

    After adding the code and the images, we are done with the styling of next previous links. Once done, refresh any single entry post and you will find it similar to screenshot below.

    Previous-Next-Single-Post-Tutorial
    Final Output: Previous Next Links

    Here we come to the end of this tutorial, where we learned to Style Previous Next Links in WordPress. If you have any query or any assistance is required, feel free to post comment as your feedback.