Tag: wordpress blog design

  • Create 404 Error page to decrease bounce rate on WordPress

    As we all know about 404 error page which is a error message from the server over a HTTP response from client side. I have seen many theme developers ignore 404 error page on wordpress, which I believe is a big mistake, as it increases bounce rate of website and reflects bad impression on visitor who landed in a deadlock situation.

    404-error-page
    404 Error Page Illustration

    Default 404 Error Page

    Many visitors type wrong URL and end up landing to default error page from server. You can see the default 404 error page design below in screenshot.

    default 404 error page from server
    Default Error Page Design

    How Bounce Rate Increases ?

    The above page is a dead end page where there is no navigation or any message to redirect to different link. In such a situation, visitor will either use Back button on browser or will type another URL in address bar. As mentioned above, default error page is displayed when there is no 404 error page code in wordpress theme, and now you can assume how you lost a visitor. Hence it increases the bounce rate, as a visitor just landed on your website and went away.

    Add 404.php in WordPress

    As we are familiar with wordpress themes, and most of them has 404.php page. But if somehow your theme folder doesn’t have 404 error page then you don’t have to worry. Follow the simple steps below to add 404 error page in wordpress:

    • Open any text editor, for instance Notepad.
    • Add below code snippet in the file.

    [php]

    <?php get_header(); ?>

    <div id="content">
    <h2>Sorry…</h2>
    <p>The page you are trying to reach is unavailable or does not exist.</p>
    </div>

    <?php get_sidebar(); ?>

    <?php get_footer(); ?>

    [/php]

    • Save the file as “404.php” and move it, into the theme folder.

    Enhance 404 error page

    Now, we have added custom design error page in wordpress blog. Since it is a PHP file, we have extended capabilities to innovate and enhance 404 error code. We can add google adsense code in 404 page, so that you get paid atleast when visitor leaves your site. You can play with the custom error code in 404.php file by adding images and eye catchy quotes.

    In the end, I will just conclude that, every website should have custom 404 error page, so that visitor shouldn’t feel deprived. I hope this tutorial was easy, but if you have any query or any further assistance required then you post comment as your feedback.

  • Add featured content slider to showcase Portfolio Work in Thesis Theme

    In my recent work on advertising website design, client being a flyer designer had an amazing portfolio on automotive flyer design. In order to show portfolio work, client demanded for a presentation or a slide show of work on landing page. A featured content slider was added on the homepage using thesis theme. A screenshot below will clear you about the featured content slider.

    Featured content slider in Thesis Theme
    Featured Slider on Client Site

    Featured content slider uses JavaScript which takes your blog to next level along with SEO advantage. In this article, we will learn to add image slider in wordpress thesis theme. But before we proceed with this article I recommend you to safely upgrade thesis theme.

    Step 1: Add Content Slider Plugin in WordPress

    In order to add featured slider in wordpress we will have to install a plugin. Below is a simple procedure to add slider plugin:

    • Login to Dashboard Admin of WordPress site.
    • Navigate to Plugins > Add new Plugin.
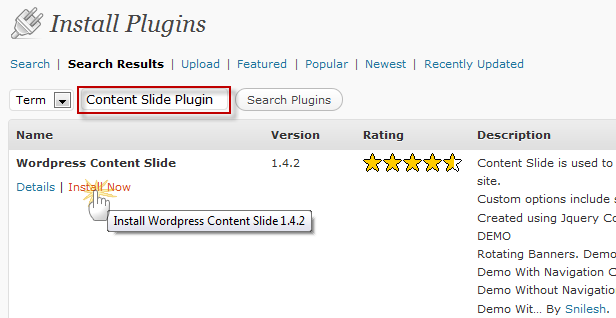
    • Type “Content Slide Plugin” in search box and click on the submit button.
    • In the listed result, click Install Now link under WordPress Content Slide Plugin by Snilesh. (Refer to the screenshot below)
    Step1-Add Featured content slider in Thesis Theme
    Step 1: Install Plugin
    • Install the plugin by clicking on install link underneath it and further Activate it.

    Step 2: Configure Content Slider Settings

    On activating the plugin, a left pane menu item “Content Slide” is added. In order to customize content slider, we will have to configure its settings for width height and content. Below is a simple procedure to configure slider.

    • Navigate to Dashboard > Content Slide.
    • Content Slide options are divided into three sections General Settings, Effects & Animation Settings and Image Source Settings.
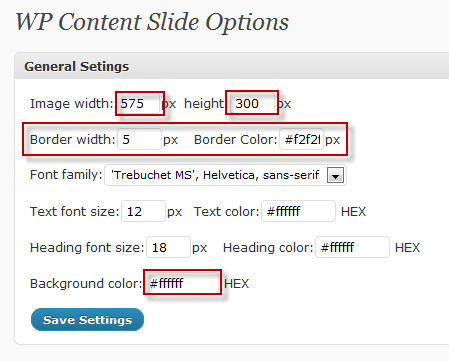
    • General Settings for content slider can be configured by referring the screenshot below:
    Step2-1-Configure Featured content slider in Thesis Theme
    Step 2: General Settings
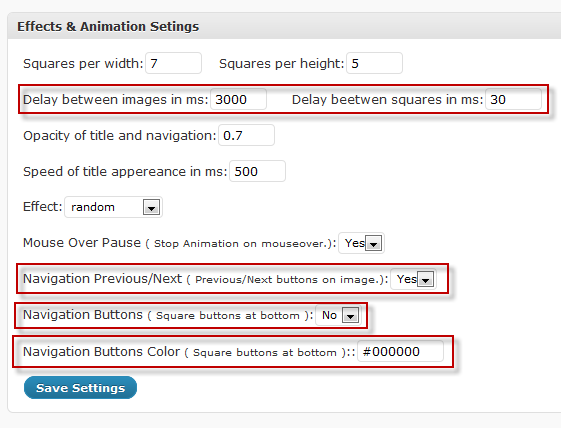
    • Effect & Animation Settings can be configured by referring the screenshot below:
    Step2-2-Configure Featured content slider in Thesis Theme
    Step 2: Effect & Animation Settings
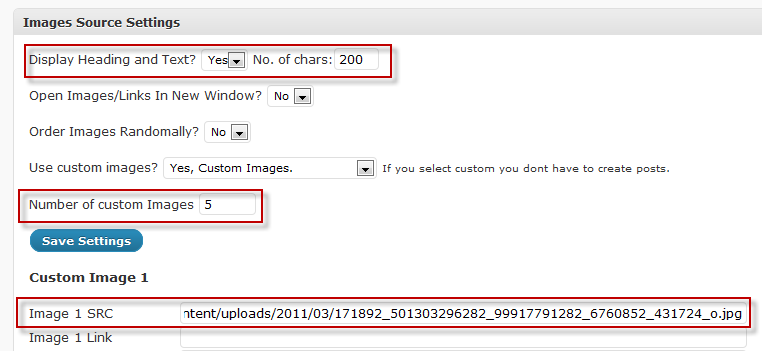
    • Image Source Settings can be configured by referring the screenshot below:
    Step2-3-Configure Featured content slider in Thesis Theme
    Step 2: Image Source Settings
    • Once you are done with the settings click the update button to save the configurations.

    Step 3: Show Featured Slider in Thesis Theme

    Now that we are done with the configuration of featured slider, we are left with to display slider on homepage template. Copy-paste the code snippet in the custom_functions.php, below:

    Make sure you take full backup of custom_functions.php file using FTP before modifying it.

    [php]
    //Author: AkyJoe
    //Email: akyjoe@gmail.com
    function content_slider() {
    if (is_home())
    { ?&gt;
    &lt;div id=&quot;slider&quot;&gt;&lt;?php if(function_exists(‘wp_content_slider’)) { wp_content_slider(); } ?&gt;
    &lt;/div&gt;
    &lt;?php }
    }
    add_action(‘thesis_hook_before_content’, ‘content_slider’);
    [/php]

    We are Done!

    Now, that we have added the code, you can refresh the website and see the slider in homepage. If you find the slider not adjusting the layout, you can repeat Step 2, above to change width, height and color settings for slider, till you are satisfied.

    We  come to the end of this tutorial to add featured content slider in thesis theme. If you have any query or further assistance is required, post comment below as your feedback.

  • Add Author Bio below single post in Thesis WordPress Theme

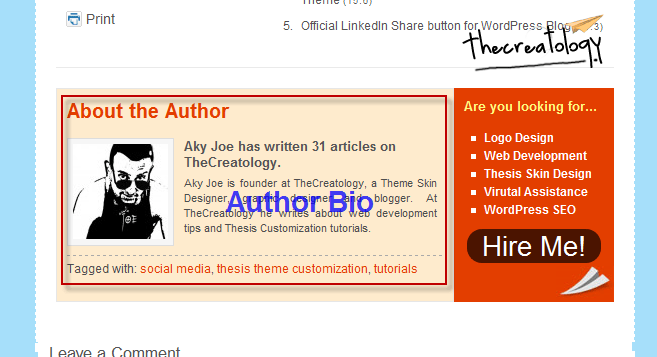
    With the increasing number of people writing articles on web, blogs are working hard to present them in best way. Being a blogger, I always get excited when I see my name published on web, for instance, a short bio explaining about you after each article you publish. By Blogs presenting its Author, I mean that a self-respect, delights a blogger and make them more enthusiastic towards their blogging. This is can be done, by adding an image of the author add adding a short bio about author, like you can see in the screenshot below.

    Author Bio example TheCreatology
    Author Bio on TheCreatology

    In this article we will learn to add author bio in Thesis Theme. As we all know about the DIY thesis theme and its SEO optimization and design customizations. Thesis being a simple wordpress theme, is incomplete with few options like  Author Bio, share buttons, etc. But since thesis theme does allows customization, so we will add author bio after post on wordpress blog. But before we proceed with this article I recommend you to safely upgrade thesis theme.

    Author BIO after post in Thesis

    As we are know that Thesis customization is done using thesis hooks which are overriding functions. To show author bio in single post, copy-paste the code snippet in the custom_functions.php.

    Make sure you take full backup of custom_functions.php file using FTP before modifying it.

    [php]
    //Author: AkyJoe
    //Email: akyjoe@gmail.com

    function add_author_bio() {
    if (is_single())
    { ?>
    <div class="postauthor">
    <?php echo get_avatar( get_the_author_id() , 120 ); ?>
    <h4>Article by <a href="<?php the_author_url(); ?>">
    <?php the_author_firstname(); ?> <?php the_author_lastname(); ?></a></h4>
    <p><?php the_author_firstname(); ?> has written <strong><?php the_author_posts(); ?></strong>  articles for us. <br/><br/><?php the_author_description(); ?></p>
    </div>
    <?php }
    }
    add_action(‘thesis_hook_after_post_box’, ‘add_author_bio’);

    [/php]

    • Now that we have added the author bio code, next we will have to style author bio by CSS code.
    • Navigate to Thesis > Custom File Editor, select custom.css file and copy paste the below code snippet very carefully in Custom.CSS file.

    [css]

    .postauthor {background: #F5F5F5; border-top: 1px solid #e1e1e0; border-bottom: 1px solid #e1e1e0; overflow: hidden; padding: 1.5em; }
    .postauthor img { border: 5px solid #e2dede; float: left; margin-right: 1.5em; }
    .postauthor h4 { color: #666; font-size: 2em; margin-bottom: 5px; }
    .postauthor p { color: #515151; font-size: 13px; margin-bottom: 12px; }

    [/css]

    • Above code will style author bio for single post and you can change color of box background and font color accordingly in the above code to match the theme.
    • Now, that we have added the code, you can refresh the website and see the author bio after post detailed page.

    I’m sure by adding author bio in single post, will increase blog rating and a check plus to boost your author’s enthusiasm. Do let us know the after effects of adding Author Bio in your blog, by a simple feedback.

    If you have any query or further assistance is required, then you can post comment below.

  • How to add scrolling text in header to increase blog hits ?

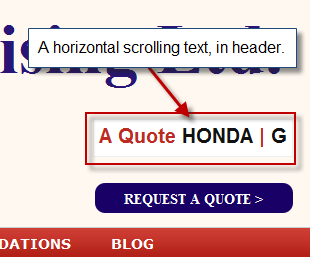
    Moving Objects and animating text looks fascinating on a website and it increases number of hits on website. You must of seen websites with moving text in header, which contains latest news, or product offers, or some alert etc. In my recent project, a client just demanded to add text scrolling in header, just like you can see in the screenshot below:

    horizontal text scrolling in header
    Screenshot showing Text Scrolling

    Few days back I wrote about How to add alert bar to grab reader attention in Thesis Theme which grabs visitor attention and increase clicks on blog. In this article we will learn to scrolling text in header, which I believe is another way to increase hit on website.

    How to add Scrolling Text in Blog ?

    We are using a simple and smart concept here and the analogy behind is by registering scroll text widget in wordpress and further displaying it  by function call in the header. You can follow the procedure below to add scrolling text in wordpress:

    • Login to Dashboard Admin of WordPress blog.
    • Navigate to Appearance > Editor and select functions.php of your WordPress Blog Theme.
    • Now scroll to the end of the file and add the following code in it.

    Make sure you take full backup of functions.php file using FTP before modifying it.

    [php]

    //Author: Aky Joe
    //Email: akyjoe@thecreatology.com

    function joe_scroll_text() { ?>
    <div class="text-flash">
    <marquee behavior="scroll" direction="left" onmouseover="this.stop();" onmouseout="this.start();" >
    <?php if (!function_exists(‘dynamic_sidebar’) || !dynamic_sidebar(‘ScrollText’) ) { ?>

    <?php } ?>
    </marquee>
    </div>
    <?php }
    register_sidebar(array(‘name’=>’ScrollText’, ‘before_title’=>”, ‘after_title’=>”));

    [/php]

    • Once done adding the code in file, click on the update button to save the file. Since we added the function now, now in order to display the scrolling text, we will have to make a function call.
    • Navigate to Appearance > Editor and select header.php and add the below code snippet where you want to display scrolling text.

    Make sure you take full backup of header.php file using FTP before modifying it.

    [php]

    <?php
    //Function call to display Scroll Text
    joe_scroll_text();
    ?>

    [/php]

    • After adding the above code, you see text scrolling in header by, it looks broken. We will have to add stylesheet code.
    • Navigate to Appearance > Editor, select style.css file and copy paste the below code snippet.

    [css]

    .text-flash {
    width:188px;
    height:32px;
    background:#fff;
    float:right;
    margin:30px 20px 20px;
    font-size: 15px;
    color:#bc2b21;
    padding: 2px 5px;
    line-height: 30px;
    border: 1px solid #eee;
    font-family: Arial;
    list-style: none outside none;
    }

    [/css]

    • Above code will style scrolling text for background color and text color. As installation is done, now we have to display some text and see how it goes live on the website.
    • Navigate to Appearance > Widgets and you will see ScrollText slot in right pane.
    • Now drag a “Text Widget” to the newly created slot ScrollText. Add some  text in widget and save it (Make sure you don’t add the title).
    • Once done, refresh the website and see the effect. It will look similar to the screenshot below:
    Add Scrolling text in header
    Demo: Scrolling Text in Header

    The scrolling text uses an old school html code “marquee” which scrolls from left to right and vice-versa. Using this tutorial, you will be able move dynamic texts of blog like latest post, news and offers with ease. If you are you using scroll text for your blog then you can share with us here by leaving a comment below.

  • 3 best ways to style blockquote for your blog

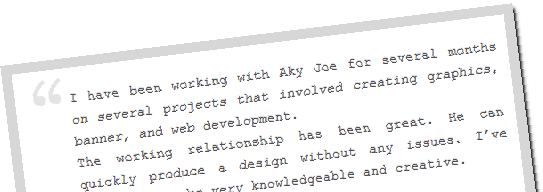
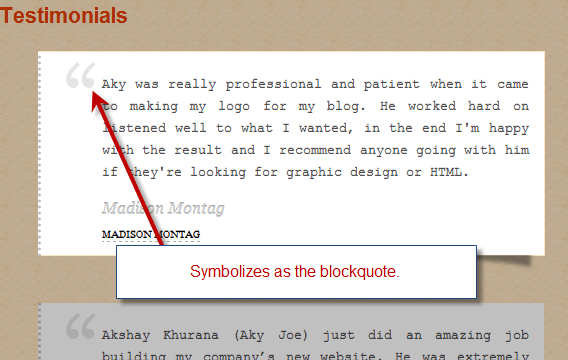
    A blockquote is a XHTML tag which is purposely used element in an article. The basic usage of blockquote in an article is when an author wants to post a thought, or a long piece of sentence from another resources or another author. Just like I did on my testimonials page, where the text posted is in voice of a different author, and hence I wrapped it between a blockquote tag. Screenshot below might just clear you a bit.

    thecreatology-blockquote-design

    A blockquote usually highlights a text and break it apart from main content. For idealistic authors blockquote is tool to make an article more interesting for the reader. A double quote character (“ This is my thought! “) represents the content as a phrase, quote or a thought.

    Usually every web browser has a default styling for Blockquotes, but we can always refine a default styling with something in relevance with theme, or may be out of the box design. In this article, I will share 3 best ways to style blockquote for your blog, using CSS.

    Style 1: Blockquote styling with Images

    With CSS, we are no just limited to color, we can always use background images so as to make blockquote distinct with content. Adding image to blockquote will make it eye-catchy and elegant. We will also have to add left padding, so that text doesn’t overlap the image. Screenshot below will make it more clear:

    thecreatology-blockquote-image-design

    Below, is the CSS code to add an image to blockquote which you can append in theme’s stylesheet, STYLE.CSS or CUSTOM.CSS (for Thesis Theme):

    [css]

    blockquote{
    background:url(‘blockquote.png’) no-repeat;
    padding: 5px 5px 5px 20px;
    border:3px solid #ddd;
    }

    [/css]

    Style 2: Blockquote styling with Drop Caps

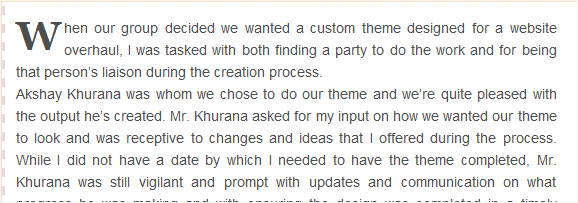
    Adding Drop caps to a content, is a Latin initialis typographic approach, which means standing at the beginning. Drop cap is decorating the initial letter of a paragraph and making it more attractive. In this example, I have added drop cap to blockquote, using the pseudo class to increase the size of the first letter in the paragraph. You can also refer the screenshot below, to add drop cap in blockquote:

    thecreatology-blockquote-dropcaps-design

    Below, is the CSS code to add an image to blockquote which you can append in theme’s stylesheet, STYLE.CSS or CUSTOM.CSS (for Thesis Theme):

    [css]

    blockquote{
    background:#fff;
    padding: 10px;

    border-left:2px dashed #ddd;

    }

    blockquote p:first-letter {
    float: left;
    margin: 5px 3px 1px 0;
    font-family: Georgia;
    font-size: 40px;
    font-weight: bold;
    }

    [/css]

    Style 3: Blockquote styling with Fonts & Colors

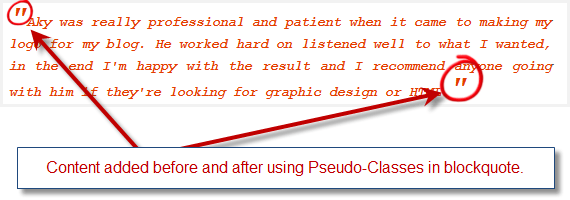
    If you find above styles, like using images and drop caps, a bit complex then you can consider another way which is simple yet highly effective style for blockquote. Font property itself has so many attributes for styling, for instance font-style (italics) or font-variant (small-caps). In this example, will require the use of pseudo-classes in order to insert content before and after the blockquote. Screenshot will clear it more:

    thecreatology-blockquote-fonts-design

    Below, is the CSS code to add an image to blockquote which you can append in theme’s stylesheet, STYLE.CSS or CUSTOM.CSS (for Thesis Theme):

    [css]
    blockquote {
    color: #e33e00;
    font-style: italic;
    font-family:’Courier New’, Courier, monospace;
    padding:20px;
    background:#fff;
    }
    blockquote p:before {
    content: ‘"’;
    font-size: 30px;
    }
    blockquote p:after {
    content: ‘"’;
    font-size: 30px;
    }
    [/css]

    I am using blockquote styling for my blog as well, and you can see the demo as below.

    Blockquote Style Demo:

    A body makes his own luck, be it good or bad.

    If you have seen any other example or have an idea to style a blockquote, I would like to hear from you. If you have any queries or if further assistance is required in regard of the article, post comment as your feedback.
  • Thesis WordPress Theme Customization for I Work at Home Center

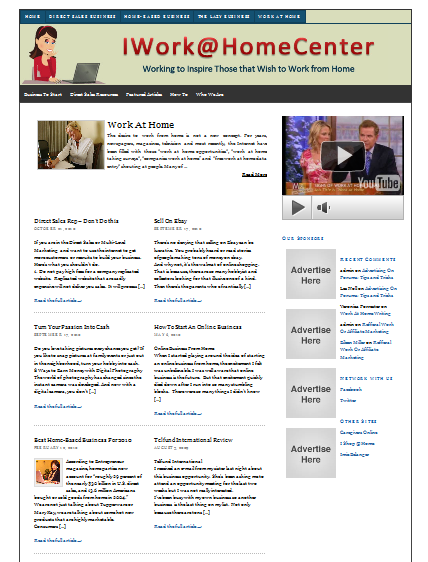
    I Work at Home Center is a WordPress blog, which inspire people who love working from home. The blog is designed on Thesis WordPress theme, which is highly customizable and SEO friendly. Web Administrator contacted thecreatology for the thesis customization service, and also wanted me to design a header graphic for them.

    Thesis WordPress Theme customization is though click-a-way work, only you need is to create directions for it. Client supplied me detailed brief for the project, and I simply worked as per the directions. And in 3 hours the work was published, and too was appreciated by the client.

    Below you can see a screenshot for the I Work at Home Center.com:

    image

    You can also visit I Work at Home Center.com here. If you like this work,  post comments as your feedback, or if you want something similar for your website, contact me below.