Tag: thesis theme customization

  • How to add alert bar to grab reader attention in Thesis Theme

    It is a normal Human tendency, that we read a blog from top to bottom as with our interest, which means anything placed at top of the website will grab reader attention. For publishers it is very important to grab reader’s attention at the top of the website, by placing an advertisement or add alertbox at top.

    alert grab people attention
    Illustration – Alert

    Thesis WordPress Theme is enriched with content management capabilities, and a best SEO theme. Thesis doesn’t come with top headline bar or ads slot but allows to add them for your blog. If you don’t have a copy of Thesis Theme then you can download thesis theme here.  If you are using an old version of Thesis Theme then I recommend you to safely upgrade thesis theme.

    In this article, we will learn to add alert bar at top of blog to grab reader attention in thesis theme.

    How to grab reader attention ?

    We will add a solid color headline alert bar at the top, where you can write anything and making it eye catchy by playing with colors. If a line or phrase is interesting like “20% off on WordPress Hosting + Free Blog Setup ”, will increase CTR or will increase clicks on blog.

    How to add alert bar in thesis ?

    We are using a simple and smart concept here and the analogy behind is by registering alert bar widget in wordpress and adding it before header. You can follow the procedure below to add alert bar in thesis theme:

    • Login to Dashboard Admin of WordPress blog.
    • Navigate to Thesis > Custom File Editor and select custom_functions.php in drop-down list and click edit selected file.
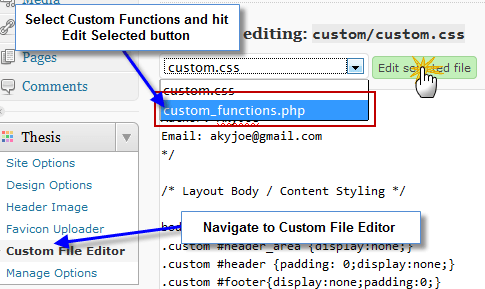
    Step-1-Add alert bar at top of Blog in Thesis Theme
    Step-1-Select Custom Function php file for editing.
    • In custom_functions.php file editor, copy-paste the below code snippet very carefully.
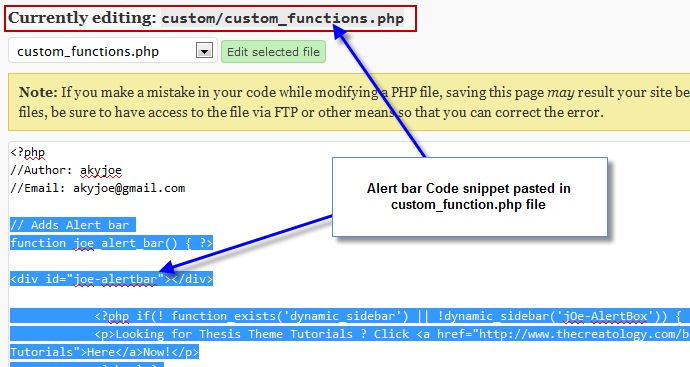
    Step-2-Add alert bar at top of Blog in Thesis Theme
    Step-2-Add code snippet in custom functions file

    Make sure you take full backup of custom_functions.php file using FTP before modifying it.


    Code:

    [php]
    // Adds Alert bar
    function joe_alert_bar() { ?>
    <div id="joe-alertbar">
    <?php if(! function_exists(‘dynamic_sidebar’) || !dynamic_sidebar(‘jOe-AlertBox’)) { ?>
    <p>Looking for Thesis Theme Tutorials ? Click <a href="http://www.thecreatology.com/blog" target="_blank" title="Thesis Tutorials">Here</a>Now!</p>
    <?php } ?>
    </div>
    <?php }
    add_action(‘thesis_hook_before_html’,’joe_alert_bar’);
    register_sidebar(array(‘name’=>’jOe-AlertBox’, ‘before_title’=>”, ‘after_title’=>”));

    [/php]

    • Now that we can added the alert bar, but you will find it broken or beyond the layout. To fix, we will have to style alert bar using CSS code.
    • Navigate to Thesis > Custom File Editor, select custom.css file and copy paste the below code snippet very carefully in Custom.CSS file.

    Code:

    [css]

    #joe-alertbar{
    background:#333; /*Change Background Color of Alert-Bar*/
    color:#fff; /* Change Text Color of Alert-Bar*/
    margin: 0 auto 5px;
    text-align:center;
    padding:5px 0;
    font-size:14px;
    border-bottom:3px solid #fff;
    }
    #joe-alertbar a{
    font-size:14px;
    color: #f60; /* Change Link Text Color of Alert-Bar*/
    }
    #joe-alertbar li.widget, #joe-alertbar li.widget p{
    margin:0;
    font-size:14px;
    }
    [/css]

    • Above code will style alert bar for background color and text color. I have commented few lines in above code snippet, where you can change color of alert bar and font color matching your theme.
    • Once we are done with installation of Alert bar, we move ahead to display some text and see how it goes live on our website. Since we have registered a sidebar named as jOe-AlertBox, so navigate to Appearance > Widgets.
    • Now drag a “Text Widget” to the newly created “jOe-AlertBox” just like in the below screenshot.
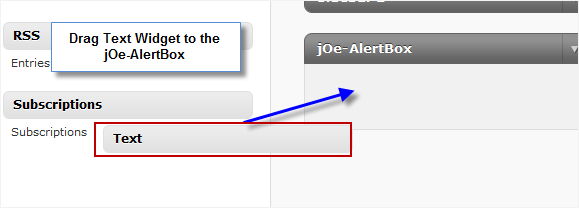
    Step-3-Add alert bar at top of Blog in Thesis Theme
    Step-3-Add Text Widget to alert box
    • In the text widget, add any html code or a text which is to be displayed on the alert bar. (Refer to the screenshot below) Make sure to restrict the text in single line and word limit should not exceed 30-35, else it will look congested.
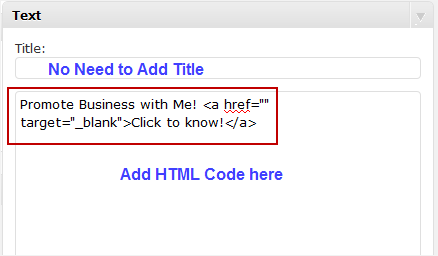
    Step-4-Add alert bar at top of Blog in Thesis Theme
    Step-4-Add text in text widget to display on alert box
    • Once done with the text, click on the save button below text area and now refresh the website, it will look something like this below.
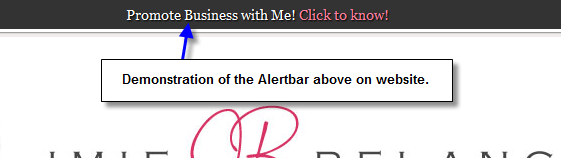
    Add alert bar at top of Blog in Thesis Theme
    Demo of alert box on website

    Alert bar has many possibilities to grab people’s attention. You can use alert to announce new products or discount coupons, featured post or may be a favorite quote of Sir Albert Einstein. Let us know how you used the alert bar at top by posting a comment below.

    If you have any query or further assistance is required, you can post comment as your feedback.
  • Local Travel Blog Design on Thesis WordPress Theme

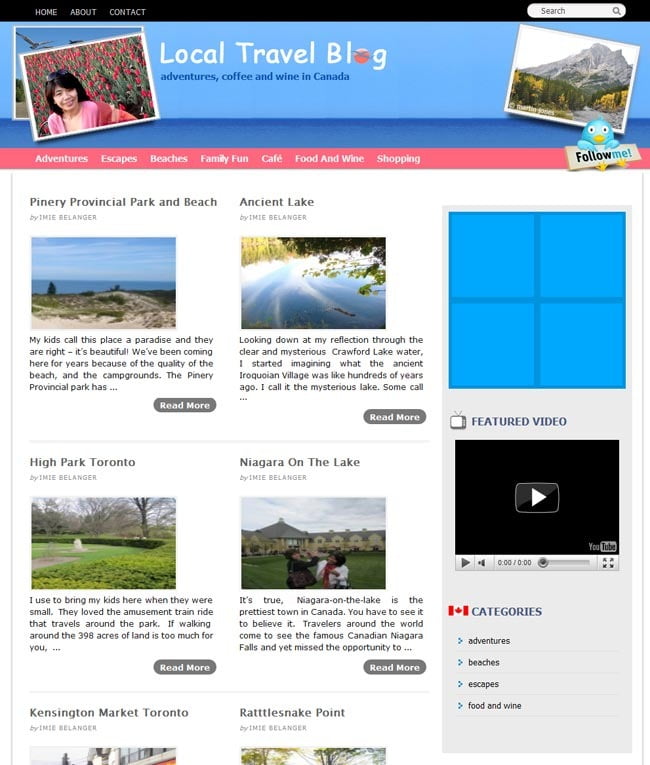
    Local Travel Blog is a WordPress blog, featuring adventures, expeditions and other travel journeys exploring Canada. The blog is designed using Thesis WordPress theme as it suited best for the scenario. Web Administrator contacted thecreatology for the website project which included customizing thesis theme and configuring plugins and essential SEO settings.

    Mockup for the travel blog design was approved by the client. In no time, travel blog thesis skin was developed and published online. Ease with Thesis Design options, made everything so easy and less time consuming.

    Below you can see a screenshot for the local travel blog canada:

    Local-travel-blog-design-thesis-wordpress-theme
    Travel Blog Designed on Thesis Theme


    To see the local travel blog live online click here and come back here to let us know your thoughts about the design, by posting a comment as the feedback.

    If you want something similar for your travel blog website, you can use the contact form below, I will get back to you as soon as possible!

  • Multiple Navigation menus using WordPress Menu 3.0 with Thesis Theme

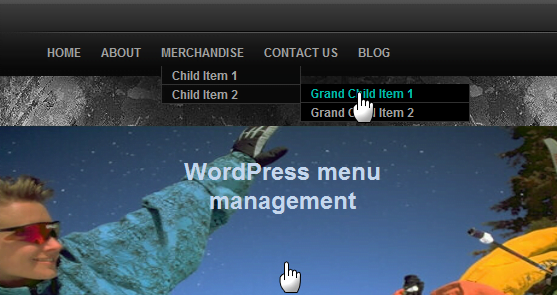
    Since WordPress 3.0 has evolved, Creating Menu for blog has relieved headaches for many, as WordPress 3.0 menu gives user ability to create and organize custom menu structure.

    Multiple Navigation menus using WordPress
    Multiple Navigation menus using WordPress

    Drop-down or nested menus was complex to code for a novice user, till Thesis Premium Theme was out in market. Thesis theme features to add custom menu structure for a WordPress blog. But, Thesis Theme allows to add one navigation menu only, hence its a limitation for a blog to add multiple menus. This limitation was soon resolved when WordPress 3.0 menu was launched. In this article I will guide you to use WordPress menu with Thesis Theme. The tutorial requires updated versions of WordPress and Thesis Theme. If you are using old version of Thesis then you can refer to article Safely upgrade to latest version Thesis 1.8 ?

    In this article, I will add two navigation menus in thesis theme, one referring the pages and other menu will refer the categories. I have divided the procedure in three steps that is register menu, create menu and finally display menu. Below is procedure to add navigation menu using WordPress 3.0 Menu.

    Step 1: Register Menu in Thesis Theme

    Menus are supported by almost every WordPress theme, some themes has it preinstalled while, other themes like thesis we have to register them before. Below is the code snippet and it will register two menu locations in Thesis Theme:

    [php]

    //Register WordPress Menus
    function joe_register_menu() {
    register_nav_menus(array(‘primary’=&gt;’Navbar1’, ‘secondary’=&gt;’Navbar2’));
    }
    add_action( ‘init’ , ‘joe_register_menu’ );

    [/php]

    Make sure you copy-paste the code precisely, otherwise erroneous code will  crash the website / blog.

    Add the above code in custom_functions.php of Thesis Custom Folder and save / upload the file. Once done, we move to next step to Create menu in WordPress.

    Step 2: Create Menu in WordPress

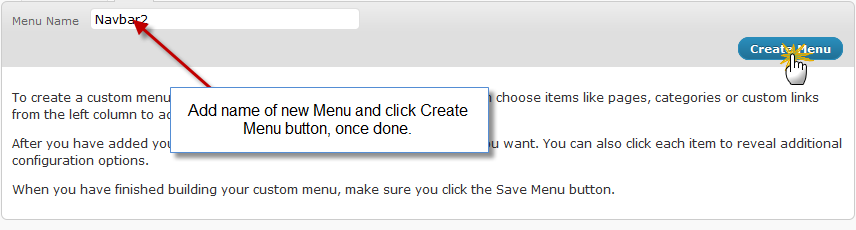
    WordPress menu management is click-a-way and easy to use. In step 1 we registered two menu locations in custom_functions.php file, so that we can differentiate theme locations of the multiple navigation menus in WordPress. In this step we will create navigation menus and assign theme locations. Login to WordPress Dashboard and navigate to Appearance > Menus. Now create new menu depending upon the requirement. For instance, I have created two menus Navbar1 and Navbar2. (Refer to the screenshot below)

    step1-Multiple Navigation menus using WordPress
    Step1: Create Menu in WordPress


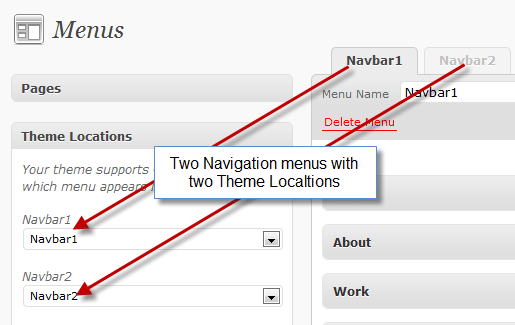
    After creating menus, you can drag drop the menu items and save menu. Next, important step is assigning menus the appropriate locations. On the Menus page find Theme Location Widget, and using the Drop down list, select appropriate Theme Locations. (Refer to the screenshot below)

    step2-Multiple Navigation menus using WordPress
    Assign Theme Locations

    Click on save button right below it, once done selecting the appropriate Theme Locations. And now we move on to next step, where we will display these menus.

    Step 3: Display Menu on Blog

    With Step 2, we are done with the backend part, and now we will publish menus on the blog. Referring to the WordPress Codex for Menus, we will once again edit custom_functions.php file. Copy-Paste the below code snippet in the custom_functions.php file, as we did in Step 1.

    [php]

    // Remove Default Header and Navigation Menu

    remove_action(‘thesis_hook_before_header’, ‘thesis_nav_menu’);
    remove_action(‘thesis_hook_header’, ‘thesis_default_header’);

    // Custom header created with multiple navigation menus
    function joe_header() { ?&gt;
    &lt;div id=&quot;joeheader&quot;&gt;
    &lt;div id=&quot;pages&quot;&gt;&lt;?php wp_nav_menu(‘theme_location=primary’);  ?&gt;&lt;/div&gt;
    &lt;div id=&quot;logo&quot;&gt;
    &lt;h1&gt;&lt;a href=&quot;&lt;?php bloginfo(‘url’); ?&gt;&quot; title=&quot;&lt;?php bloginfo(‘description’); ?&gt;&quot;&gt;&lt;/a&gt;&lt;/h1&gt;
    &lt;h2&gt; &lt;?php bloginfo(‘description’); ?&gt; &lt;/h2&gt;
    &lt;/div&gt;
    &lt;div id=&quot;cats&quot;&gt;&lt;?php wp_nav_menu(‘theme_location=secondary’);  ?&gt;&lt;/div&gt;
    &lt;/div&gt;
    &lt;?php }
    add_action(‘thesis_hook_before_html’,’joe_header’);

    [/php]

    Make sure you copy-paste the code precisely, otherwise erroneous code will  crash the website / blog.

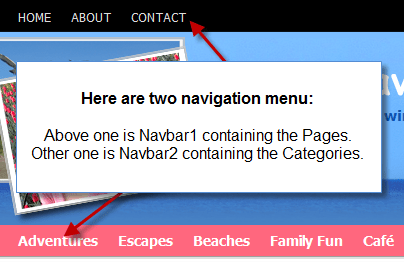
    Save and update the custom_functions.php file once done with editing the code. In the above code we have called wp_nav_menu() twice but with different parameters. First instance under displays the Navbar1 menu while the second instance displays the Navbar2. On refreshing the site you will find something like, as in the below screenshot.

    step3-Multiple Navigation menus using WordPress
    Multiple menus on WordPress Blog Demo


    In order to style WordPress menu, you can refer to my post Ease with Thesis WordPress Theme Design options panel or you can custom code in Custom.CSS and save it.

    With this we come to end of this tutorial, I’m sure you will find using menu with Thesis theme, more efficient and flexible. If you have any query or need any further assistance, post your feedback as comments below.

    If your WordPress blog is currently using a custom theme, then you can redesign it using the Thesis Theme Services.

  • How to auto generate thumbnail in Thesis Theme without Plugin

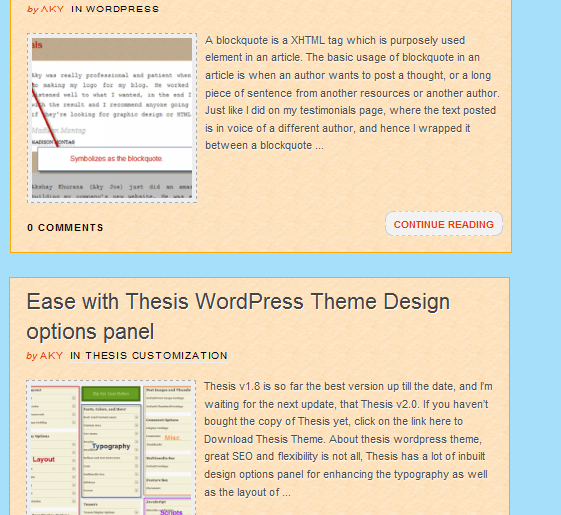
    A Thumbnail on a blog page makes it alive and increase more visits on articles.

    add-thumbnail-thesis-theme-thecreatology
    Thumbnail Preview on Blog Page

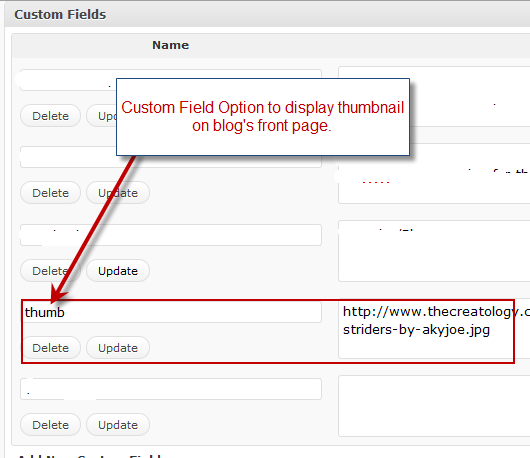
    Some premium themes features to add thumbnail using the custom field, like in Thesis WordPress theme you can customize a thumbnail and add it on blog page. But, custom field option can be complicated and time consuming process from bloggers.

    add-thumbnail-thesis-theme-custom-field
    Custom Field Option in themes

    At present, most of the blogs are using plugins like thumbnail-for-excerpts to show thumbnail on front page, which saves time & complexity. But the only issue I find using plugins is that it increases more of php calls, hence increasing server load and slow page loading. This post will guide to auto generate thumbnail in Thesis Theme without using any Plugin or custom fields.

    This article is only for blogs using Thesis WordPress theme, and if you are interested in thesis theme you can Download Thesis Theme here.

    The analogy behind the tutorial will integrate a function to get the first image from the post content, and further that image will be resized using the TimThumb open source script, to generate a thumbnail. Below is the procedure in detail to add thumbnails in Thesis Theme without Plugin:

    Step 1: Get TimThumb.php open source script

    TimThumb.php is an open source script and you can download it and place it in the custom folder of the Thesis theme directory. You can also open the script in the web browser and copy-paste the code in a text file and save is as TimThumb.php

    Step 2: Add code in Custom_Functions.php

    Once we have placed the TimThumb.php file, we now have to add code in custom_functions.php file located in custom folder. The code is divided in to two sets of functions. One will get the first image from the content, and will be initialized using init function to invoke default values. Other part contains code to show Thumbnail before post.

    Code to get first image from the content:

    [php]

    //Get Image Function
    function get_image_joe(){
    global $post, $posts;
    $first_img = ”;
    ob_start();
    ob_end_clean();
    $output = preg_match_all(‘/<img.+src=[\’"]([^\’"]+)[\’"].*>/i’, $post->post_content, $matches);
    $first_img = $matches [1] [0];
    if(empty($first_img))
    {     //Default Image Path
    return $first_img= "/images/default.jpg";
    }
    else
    {
    return $first_img;
    }
    }
    add_action(‘init’, ‘get_image_joe’);

    [/php]

    Code to show thumbnail before post:

    [php]

    //Auto Generate Thumbnail
    function auto_thumb_joe(){?>
    <?php if(!is_single() || !is_page()){?>
    <div class="thumbnail">
    <?php $values = get_post_custom_values("thesis_thumb");
    if ($values) { ?>
    <a href="<?php the_permalink() ?>" title="Click to read more on<?php the_title(); ?>"><img alt="<?php the_title(); ?>" src="<?php $values = get_post_custom_values("thesis_thumb"); echo $values[0]; ?>" /></a>
    <?php }
    else {?>
    <a href="<?php the_permalink() ?>" title="Click to read more on<?php the_title(); ?>" ><img src="<?php bloginfo(‘template_directory’); ?>/custom/scripts/timthumb.php?src=<?php echo get_image_joe(); ?>&h=150&w=150&zc=1" alt="<?php the_title(); ?>" width="150" height="150" /></a>
    <?php }?>
    </div>
    <?php }}
    add_action(‘thesis_hook_before_teaser’,’auto_thumb_joe’);

    [/php]

    Place the above code in custom_functions.php file in Thesis folder make sure you do it precisely, else it might crash your access to WordPress Dashboard.

    In above code you can specify width and height of the image as well according to your requirement, for instance I have specified 150 x 150 as a standard thumbnail size.

    Step 3: Thumbnail CSS Styling

    Everything needs a finishing touch, and here we do it by adding some styling to the thumbnail generated. Below is the code which will float thumbnail on left of the content excerpt. If you want the thumbnail to float on right, you can simply change the below code with float property. Here is the CSS code:

    [css]

    .thumbnail {
    float:left;
    background:#EEE;
    border: 1px dashed #aaa;
    margin: 3px 10px 0 20px;
    padding: 5px;
    }

    [/css]

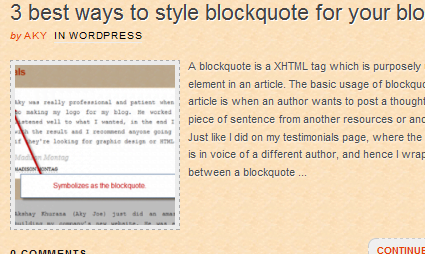
    Place the code in the custom.css file located in custom folder of Thesis theme directory, and refresh to result something like this in the screenshot below:

    add-thumbnail-thesis-theme
    Auto Generated Thumbnail Demo

    With this we come to end of this tutorial, with no more pain uploading images or depending upon the plugins. If you have any query or require any further assistance, post your feedback as comments below.

    If your WordPress blog is currently using a custom theme, then you can redesign it using the Thesis Theme Services.

  • Ease with Thesis WordPress Theme Design options panel

    Thesis v1.8 is so far the best version up till now and waiting for the next update of thesis theme, that is Thesis v2.0. If you haven’t bought the copy of Thesis yet, click on the link here to Download Thesis Theme.

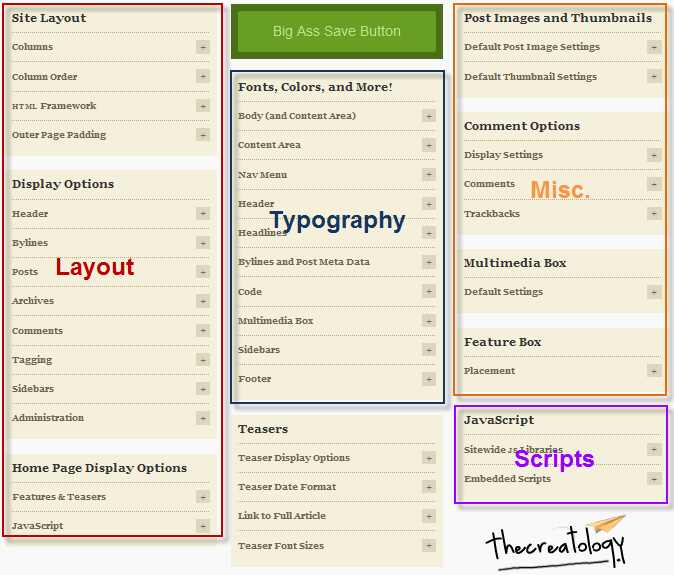
    About thesis wordpress theme, great SEO and flexibility is not all, Thesis has a lot of inbuilt design options panel for enhancing the typography as well as the layout of the blog. In this article, I will give you a quick overview of the Thesis WordPress Theme Design options panel. Thesis Design options are sorted into different sections like layout, typography, Scripts and other Miscellaneous options. You can also refer to the screen shot below:

    Thesis-Theme-Design-Options-thcreatology

    Thesis theme design options panel will ease you in organizing the website content in an efficient way. Here under, I will explain you about the Layout, Typography, Scripts and Misc. options.

    Layout

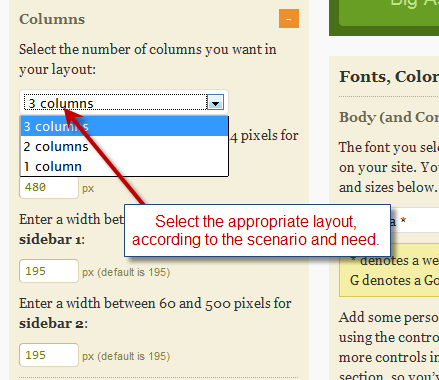
    Layout of the website is what matters the most, and it depends upon the nature of the website. For instance a 3 column layout website  is effective where there is more of content to be published, like a magazine style WordPress theme has. Thesis Theme has an option to switch between 3-column, 2-column or 1-column. Below is a screenshot which shows the layout selection in Thesis Theme.

    Layout-Thesis-Theme-Design-Options

    Typography

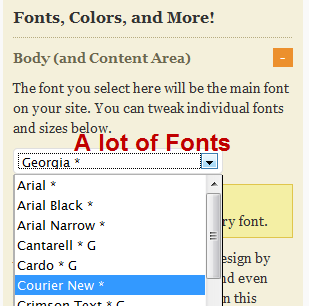
    Fonts play a vital role in presentation of the content on website. Thesis Theme has variety of options to enhance and customize Typography of a blog. There are a lot of fonts, comprising the Gothic, Typewriter, Old english style etc… We can also vary the different fonts in different parts of the website, for instance assigning Arial to Navigation Menu, Georgia to Post Title and Verdana to Body content. Below is a screenshot for selecting the fonts in thesis theme.

    Fonts-Thesis-Theme-Design-Options

    Scripts

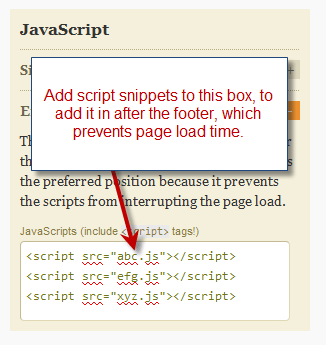
    Everyone of us are aware of JavaScript and jQuery codes which enhances the usability of the websites. There is a drawback of using these scripts as they take time to load in browser depending upon the network and system. Usually scripts snippets were added in header which on parsing by browser increases load time of the website. Yet another benefit of Thesis Theme is that it allows you add scripts in a preferred position, so that it doesn’t affect the page load time. Refer to the screenshot below:

    Scripts-Thesis-Theme-Design-Options

    Miscellaneous

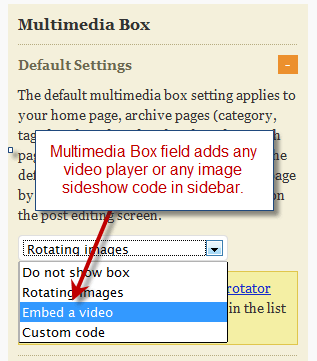
    A website is incomplete without multimedia presentation or a content slider or may be a video in it. Thesis Theme has a multimedia box widget for sidebar, which can embed video player, image sideshow or any other multimedia content. It also has a custom code option in the list, which can add any code snippet likely a flash or a Javascript. Refer the screenshot below:

    Miscellaneous-Thesis-Theme-Design-Options

    There are still a lot of options in Thesis Design Options, as I chose to brief you about essential ones. I will summarize the essential points discussed above for the ease of Thesis WordPress Theme Design options panel, before ending this article.

    Summary of Thesis Design options:

    1. Select Layout Option depending upon the need (3-column, 2-column or 1-column).
    2. Select fonts and vary fonts in different parts of website to enhance Typography.
    3. Add code snippet in order to prevent page load time.
    4. Add multimedia content for effective presentation in website.

    For any queries or assistance required, post comment as your feedback. If your WordPress blog is currently using a custom theme, then you can also redesign it using the Thesis Theme Services.
  • Thesis WordPress Theme Customization for I Work at Home Center

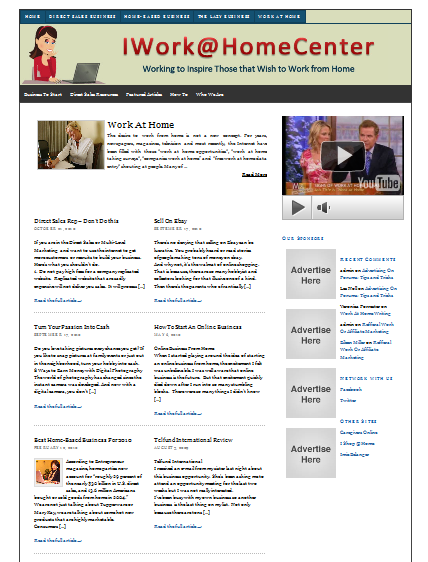
    I Work at Home Center is a WordPress blog, which inspire people who love working from home. The blog is designed on Thesis WordPress theme, which is highly customizable and SEO friendly. Web Administrator contacted thecreatology for the thesis customization service, and also wanted me to design a header graphic for them.

    Thesis WordPress Theme customization is though click-a-way work, only you need is to create directions for it. Client supplied me detailed brief for the project, and I simply worked as per the directions. And in 3 hours the work was published, and too was appreciated by the client.

    Below you can see a screenshot for the I Work at Home Center.com:

    image

    You can also visit I Work at Home Center.com here. If you like this work,  post comments as your feedback, or if you want something similar for your website, contact me below.