A security breach detected in a commonly used plugin Jetpack, as a result makes the WordPress site vulnerable to hackers. However, this serious bug in Jetpack plugin, lets hacker to mess around with website database and gain full site access as well. Wake-Up!
If you’re not aware of Jetpack plugin version, then contact your web administrators and ask them to update Jetpack plugin to 2.9.3 version it for you. If you choose to DIY, then:
Update Jetpack Plugin from Dashboard
Login to your WordPress Dashboard.
Navigate to Dashboard > Plugins
In the list of installed plugins, find Jetpack by WordPress.com and check the version number below it.
If you’re using an older version < 2.9.3, then there shall be an update message below the plugin itself, saying “There is a new version of Jetpack by WordPress.com available. View version 2.9.3 details or update now.”
Click on Update Now and it will redirect to update plugin page.
Have you ever heard of Publishing article directly from email? Sounds crazy, ‘eh? Well, a new feature of Jetpack plugin, Post by Email, allows you to publish articles on WordPress Blog just by sending email.
Jetpack 2 Post by Email Feature
WordPress Mobile App is limited only to IOS and Android supported devices. Whereas, with Post by Email feature, you can quickly post articles from any mobile device supporting email. Double benefit for smart phones!
In this article, we will learn to Publish article by Email on WordPress blog.
Jetpack 2: Post by Email Working Analogy
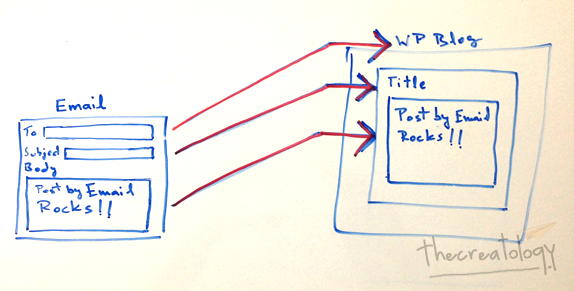
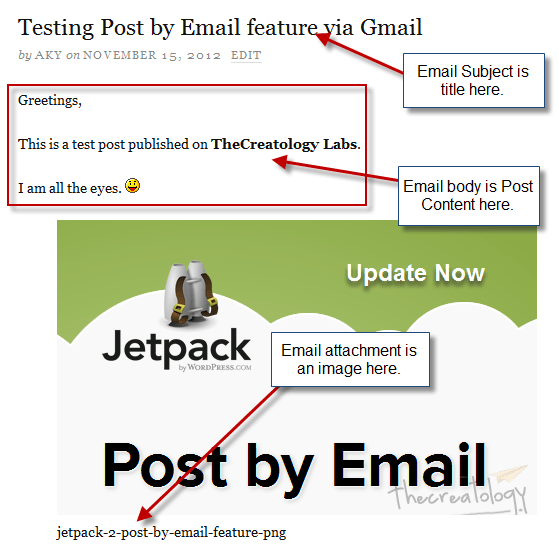
Check the illustration explaining post by email feature working, below:
Jetpack Post by Email feature working explained
Above illustration explains the following:
Tofield containing Secret Email Address points to WordPress Blog
Subject field points to Title of WordPress Post
Body field points to Content of WordPress Post.
Generate Secret Email Address for Blog
Secret email address bridges between Email client and WordPress blog. A special email address generates every time you enable Post by Email feature on your Blog. It is an unique email address and must be kept secret unless you want other people to publish articles on your blog.
Below is procedure to generate secret email address:
Note: Make sure you have enabled Post by Email feature under Jetpack Dashboard settings.
Navigate to Dashboard > Users > Your Profile.
Scroll down till you see Post by Email.
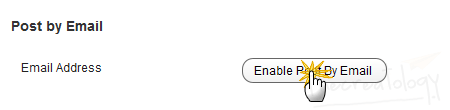
Enable Post by Email Feature
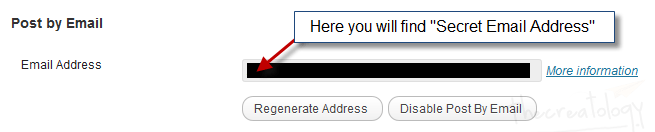
Clickthe Enable Post by Email button. Once done, you will see something similar to screenshot below.
Secret Email Address
Don’t disclose your Secret Email Address with anyone.
Whereas, if you experience any fraud then use Regenerate Address button or Disable Post by Email button.
Compose Email to Post on WordPress
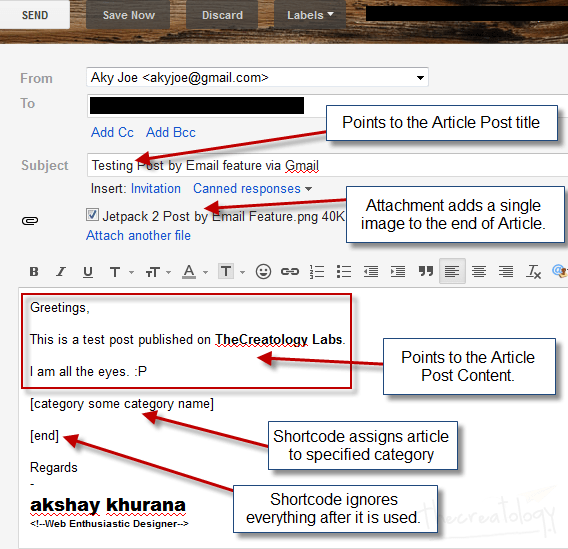
Now that we have generated secret email address for blog, let’s get started. Check out the info graphic about writing an email to publish article on WordPress, below:
Compose Email to Post on WordPress
Refer to Post by Email working analogy explained above. Also, there are some post formatting options and short-codes available here, for advanced blogging.
Note: Make sure you proof-read before sending email, as there is no option to update post.
Once done, send email to the secret email address.
Post Published from Email
Let’s see the post published via email on WordPress test site.
Post Published by Email
Looks good!
What else?
Post by Email feature can be effective for bloggers covering news, live events and press conferences etc. They can draft email templates before hand to save more time for proof-reading content.
What do you think about Jetpack Post by Email feature? Do let us know by posting a comment below.
No need to copy/paste links on Social media sites as Jetpack Plugin 2.0 will do it for you. Few moments ago, Automatic team released 10th update of Jetpack plugin with next-generation features. Jetpack 2.0 Plugin can publicize to Facebook, Twitter etc. and also allows you to Post article on WordPress by Email. Some catchy features like Photon and Infinite Scroll are also packed with new Jetpack update.
Jetpack Plugin 2.0 Update
Jetpack 2.0 Features
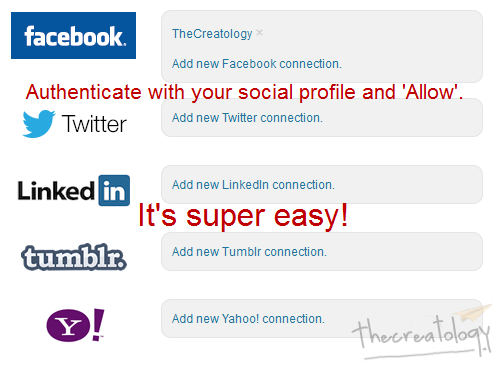
Publicize on Facebook, Twitter, LinkedIn & Tumblr
Post by Email
Photon – Faster Image Caching
Infinite Scroll
Auto Share Post on Social Media using Publicize Feature
Jetpack 2.0 allows your to share content on Facebook, and other social media sites, as soon as you hit publish button. You don’t have to manually share links on Twitter or Facebook when WordPress Jetpack Plugin does it with ease.
Enable Publicize Feature
Make sure that Publicize Feature is enabled under Jetpack Dashboard.
Navigate to Dashboard > Settings > Sharing.
Publicize using Jetpack 2
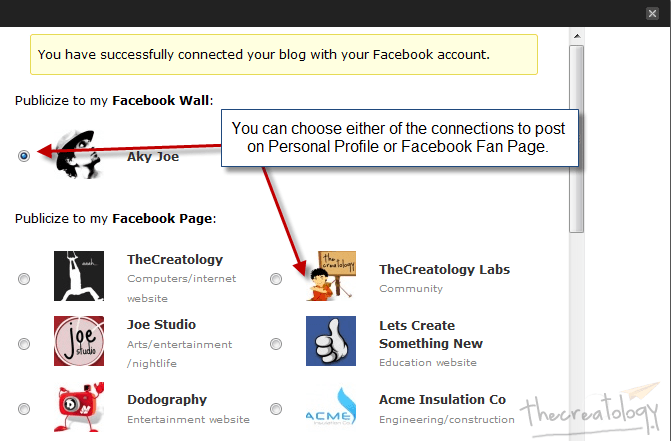
Choose your connection type and click on Add new connection. For Instance, we added a Facebook connection in the screenshot below:
Publicize on Facebook using Jetpack 2
Once done, click on the Ok button. Done?
Cool, we have a Facebook Connection now. You can try by adding more connections in similar fashion.
Your Thoughts?
Let us know, if Publicize to Facebook, Twitter, LinkedIn and Tumblr feature helpful or not.
Almost everybody is using smart phones and are surfing websites though that medium. But mobile phones have comparatively smaller resolution than a laptop or desktop computer screen and hence it either break a website layout or make it hard for user to zoom in and out. Unacceptable? Yes, indeed! But, if your website is running WordPress then Jetpack Plugin 1.8.1 update features a mobile optimized website.
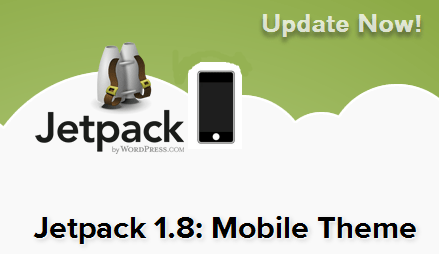
Mobile Theme: Jetpack Plugin 1.8 Update
What’s New in Jetpack 1.8 Update?
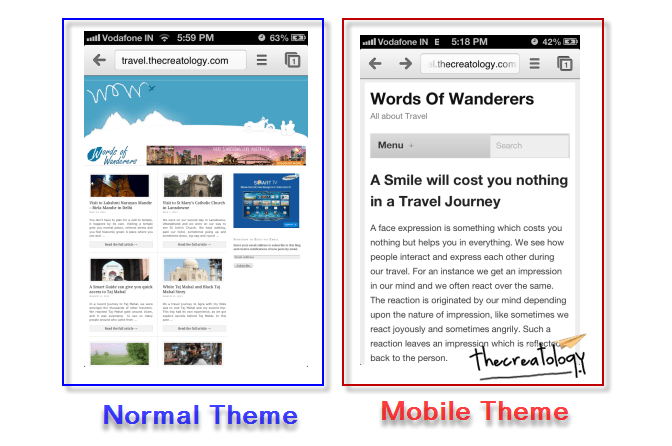
Mobile Theme Jetpack plugin update proclaims to deliver better mobile browsing interface making content more readable with less cluttered layout. We tried testing this plugin update on a travel blog to see its effect. Well, we found it working fine and content looks neat and readable. Got a screenshot of the difference showing one with Normal WordPress and other having Jetpack enabled Mobile Theme. Check below:
Jetpack Mobile Theme vs Normal WordPress Theme (IOS 6 | Chrome Browser)
I hope that says it all.
How to get Jetpack Mobile Theme Feature ?
To get mobile theme feature on blog, you will have to install/update Jetpack plugin. Not sure about how to update Jetpack Plugin, follow this procedure below:
Login to WordPress Admin Panel and Navigate to Dashboard > Plugin.
Find Jetpack Plugin listed and click on Update Automatically link in orange.
You will get redirected to update plugin status page.
Done? Now navigate to Dashboard > Jetpack and Activate Jetpack Mobile Theme Widget.
Pros & Cons for Jetpack Mobile Theme
Wondering if it is worth installing on WordPress Blog or not? Here is a list of Pros & Cons for you to figure out, read below:
PROS FOR INSTALLING MOBILE THEME
Better readability on Mobile Devices.
Less Cluttered and 1-Column mobile layout
Option to toggle on/off mobile theme.
Option to show full post or excerpt post content.
CONS FOR INSTALLING MOBILE THEME
Doesn’t work with custom page layouts.
No option to customize theme colors.
Menu Drop Button could have been better, as nobody will bother to click it.
What do you think?
Are you getting Jetpack Mobile theme? I believe it is worth a try, after all it comes with toggle option. 😉
Share your thoughts about this New Jetpack Mobile Theme feature introduced with Plugin Update 1.8 and you can do so by posting a comment below.
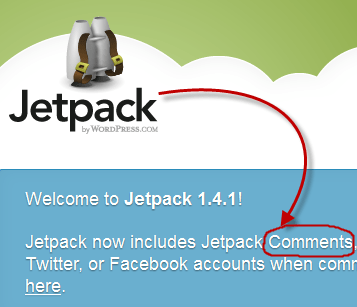
It is amazing how Jetpack Plugin is improving day-by-day and introducing new features. Last Jetpack Plugin update was about new contact form option for Feedbacks and this time its enhanced Commenting System for WordPress. Arrh…that wasn’t loud! Let me say that again… Jetpack has added New JetPack Comments Feature, with its new version 1.4.1.
Not sure what is Jetpack all about ? Click here to know more about Jetpack Plugin or click the JetPack picture below:
Click to Install Jetpack on WordPress!
Whats New in Jetpack Plugin ?
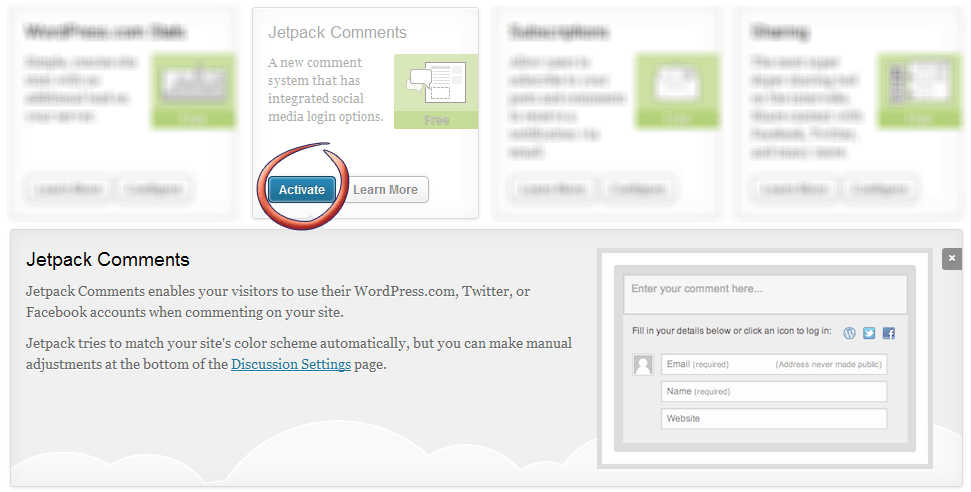
The new JetPack Commenting System extends capabilities of conventional WordPress comments. You will find JetPack Comment widget in Dashboard once you have updated the plugin. It looks like below screenshot:
Jetpack Comments Widget in Dashboard
How to get Jetpack Comments Feature ?
To get Comments Feature in blog, you will have to update Jetpack plugin. If don’t know how to update Jetpack Plugin follow a quick procedure below:
Login to WordPress Admin Panel and Navigate to Dashboard > Plugin.
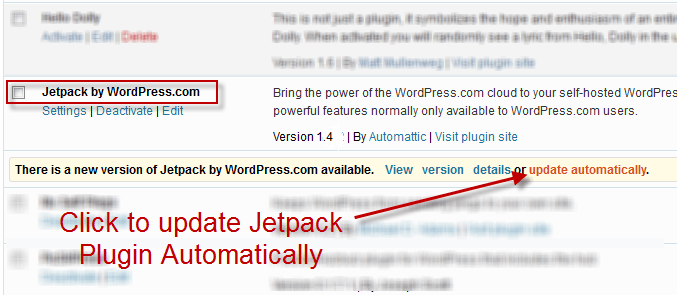
Find Jetpack Plugin Listed with other plugins. Click on Update Automatically link in orange, just like in the screenshot below:
Click on Update Automatically Link
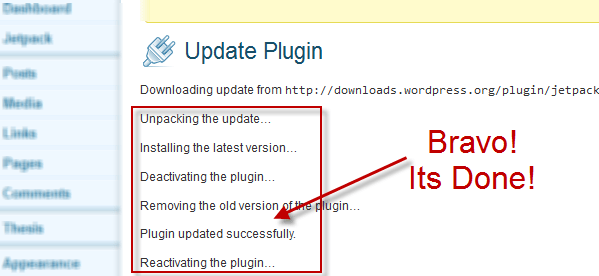
After clicking the link you will get redirected to update plugin status page and you will see something similar as below screenshot.
Plugin Updated Successfully!
Done? Now navigate to Dashboard > Jetpack to see JetPack Comment Widget.
Pros & Cons for JetPack Comment
Hah…you must be wondering about whether its worth installing on your WordPress Blog or it is not. Hmmmm…the list of Pros & Cons is especially for you to figure out, read below:
PROS FOR INSTALLING JET PACK COMMENTS
Allows a commenter/visitor to use WordPress.com, Facebook or Twitter Account while posting a Comment on your site.
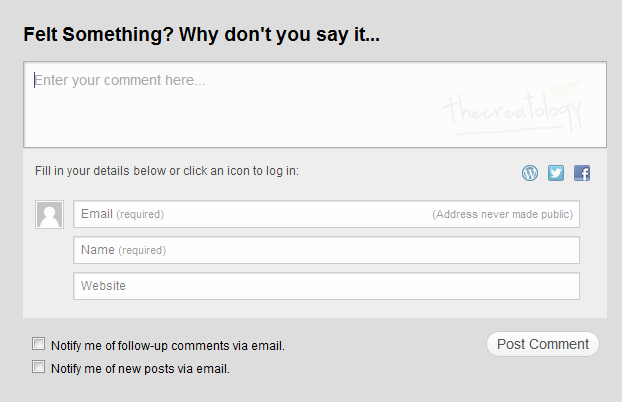
Enhanced Comment Form with jQuery Animation
3 different Themes for Comment Form: Light, Dark & Transparent.
jQuery Validation for required Fields.
CONS FOR INSTALLING JET PACK COMMENTS
Still using div html tags which states it is not on HTML5 completely.
Doesn’t work with Thesis Theme or other frameworks.
Increases page load time by 0.5-1 second/s.
Here is how a JetPack Comment Form looks like, on Twenty Eleven Theme:
Jetpack Comment Form on Twenty Eleven Theme
What do you think ?
Isn’t it feel good to have your WordPress Blog up-to-date & with latest features ? I believe nothing can beat that feeling, so what do you think about it? Share your thoughts with us about this New Jetpack Comments Feature introduced with Plugin Update 1.4.1. Of course, you can post a comment below. 😉
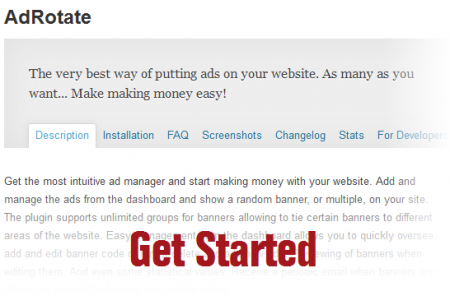
An Advertisement-Ready Website, a recent project by TheCreatology, was configured with Adrotate Plugin. The plugin has extensive features for Ad management, Click Tracking & Campaign Management etc. with detailed reporting, which also we will be using in our Tutorial. This tutorial is a request from a client, which is Quick-n-Easy tutorial, as we will learn to add new advertisement slot using adrotate in WordPress theme.
Add New Ad Slot Using Adrotate
For your ease, I have divided this tutorial into three sections: 1) Add/Install Adrotate Plugin, 2) Add/Create New Ads with Adrotate & 3) Display Ad Slot Code in Theme
Step 1: Add/Install Adrotate Plugin
To install WordPress Adrotate plugin, login to WordPress dashboard:
Navigate to Dashboard > Plugins > Add new Plugin.
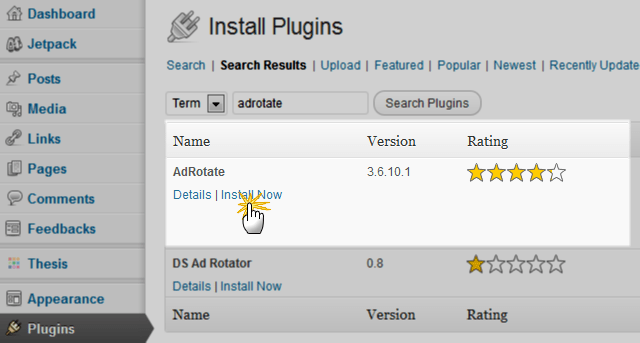
Search for Adrotate plugin and click to install it.(Refer to screenshot below)
Install Adrotate WordPress Plugin
Once the plugin is installed, click on Activate link to complete the installation of plugin.
Now that we are done with the installation of plugin, we can move on to create new ad banners.
Step 2: Add/Create New Ad Banner with Adrotate
Adding new ads is just a click-a-way thing and a bit of focus is required. Follow quick steps below:
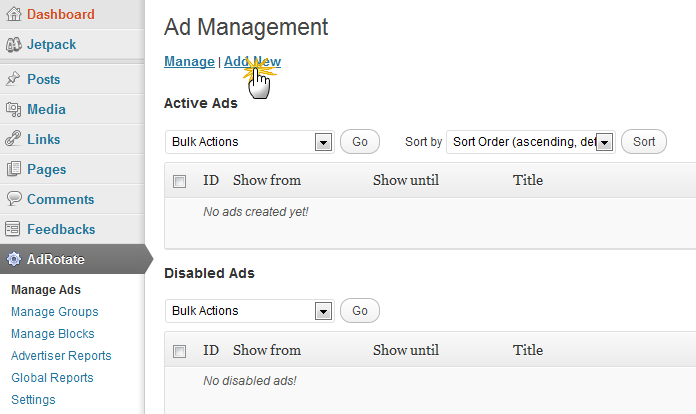
Login to WordPress Dashboard and navigate to Dashboard > Adrotate
Click on Add New to add ad banner just like in the screenshot below.
Navigate to Adrotate Management Screen
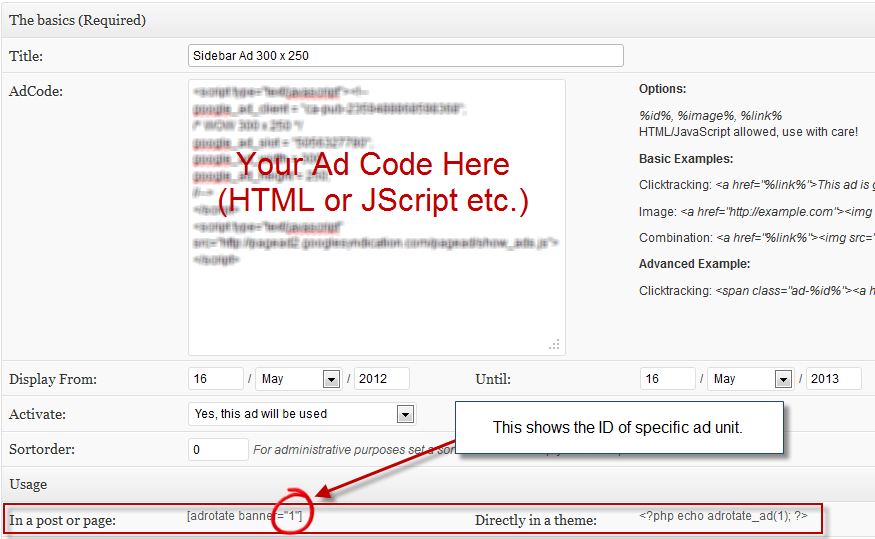
In next screen, you will see a form prompting about new Ad details. Fill the required fields that is Title, Ad Code & Display Period. (Note: Advance Settings are optional, depending upon your requirement.)
For your reference, you can memorize Ad unit ID, which will be required in Step 3 (refer the screenshot).
Add new Ad unit
Hit Save Ad button once done.
Step 3: Display Ad Slot in Theme
In our previous step, we added Ad Unit, where as this step will integrate Ad Code in theme. Adrotate Ad Unit can be displayed in two ways: 1) Using Adrotate Widget & 2) Using Short Code or PHP Code
USING ADROTATE WIDGET
This is an easy method and recommended option for people who don’t like to code. Follow simple steps below to display ad slot using adrotate widget:
Login to WordPress Admin and Navigate to Dashboard > Appearances > Widgets.
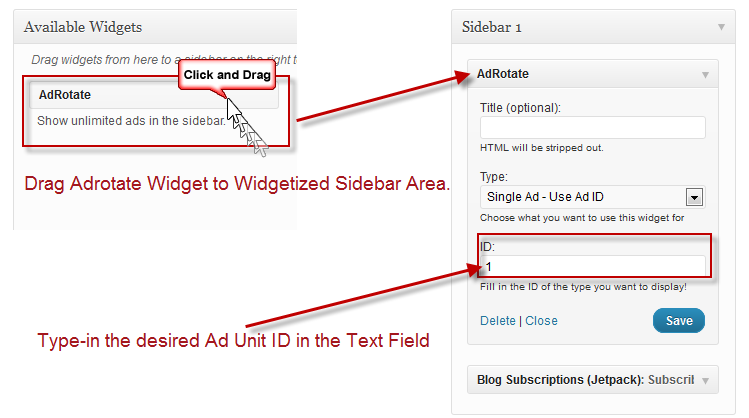
In the available widgets, Drag Adrotate Widget to the Widgetized Area, just like in screenshot below.
Display Ad in Sidebar using Adrotate
Type-in, the desired Ad unit ID, which you memorized while creating Ad Unit in Step 2. If you are not sure about the ID, simply Navigate to Dashboard > Adrotate and find the Ad Slot ID
Hit Save button to update the changes.
USING pHp CODE
A bit complex method, as you either need to have developer skill-set or a developer to fix it, as a slight mistake may end up breaking theme layout or crash the website. The method comparatively is more flexible than Adrotate Widget method, as you can display any size Ad Unit anywhere in your Theme. To do so, follow steps below to display ad slot using php code:
Login to WordPress Admin and Navigate to Dashboard > Adrotate.
Click the desired Ad unit you want to embed in your Theme.
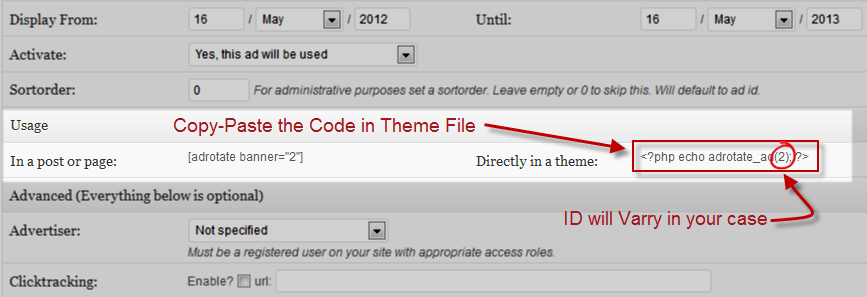
Scroll down a bit till you see Usage section similar to screenshot below.
Adrotate Ad unit PHP code
Copy the php code <?php echo adrotate_ad(#WILL VARY IN YOUR CASE#); ?>
Paste, the code in your theme layout file, for instance header.php or single.php as desired.
Save & upload file to server using FTP.
We’re Done
Now that you have added ad unit code in the theme, refresh webpage to preview the ad slot. Works fine ? Bravo, we are done with the tutorial.
Not Working ‘eh ? Recheck the codes, make sure you have uploaded the right file and clear cache, in case you are using cache plugins. Go through the Step 2 & Step 3 again, till you see the ad unit live in action. 😉
In this tutorial we learned about adding a new ad slot in WordPress Theme using Adrotate Plugin. If you have any queries or further assistance is required, post us your feedback using the comment form below.
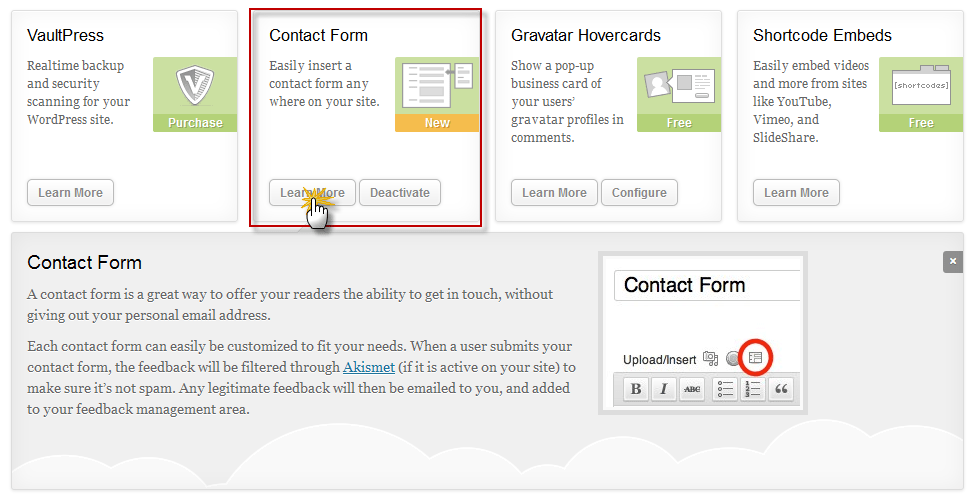
Few hours back, WordPress notified to update Jetpack Plugin, which made me curious about new features. In last Jetpack Plugin update, New Subscription option was added with Extra Sidebar Widgets making easy for lazy bloggers. Hmmm…what we have now ? Well, Jetpack has added New Contact Form Feature, as they say its time to trash all other contact form plugins. 😛
Not sure what is Jetpack all about ? Click here to know more about Jetpack Plugin.
Know more about JetPack Plugin ?
Whats New in Jetpack Plugin ?
Contact Form widget is what you will find in Jetpack Dashboard after updating the plugin. It looks similar to below screenshot:
Contact Form Widget
Get Contact Form Feature Jetpack Plugin
To get Contact Form Feature in blog, you will have to update Jetpack plugin. If don’t know how to update Jetpack Plugin follow a quick procedure below:
Login to WordPress Admin Panel and Navigate to Dashboard > Plugin.
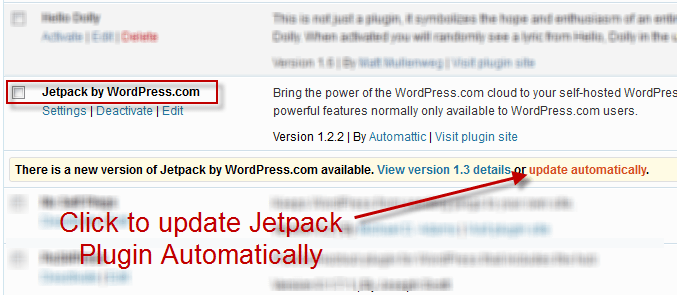
Find Jetpack Plugin Listed with other plugins. Click on Update Automatically link in orange, just like in the screenshot below:
Click Update Automatically Link
After clicking the link you will be redirected to update plugin status page. If you have good web hosting, then it will not take more than 5 seconds to update Jetpack Plugin and you will see something similar as below screenshot.
Jetpack Update Status
Well, we are done. Navigate to Dashboard > Jetpack to find Contact Form Feature Widget.
Share Your Views
I am sure this new update excites you as well, don’t forget to share your thoughts with us about New Contact Form Feature in Jetpack Plugin, by posting a comment below. 😉
If you are an Email Marketer then you must be knowing about MailChimp, no big deal if you don’t know What MailChimp is ? MailChimp is one of the best Email marketing service on web, which helps you to circulate Newsletters, Notices & other promotional media amongst your subscriber list. Doesn’t flatter your mind ? Go ahead and sign up for MailChimp for FREE Trial Account Now! 🙂
Once you have MailChimp account, you would want to see things in action, probably by embedding MailChimp form on WordPress Blog/website. MailChimp features you to embed form in two ways either using Html/JS code or using WordPress Plugin. Out of these two option, I found WordPress Plugin to be the easier way to integrate MailChimp form on website. Hence, in the article we will learn how to add MailChimp subscription form using WordPress plugin.
I have divided this tutorial into four sections that is Installation, Configuration, Styling and Embedding form in Sidebar.
Install MailChimp Plugin in WordPress Blog
As MailChimp plugin is free to use, so our basic step will be to install MailChimp Subscribe List Plugin.
Login to WordPress Admin and Navigation to Dashboard > Plugins > Add New Plugin.
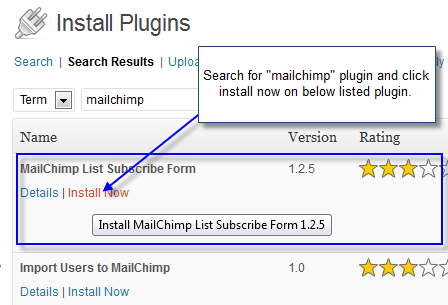
Search with “mailchimp” keyword and find “MailChimp List Subscribe Form” and click Install Now.
Install MailChimp Plugin
Once the plugin is installed, click activate button.
Configure MailChimp Plugin Settings
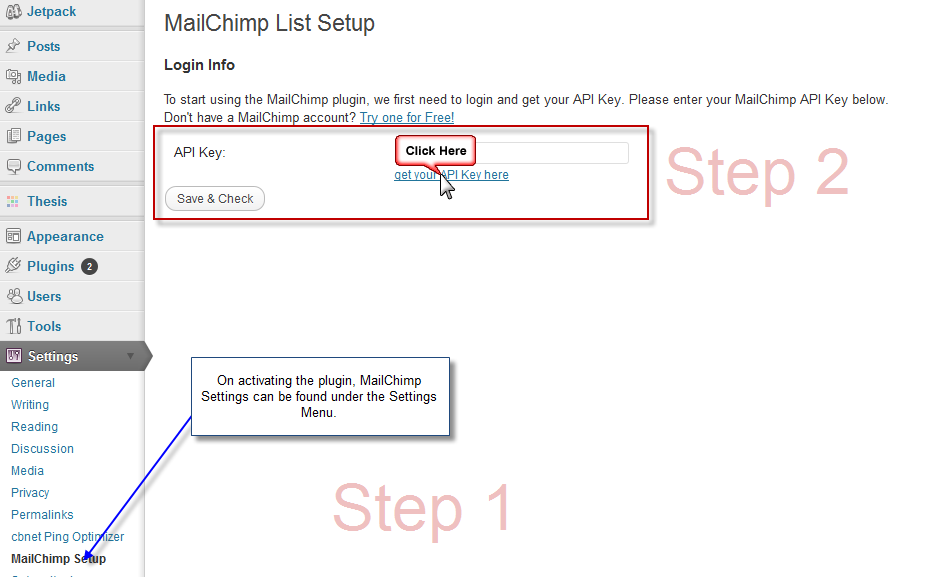
When you will activate the plugin, MailChimp Settings will appear in Settings tab.
Click on MailChimp Settings to configure Subscription form settings, similar to screenshot below.
MailChimp Plugin Settings
Note: In above screenshot Step 2: Plugin prompts to synchronize MailChimp account with WordPress, which requires a secret API key.
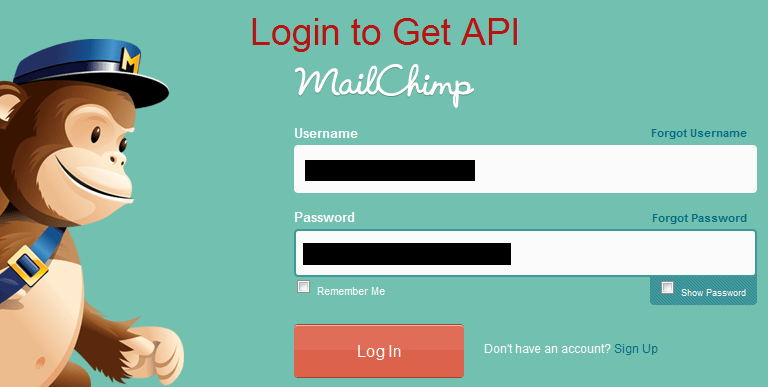
Click on the blue link which says “get your API key here” and you will be directed to MailChimp login screen, similar to screenshot below.
MailChimp Login Screen
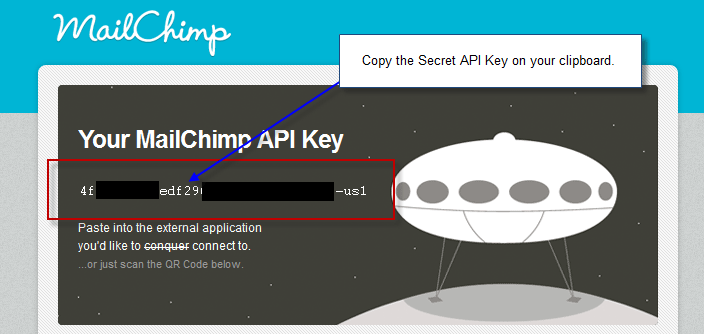
On successful login, you will get to see Your MailChimp API Key.Copy the key and save it for future usage.
MailChimp API Key Screen
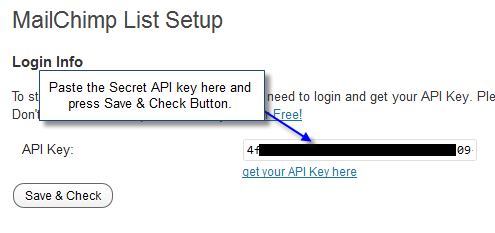
Once you have the key, go back to MailChimp Plugin Settings window and paste API key in text-field. Also press Save & Check Button to see some action.
Save MailChimp API Key
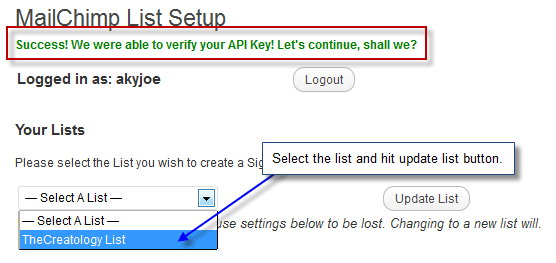
If API key gets validated, you will see Green Text saying “Success! We were able to verify your API Key! Lets continue, shall we?”.
Further, with successful synchronization, plugin will list all mailing lists created under that MailChimp account. You can select any one list from the dropdown and hit the Update List button on right. (Refer to the below screenshot)
Valid MailChimp API Key Message
On updating the list, you will see a lot of options below to customize and style the subscription form.
How to style MailChimp form in WordPress ?
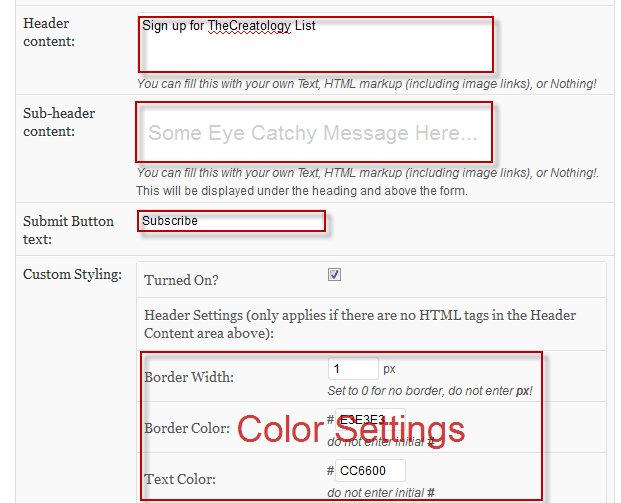
As we know subscription forms should be eye catchy to attract more subscribers. You can do so by using the MailChimp Settings to style MailChimp subscription form.
Refer to the screenshot below which explains about styling and customization of MailChimp form.
Customize Subscription Form
Once done, click on Update List Form Settings Button to save all changes. We are now all set to display subscription form in Sidebar.
How to Embed MailChimp form in Sidebar ?
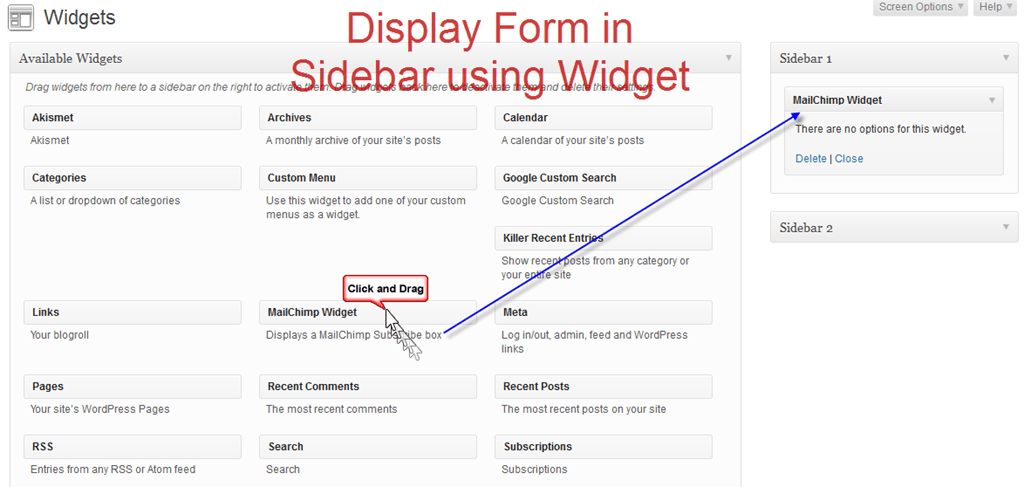
MailChimp Subscribe List Plugin creates a widget, which can be found in Appearances > Widgets.
Simply drag from the MailChimp Widget to the desired position in the sidebar, you can also refer to the screenshot below.
Embed MailChimp form in sidebar
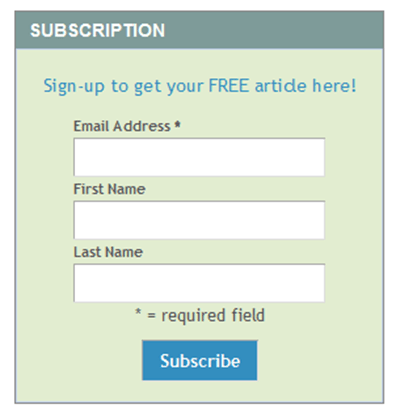
Once done, refresh the website to check MailChimp form in sidebar of WordPress Site.
Somehow if you don’t like your MailChimp form styling, you can go back to the Step-3 and redesign subscription form again, with some new colors, till you satisfy yourself. 🙂
Seems to be Easy ‘eh ?
Well, this tutorial may look too lengthy, but believe me it just saved you from the Nightmares and Ghosts Coding and CSS Styling. LOL! Secondly, MailChimp power ease in managing Email subscription list and builds database of your contacts.
With this we come to the end of this tutorial on Easy way to add MailChimp Subscription Form on WordPress Blog. If you have any query or further assistance is required, you can post comment below as your feedback.
Spamming on WordPress blogs has become vital, just kidding, increasing day-by-day. You must be here looking up for solution to stop spam on your blog as well. To stop spam comments, I have covered two articles on How to Block Spam using HTACCESS and using Akismet Plugin. But these tutorials will only help you to stop spam commenting on your blog but not on contact forms. For a spammer, it’s just a Submit button required to do all the action.
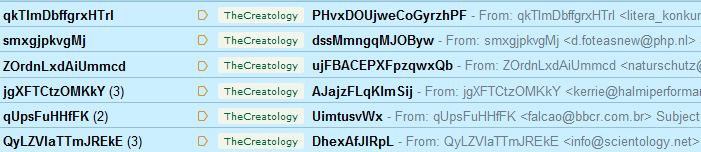
If your WordPress Blog is using Contact Form 7 plugin, then beware that you can be spammer’s next target. Recently, I received few spam comments on my Email via Contact form 7 on thecreatology and it got worst with count of 50+. Annoying! Below is screenshot of the Inbox:
Spam Messages from Contact Form 7
I tried tracking IP Address of all emails and the origin, but it was hard to block spammer access because they used a random IP Address every time. So, I had to install CAPTCHA in Contact Form 7 settings. In this tutorial, you will learn how to add CAPTCHA in Contact Form 7 Plugin to block Spam on Website.
Block Spam using CAPTCHA
CAPTCHA is an automated scripts made to validate forms submission. CAPTCHA reforms a word every time it refreshes. This makes it complex for spam bot to read CAPTCHA letters and auto submit form. To add CAPTCHA in WordPress Contact form, you will be required to install Really Simple CAPTCHA plugin. Below is stepwise procedure to add CAPTCHA in Contact form 7.
Step 1: Install Really Simple CAPTCHA Plugin
To install WordPress CAPTCHA plugin, login to WordPress dashboard:
Navigate to Dashboard > Plugins > Add new Plugin.
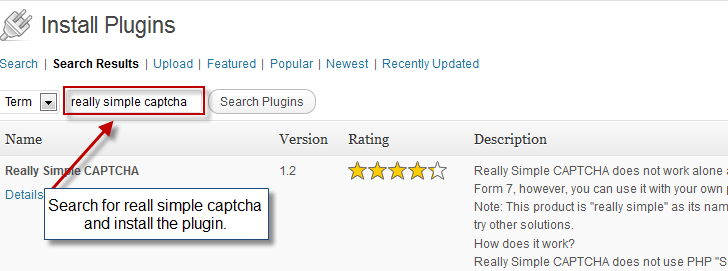
Search for Really Simple CAPTCHA plugin and click to install it. Refer to screenshot below.
Install CAPTCHA plugin
One the plugin is installed, activate it.
Are done with installation of plugin? Move on to configure Contact Form 7.
Step 2: Add CAPTCHA to Contact Form 7
You can add CAPTCHA in contact form in few easy clicks. Follow the procedure below:
Login to WordPress Dashboard and navigate to Dashboard > Contact.
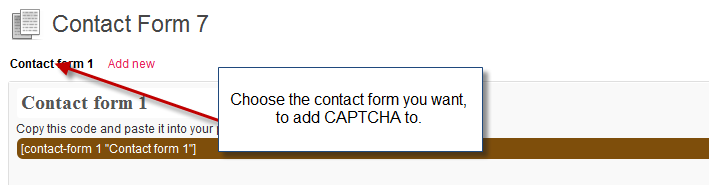
Select the contact form to edit it, refer to the screenshot below.
Select Contact Form To add CAPTCHA
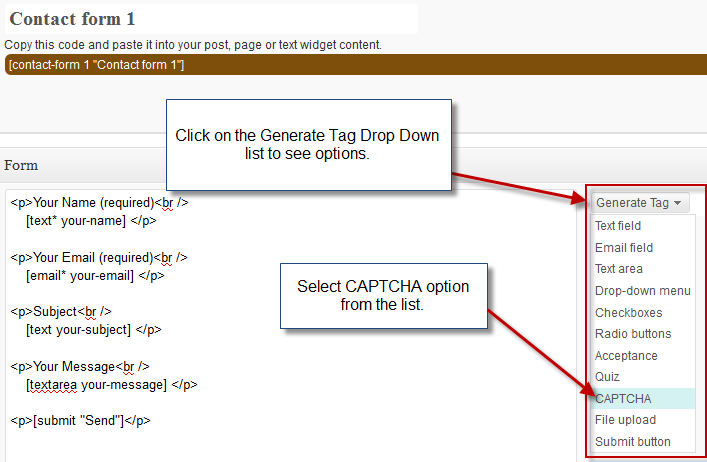
To add CAPTCHA, click on the Generate Tag drop down list on right, and select CAPTCHA option in the list, just like in the screenshot below:
Generate CAPTCHA Tag for Contact Form
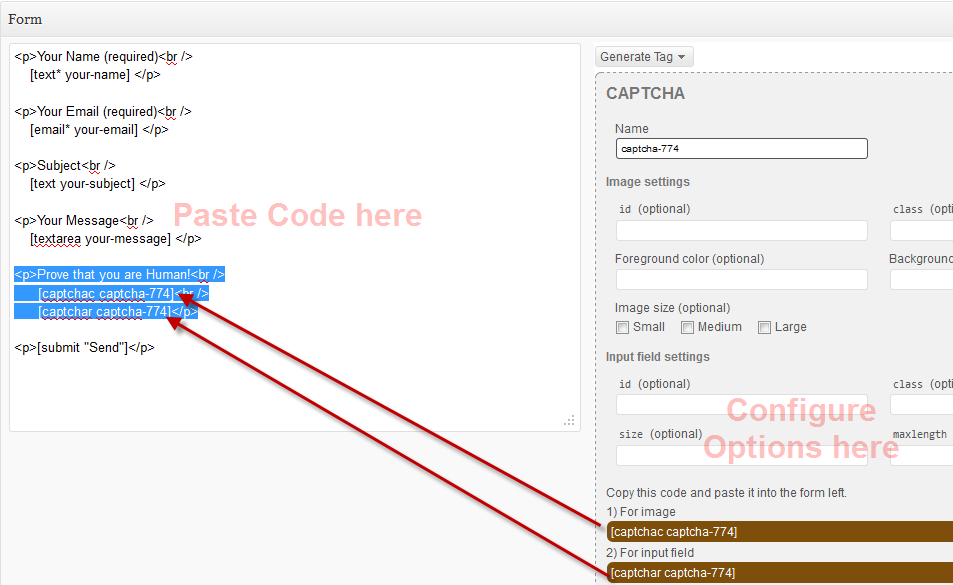
After you click on the CAPTCHA option, CPATCHA setting options will appear under the Generate Tag drop down list. Now, configure the options and copy-paste the code on the left side of the window. Refer to screenshot below:
Add CAPTCHA to contact form code
Once done, hit the Save button on top right and We’re Done! 😉
We’re Done
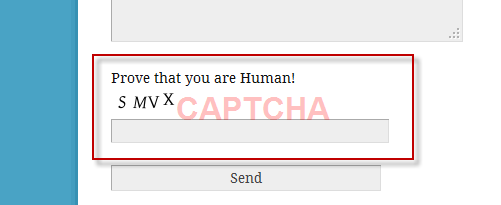
Now that you have added the code, refresh the contact form page and check it out, it will look similar to screenshot below:
Demo: CAPTCHA on WordPress Blog
Adding CAPTCHA will violate bots to submit spam on website. In a way you can focus more on blogging rather administering your blog.
In this article, we learned to add CAPTCHA in Contact Form 7 WordPress Plugin to block spam. If you have any queries or require any assistance, you can post a feedback using comment form below.
Does your blog show Previous-Next Links on home page ? The reason behind the question is the missing swift feature on blog. As we know that, Previous-Next links in Thesis Theme is less prominent, hence they increase bounce rate and pagination is not that effective too. In my previous article, I mentioned about how we can Style Previous Next Links in WordPress to decrease bounce rate. In the following article we will learn to add Pagination on blog to increase efficient paging.
Efficient Paging
How to add Pagination in WordPress Blog ?
Pagination adds an advantage in a blog as making smart navigation on website. In this article we will use WordPress Plugin WP-PageNavi to add pagination on WordPress. But, before we proceed to add pagination in Thesis Theme, I recommend you to safely upgrade thesis theme.
Below is a simple 2-Step procedure to add Pagnavi in WordPress blog:
Step 1: Install PageNavi Plugin
Navigate to WordPress Admin Panel > Plugins > Add New.
Search for plugin “wp-pagenavi” and install the plugin. Or you can also download the plugin here.
Once the plugin is installed, activate it.
Step 2: Add PageNavi in Thesis Theme
In order to add pagination on blog page, edit custom_functions.php file and copy-paste the below code snippet.
Make sure you take full backup of custom_functions.php file using FTP before modifying it.
[php]
// Page Navigation
function joe_adds_page_navi(){
if (!is_single() && !is_page()){ ?>
<div id="pagenavi"><?php if(function_exists(‘wp_pagenavi’)) { wp_pagenavi(); } ?></div>
<?php }}
add_action(‘thesis_hook_after_content’,’joe_adds_page_navi’);
[/php]
We Are Done!
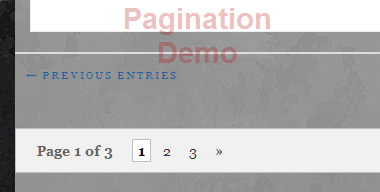
After adding the code, we are done with the adding pagination to blog page. Once done, refresh the blog page and you will find it similar to screenshot below.
Page Navigation Demo
Thesis WordPress is a great theme and adding Pagination, just makes it perfect. It is believed that the next version of Thesis Theme will have Pagination preinstalled. Since there is no exact date when it will going to happen, but by that time we can add Pagination manually to Thesis Theme.
If you have any query or any further assistance is required, you can post comment as your feedback.




 Somehow if you don’t like your MailChimp form styling, you can go back to the Step-3 and redesign subscription form again, with some new colors, till you satisfy yourself. 🙂
 If your WordPress Blog is using Contact Form 7 plugin, then beware that you can be spammer’s next target. Recently, I received few spam comments on my Email via Contact form 7 on