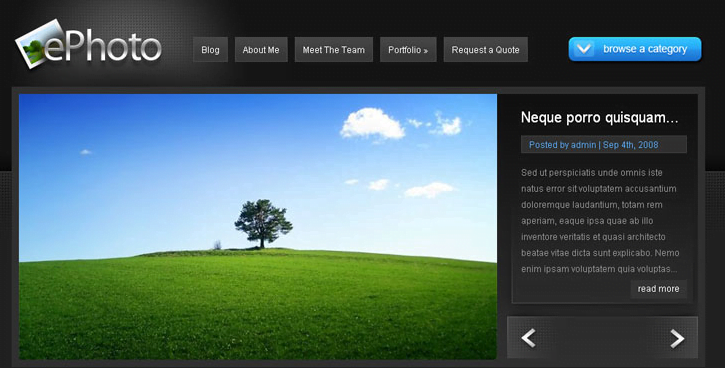
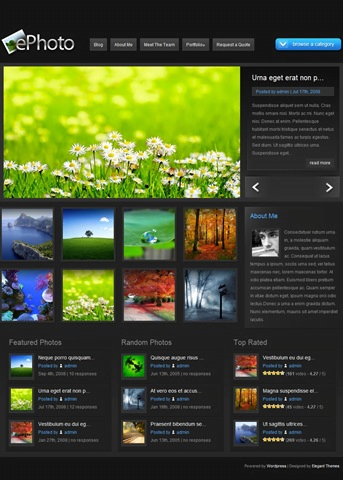
ePhoto WordPress Theme is photo portfolio for photographer. I believe for best photographer website must have a photo gallery which elucidates its work, and ePhoto theme suits best-in for the scenario. It has jquery photo gallery slider with various animated effects, which gives elegant impression to visitor. Best thing I like about this theme is that it features to add blog posts with the photo gallery, hence a photographer can also share its experience with audience.
Photo Gallery Slider
ePhoto photo blog theme has two color black and blue schemes which can be easily switched from the option panel. With advanced theme option panel, it eases content management, with various settings.
ePhoto theme is 3 column wordpress theme with customized widget support. For efficient working the theme is capable of dynamically resizing thumbnail. I have listed few more features about the theme, you can find them listed below:
Do visit again to tell us, how did you find ePhoto WordPress theme ? Do share with us, which theme are you using for your photo blog, by posting a comment/s below.
It is a normal Human tendency, that we read a blog from top to bottom as with our interest, which means anything placed at top of the website will grab reader attention. For publishers it is very important to grab reader’s attention at the top of the website, by placing an advertisement or add alertbox at top.
Illustration – Alert
Thesis WordPress Theme is enriched with content management capabilities, and a best SEO theme. Thesis doesn’t come with top headline bar or ads slot but allows to add them for your blog. If you don’t have a copy of Thesis Theme then you can download thesis theme here. If you are using an old version of Thesis Theme then I recommend you to safely upgrade thesis theme.
In this article, we will learn to add alert bar at top of blog to grab reader attention in thesis theme.
How to grab reader attention ?
We will add a solid color headline alert bar at the top, where you can write anything and making it eye catchy by playing with colors. If a line or phrase is interesting like “20% off on WordPress Hosting + Free Blog Setup ”, will increase CTR or will increase clicks on blog.
How to add alert bar in thesis ?
We are using a simple and smart concept here and the analogy behind is by registering alert bar widget in wordpress and adding it before header. You can follow the procedure below to add alert bar in thesis theme:
Login to Dashboard Admin of WordPress blog.
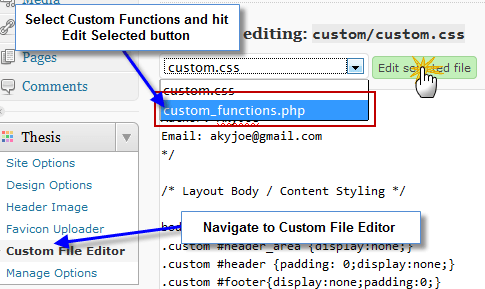
Navigate to Thesis > Custom File Editor and select custom_functions.php in drop-down list and click edit selected file.
Step-1-Select Custom Function php file for editing.
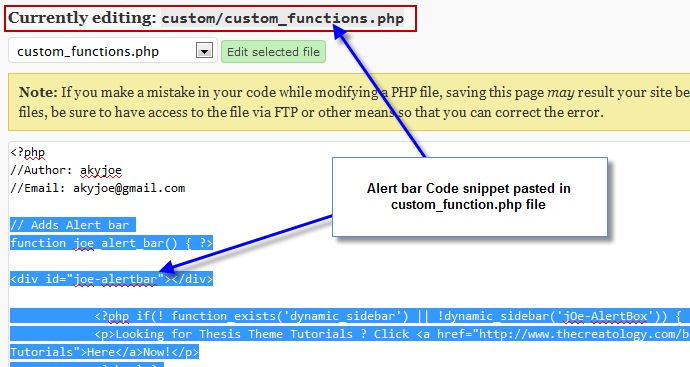
In custom_functions.php file editor, copy-paste the below code snippet very carefully.
Step-2-Add code snippet in custom functions file
Make sure you take full backup of custom_functions.php file using FTP before modifying it.
Now that we can added the alert bar, but you will find it broken or beyond the layout. To fix, we will have to style alert bar using CSS code.
Navigate to Thesis > Custom File Editor, select custom.css file and copy paste the below code snippet very carefully in Custom.CSS file.
Code:
[css]
#joe-alertbar{
background:#333; /*Change Background Color of Alert-Bar*/
color:#fff; /* Change Text Color of Alert-Bar*/
margin: 0 auto 5px;
text-align:center;
padding:5px 0;
font-size:14px;
border-bottom:3px solid #fff;
}
#joe-alertbar a{
font-size:14px;
color: #f60; /* Change Link Text Color of Alert-Bar*/
}
#joe-alertbar li.widget, #joe-alertbar li.widget p{
margin:0;
font-size:14px;
}
[/css]
Above code will style alert bar for background color and text color. I have commented few lines in above code snippet, where you can change color of alert bar and font color matching your theme.
Once we are done with installation of Alert bar, we move ahead to display some text and see how it goes live on our website. Since we have registered a sidebar named as jOe-AlertBox, so navigate to Appearance > Widgets.
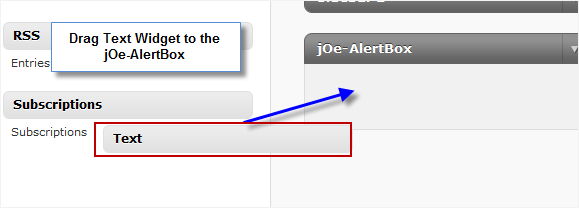
Now drag a “Text Widget” to the newly created “jOe-AlertBox” just like in the below screenshot.
Step-3-Add Text Widget to alert box
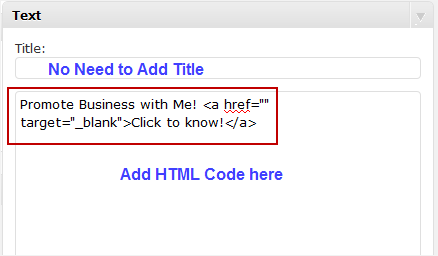
In the text widget, add any html code or a text which is to be displayed on the alert bar. (Refer to the screenshot below) Make sure to restrict the text in single line and word limit should not exceed 30-35, else it will look congested.
Step-4-Add text in text widget to display on alert box
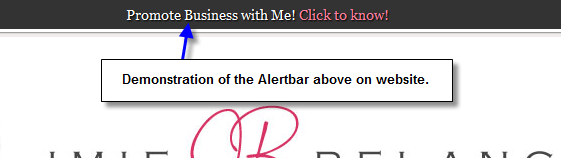
Once done with the text, click on the save button below text area and now refresh the website, it will look something like this below.
Demo of alert box on website
Alert bar has many possibilities to grab people’s attention. You can use alert to announce new products or discount coupons, featured post or may be a favorite quote of Sir Albert Einstein. Let us know how you used the alert bar at top by posting a comment below.
If you have any query or further assistance is required, you can post comment as your feedback.
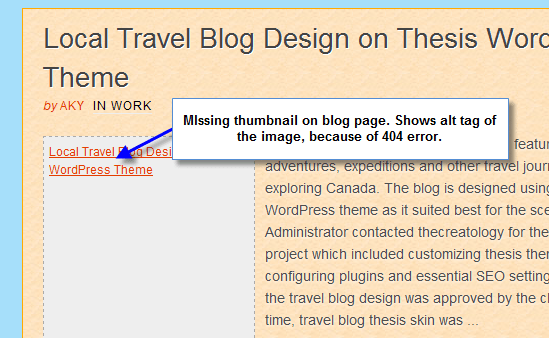
Recently during the analysis of the website TheCreatology, I found that there was no thumbnail image on blog page, instead it was the image alt text. When I looked at the markup using firebug and I found that the auto thumbnail image generated using timthumb returns 404 error.
No Thumbnail using TimThumb issue with Hostgator
TheCreatology is using TimThumb script to auto generate thumbnail as in the article How to auto generate thumbnail in Thesis Theme without Plugin. But, everything seemed to be okay according to the procedure, and also I tested it on a local test server. Finally, I realized that timthumb script fails to execute on server, and returns 404 error. The website is hosted on Hosgator, so I logged in and contacted technician to resolve this issue for me. Below is what I exactly did to solve timthumb issue with hosgator:
Login to the Hostgator Cpanel and click on the Live Chat Support. Further select Technician in drop down list (as it being a technical issue), and Enter your name, your website’s Url and the question.
Once you are connected to the chat support, ask the technician to whitelist timthumb file used for thumbnail generation for mod_security. Since this is a known issue with Hostgator WordPres hosting, so they will recognize the problem easily.
In order to whitelist the Thumbnail file, the technician will ask you to verify your identity with the billing info, so just keep the details handy with you.
Once verification is done, technician will ask you to check for the Files and Folders’ permission. Make sure all folder’s permission is set to 755 and all file’s permission is set to 644, especially the timthumb.php file should be set to 644. Once done, confirm the technician about permission is set.
You will get the confirmation from the technician in few minutes, and the problem will be resolved soon after it.
I had a long conversation with the technician and asked him how to solve timthumb error, but couldn’t get a better solution than this. But I was happy to get the thumbnails back on the site, as the blog looked incomplete without thumbnails.
If you are so stuck or unable to resolve this issue, then you can post your feedback as comment below and I will get back to you as soon as possible.
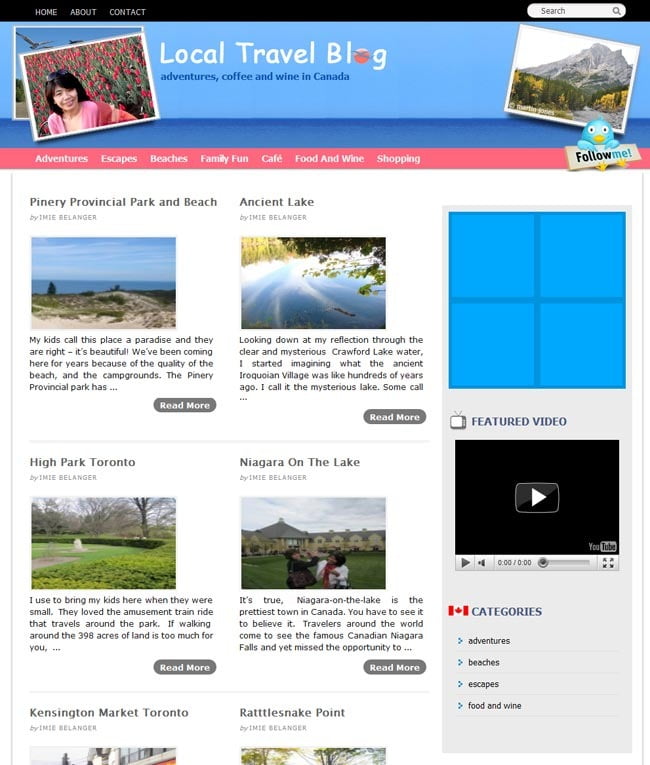
Local Travel Blog is a WordPress blog, featuring adventures, expeditions and other travel journeys exploring Canada. The blog is designed using Thesis WordPress theme as it suited best for the scenario. Web Administrator contacted thecreatology for the website project which included customizing thesis theme and configuring plugins and essential SEO settings.
Mockup for the travel blog design was approved by the client. In no time, travel blog thesis skin was developed and published online. Ease with Thesis Design options, made everything so easy and less time consuming.
Below you can see a screenshot for the local travel blog canada:
Travel Blog Designed on Thesis Theme
To see the local travel blog live online click here and come back here to let us know your thoughts about the design, by posting a comment as the feedback.
If you want something similar for your travel blog website, you can use the contact form below, I will get back to you as soon as possible!
Are you looking for glossy button design for website, similar to the image below ? Then you can design glass button by yourself in simple steps using photoshop.
Glass button image sprite for website
In this article, I will use Adobe Photoshop to create glass button sprite. Image sprites are purposely used by CSS developer to design mouse over image, function smoothly and efficiently. Here is the tutorial to design glass button image sprite for website in photoshop.
Step 1: Create Simple Button Base
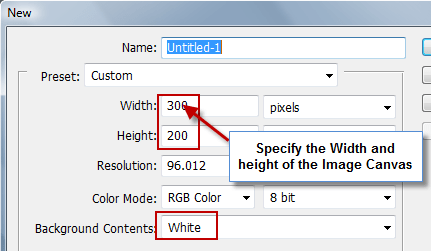
To start from scratch, Open Photoshop and create new image canvas with approximate pixels for width and height. If you want create transparent website button then choose Transparent in Background Contents, or you can stick with White background as well. (Refer to the screenshot below)
Step1-1 Create New Image Canvas
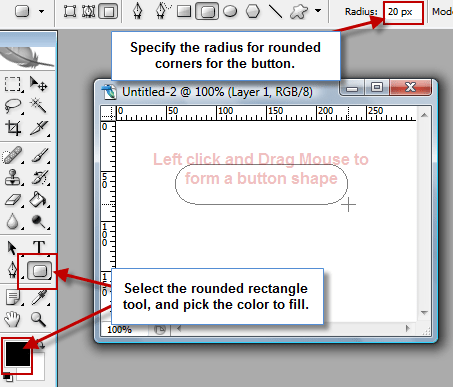
Create a new layer and name it as button. On the button layer, select Rounded rectangle Tool and give it a desired radius, for instance I give it 20px in this example. Now left click and draw out a rectangle on the canvas. (Refer to the screenshot below)
Step1-2: Draw Rounded Rectangle base
Now that we have created base for the button, so we now proceed to our next step 2 to add glossy effect.
Step 2: Apply Glass Effect to Button
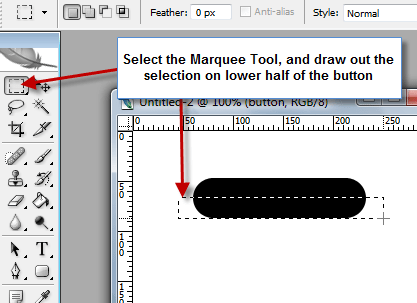
In order to add glass effect, create another layer and name it as a glass. Select the marquee tool and draw a selection over the lower half of the button. (Refer to the screenshot below)
Step2-1 Select Marquee Tool
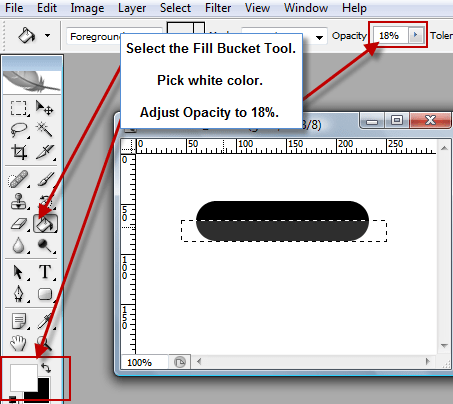
Now select the Fill Bucket Tool and with white color #ffffff and opacity level adjusted to 18%, fill the selected area. And it should look something like this.
Step2-2: Fill lower half of the rectangle
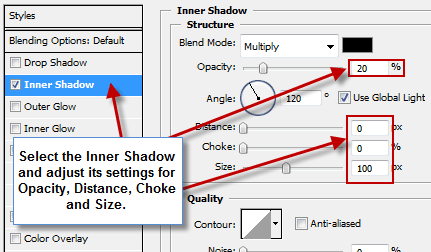
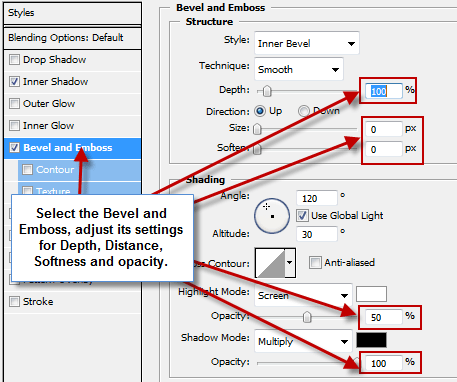
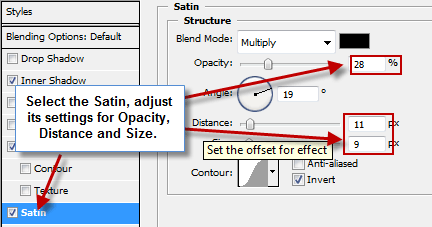
Now right click on the button layer, open Blending Options and adjust the settings for the following:
Inner Shadow
Step2-3 Inner Shadow Adjustment
Bevel and Emboss
Step2-4 Bevel and Emboss Adjustment
Satin
Step2-5 Satin Adjustment
Gradient Overlay
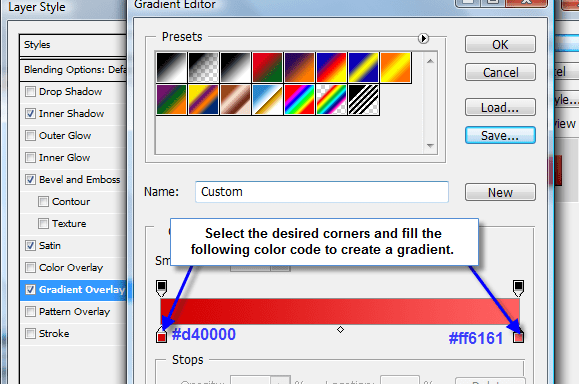
Step2-6 Gradient Overlay Adjustment
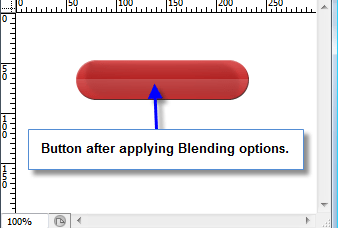
After adjusting the blending options, the button should look like this.
Step2-7 Button with Glossy effect
Step 3: Button Text and Finalize
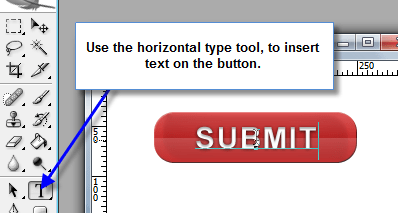
As in Step 2, we have created the glass button, now we have to add Text and finalize it. To insert text to the button, use the Horizontal Type Tool and add text to the button.
Step3 Adding text to the Button
After adding the text, and nudging a bit we will get the final image. In order to create another button, simply repeat step 1 and then adjust different colors in step 2 to create multiple buttons, just like below.
Multiple Glass button Designs
Here I come to the end of this tutorial, I’m sure that these glass web buttons will add elegance on your website. If you have any query or further assistance is required, post comment as your feedback.
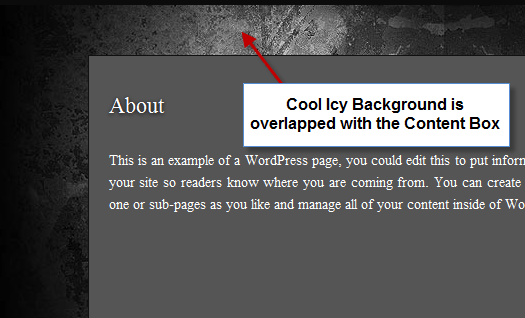
Are you looking for a Transparent content box for website ? It can be very useful in case you have a creative background for website, and it is overlapped by the content box or post box of website. Have a look at the image, which will clear you a bit more.
Non-Transparent background post box
And if you have spent lot of bucks for the attractive background image, then it is just a waste of money. But there is a resolution for it, and by applying transparency to background, it will give website a fresh look.
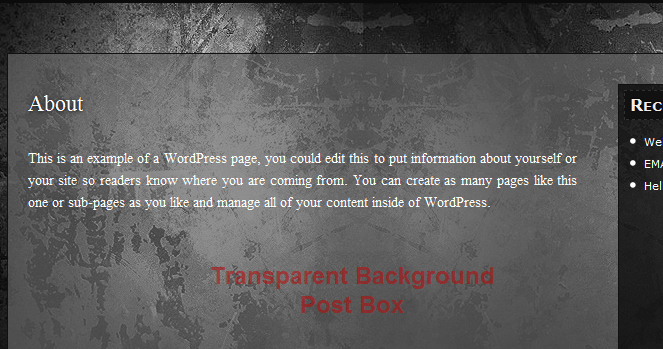
In this article I will guide you how to restyle post box with transparency, and hence it will create transparent background post box for a website. Just like in a screenshot below:
Transparent background post box
Below is a three step procedure to give transparency effect on website.
Step 1: Pick background Color Code of Post Box
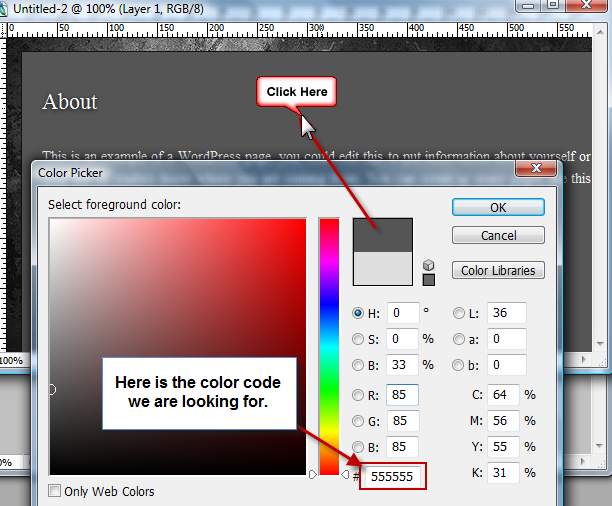
The initial step of the tutorial is to pick the background color code of the post box. If you already know the background color code post box, then you can skip to Step 2. If you don’t know the background color code, find it using:
Firefox ColorZilla Addon
Firefox Firebug Addon
Print Screen key, and pasting it on any image editor and picking the color code from there. Refer to the screenshot below, I’m using Adobe Photoshop’s Color Picker tool.
Step1 Create transparent background post box
Once you have the background color code, proceed to Step 2.
Step 2: Create Transparent Image Pixel
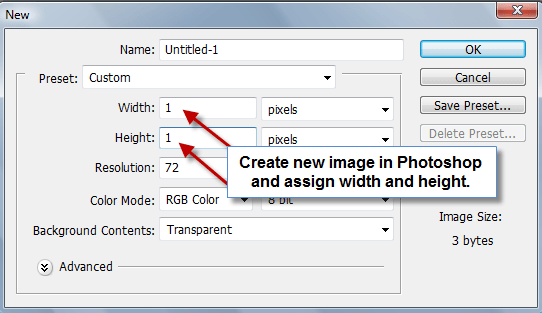
In this step we will create a new image file using adobe photoshop. To create new image, open Photoshop and navigate to File > New or you can also use Ctrl+N. Specify the width and height as 1 pixel, as we will use CSS, which I will explain you in Step 3. You can also refer to the screenshot below:
Step2-1 Create transparent background post box
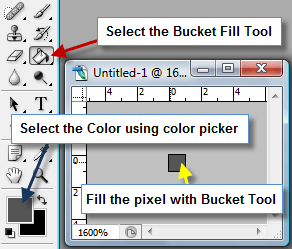
After creating the new file, we will now fill the image pixel with color code we find in Step 1. Below screenshot will explain you to how to fill the pixel.
Step2-2 Create transparent background post box
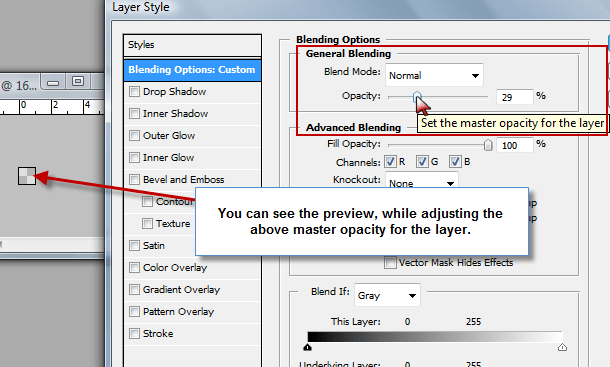
Now, once we have the pixel filled, we will now apply transparency effect to it. For applying transparency effect, we will use the Blending options of the layer. Refer to the screenshot below:
Step2-3 Create transparent background post box
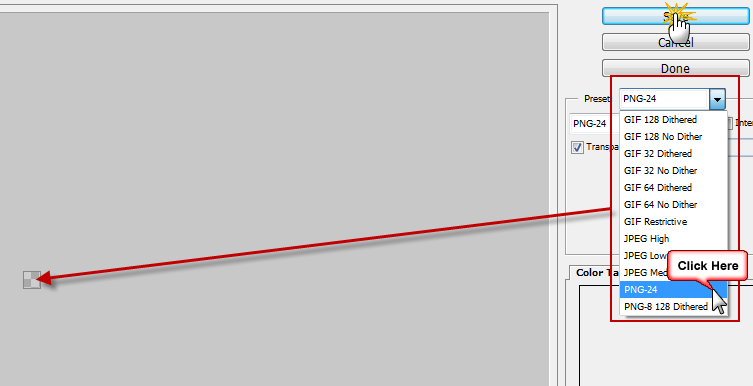
When you are satisfied with the preview, click Ok button to apply the blending options. As our image is ready to be used, we will have to export the image as PNG format, as it is the only type of format with supports transparency without loosing any pixel. In order to save image as PNG navigate to File > Save for Web… or you can also use Ctrl+Alt+Shift+S. It will open a new window with different options to export the image. Choose PNG-24 option from the drop down list as explained in the image below and save the file in your theme directory.
Step2-4 Create transparent background post box
Step 3: Add transparency to post box
This is final step of this tutorial, in other words we say final touch up for transparent website. In this step we will edit the CSS code for the post box which we want to apply the transparent effect. Locate the code for the post box in the CSS file and replace it with below code snippet.
Please Note: This is a syntax code, where you will have to replace “#your-post-box-div” and “transparent-image-path-location.png” with real values which will vary as per your scenario.
After editing the CSS file, upload the transparent image as well as the updated CSS onto your web server. Now refresh to the website to see the effect, as I have in below screenshot:
Demo Transparent background post box
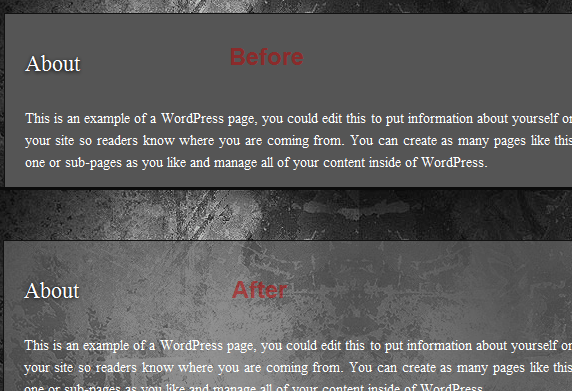
What do you think after seeing the image above? It did made the site look different now, as the background on the website is visible. If you ain’t satisfied with the transparency effect then, you can repeat the Step 2 and Step 3 again until it meets the satisfaction level.
With this we come to the end of this tutorial, if you have any query or need further assistance you can simply post comments below as the feedback.
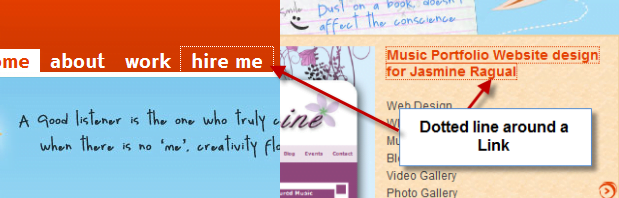
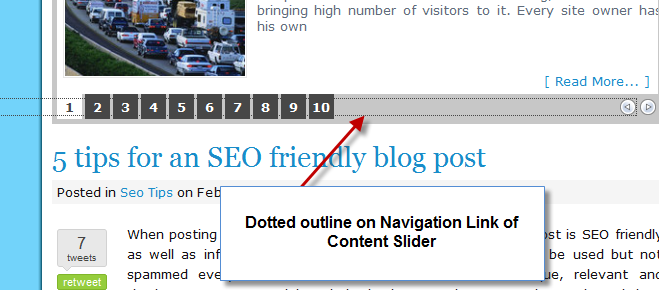
Are you annoyed of the dotted outline around link when it gains focus or get active? Well, most of us use Firefox, and by default Anchor links have dotted outline around them, when they get active or gain focus. Below screenshot which will clear you more:
Dotted outlline around link
Usually outlines around small size links don’t get in notice, but if a link is “h1” heading then it really affects the readability. Also the websites which are using content sliders, you will notice the navigation arrows have big dotted lines around them and floated from left which looks more ugly and. Just like one in the screenshot below:
Dotted Line on Content Slilder
How to remove ?
Many instances we find these outline important as they justify us about the link, but few instances like the content sliders or floated items, it really looks undesired. In this article, I will share a simple tweak to override the browser’s default css, and it will remove dotted outline around all links.
[css]
a {
outline: 0;
}
[/css]
Copy-Paste the above code snippet in the Style.css file of the website or blog. If we don’t want to remove outline completely, for instance active state of links should have outline enabled and removed for focus and mouseover states. The code for the scenario will look like as give below:
[css]
a: hover, a:focus {
outline: 0;
}
[/css]
Copy-Paste the above code snippet in the Style.css file of the website or blog. Further save and refresh to see the effect, you will find the outline is not visible while links gaining focus.
We come to the end of this article, though it was a three line code and but important for many of us. If you have any query or any further assistance required post comments as your feedback.
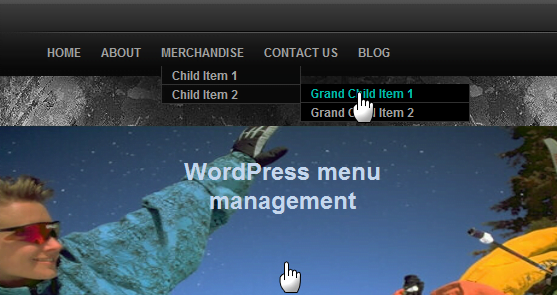
Since WordPress 3.0 has evolved, Creating Menu for blog has relieved headaches for many, as WordPress 3.0 menu gives user ability to create and organize custom menu structure.
Multiple Navigation menus using WordPress
Drop-down or nested menus was complex to code for a novice user, till Thesis Premium Theme was out in market. Thesis theme features to add custom menu structure for a WordPress blog. But, Thesis Theme allows to add one navigation menu only, hence its a limitation for a blog to add multiple menus. This limitation was soon resolved when WordPress 3.0 menu was launched. In this article I will guide you to use WordPress menu with Thesis Theme. The tutorial requires updated versions of WordPress and Thesis Theme. If you are using old version of Thesis then you can refer to article Safely upgrade to latest version Thesis 1.8 ?
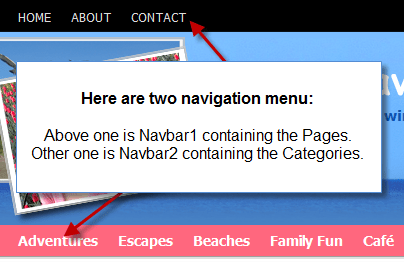
In this article, I will add two navigation menus in thesis theme, one referring the pages and other menu will refer the categories. I have divided the procedure in three steps that is register menu, create menu and finally display menu. Below is procedure to add navigation menu using WordPress 3.0 Menu.
Step 1: Register Menu in Thesis Theme
Menus are supported by almost every WordPress theme, some themes has it preinstalled while, other themes like thesis we have to register them before. Below is the code snippet and it will register two menu locations in Thesis Theme:
Make sure you copy-paste the code precisely, otherwise erroneous code will crash the website / blog.
Add the above code in custom_functions.php of Thesis Custom Folder and save / upload the file. Once done, we move to next step to Create menu in WordPress.
Step 2: Create Menu in WordPress
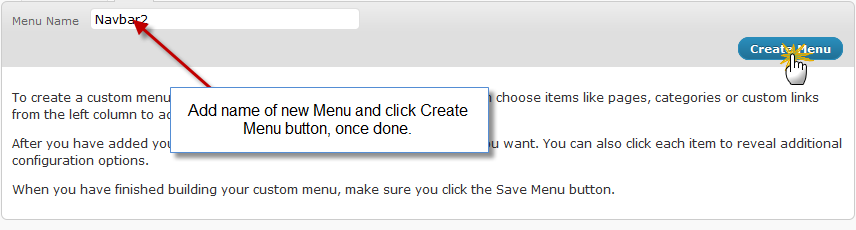
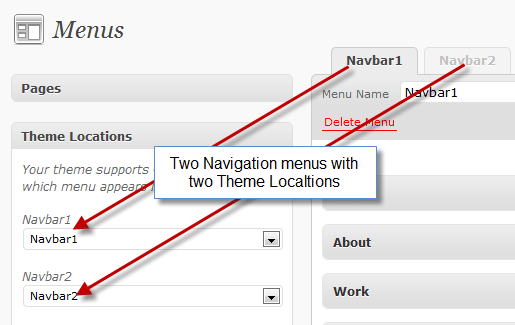
WordPress menu management is click-a-way and easy to use. In step 1 we registered two menu locations in custom_functions.php file, so that we can differentiate theme locations of the multiple navigation menus in WordPress. In this step we will create navigation menus and assign theme locations. Login to WordPress Dashboard and navigate to Appearance > Menus. Now create new menu depending upon the requirement. For instance, I have created two menus Navbar1 and Navbar2. (Refer to the screenshot below)
Step1: Create Menu in WordPress
After creating menus, you can drag drop the menu items and save menu. Next, important step is assigning menus the appropriate locations. On the Menus page find Theme Location Widget, and using the Drop down list, select appropriate Theme Locations. (Refer to the screenshot below)
Assign Theme Locations
Click on save button right below it, once done selecting the appropriate Theme Locations. And now we move on to next step, where we will display these menus.
Step 3: Display Menu on Blog
With Step 2, we are done with the backend part, and now we will publish menus on the blog. Referring to the WordPress Codex for Menus, we will once again edit custom_functions.php file. Copy-Paste the below code snippet in the custom_functions.php file, as we did in Step 1.
Make sure you copy-paste the code precisely, otherwise erroneous code will crash the website / blog.
Save and update the custom_functions.php file once done with editing the code. In the above code we have called wp_nav_menu() twice but with different parameters. First instance under displays the Navbar1 menu while the second instance displays the Navbar2. On refreshing the site you will find something like, as in the below screenshot.
With this we come to end of this tutorial, I’m sure you will find using menu with Thesis theme, more efficient and flexible. If you have any query or need any further assistance, post your feedback as comments below.
If your WordPress blog is currently using a custom theme, then you can redesign it using the Thesis Theme Services.
Latest version of Thesis WordPress theme was launched last year, which enhanced Design Options for flexibility in content management. In my recent post, I explained the Ease with Thesis WordPress Theme Design options panel, which you will find it in the latest version of Thesis theme.
Though upgrading to Thesis 1.8 is a click-a-way work, but sometimes a bit of lag can ruin a website or blog for functionality or SEO, which costs you an extra overhead. In this tutorial, I will guide you through about how to safely upgrade to Thesis 1.8 ?
Below is the procedure to upgrade thesis theme:
Step 1: Download latest Thesis 1.8
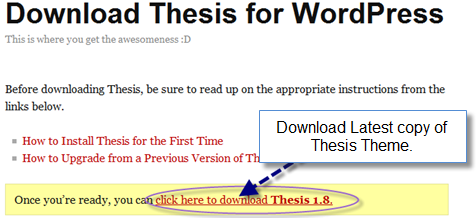
Thesis 1.8 version is available at DIY Theme Thesis admin area, where you can download the latest copy of Thesis Theme. Once you login to the admin area, you can click “Download Thesis for WordPress” and you will be redirected to the download page. On the download page, click to “download Thesis 1.8” and save the file to your computer, when prompted. You can also refer to the screenshot below:
Download Thesis 1.8 Version
After saving the file, open it and cross check the Zip archive for CRC errors, which usually occurs when transferring files from internet.
Step 2: Backup Database and Settings
To stay at safer side, I suggest you to always backup your website’s database while making any updates or modifications in WordPress backend. You can simply use WordPress Export Tool (Dashboard Admin > Tools > Export) to download all Posts, Pages, Categories etc. in a XML file to your computer.
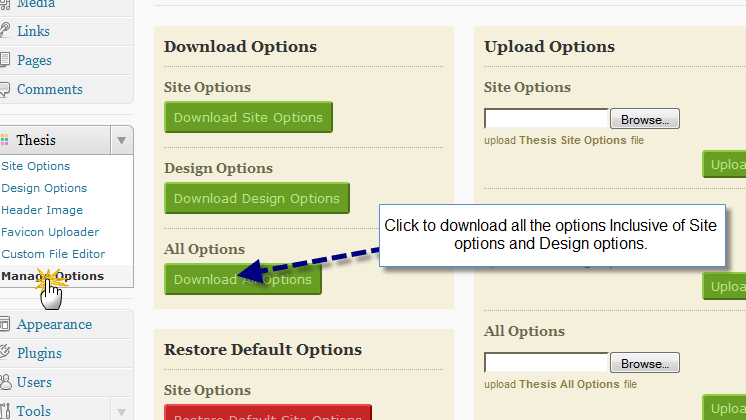
Though Thesis retains its options comprising Site Options and Design Options, after upgrading to Thesis 1.8, but you can backup them as well by using the Thesis Download Options (Dashboard Admin > Thesis > Manage Options) and save them to your computer. You can also refer to screenshot below:
Backup Thesis Options
Step 3: Backup Custom Folder
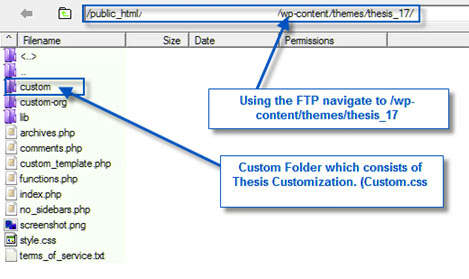
Once your are done with backup of database, another important step is to backup Custom folder Thesis theme. Custom folder contains all of the customization related to styling and functionality of the blog. In order to take backup of custom folder, login to your ftp client and navigate to path /public_html/wp-content/themes/thesis_17/ and further download the custom folder to your computer. Below screenshot shows the location of custom folder under thesis theme.
Backup Custom Folder Thesis Theme
Step 4: Installing Thesis 1.8
After taking the backup of database, thesis settings and custom folder, we move on to install latest Thesis version. As I have already explained in my Tutorial to Install Thesis Theme on a WordPress Blog in 3 steps, so you always go through the article and come back here.
After you have installed thesis theme, you can now restore the custom folder of old Thesis theme downloaded in Step 3. In order to restore it, login to your ftp client and navigate to path /public_html/wp-content/themes/thesis_18/ and add the custom folder in the current directory.
Once done with uploading the custom folder, you can check out your blog/website now, which is powered with latest version of Thesis theme. And with this we also come to the end of our tutorial, if you have any query or further assistance is required, you can post your comments as your feedback, or you can use the Thesis Theme Services for the upgrading Thesis for you.
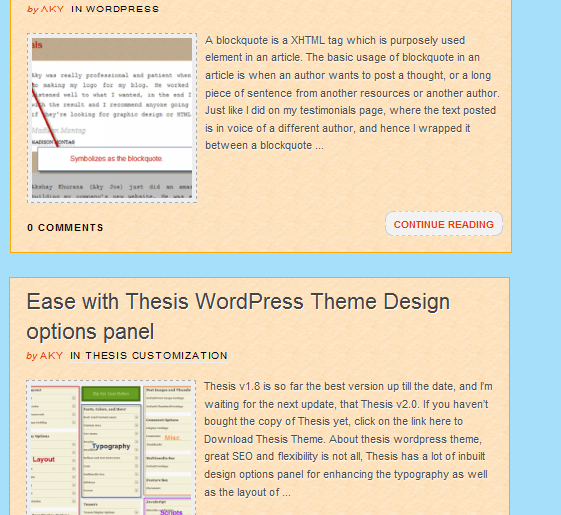
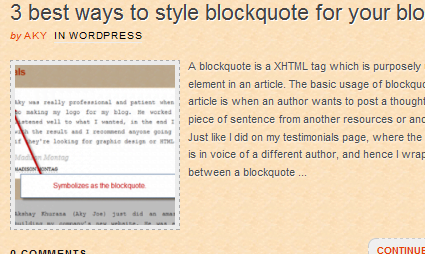
A Thumbnail on a blog page makes it alive and increase more visits on articles.
Thumbnail Preview on Blog Page
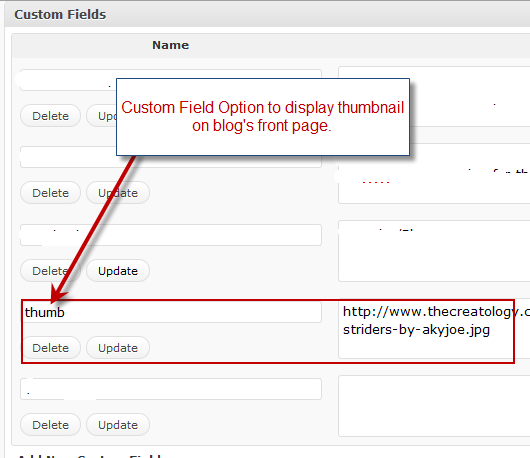
Some premium themes features to add thumbnail using the custom field, like in Thesis WordPress theme you can customize a thumbnail and add it on blog page. But, custom field option can be complicated and time consuming process from bloggers.
Custom Field Option in themes
At present, most of the blogs are using plugins like thumbnail-for-excerpts to show thumbnail on front page, which saves time & complexity. But the only issue I find using plugins is that it increases more of php calls, hence increasing server load and slow page loading. This post will guide to auto generate thumbnail in Thesis Theme without using any Plugin or custom fields.
This article is only for blogs using Thesis WordPress theme, and if you are interested in thesis theme you can Download Thesis Theme here.
The analogy behind the tutorial will integrate a function to get the first image from the post content, and further that image will be resized using the TimThumb open source script, to generate a thumbnail. Below is the procedure in detail to add thumbnails in Thesis Theme without Plugin:
Step 1: Get TimThumb.php open source script
TimThumb.php is an open source script and you can download it and place it in the custom folder of the Thesis theme directory. You can also open the script in the web browser and copy-paste the code in a text file and save is as TimThumb.php
Step 2: Add code in Custom_Functions.php
Once we have placed the TimThumb.php file, we now have to add code in custom_functions.php file located in custom folder. The code is divided in to two sets of functions. One will get the first image from the content, and will be initialized using init function to invoke default values. Other part contains code to show Thumbnail before post.
Place the above code in custom_functions.php file in Thesis folder make sure you do it precisely, else it might crash your access to WordPress Dashboard.
In above code you can specify width and height of the image as well according to your requirement, for instance I have specified 150 x 150 as a standard thumbnail size.
Step 3: Thumbnail CSS Styling
Everything needs a finishing touch, and here we do it by adding some styling to the thumbnail generated. Below is the code which will float thumbnail on left of the content excerpt. If you want the thumbnail to float on right, you can simply change the below code with float property. Here is the CSS code:
Place the code in the custom.css file located in custom folder of Thesis theme directory, and refresh to result something like this in the screenshot below:
Auto Generated Thumbnail Demo
With this we come to end of this tutorial, with no more pain uploading images or depending upon the plugins. If you have any query or require any further assistance, post your feedback as comments below.
If your WordPress blog is currently using a custom theme, then you can redesign it using the Thesis Theme Services.