Author: Aky

  • How to add tweetmeme button on post page in Thesis Theme ?

    I have already mentioned about twitter share count button for wordpress and in this article we will learn to add twitter button in thesis theme.
    thesis-theme-twitter-button
    Get Thesis Theme Now

    As we know that Thesis Theme is capable of content management and efficient SEO. Though it is a raw wordpress theme but it allows endless customization for your blog. If you don’t have a copy of Thesis Theme then you can download thesis theme here.  If you are using an old version of Thesis Theme then I recommend you to safely upgrade thesis theme.

    Add Twitter button in Single post

    As we are know that Thesis customization is done using thesis hooks which are overriding functions. To show twitter button in single post, copy-paste the code snippet in the custom_functions.php.

    Make sure you take full backup of custom_functions.php file using FTP before modifying it.

    [php]

    function joe_adds_twitter_btn ()  {
    if (is_single()) { ?>
    <div style="float:right; margin:0 10px;"><script type="text/javascript">tweetmeme_source = ‘thecreatology’;</script>
    <script type="text/javascript" src="http://tweetmeme.com/i/scripts/button.js"></script></div>

    <?php
    }
    }
    add_action(‘thesis_hook_before_headline’,’joe_adds_twitter_btn’);

    [/php]

    Note: Change the ‘twittermeme_source’ which will be your twitter username, in above code.

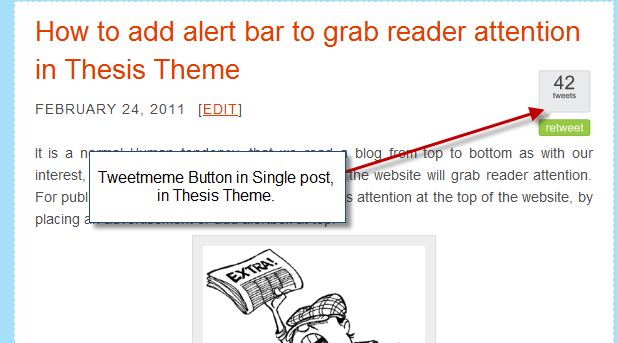
    Save the custom_functions.php file, once you are done adding the above code. Now upload the edited file on server using ftp client and when you will refresh website, you will find something like in screenshot below.
    add-twitter-button-in-single-post-thesis-theme
    Twitter Share button in Single Post

    As we have added twitter button in thesis theme, we come to the end of this article. If you have any queries then you can post comment below as your feedback.

  • Official LinkedIn Share button for WordPress Blog

    As we all are aware of the professional network LinkedIn, which is a business adapted social networking website. With the growing network on social media websites like Twitter and Facebook, LinkedIn has also launched its official share button.

    Add Official LinkedIn Share button for WordPress
    Share on LinkedIn

    LinkedIn share button works same as Twitter Share button, Tweetmeme and Facebook Like Button which help bloggers to share articles around the network. In this post we will learn to add official linkedin button for wordpress blog.

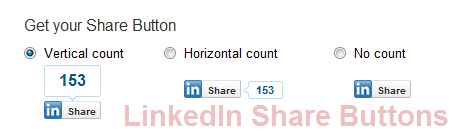
    LinkedIn buttons are simple to use and need not require any configurations. There are three types of LinkedIn buttons, developed to fit with different layouts schemes, they are Vertical Count, Horizontal Count and No Count.

    Official LinkedIn Share button for WordPress Blog
    Different LinkedIn Buttons

    Below are different buttons with the respective code snippets:

    Vertical LinkedIn Button

    Vertical Count button displays the counter above the button as you can see the image above. The code for vertical button is as under:

    [php]

    &amp;amp;lt;script type=&amp;amp;quot;text/javascript&amp;amp;quot; src=&amp;amp;quot;http://platform.linkedin.com/in.js&amp;amp;quot;&amp;amp;gt;&amp;amp;lt;/script&amp;amp;gt;
    &amp;amp;lt;script type=&amp;amp;quot;in/share&amp;amp;quot; data-url=&amp;amp;quot;&amp;amp;lt;?php the_permalink(); ?&amp;amp;gt;&amp;amp;quot; data-counter=&amp;amp;quot;top&amp;amp;quot;&amp;amp;gt;&amp;amp;lt;/script&amp;amp;gt;

    [/php]

    Horizontal LinkedIn Button

    Horizontal Count button displays the counter on right of the button, as you can see it in the picture above. The code for horizontal button is as under:

    [php]

    &amp;amp;lt;script type=&amp;amp;quot;text/javascript&amp;amp;quot; src=&amp;amp;quot;http://platform.linkedin.com/in.js&amp;amp;quot;&amp;amp;gt;&amp;amp;lt;/script&amp;amp;gt;
    &amp;amp;lt;script type=&amp;amp;quot;in/share&amp;amp;quot; data-url=&amp;amp;quot;&amp;amp;lt;?php the_permalink(); ?&amp;amp;gt;&amp;amp;quot; data-counter=&amp;amp;quot;right&amp;amp;quot;&amp;amp;gt;&amp;amp;lt;/script&amp;amp;gt;

    [/php]

    No Count

    This is a simple linkedin button which doesn’t display any counter. You can see this button in above image preview. The code for simple LinkedIn button is as under:

    [php]

    &amp;amp;lt;script type=&amp;amp;quot;text/javascript&amp;amp;quot; src=&amp;amp;quot;http://platform.linkedin.com/in.js&amp;amp;quot;&amp;amp;gt;&amp;amp;lt;/script&amp;amp;gt;
    &amp;amp;lt;script type=&amp;amp;quot;in/share&amp;amp;quot; data-url=&amp;amp;quot;&amp;amp;lt;?php the_permalink(); ?&amp;amp;gt;&amp;amp;quot;&amp;amp;gt;&amp;amp;lt;/script&amp;amp;gt;

    [/php]

    Add LinkedIn button in WordPress

    Make sure you take backup before editing the code.

    Choose the appropriate button above for your Theme and simply open up your theme file, for instance Single.php and add linkedin button code within post loop. Once done, upload the file server and refresh the blog to see the effect.

    There are also plugins developed for LinkedIn button, but in order avoid plugin dependency, one should prefer adding the codes manually. You can also visit Official LinkedIn resources for Publishers.

    This ends a simple tutorial to add linkedin button in wordpress. If you have any query or further assistance is required, post comment as your feedback.

  • How to reduce page load time of blog using Thesis WordPress Theme ?

    Wesite Load Time is Annoying
    Wesite Load Time is Annoying

    Is your blog using Thesis Theme, takes a lot of time while loading a page or homepage ? If you are not sure, then you can check page load time for your website page using Pingdom Tools. These tools helps you in analyzing resources that are causing page loading. Usually Images and JavaScript are the major factor behind page load time on Website or on Blog.

    How to Optimize Image ?

    Pingdom Tools test will help you create a list of Images which are causing page load time and then you can use Smush It tool by Yahoo! to optimize images on website.

    How to Optimize JavaScript ?

    There are many JavaScript compression tools available online, which reduces the JavaScript code size. One of the tools, which I prefer is JavaScript Compressor. This tool till help you reduce the size of your JavaScript code, by truncating spaces and other used lines. But in case JavaScript is causing the delay in page loading, then it is a major concern as JavaScript is declared in the Head Section which loads before the body, hence causing delay. But if you are using Thesis WordPress Theme then you don’t have to worry about it. In this article, we will learn about how you can reduce load time using Thesis Theme.

    Before we proceed with the tutorial, I want to make sure that you are using latest version of thesis, if not then you can refer to article and Safely upgrade to latest version Thesis 1.8

    Thesis Theme has an advanced control panel featuring a lot of options to optimize SEO, typography and layout design. I have already mentioned the Design Options in an article Ease with Thesis WordPress Theme Design options panel. We will use design options to embed code in footer which will reduce page load time.

    How to add Script using Thesis Options ?

    I have seen many bloggers using JavaScript in head section, and even which is not mandatory. For instance, many people add stats-tracking code or other third party media codes in head section and causes delay in page loading.

    add script using thesis options
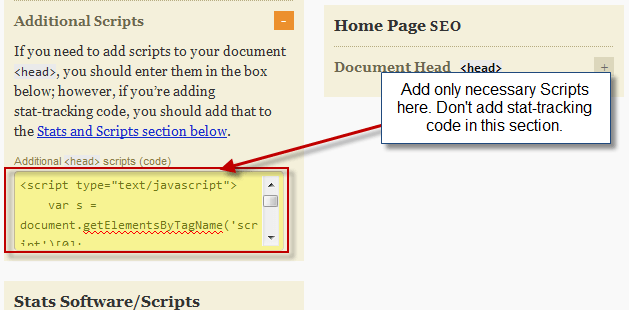
    Additional Scripts: Thesis Site Options

    In order to overcome page loading issues, simply add the code after footer section. Here is a simple procedure to move scripts from head section to footer section (If there is no code in head section, then you can simply skip this procedure):

    • Login to WordPress Admin panel and navigate to Thesis > Site Options.
    • Click on the Additional Scripts to expand.
    • Copy the unnecessary JavaScript code on Clip Board or on a Notepad for safer side.
    • Click Big Green Save Button.
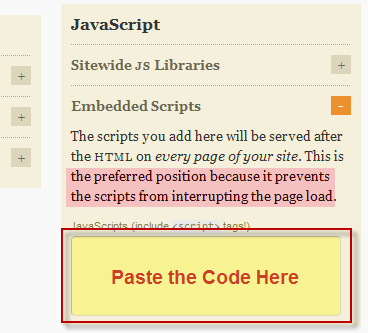
    • Now, navigate to Thesis > Design Options and expand JavaScripts.
    • Paste the code in the text area, you can refer to the screenshot below.
    add script thesis design options
    JavaScripts: Thesis Design Options
    • Now click Big Green Save Button and you are done.

    Refresh the site, and test it out using the Pingdom Tools again. Let us know your page load time after using this tutorial, by posting a comment below.

    Page load time should not be more than 10-15 seconds, as accordingly to Google terms, your website can be black listed. But you can surely optimize website using thesis, and I hope this tutorial get productive for you. If you have any query or further assistance is required, you can simply post a comment below as your feedback.

  • Add Facebook Like Button to Increase traffic on blog

    Social market is growing with web major dominants Twitter and Facebook. With increasing traffic on websites around the globe everyday, millions of people are reading and sharing articles on these social markets. Like the tweetmeme button on twitter, Facebook has “Fshare” and “Like” button.

    Add Facebook Like Button to Increase traffic on blog
    Facebook Like button

    Most of the blogs are using “like” and “recommend” button, which helps in increasing blog traffic and social media promotion. In this article, we will learn that by adding facebook like button can increase blog traffic and how to add like button on wordpress blog.

    How Facebook Like Button Increase Blog Traffic ?

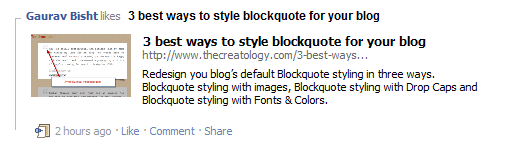
    Facebook is the most visited website in the online world where people with age 8-80 exists. Each user has news feed and has ability to see updates of their connections and vice-versa. Now for instance, a user Gaurav with 500 friends, when clicks a “like” button on a blog, its News Feed gets updated. When news feed is updated for a user, it automatically update it for each of the 500 friends News Feed. You can also see a screenshot below of a user Gaurav  liking a post.

    News Feed to Increase traffic on blog
    News feed preview of User liked the post

    This cycle continues to function when any friend of 500 connections again clicks the “like” button on its wall. And then it gets updated on its news feed and it goes on. Have you ever heard of free automatic social promotion of blog ? Well, adding like button on blog, is what is the answer to this question. Learn how to integrate like button on wordpress below.

    How to add Facebook Button on WordPress Blog ?

    I hope now you know the advantages of facebook “like” button and how useful is for your blog. Adding “like” button on post, will require to edit single.php like we did in our article to add Official Twitter Button Count on WordPress Blog. Paste the code snippet below and add it in single.php located in Theme Template Directory.

    Make sure you backup file before you paste the code below.

    [php]
    <iframe src="http://www.facebook.com/plugins/like.php?href=<?php echo urlencode(get_permalink($post->ID));?&amp;layout=standard&amp;show_faces=false&amp;width=450&amp;action=like&amp;colorscheme=light" scrolling="no" frameborder="0" allowTransparency="true" style="border:none; overflow:hidden; width:450px; height:60px;"></iframe>
    [/php]

    After adding the code in single.php, upload file on server, and you will be done. In order to adhere functionality for facebook like button, configure it using the following parameters:

    show_face=true (true/false):- Enable friend icons below like button.

    layout=button_count (standard/box_count/button_count):- Choose the layout suits best for your scenario.

    Facebook button layout to Increase traffic on blog
    Different Facebook button layout

    colorscheme=light (light/dark):- You can choose the color scheme as per your blog theme.

    action=like (like/recommend):- You can select between “like” and “recommend” button, though functionality is the same.

    The above code uses iframe tag, which can be customized further by css styling for width and height.

    With this we come to the end of this tutorial, and we have added Facebook Like button on wordpress blog. If you have any queries or need any assistance, post comment as your feedback.

  • How to add Official Twitter Button Count on WordPress Blog ?

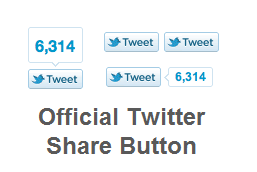
    Twitter announced an official share button, which works same as a Tweetmeme button, but it is developed by twitter. You can see the screenshot below with different types of twitter button shapes to fit best for your layout. As mentioned above twitter button is similar to  Tweetmeme button which I explained in Tutorial to add Twitter Share Retweet Button on WordPress Blog.

    Official Twitter Button Count
    New Twitter Share

    The new twitter button features to have better customization and in addition to it includes account recommendation. For instance if you have two different twitter handles, you can customize new twitter button in a way, a vistor can share post using one handle, and recommend with the another handle.

    In this tutorial, we will learn to add new twitter button on wordpress blog.

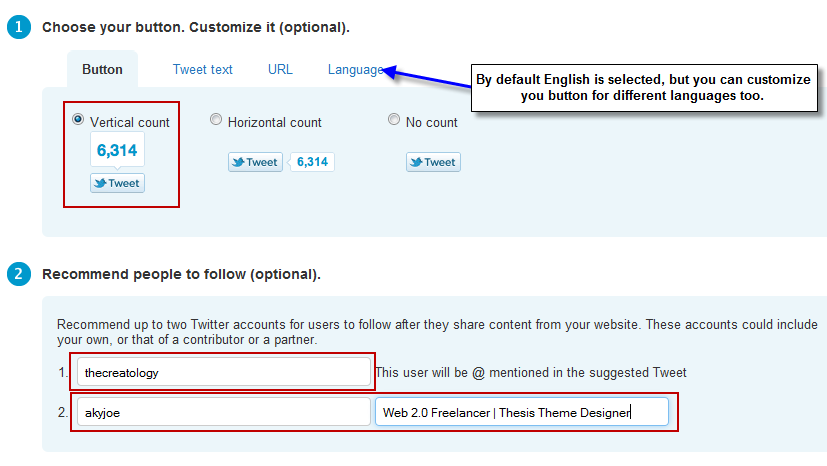
    Step 1: Configure twitter button

    Go to Twitter Button Page and configure the twitter button for size, url and twitter handle. (Refer to the screenshot below)

    Configure Official Twitter Button Count
    Customize Twitter button

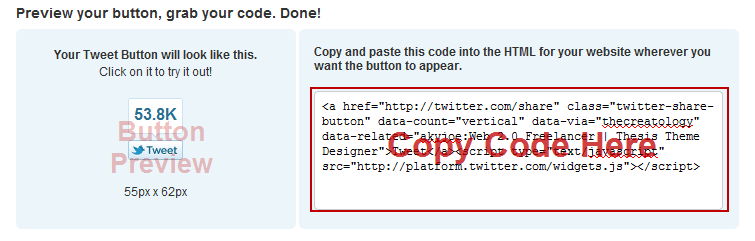
    Step 2: Get Twitter Button Code

    Once you are done with the configuration of twitter button, scroll down and get twitter button code for your blog integration. (Refer to screenshot below)

    get official twitter button code
    Twitter Button Code

    You can also copy the code below directly into theme file, and make sure you change the twitter handles. Here is the code below:

    [php]
    &lt;a href=&quot;http://twitter.com/share&quot; data-url=&quot;&lt;?php the_permalink(); ?&gt;&quot; data-count=&quot;vertical&quot; data-via=&quot;thecreatology&quot; data-related=&quot;Aky Joe:He is Cool!&quot;&gt;Tweet&lt;/a&gt;
    &lt;script type=&quot;text/javascript&quot; src=&quot;http://platform.twitter.com/widgets.js&quot;&gt;&lt;/script&gt;
    [/php]

    Make sure you take backup before editing the code.

    Now that you have the twitter button code, add twitter code in single.php or custom_fucntions.php in case of Thesis Theme. Use any FTP client and upload file on server. Refresh website to see the effect.

    With this we are done adding new twitter button on blog, and come to the end of the tutorial. A lot of people have already switched with new twitter button, I hope this tutorial will be easy for you. If you have any query or need assistance post comment, as your feedback, I will get back to you asap!

  • Tutorial to add Twitter Share Retweet Button on WordPress Blog

    Twitter has been statistically growing with social media market, and allowing bloggers to share article on twitter. I believe adding social share buttons on blog is as vital as oxygen and water for survival. I’m sure you must have seen a popular blogs with share count buttons, and if you haven’t then you are certainly missing something on your blog.

    add-retweet-button-for-wordpress
    Retweet Button for WordPress Blog

    After reading an article or post on blog, if visitor finds it interesting can share it on social media like twitter, facebook etc… For an effective placement of share button, a retweet button should be placed before the post page. In this article, we will learn to add retweet button on wordpress Blog.

    Choose your Retweet Button!

    There are two types of retweet button depending upon the size, one is large retweet button and other one is compact retweet button. You can choose the button which fits best for your layout of the website. Desired Code for the both buttons are as under:

    Add large retweet button:

    [php]
    <script type="text/javascript">
    tweetmeme_source = ‘thecreatology’;
    </script>
    <script type="text/javascript" src="http://tweetmeme.com/i/scripts/button.js"></script>
    [/php]

    Add compact reweet button:

    [php]
    <script type=’text/javascript’>
    tweetmeme_style = "compact";
    tweetmeme_source = ‘thecreatology’;
    </script>
    <script type="text/javascript" src="http://tweetmeme.com/i/scripts/button.js"></script>
    [/php]

    In the above code make sure you change tweetmeme_source with your twitter username or twitter handle. You can add the above code snippet in your Theme file, for instance for post page you can add the above code by editing single.php file.

    I’m sure retweeting will give your blog a great exposure which will increase visits and hits on your blog. If you have any query or need further assistance, you can post comment below as your feedback.

  • Tutorial to Password Protect Website directory using htaccess

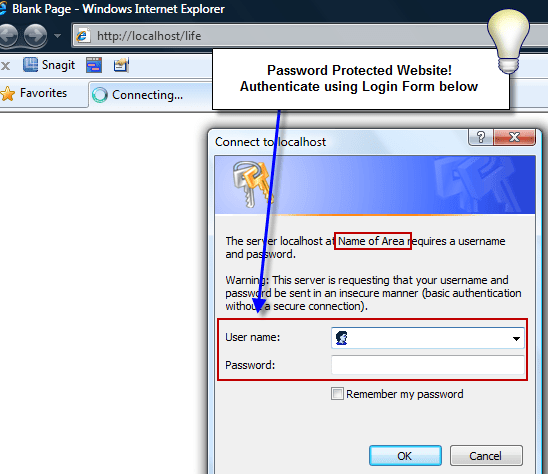
    As web technology is growing and making advancements, vulnerabilities are also increasing with the same rate. Website security is a major concern today and planning effective strategy is the resolution. If your website has confidential content or premium content, which needs to be limited within a scope of few users, then you can simply password protect premium content on website. All visits made to that content will be prompted to enter username and password to gain access to premium content, just like in the screenshot below.

    password protect website using htaccess
    Login Screen: Access to Protected Area on website

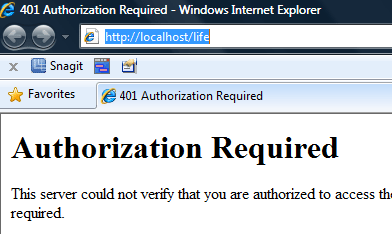
    And if a failure to login happens, visitor is redirected to 401 error page, just like the below screenshot.

    401-error-password-protect-website-using-htaccess
    401 Error Page: Failed to Access Protected Area

    How to Password Protect Website ?

    If your website is hosted on Apache web server, then website or website directory can be password protected using the htaccess method. In previous article I explained about protecting website by disabling directory browsing, if you missed it, then  you can read it here: Disable directory browsing to protect website using htaccess method.

    HTACCESS file sets security attributes to the web directory which you want to protect. In order to set password on website, HTPASSWD file will created which will store all usernames and followed with the passwords. For instance, if username is aky and password is joe, then it will be written as  “aky : joe”.

    How to create HTPASSWD file ?

    HTPASSWD is the file which contains usernames as well the passwords for the HTACCESS file to validate during authentication.

    • Using any ftp client, login to the web directory of your website.
    • Create a simple text file using any text editor and add the below code snippet precisely.

    [php]

    aky : joe
    username2:password2
    username3:password3

    [/php]

    • The above code contains username and passwords. Any word before colon (:) is username, while word after colon (:) is password.
    • Once done, save the file as “.htpasswd” and upload it to the root of the directory.

    How to create HTACCESS file ?

    HTACCESS file sets security attributes on a web directory for user accessibility. HTACCESS file can be created using any text editor like a notepad and should be save as….htaccess” (without quotes). To create htaccess file to password protect website directory, follow basic steps below:

    Make sure before modifying file for any changes, I recommend you to backup all the website data.

    • Using any ftp client, login to the website directory, you will find .htaccess file located in the root of your directory.
    • Open .htaccess file to edit it using a text editor and add below code snippet precisely.

    [php]

    AuthUserFile /path/to/file/.htpasswd
    AuthName "Premium Content Area"
    AuthType Basic
    require valid-user

    [/php]

    • On line 1 in the above code, specify the location of the HTPASSWD file, which we created in the section above. Once done, save the file as “.htaccess” and upload it to the web directory which is to be password protected. For instance, if the web directory is “www.yourwebsite.com/secure/” then browse into this directory using ftp client and place the HTACCESS file in secure web directory.

    Now open the webpage or website, for instance “www.yourwebsite.com/secure”, will prompt you to login to gain access to protected area, else it is redirected to 401 Authorization Required Exception Page. Now that your content is password protected, and is safe from the vulnerabilities and hackers. Make sure you don’t share your password with anyone.

    Here we come to end of this tutorial, if you have any queries for require any further assistance, post comment as your feedback.

  • ColdStone Premium Theme: 3-Post Layout Unique WordPress Theme

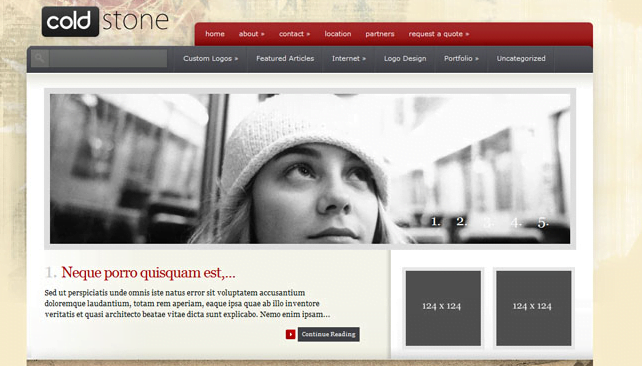
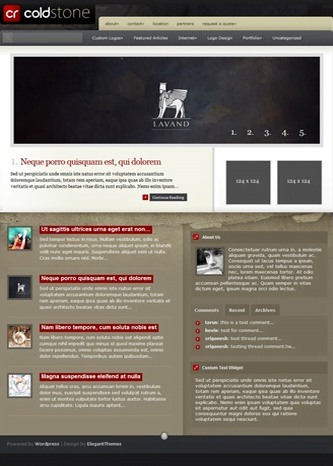
    A unique wordpress theme having three different homepage layout, for Business Style, Magazine Style and Blog Style. The magazine style template is designed to show lots of content on single page. Something I like about the elegant themes is the unique design website template with professional elements.

    3-Post Layout Unique WordPress Theme
    Magazine Style Template

    ColdStone Theme is a widget ready theme with built in theme option panel, which makes it fast and easy to manage for the beginners. The theme has two 125×125 ad slots on sidebar and a 468×60 in detailed post pages. Ads can easily be enabled or disabled from the theme options.

    ColdStone theme uses timthumb script to auto generate thumbnail and resize thumbnail images efficiently. Thumbnails are used in the Blog style template to make it organized. There are more features of coldstone wordpress theme, you can find them listed below:

    Key Features

    • 3 Unique template
    • Professional Design with Grunge
    • Widget Ready Template
    • User friendly Theme Panel
    • Ad Management
    • PSD files for logo and design
    • Browser Compatible-All

    If you are not satisfied with the features listed above, see screenshot below or you can also see the live preview of the theme. You can also download coldstone theme, here.

    Screenshot

    ColdStone 3-Post Layout Unique WordPress Theme
    ColdStone WordPress Theme

    How to download ColdStone Theme ?

    ColdStone theme is a premium wordpress theme, crafted by elegant themes. Click the link below to download the theme.

    Download | Preview

    What do you think about ColdStone Theme and its features ? Do share your views for the theme here with us, by posting a comment below.

  • Disable directory browsing to protect website using htaccess method

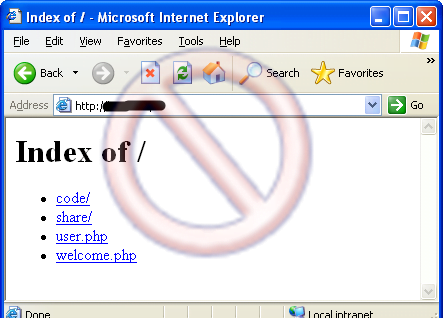
    If your website is hosted on a Apache Web Server, then you should know that directory browsing feature is enabled by default. When a default file or index.html file is not present, server list downs all directory contents.  In order to protect website from hackers or other unwanted vulnerabilities, one should disable directory listing on the Apache server.

    Disable Directory browsing using htaccess
    Disable Directory browsing

    How to disable directory browsing ?

    Directory browsing can be disabled by two ways, one is by editing the .htaccess file and add security to website which is located in root of the directory. Other method is by editing the httpd.conf file, which is the apache server file.

    In my previous article How to improve website performance by Image Caching using htaccess, I explained about improving website performance and this article will cover a tip about website security.

    Make sure before modifying file for any changes, I recommend you to backup all the website data.

    • Using any ftp client, login to the website directory, you will find .htaccess file located in the root of your directory.
    • Open .htaccess file to edit it using a text editor.
    • Find “Options-Indexes” in the text editor, you can use Ctrl+F to search for exact match. In case no “Options-Indexes” line exists, add “Options-Indexes” without quotes in the new line of htaccess file.
    • Once done, save the file and upload to root directory of website.

    Once htaccess file is uploaded, refresh the website / url, which is listing directory content. I hope this tutorial will secure your website. If you have any queries or any further assistance is required, you can post comment below, as your feedback.

  • How to improve website performance by Image Caching using htaccess

    A website or a blog, usually are designed using images which looks creative but increases page load time. Sometimes it gets annoying for daily visitors and it leaves a bad impression for the website. With the advancements in technology and WWW, now web browsers have image cache feature, which has resolved many problems for websites like page load problem for photo blogs.

    enable-image-cache-using-htaccessThe analogy behind browser cache states that when a page is loaded, all the images are saved in a cache pool of browser itself. And when a visitor visits the site again, finds no delay while opening a page, as the images are pulled locally from the browser. Hence, enabling image cache for a website, decrease page load time. In the this article, you will learn how to enable image cache for website using htaccess method.

    How htaccess file improve website performance?

    htaccess file improve website performance
    Improve performance by enabling Image Cache

    htaccess is a file to add security attributes to root directory or to any other specified directory. Every browser reads .htaccess file, and further reads header information of the website. On the complementary, browser check for attributes whether to save image in cache pool or any media which also specify the expiration time and a cookies are created accordingly. For instance, if cookies are created for an image which specify it to expire in 2 weeks, and after two weeks, browser will clear image from the cache pool, and browser will have to reload image again. Hence, this states image caching also save website bandwidth.

    How to enable image cache ?

    Below is the tutorial, to enable image cache for wordpress blog or website.

    Make sure before modifying file for any changes, I recommend you to backup all the website data.

    • Using any ftp client, login to the website directory, you will find .htaccess file located in the root of your directory.
    • Open the .htaccess file using text editor. In case there is no htaccess file, create a new text file and save is as “.htaccess” (Make sure you don’t miss the “. (DOT) access”).
    • Further add the below code snippet in the text file.

    Code:

    [css]
    # Image and Flash content Caching for One Month
    <FilesMatch ".(flv|gif|jpg|jpeg|png|ico|swf)$">
    Header set Cache-Control "max-age=2592000"
    </FilesMatch>
    [/css]

    Be very precise with the code you copy and paste in the file, else your website may not be accessible.

    • After pasting the code in htaccess file, review it and save it. Once done, it will turn on the image caching for one month, as the ‘max-age’ parameter value equals 2592000 seconds. If you want that image caching never expires, edit “max-age=29030400”, as 29030400 seconds = 1 year.

    As we come to the end of this simple, yet beneficial tutorial to improve website using htaccess method . Do let us know what methods did you apply to improve website performance ?

    If you have any queries or any further assistance is required, you can post comment below, as your feedback.