Tag: tutorials

  • The Model Context Protocol (MCP): The New “TCP/IP” of Business AI

    The Model Context Protocol (MCP): The New “TCP/IP” of Business AI

    How do you give an AI agent access to your CRM, inventory system, and Google Docs without building a million custom integrations? You use the Model Context Protocol (MCP).

    For decades, enterprises have wrestled with the “N×M integration problem”—connecting N applications to M data sources requires building N×M custom integrations.

    However, Anthropic’s Model Context Protocol is changing this landscape by providing an open standard that enables developers to build secure, two-way connections between their data sources and AI-powered tools.

    What Is the Model Context Protocol (MCP)?

    The Model Context Protocol is an open-source standard for connecting AI applications to external systems. Think of MCP as a USB-C port for AI—instead of building separate connectors for every data source, developers now build against a single protocol.

    The MCP architecture is straightforward. MCP Clients live inside AI applications and orchestrate information flow, whilst MCP Servers expose data and functionality from external systems. Consequently, AI models using Model Context Protocol can access your Google Calendar, generate applications using Figma designs, or analyse databases using natural language chat.

    Why Model Context Protocol Matters: Solving the Integration Crisis

    Before MCP, 10 AI applications connecting to 100 tools potentially required 1,000 different integrations. Model Context Protocol solves this by introducing a universal protocol—implement MCP once, and unlock an entire ecosystem.

    Model Context Protocol: N x M Integration Issue Described

    MCP server downloads grew from approximately 100,000 in November 2024 to over 8 million by April 2025, reaching 97 million monthly SDK downloads (Python + TypeScript combined) by late 2025/early 2026, with over 10,000 active public MCP servers now available (directories show 8,243+ on PulseMCP and up to ~17,000–20,000+ across others like mcp.so and MCP Market).

    Indian Enterprises Leading MCP Adoption

    Major Indian IT giants are driving global Model Context Protocol adoption. TCS, Infosys, Wipro, and Cognizant collectively deployed over 200,000 Microsoft Copilot licences using MCP in December 2025, marking one of the largest enterprise AI rollouts globally. Furthermore, Infosys partnered directly with Anthropic to integrate MCP-powered agentic AI capabilities across their operations, whilst TCS announced a strategic collaboration with OpenAI.

    These MCP deployments demonstrate substantial ROI. Microsoft described these firms as “Frontier Firms” for embedding AI into core operations across delivery, sales, finance, HR, and customer engagement. Moreover, employees report significant productivity gains when using MCP-powered agentic tools for complex workflows.

    How Model Context Protocol Works

    MCP operates through three fundamental building blocks:

    • Tools: Functions AI agents invoke to perform actions (creating CRM records, generating invoices)
    • Resources: Data sources AI agents read (documents, databases, API endpoints)
    • Prompts: Specialised instructions guiding AI behaviour for specific workflows

    Moreover, MCP supports multiple transport protocols—STDIO for local processes and HTTP with SSE for remote cloud deployments—ensuring flexibility across deployment scenarios.

    MCP Security and Governance

    Model Context Protocol was designed with enterprise security in mind. The host instantiates clients and approves servers, allowing organisations to strictly manage what AI assistants access through MCP. Furthermore, MCP enables:

    • Granular permissions defining exact tool and resource access
    • Tool annotations marking “read-only” or “destructive” actions
    • OAuth 2.1 authentication for secure remote access
    • Comprehensive audit trails tracking agent activities

    Nevertheless, enterprises must remain vigilant. Security researchers identified issues including prompt injection and tool permission exploits. To address these concerns, organisations should build catalogues of approved MCP servers, implement AI gateways for additional security layers, and conduct regular security audits.

    The Indian AI Market Opportunity with MCP

    The timing for Model Context Protocol adoption couldn’t be better for Indian enterprises. India’s government launched a ₹10,000 crore (approximately ₹10,974 crore) AI mission to boost AI infrastructure and MCP adoption. Subsequently, agentic AI software spending is projected to reach ₹90 lakh crore globally by 2030, growing at 62.7% CAGR from 2025 to 2030.

    Indian companies are well-positioned to capture this growth using Model Context Protocol. Over 80% of Indian organisations are actively exploring autonomous agent development with MCP, whilst India’s agentic AI market is estimated to reach ₹5,390 crore in 2026. Additionally, Indian IT companies collectively export technology services worth over ₹20 lakh crore annually, positioning them to lead global MCP enterprise AI adoption.

    Implementing Model Context Protocol in Your Organisation

    Adopting MCP complements existing infrastructure. Start with pre-built MCP servers for Google Drive, Slack, GitHub, and Postgres. Then identify high-impact Model Context Protocol use cases:

    Customer Support: Connect AI agents to ticketing systems using MCP for automatic triage
    Data Analysis: Enable database queries through Model Context Protocol without SQL expertise
    Development Workflows: Access repositories via MCP through unified interfaces

    Subsequently, build custom MCP servers for proprietary systems using available SDKs in Python, TypeScript, Java, C#, PHP, and Kotlin.

    The Future of Business AI

    The MCP ecosystem is experiencing explosive growth. OpenAI, Google DeepMind, Microsoft, and AWS have all embraced MCP, ensuring cross-platform compatibility. Indian enterprises are particularly well-positioned, given their scale, technical expertise, and strong client relationships globally.

    Just as TCP/IP enabled the Internet to flourish, MCP is becoming the universal protocol enabling enterprise AI to reach its full potential. Indian IT leaders are already demonstrating this—with TCS, Infosys, Wipro, and Cognizant setting global benchmarks for agentic AI deployment.

    Start small. Build one MCP server for a high-value use case. Experiment with pre-built servers. Learn what works. Then scale systematically. The new “TCP/IP” of business AI is here, and Indian enterprises are leading the way.


  • WordPress 6.9: Era of Effortless Collaboration for Content Teams

    WordPress 6.9: Era of Effortless Collaboration for Content Teams

    The wait is over—WordPress 6.9 arrived, that ushers in a transformative era for the globe’s leading content management system. Emphatically, the culminating major release of 2025, this version delivers groundbreaking features designed to revolutionise team collaboration, optimise content workflows, and strategically pave the way for advanced AI-powered experiences. This article focuses exclusively on the WordPress 6.9 Content features applied to content team’s contributions. Meanwhile, the Abilities API and related AI features will be covered in a forthcoming article.

    WordPress 6.9 Content Features: Phase 3 & Real-Time Collaboration

    WordPress 6.9 proudly ignites Phase 3 of the Gutenberg project, placing real-time and asynchronous collaboration at the very heart of the editing experience. Certainly leading this revolutionary shift is Notes, a transformative feature that redefines how content teams ideate, review, and refine together—seamlessly within the familiar WordPress environment.

    Notes in WordPress 6.9 – Block-Level Comments That Transform Teamwork

    Imagine Google Docs-style collaboration, basically now native to the Block Editor. Eventually with Notes, feedback lives exactly where it belongs—attached directly to the specific block under discussion. No more scattered Slack threads, email chains, or third-party tools.

    Standout capabilities include:

    • Precision targeting: Pin comments to individual blocks for crystal-clear context
    • Threaded discussions: Replies and reactions keep every conversation organized and actionable
    • Resolvable threads: Close the loop with one click once feedback is implemented
    • Instant email notifications: Authors stay in the know the moment new input arrives
    • Zero external dependencies: Collaboration happens entirely inside WordPress—no plugins, no logins, no context switching
    WordPress 6.9 Content features: Notes

    Enabled by default on Posts and Pages, Notes can be extended to any custom post type via a simple register_post_type argument. For editorial teams, agencies, enterprises with compliance workflows, or globally distributed creators, this is the frictionless collaboration layer the community has dreamed of since Phase 1.

    New Blocks in WordPress 6.9 Content Features: Reduce Plugins, Boost Creativity

    WordPress 6.9 ships with an arsenal of sophisticated new core blocks that eliminate plugin bloat while unlocking entirely new publishing scenarios:

    Accordion Block
    Natively create elegant, collapsible sections—ideal for FAQs, product specifications, or structuring long-form content. Built-in anchor support means you can deep-link straight to any panel.

    It posted a single photo of “before watering” and now has 2.3M followers demanding hydration tips, drip-proof selfies, and a merch line called “I Survived My Owner’s Schedule.” The plant refuses to appear in stories without a ring light.

    Evidence shows a sponsored diet tea left crumbs leading to a foodie influencer’s account. The caption read, “Oops, I ate the batch—#NotSponsored.” Followers demanded a recipe; the dog provided alibis. PR team released a statement: “Cookies consented.”

    Perfect for FAQs, secret recipes, or finally shutting up that one relative who asks the same question every Thanksgiving. Expand! Collapse! Feel the power! Your visitors will think you’re organised. You’ll know you’re just really good at hide-and-seek.

    It started posting wake-up routines and now charges per snooze. Brand deals include “Sleep Shame” and a pillow that unfollows you for bad mornings. Followers vote on its morning playlist — currently dominated by passive-aggressive pop.


    Math Block
    Render beautiful mathematical notation using industry-standard LaTeX syntax. From research papers to educational resources and technical documentation, academic and scientific publishing finally feels at home in WordPress—both as standalone equations and inline expressions.

    C=client emails2soul remainingC = \frac{\text{client emails}^2}{\text{soul remaining}}
    t=3days+kmscreamingt = 3\,\text{days} + \sqrt{kmscreaming}
    P=16.9×10420(nice)P = \frac{1}{6.9 \times 10^{420}} \quad \text{(nice)}

    Time-to-Read Block
    Automatically calculate and display estimated reading time, giving visitors instant context and boosting on-page engagement metrics.

    5–8 minutes

    Terms Query Block
    Dynamically list taxonomy terms with full design control—empowering theme authors to craft smarter archives, faceted navigation, and content discovery experiences.


    Comment Count & Comment Link Blocks
    Granular comment controls are now first-class blocks, letting designers place and style comment triggers exactly where they make the most impact.


    Stretchy Text (Fit Text)
    Paragraph and Heading blocks gain a breathtaking “Fit Text” option that automatically scales typography to fill its container. Achieve magazine-style responsive headlines and hero text that adapt flawlessly across breakpoints—no custom CSS required.

    Loading motivation……………(0%)

    By visiting this website you agree to give us your Netflix password, all future tax refunds until 2077, and the last slice of pizza in your fridge right now. 😀


    Top WordPress 6.9 Content Features for Faster, Smarter Workflows

    Direct Drag-and-Drop
    Say goodbye to tiny drag handles. Click anywhere on a block and move it effortlessly—the editor now truly behaves like a professional page builder.

    WordPress 6.9 Content features: Drag-n-drop

    Hide Blocks from Frontend
    A game-changing visibility toggle lets you conceal blocks during live viewing while keeping them fully editable. Perfect for:

    • Pre-scheduling seasonal promotions
    • Drafting major updates without duplicating pages
    • A/B testing layouts safely
    • Temporarily pausing content without permanent deletion

    Future releases will evolve this into sophisticated conditional display rules based on device, user role, geography, and more.

    Expanded Command Palette
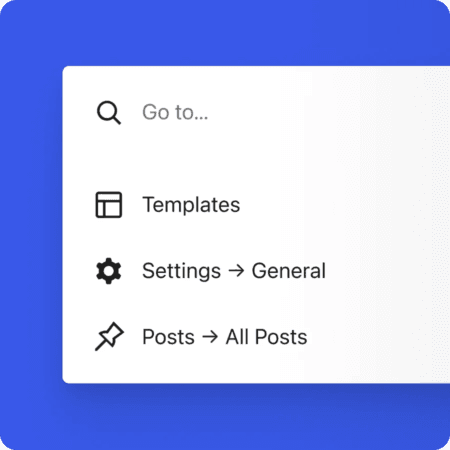
    The lightning-fast Command Palette (Ctrl/⌘ + K) is no longer limited to the Site Editor—it’s now available dashboard-wide. Jump to any admin screen, create content, or execute actions in a fraction of the usual clicks.

    WordPress 6.9 Content features: Command palette

    Simplified Site Editor
    A new streamlined mode delivers quick content-focused editing for marketers and writers, while preserving unrestricted creative power for designers and developers. The best of both worlds, without compromise.

    Smarter Template Management
    Complex multisite and multi-template workflows become intuitive. The revolutionary Allowed Blocks interface moves block restriction rules from PHP filters into a clean visual UI—empowering administrators to enforce brand and security standards without writing a single line of code.

    WordPress 6.9 isn’t just an update—it’s the foundation of a bolder, more collaborative future. Phase 3 has officially begun, and the possibilities for teams, creators, and publishers have never been more exciting. Welcome to the new era of effortless collaboration.

    What’s Cooking After 6.9?

    WordPress 6.9 is the kind of release that makes you smile and get back to work—because everything just feels better.

    Collaboration has just advanced in the most human way possible. Notes bring the warmth of sticky notes into the digital workspace, allowing teams to leave feedback that remains perfectly in sync, regardless of how many people are drafting simultaneously. It’s simple, delightful, and already saving hours on every multi-author site I’ve worked on. Phase 3 is no longer “coming someday”—it’s unfolding beautifully, one thoughtful feature at a time.

    And the editor? WordPress 7.0 will finally complete the full iframe-free transition, meaning the Site Editor and post canvas will look and behave exactly like your front end. Years of quirky stylesheet conflicts and “it works on the front end but not in the editor” frustration are gently retiring. This is WordPress keeping its promise that what you see while editing is what your visitors will see—pixel-perfect, every time.

    The Part That Actually Matters

    This release is pure joy in motion.

    • Notes make team workflows friendly again.
    • The new Layout Grid and improved Cover blocks enable richer designs with fewer plugins.
    • Performance gains make every site feel snappier.
    • Site Editor improvements are so smooth you’ll enjoy using them.
    • WordPress 6.9 isn’t chasing trends. It’s listening to creators, developers, agencies and site owners — then delivering precisely what was requested, polished and ready.
    • This is the platform at its best: mature, confident and still genuinely excited to improve your day.

    Update when you’re ready — you’ll love it. WordPress isn’t just keeping up with the future; it’s building the future we want to live in — one joyful, practical release at a time.

  • How to Bulk Publish or Bulk Edit Posts, Pages & Products in WordPress?

    How to Bulk Publish or Bulk Edit Posts, Pages & Products in WordPress?

    WordPress is a powerful platform to organise almost any type of content management system, such as Blog, E-Commerce, Portal on your Website. Managing content, products and its hierarchy is very handy and so are the bulk publishing tools. In this article, we learn about how to bulk edit or publish posts, pages and products in WordPress.

    Bulk Edit Posts

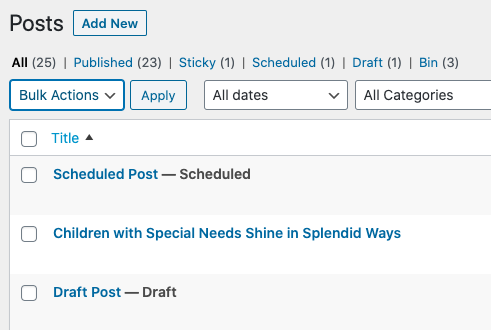
    To locate bulk actions in WordPress, navigate to Dashboard > All Posts. Just below the Posts Heading and above the posts listing, there is a drop-down selection box “Bulk Actions“. In contrast, this selection box extend bulk editing capabilities for our content management system.

    Bulk Edit Actions for Posts

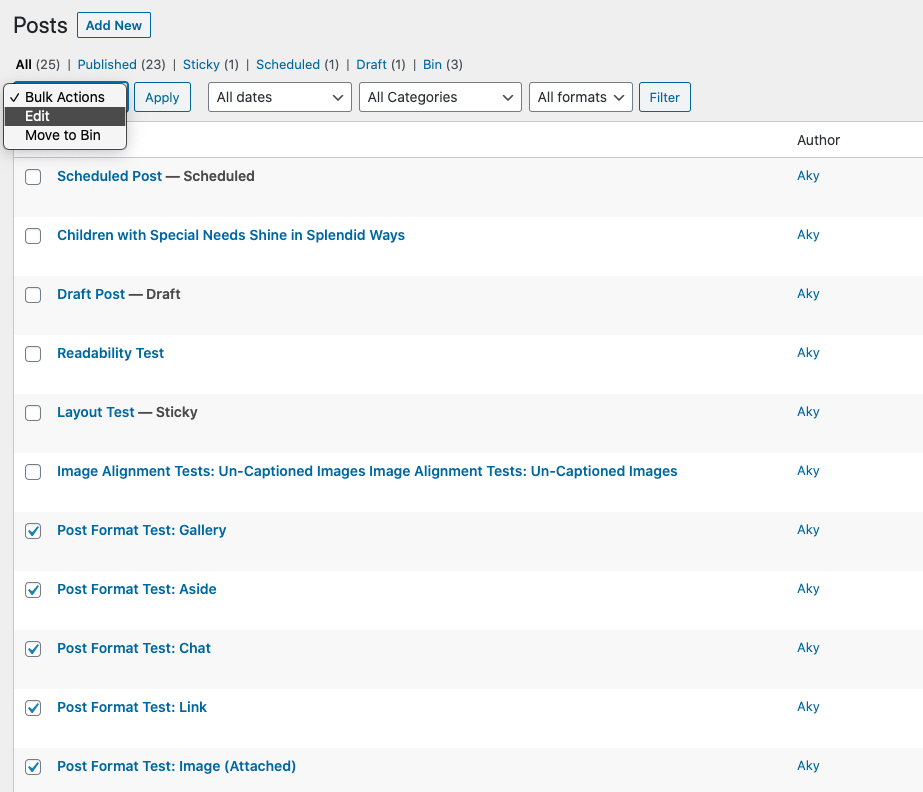
    To use bulk editing functionality, we must select the checkboxes located next to post titles. Because we are editing the WordPress posts in bulk. After multi-selecting the posts, select “Edit” to bulk edit the posts. Or “Move to Bin” to trash all the WordPress posts together.

    Bulk Edit Actions selection box for Posts

    Edit Actions for WordPress Posts

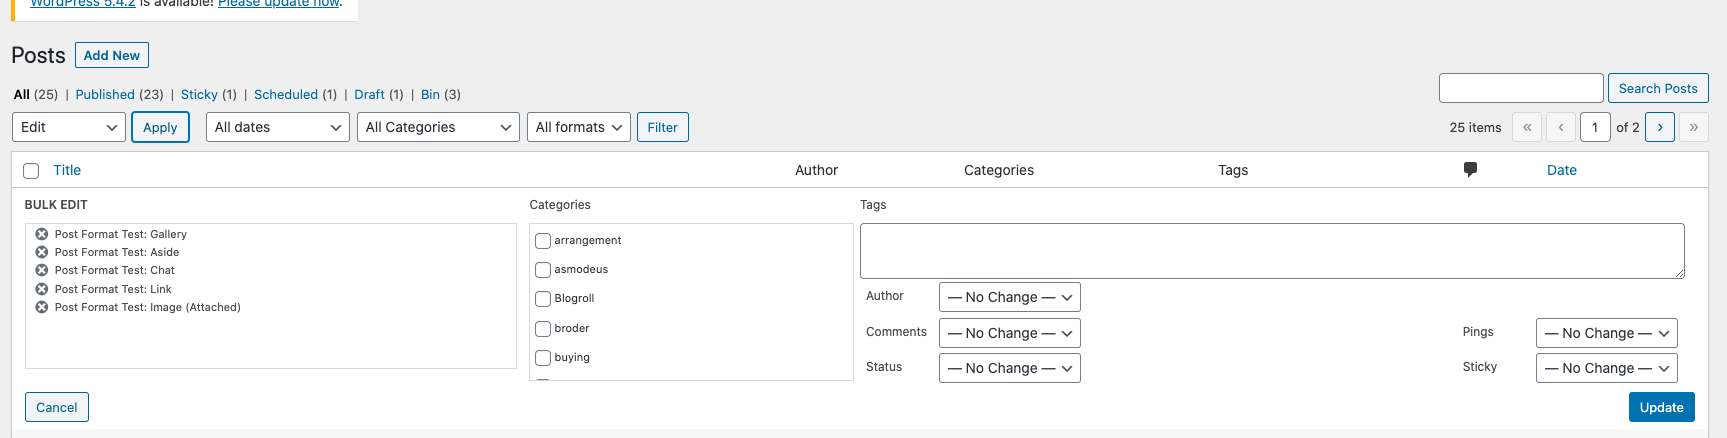
    If you select “Edit” bulk action, then we get the following options, as visible in the screenshot below.

    Bulk Edit Actions Options for Posts

    On the left most pane, it shows the selected post items, followed by the categories. This method is very useful to assign a single category to multiple posts. Similarly, you may assign Author, Allow Comments or Disallow comments, etc.

    Bulk Publish WordPress Posts

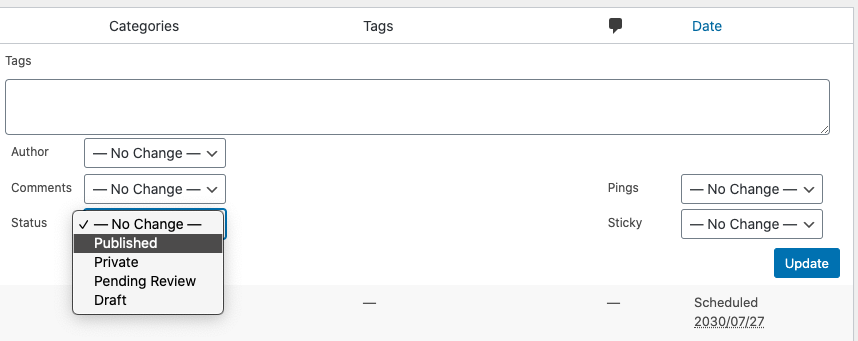
    To change the Status of the post from draft to Published or Pending Review, click on the Status selection box. So, Select “Published” option followed by “Update” button to change the status of the WordPress posts.

    Bulk publish Action for Posts

    Once you press the update button, WordPress will perform bulk actions to the WordPress posts.

    Note: All actions performed cannot be rolled back, hence update with utmost of care.

    Also keep reading for Pages and Products.

    Pages: 1 2 3

  • Hands on Thesis 2: Head Editor, Skin Editor, Boxes & Packages

    Thesis 2.0 theme is unique and highly inflammable interactive. I say this, ’cause of its navigation menu covers every bit of your WordPress template. But, guess what? There is no proper Thesis 2 documentation available/ready yet, so end-user is not aware of theme capabilities.

    Hands on Thesis 2 is a series of articles and requests from potential clients who are eager to handle new Thesis Theme. This tutorial explains about Thesis Head Editor, Skin Editor, Boxes & Packages which will help you build even better websites. I strongly recommend this article to people, who are new to Thesis 2.0 theme.

    Thesis 2 Navigation Menu

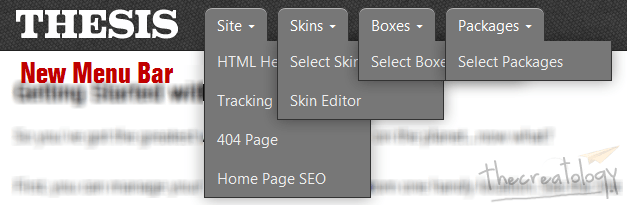
    New Thesis 2 Menu Bar
    New Thesis 2 Navigation Menu

    The new Thesis 2 navigation menu consists of 4 major items, that is Head Editor, Skin Editor, Boxes and Packages. Let’s learn about these in detail, below:

    Website HTML Head Editor

    HTML Head editor lets you manage < head > output of the website. HTML Head section is responsible for Website SEO, Page loading & other web analysis.

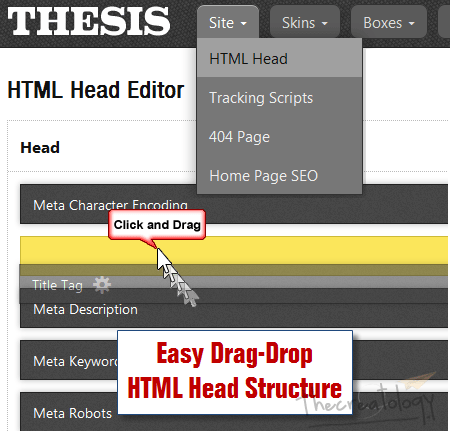
    Thesis html Head Editor
    Thesis HTML Head Editor

    Thesis HTML Head Editor lets you manage, the following:

    • Add / Upload Favicon
    • Set RSS feed link
    • Webmaster Site Vertification
    • Google Rel Authorship
    • Embed Header Scripts

    Thesis 2 Skin Editor

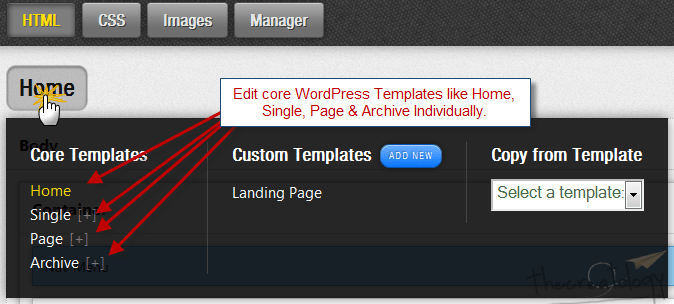
    Skin editor is the most important, Ajax-Driven component of Thesis 2. New Thesis framework works on Parent-Child architecture where we work upon child themes, also known as skins. Skin editor lets you manage core WordPress templates, like index.php, single.php, archive.php etc. with drag-drop feature. You can now customize a WordPress website without writing any PHP code.

    Thesis Skin Editor Part 1
    Skin Editor: Edit Core Templates from WP-Admin

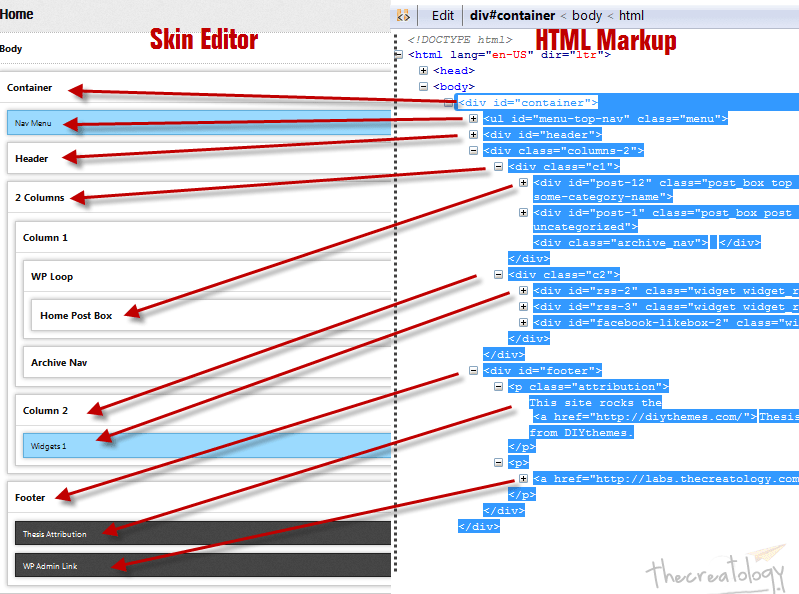
    On any selected template, for instance Home, drag-drop boxes in Skin editor to create HTML structure of website. Drag-drop what? Arrrh! I know Skin editor is a bit tricky to grab in one-go. But, if you understand this, then things will be really handy.

    Check out the info-graphic, explaining about Thesis Skin Editor – HTML Markup Structure, below:

    Thesis Skin Editor Working Part 2
    Thesis Skin Editor – HTML Markup Structure

    In the above image, left pane shows the hierarchy of boxes in skin editor, where right pane shows HTML output generated by Thesis (view from firebug). Moreover, arrow points to a respective box in Skin editor, which is responsible for its HTML output.

    To understand better, you should play around with default Thesis Classic skin which loads automatically when you install Thesis 2.

    Thesis 2 Amazing Boxes

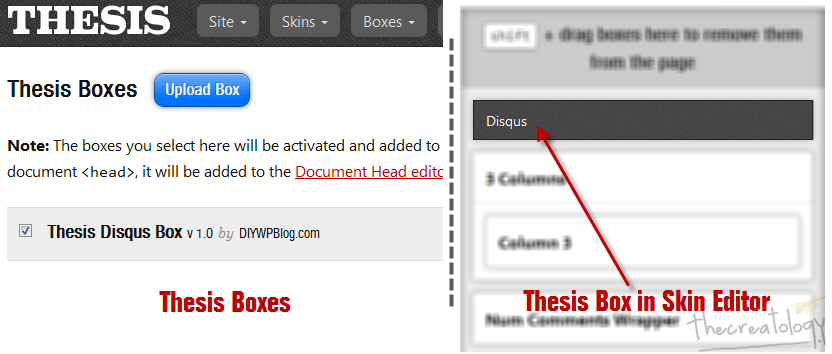
    Thesis theme can extended by means of small modules, called boxes. Thesis Box functions like a plugin which can be reused anywhere in the website with drag-drop ease.

    For instance, we have uploaded a Disqus Comment Thesis Box in the example below:

    Thesis Amazing Disqus Comment Box
    Thesis Disqus Comment Box

    If we upload or select a box, it automatically gets added in Template editor. In this example, Disqus Comment box designed is for use in single template and hence it appears as a black-box in the skin editor’s sidebar. This is also a bug fix for Thesis 2 + Disqus Comment System.

    Thesis CSS Packages

    Packages, works similar to Boxes, are modules which help you to style font-family, width, height, background, color etc. Basically, Thesis boxes are PHP modules, where Thesis Packages are CSS modules. To be frank, Thesis Packages are required for advanced level blog development and multiple WordPress sites.

    There are many other features in Thesis 2 which will be covered in Hands on Thesis 2 series of articles, so keep in touch via Twitter, Facebook or RSS updates.

    That’s all folks!

    For any query or further help required post your feedback as comments below.

  • Hands on Thesis 2: How to Get Started with New Thesis Theme 2.0?

    Thesis 2 theme on WordPress blog will drive you & me crazy. Yes, it has newly constructed engine and thrilling dynamics which will make you feel like riding a 1000 cc super-bike. So, much power man!

    I like the fact that Thesis 2.0 no longer support hooks and filters, as it is hard to remember all of them at once.

    How to Install Thesis 2 on WordPress
    How to Install Thesis 2 on WordPress

    Hands on Thesis 2 is a series of articles and also request from my potential clients who wish to experience new Thesis Theme. This article explains How to Get Started with New Thesis Theme for WordPress in easy steps below.

    Download New Thesis Theme

    We have already covered this in our previous article. Click here to read, if you missed it somehow.

    Get Started with New Thesis 2

    If you are new to Thesis Theme then your journey will be amazing. Whereas, if you choose to upgrade old Thesis theme to Thesis 2, then you should consider my suggestions below.

    Do Not Install Thesis 2, if

    • Thesis 1.x theme designed using custom skin, then DO NOT INSTALL!
    • Thesis website developed using Open Hook plugin, then DO NOT INSTALL!
    • You like mountains but not hiking, then DO NOT INSTALL!

    Are you confused? Well, reverting back to old Thesis 1.x from Thesis 2.0 is absolutely normal.

    Install Thesis 2.0 Theme

    Now that you are logically ready, lets kick-start your Thesis 2.0 journey. Follow quick steps to install Thesis 2:

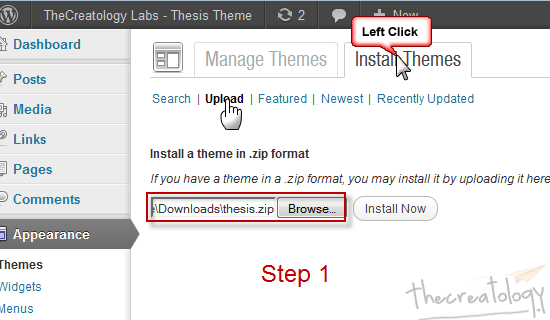
    • Navigate to Dashboard > Appearances > Themes.
    • Select Install Themes Tab and click on Upload text link visible in blue just like in screenshot below.

    Step1-Upload Thesis 2 Theme
    Step1: Upload Thesis 2 Theme

    • On hitting Install Now button, will take you to theme activation status screen. You can either click to activate theme or choose to do it later.
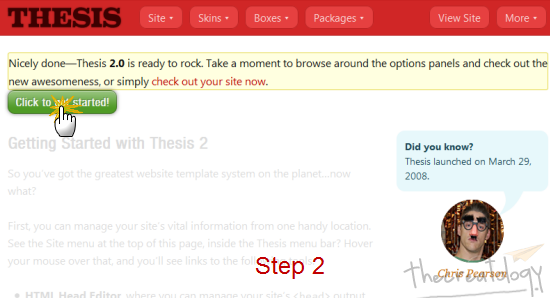
    • On activating Thesis 2, you will see a welcome page with greeting message. This page is personally designed for Chris Pearson and Missieur (his dog). 😛

    Step2- Thesis 2 Welcome Page Get Started
    Step2- Thesis 2 Welcome Page Get Started

    • Click green Get Started Button as soon as you activate thesis theme, else your website will show nothing but a white blank template.
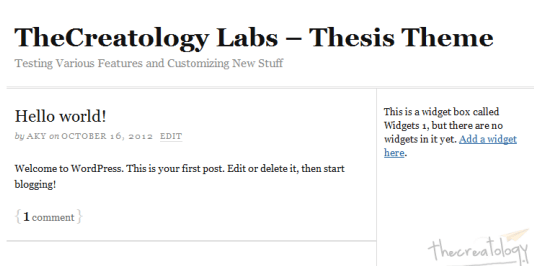
    • Once done, refresh your website and you will see something similar to screenshot below.

    Thesis Theme with Classic Skin
    Thesis Theme with Classic Skin

    • Tada…here it is, the new Thesis Theme loaded with classic skin.

    What’s Amazing about Thesis 2?

    New Thesis looks similar to older one, but is 10 times powerful in terms of flexibility and extensibility. Check out something amazing about Thesis 2.0, especially for lazy bloggers:

    • Design skins and customize from WordPress admin panel. No FTP!
    • Ease by Drag-drop HTML structure. No Coding!
    • Built-in CSS Packages. No Coding!
    • Missieur (Chris’s dog) tips about SEO, broken links & 404 error pages. The doggie style!

    There are many other features in Thesis 2 which will be covered in Hands on Thesis 2 series of articles, so keep in touch via Twitter, Facebook or RSS updates.

    That’s all folks!

    For any query or further help required post your feedback as comments below.

  • Add Slim Subscription Box in Header to Increase Blog Readers

    Not getting enough readers for your blog ? It doesn’t matter if blog content is unique or covers latest news, tRUth is that, a reader will come, read the content or will exit away and never return. While going through thecreatology stats, I analyzed that RSS Subscription was not performing well because of its placement in footer. Guess what, you can now see another slim subscription box above content box on thecreatology blog. It looks similar to the screenshot below:

    Slim Subscription Box TheCreatology
    Slim Subscription Box TheCreatology

    The point is that, if you offer FREE Subscription of Blog Updates and maintain a subscriber list then it will certainly help you to get loyal visitors on blog. Well, if you want to add attractive subscription box in WordPress blog, then you can follow rest of the article.

    In this article, we will learn to Add Slim Subscription Box in Header to Increase Blog Readers. Below are quick steps for the same:

    Getting Started

    Before we start with the tutorial, I want you to make sure that your WordPress, Plugins and Theme are updated with latest versions. If you are using Thesis Theme then you can Safely upgrade to latest version Thesis.

    Add Subscription Box in Header

    In this example, we are going to add RSS Subscription box which I believe is most commonly used and FREE too. Find the code for RSS Subscription box below and paste in single.php or  header.php file of the currently activated theme. If you are using Thesis Theme, then paste the code in custom_functions.php file using thesis hook before content. PHP code is as under:

    NOTE: Make sure you take full backup of functions.php file or custom_functions.php file using FTP before modifying the original file or you can also refer to the article about how to safely edit custom_functions.php.

    [php]
    <!–Do not remove this line
    Designed by TheCreatology–>
    <div id="slim-subscribe">
    <span>Need Blog Updates?</span>
    <form action="http://feedburner.google.com/fb/a/mailverify" method="post" target="popupwindow" onsubmit="window.open(‘http://feedburner.google.com/fb/a/mailverify?uri=thecreatology’, ‘popupwindow’, ‘scrollbars=yes,width=550,height=520’);return true">
    <h4>Subscribe to TheCreatology via <a href="http://feeds.feedburner.com/thecreatology" target="_blank" rel="nofollow">RSS</a> | <a href="http://feedburner.google.com/fb/a/mailverify?uri=thecreatology">Email</a></h4>
    <input type="text" name="email" value="Your e-Mail address…" onblur="if (this.value == ”) {this.value = ‘Your e-Mail address…’;}" onfocus="if (this.value == ‘Your e-Mail address…’) {this.value = ”;}">
    <input type="hidden" value="thecreatology" name="uri"/>
    <input type="hidden" name="loc" value="en_US"/>
    <input type="submit" value="Subscribe">
    </form>
    </div>
    <!–Designed by TheCreatology, Author: Aky Joe–>
    [/php]

    Style Subscription Box CSS Code

    After adding the HTML part, we definitely require to add CSS code to make it look attractive. Subscription box style code is as under:

    NOTE: Make sure you take full backup of style.css or custom.css file using FTP before modifying the original file.

    [css]

    /*
    Author: Aky Joe
    URL: http://akyjoe.thecreatology.com
    */
    #slim-subscribe{ background:#E2F7A8; border: 1px dashed #A6DFFA; height: 70px; margin: 20px 0 0; font-family: Arial;}
    #slim-subscribe span{color: #f60; text-decoration: none; font-family: comic Sans MS; font-size: 26px; line-height: 65px; margin: 0 0 0 20px;}
    #slim-subscribe h4{font-size: 12px; margin:5px 0;}
    #slim-subscribe h4 a:hover{text-decoration: underline;}
    #slim-subscribe form{float: right; margin: 5px 20px 5px 0;}
    .txt-blog,.txt-blog:focus{background:#fff; border: 1px solid #b7cb80; border-radius:5px; padding: 6px 10px; width: 180px; font-size: 15px; color: #888;}
    .btn-blog,.btn-blog:focus{background:#555; border: 0; border-radius:5px; padding: 6px 10px; font-size: 15px; color: #fff; text-shadow:1px 0 2px #333;}
    .btn-blog:hover{background:#333;}

    [/css]

    Did you Play with the Code ?

    Did you copy the code as it is ? Well, if yes then I recommend you to replace HTML part saying “thecreatology” with your RSS feedburner ID. Also you can play with the CSS to change background color of box and font color matching blog theme. Don’t change its size as fat body covers a lot of space, so let it be slim like me mine. 😉

    We’re Done!

    Wow subscription box looks good now, ‘eh ? If not, I would say NEVER STOP PLAYING. And here we come to the end of tutorial add subscription box in header to increase blog readers. I hope it was easy, if not? you can also hire me to add-style subscription box for you. If you have any query or further assistance is required, post your feedback as a comment below.

  • Create Google+ Fan Page for your Website or Blog

    The wait is over now, as Google has used their trump card by launching Google+ Pages for Business. Yes, you can now create Google+ Pages for your websites, blogs, local business, brands and etcetera. Creating a Google+ Fan Page is, quite similar to a Facebook Fan Page, that you just need to login to your profile and get started. Not that easy ? Or doesn’t make sense to you ? Not a problem, you can simply follow rest of the article. 😉

    google-plus-pagesIn the article, we will learn how to create Google+ page for your blog or website. For your ease, I have divided this article into three easy steps, that is, Getting Started, Setup Info and Publish & Share.
    Getting Started: Create Google+ Page

    Let us get started with the creation of your first Google+ Page, follow the quick steps below:

    • Login to your Google+ Profile.
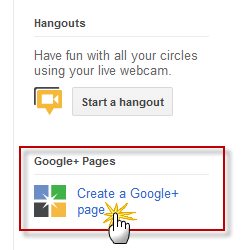
    • On the right pane look for Create a Google+ Page and click on the link or you can simply click here.

    create new google plus page
    Create new google plus page

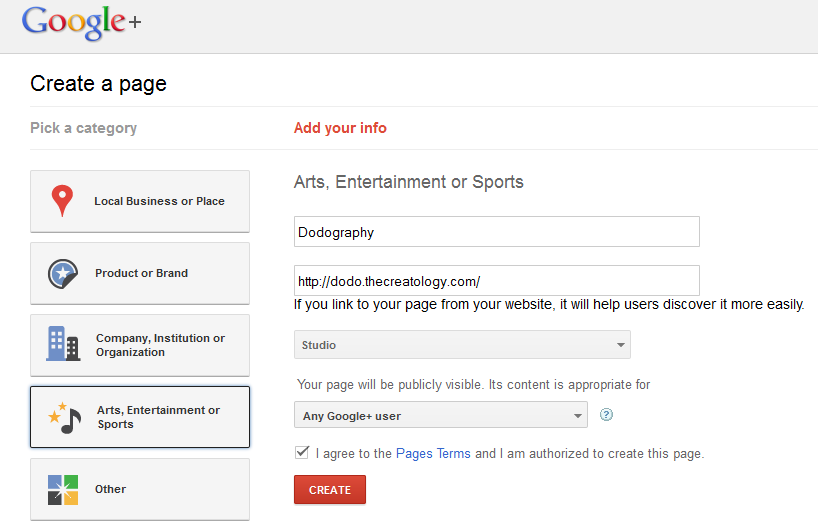
    • After clicking the link, you will be redirected to a page similar to screenshot below:

    setup new google page
    Screen 1: Create a page

    • Enter the required details, for instance Name of the Page, Category, Website Link and privacy. Privacy is beneficial if you want to make your page private or limit page scope to people who connect the circle. Once done, click the red CREATE button and your page will be created.
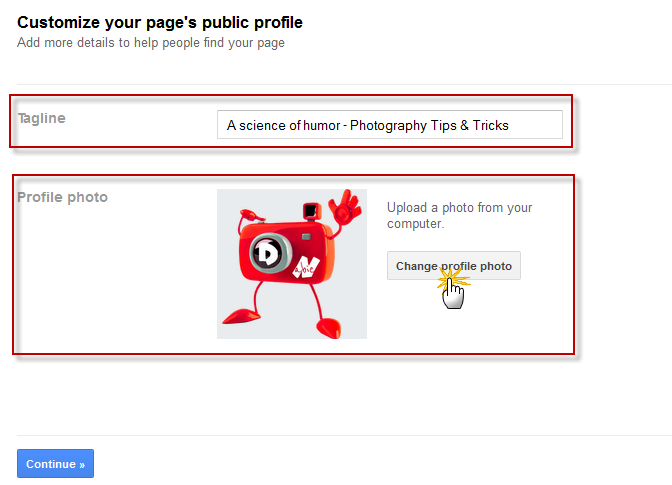
    • In next screen, you will be prompted to add a tagline and add image to Google Page, just like in the screenshot below:

    customize google page
    Screen 2: Customize Google Page

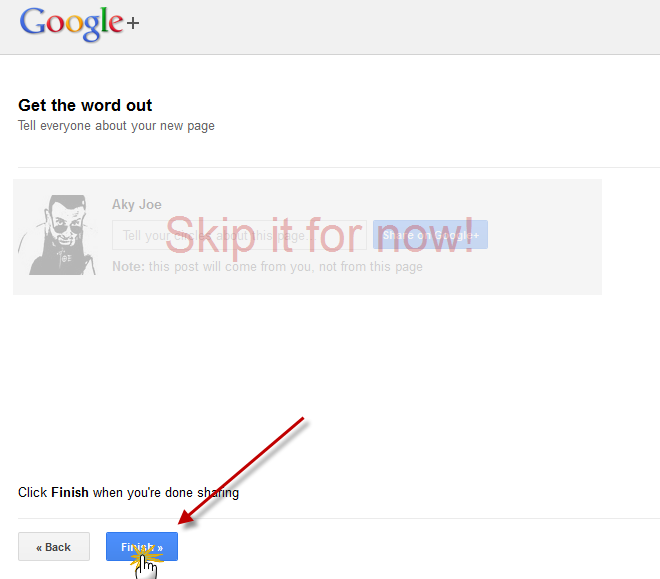
    • Once done, click Continue Button to save changes and move to next screen. In the next screen, Google will ask you to publish this page, but I recommend you to skip this step as it will share incomplete page to your fans. Click the Finish Button to complete Getting Started step. (refer to screenshot below)

    save google page changes
    Screen 3: Share Google Page

    Setup Info: Configure Google+ Page

    So now that you have created new Google Fan Page for website, we will have to setup few things before we publish or share it with your fans. Below are quick steps to setup profile of Google Fan Page:

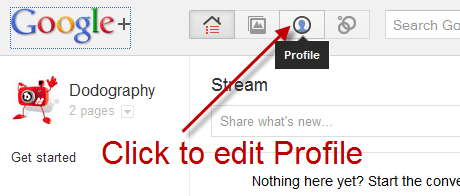
    • On the home screen, click the profile button as shown in the screenshot below.

    edit profile google fan page
    Edit Google Page profile

    • On the profile page, click the About Tab and press blue Edit Profile Button on top right.
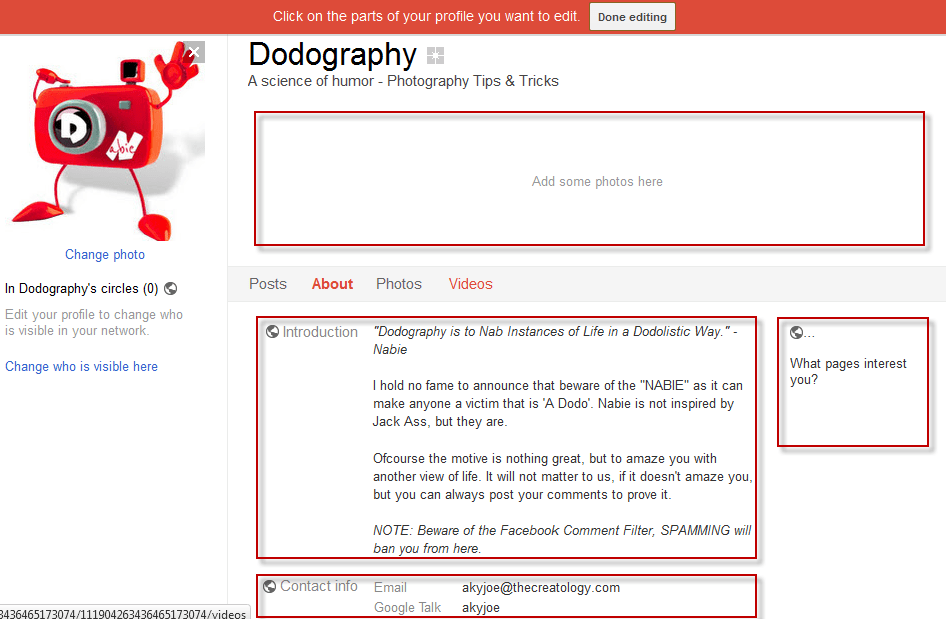
    • In the edit profile screen, you can change profile picture, add description, custom link on right pane and so on. (refer to the screenshot below)

    google fan page description
    Add profile information

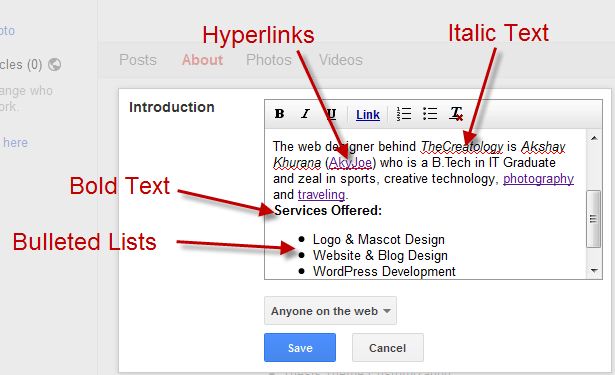
    • In Google+ Fan Page description has rich text editor, which also allows you to insert links, format text for bold, italics & underline, and bulleted & numbered list items. (refer to the screenshot below)

    format google page description
    Format Profile Description with Rich Text Editor

    Google Fan Page looks good ? Don’t miss to use rich text editor to format your description.

    • Once done, click the Save button and also the red top bar Done Editing button, when you finish editing the profile.

    Publish & Share Google+ Page with Friends

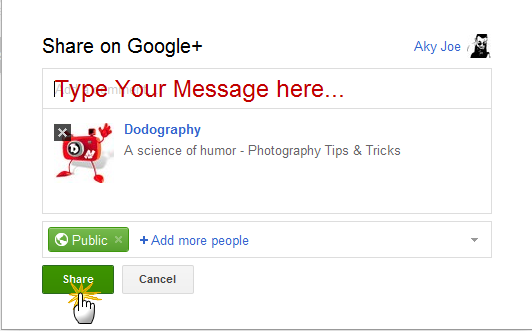
    Ready with your Google+ Fan Page ‘eh ? If so, then without any further delay we should promote the Google+ Fan Page with your friends. In the profile page itself hit the green Share your page Button, which you will see right below the profile picture. On clicking the green button, a window will open similar to screenshot below.

    share google fan page with friends
    Share Google Page with your friends

    In the share window, type your message, set the privacy level and hit the Share Button. Done ? GREAT! You have now successfully shared Google Page with your friends and with this we come to the end of this tutorial.

    Did you like Google+ Fan Page for your Blog ? Let us know by posting a comment below and you can also add TheCreatology on Google+.

  • How to Extend Contact Details of Author Profile in WordPress

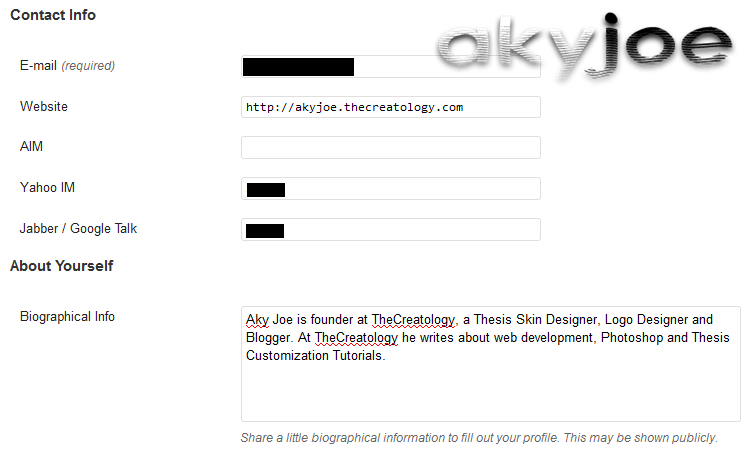
    Do you think WordPress has a user-friendly interface ? Of-course I do, not just because of its interface, but its ability to extend features to meet the required needs. For instance, in WordPress user profile editor under Contact Info section you can add E-mail, Website, AIM, Yahoo IM & Google Talk.

    wordpress admin default contact details
    Default Contact Options in WordPress

    WAIT! What if you need to add Twitter account in user profile or may be Facebook account in WordPress user profile ? Well, by default there is no space made by WordPress developers yet. I really wonder why do they ignore Twitter and Facebook or may be they don’t bother. Anyway, you don’t have to worry as WordPress is capable of extending its features, hence you can extend Contact Info of author profile. In this article, we will learn How to Extend Contact details of Author Profile in WordPress blog.

    Getting Started

    Before we start with the tutorial, I want you to make sure that your WordPress, Plugins and Theme are updated with latest versions. If you are using Thesis Theme then you can Safely upgrade to latest version Thesis.

    Add Contact Options in User Profile

    WordPress uses filters to override its default functions, and to extend WordPress Contact options it requires to create a filter. Find the code below and paste contact info filter in function.php file of the currently activated theme. If you are using Thesis Theme, then paste the code in custom_functions.php file. PHP code is as under:

    NOTE: Make sure you take full backup of functions.php file or custom_functions.php file using FTP before modifying the original file or you can also refer to the article about how to safely edit custom_functions.php.

    [php]
    /*
    * Author: Aky Joe
    * Edit Custom Author Fields
    */
    function extend_author_profile_joe( $joefields )
    {
    $joefields[‘twitter’] = ‘Twitter’;
    return $joefields;
    }
    add_filter(‘user_contactmethods’,’extend_author_profile_joe’,10,1);
    [/php]

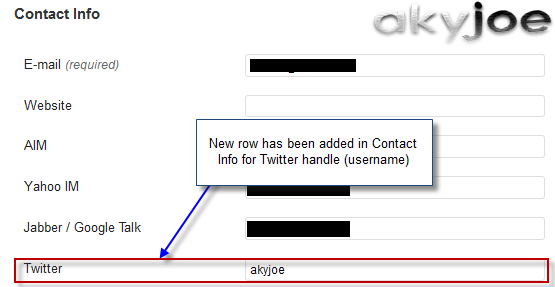
    Above code will add Twitter option field in user profile under Dashboard Admin. Once you have added the code, save the file and upload it to server using FTP. Navigate to Dashboard Admin > Users > Your Profile and look for Twitter under contact info, similar to the screenshot below:

    extend wordpress contact option twitter
    Twitter Option added in User Profile

    Embed Contact option in Theme

    In a WordPress blog, Contact Info options are often used in Single Posts, for instance in Author Bio, Bylines & etcetera. To show Contact Info option in Theme requires, a PHP code to be added within the Post Loop in Single.php. Thesis Theme users can refer to Add Author Bio below single post in Thesis WordPress Theme. PHP Code to embed contact option is as under:

    [php]
    < ?php the_author_meta( ‘twitter’ ); ?>
    [/php]

    Was that easy ?

    I hope it was and in similar fashion you can extend contact details in WordPress. You can play or innovate the above code to meet your requirements, like adding facebook account in user profile, custom image urls in user profile and so on.

    Can’t figure out a word above ? then you can also hire me to do extend Contact Options for WordPress. Else if you have any query or further assistance is required, post your feedback as a comment below.

  • Easy way to add MailChimp Subscription Form on WordPress Blog

    If you are an Email Marketer then you must be knowing about MailChimp, no big deal if you don’t know What MailChimp is ? MailChimp is one of the best Email marketing service on web, which helps you to circulate Newsletters, Notices & other promotional media amongst your subscriber list. Doesn’t flatter your mind ? Go ahead and sign up for MailChimp for FREE Trial Account Now! 🙂

    Free-MailChimp-AccountOnce you have MailChimp account, you would want to see things in action, probably by embedding MailChimp form on WordPress Blog/website. MailChimp features you to embed form in two ways either using Html/JS code or using WordPress Plugin. Out of these two option, I found WordPress Plugin to be the easier way to integrate MailChimp form on website. Hence, in the article we will learn how to add MailChimp subscription form using WordPress plugin.

    I have divided this tutorial into four sections that is Installation, Configuration, Styling and Embedding form in Sidebar.

    Install MailChimp Plugin in WordPress Blog

    As MailChimp plugin is free to use, so our basic step will be to install MailChimp Subscribe List Plugin.

    • Login to WordPress Admin and Navigation to Dashboard > Plugins > Add New Plugin.
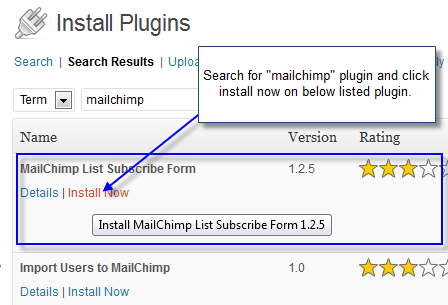
    • Search with “mailchimp” keyword and find “MailChimp List Subscribe Form” and click Install Now.

    MailChimp-Install-Plugin
    Install MailChimp Plugin

    • Once the plugin is installed, click activate button.

    Configure MailChimp Plugin Settings

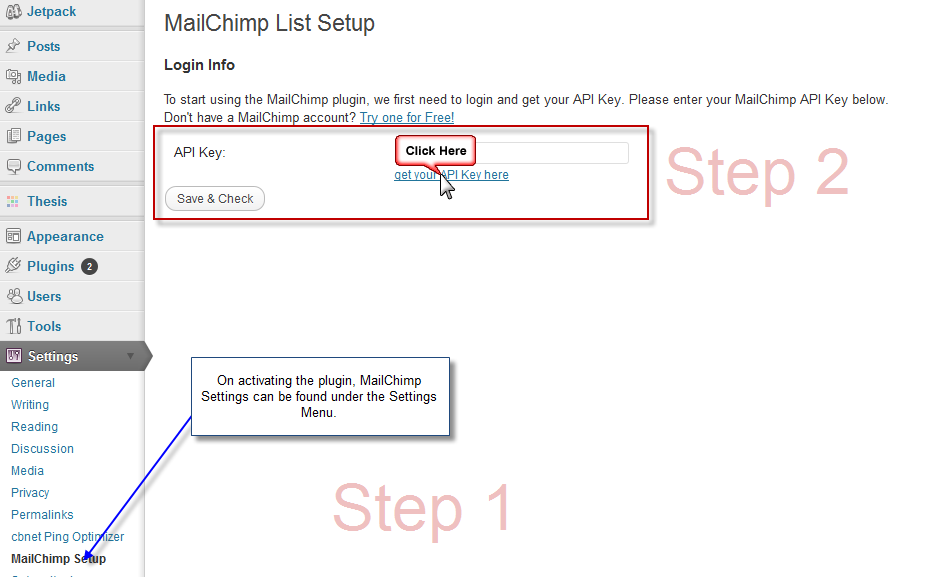
    When you will activate the plugin, MailChimp Settings will appear in Settings tab.

    • Click on MailChimp Settings to configure Subscription form settings, similar to screenshot below.

    MailChimp-Settings-Plugin
    MailChimp Plugin Settings

    Note: In above screenshot Step 2: Plugin prompts to synchronize MailChimp account with WordPress, which requires a secret API key.

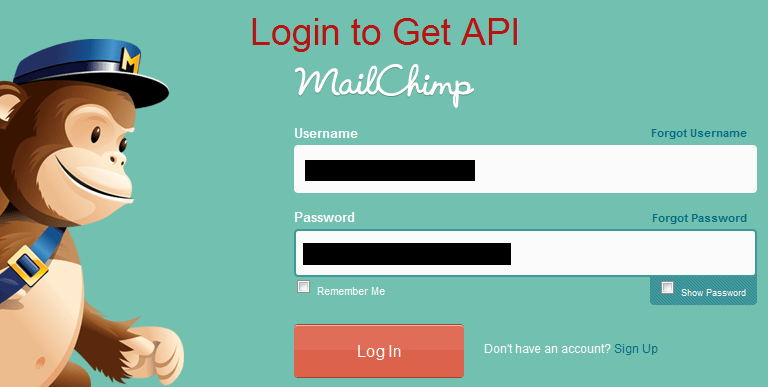
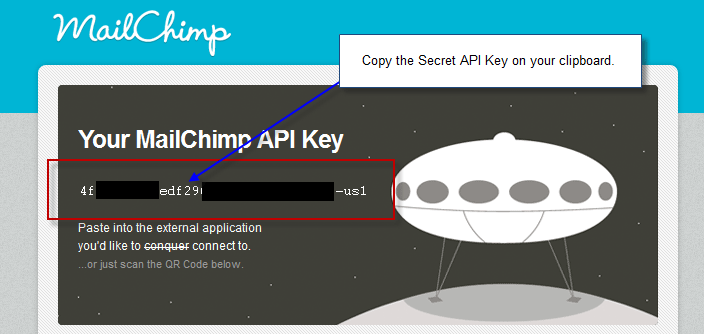
    • Click on the blue link which says “get your API key here” and you will be directed to MailChimp login screen, similar to screenshot below.

    Get-API-Key-Screen-1
    MailChimp Login Screen

    • On successful login, you will get to see Your MailChimp API Key. Copy the key and save it for future usage.

    Get-API-Key-Screen-2
    MailChimp API Key Screen

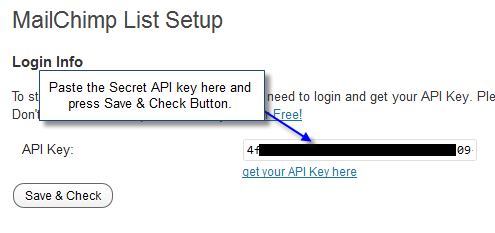
    • Once you have the key, go back to MailChimp Plugin Settings window and paste API key in text-field. Also press Save & Check Button to see some action.

    Save-API-Key-WordPress
    Save MailChimp API Key

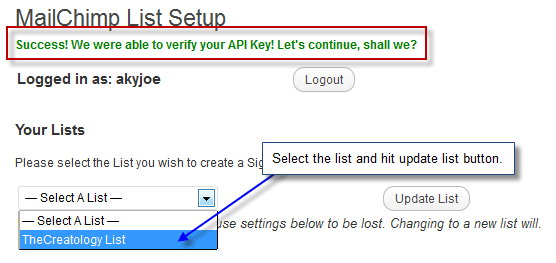
    • If API key gets validated, you will see Green Text saying “Success! We were able to verify your API Key! Lets continue, shall we?”.
    • Further, with successful synchronization, plugin will list all mailing lists created under that MailChimp account. You can select any one list from the dropdown and hit the Update List button on right. (Refer to the below screenshot)

    Valid-MailChimp-API-Key-Message
    Valid MailChimp API Key Message

    • On updating the list, you will see a lot of options below to customize and style the subscription form.

    How to style MailChimp form in WordPress ?

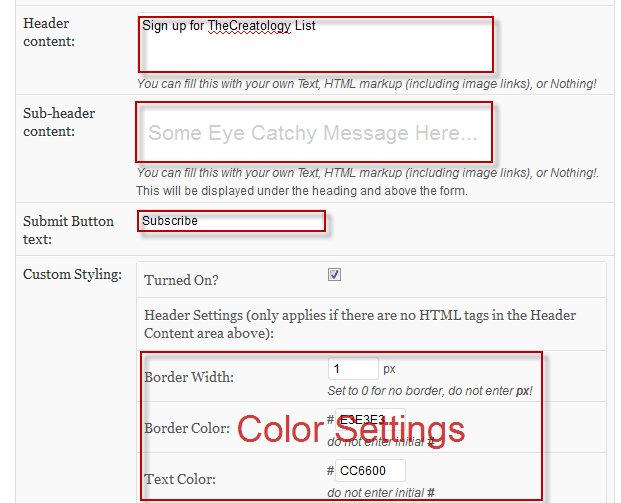
    As we know subscription forms should be eye catchy to attract more subscribers. You can do so by using the MailChimp Settings to style MailChimp subscription form.

    • Refer to the screenshot below which explains about styling and customization of MailChimp form.

    MailChimp-Configuration-Plugin
    Customize Subscription Form

    • Once done, click on Update List Form Settings Button to save all changes. We are now all set to display subscription form in Sidebar.

    How to Embed MailChimp form in Sidebar ?

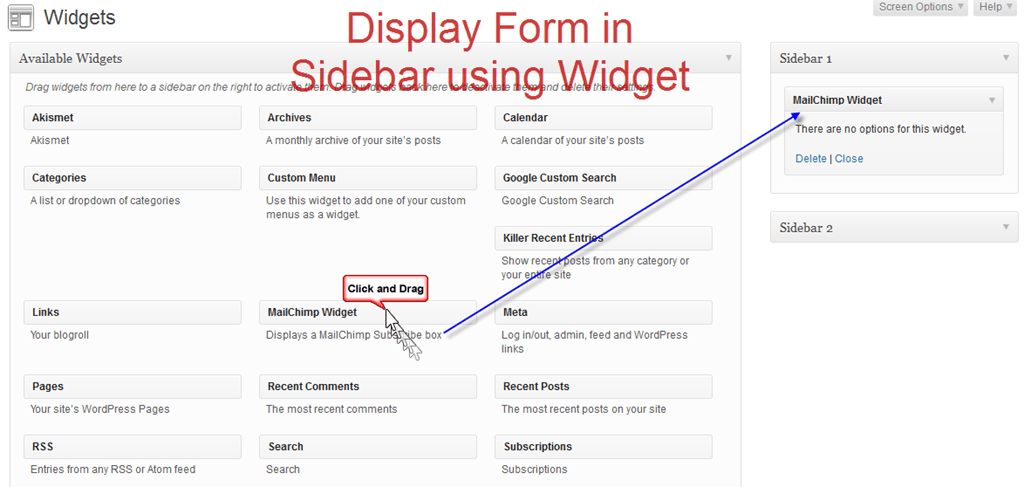
    MailChimp Subscribe List Plugin creates a widget, which can be found in Appearances > Widgets.

    • Simply drag from the MailChimp Widget to the desired position in the sidebar, you can also refer to the screenshot below.

    Display MailChimp Form in Sidebar
    Embed MailChimp form in sidebar

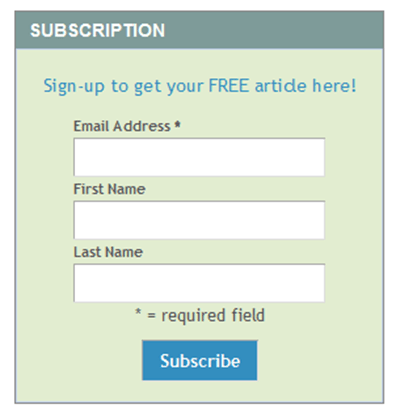
    • Once done, refresh the website to check MailChimp form in sidebar of WordPress Site.

    MailChimp Form Sidebar WordPressSomehow if you don’t like your MailChimp form styling, you can go back to the Step-3 and redesign subscription form again, with some new colors, till you satisfy yourself. 🙂

    Seems to be Easy ‘eh ?

    Well, this tutorial may look too lengthy, but believe me it just saved you from the Nightmares and Ghosts Coding and CSS Styling. LOL! Secondly, MailChimp power ease in managing Email subscription list and builds database of your contacts.

    With this we come to the end of this tutorial on Easy way to add MailChimp Subscription Form on WordPress Blog. If you have any query or further assistance is required, you can post comment below as your feedback.

  • Update Timthumb.php File in WordPress Theme Vulnerable to Hackers

    I am wondering why there is no update from DIY Themes about new version of Thesis Theme as timthumb file is making Thesis Theme Websites vulnerable to hackers. It has been reported that certain version of Timthumb script http://code.google.com/p/timthumb/issues/detail?id=212 holds security hole and Thesis Theme uses Timthumb.php file for re-sizing an image. I have no clue when new Thesis version will arrive, hence being on safer side why don’t we just update Timthumb file manually. 😉

    timthumb-hacked
    Timthumb file prone to hackers

    Therefore this vulnerability may also exist in your WordPress Theme or a Thesis Theme. For people who have followed this article How to auto generate thumbnail in Thesis Theme without Plugin, I strongly recommend you to update timthumb.php file, before a hacker ruins your morning, or make your sleepless nights.

    In this article, you will learn how to update TimThumb file in WordPress Theme.

    Step 1: Get Latest Timthumb.php for WordPress

    As mentioned about the security flaws with the timthumb.php, so our first step will be to get the latest version thumb file. You can download Timthumb.php source code from here. Another option, is to copy entire source code and edit existing Timthumb.php file. Move on to the next step which is to find timthumb file location.

    Step 2: How to find Timthumb file location ?

    As mentioned above about timthumb.php, which is a script used by developers to resize post images / slider images, so it can be found within the Theme/Plugin Directory. Depending upon various plugin and theme developers, name of the file can be either thumb.php or timthumb.php.

    For Thesis users, location of timthumb file in thesis theme is wp-content/thesis_18/lib/scripts/thumb.php

    Step 3: Why wait, replace new timthumb file asap!

    If you know the location of timthumb.php file, without any further delays, just  replace timthumb with its newer version and upload it on server using ftp. Once done, take a breather and relax! What next ?

    Did you check  other web directories ?

    timthumb-update-we are not done yet
    Analyse all web directories

    Well, I just told you to relax but we are not done yet. Make sure that you have not skipped any inactive themes directory or plugins, as this vulnerability applies to each timthumb file, regardless of whether it is active or executed by the server. I recommend you to delete all inactive themes and update existing ones to the latest versions.

    Phew! And with this you have saved your valuable asset from being hacked, but not until next time. 😛

    If you have any query or further assistance required then you can leave your comments below.