Tag: tutorials

  • How to add Social Media Share Count Buttons in WordPress Blog ?

    If you are looking forward to boost blog traffic then make sure that you have Social media buttons on your blog. When we talk about the Web2.0, social media buttons have been replaced by the new share count buttons trending Facebook Like Button, Tweetmeme, Twitter Share button and etcetera. In this article, we will learn to add different social media button in WordPress.
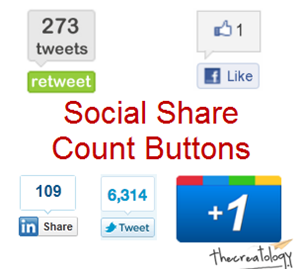
    social-share-count-button
    Social Share Count Button for WordPress

    Different Social Share Buttons

    As mentioned above, social share buttons on website is like a car with wheels, and you cannot move ahead without them. I have already covered some Social media buttons in my previous articles, whereas if you have missed any then you can find them below:

    Share Button Codes for WordPress

    For ease of access I have complied all social share button codes in this article so that you can simple add share count button in WordPress Website.

    Make sure you take full backup of single.php file using FTP before modifying it.

    Retweet Button

    [php]
    <script type="text/javascript">
    tweetmeme_source = ‘thecreatology’;
    </script>
    <script type="text/javascript" src="http://tweetmeme.com/i/scripts/button.js"></script>
    [/php]

    Above code is for the Retweet Button, make sure to change the tweetmeme_source @thecreatology with your twitter handle. To see more options you may refer the original post How to Add ReTweet Button in WordPress Blog.

    Official Twitter Button

    [php]
    <a href="http://twitter.com/share" data-url="<?php the_permalink(); ?>" data-count="vertical" data-via="thecreatology" data-related="Aky Joe:He is Cool!">Tweet</a>
    <script type="text/javascript" src="http://platform.twitter.com/widgets.js"></script>
    [/php]

    Above code is for the Official Twitter Button, make sure to change the data-via @thecreatology & data-related with your twitter handle. To see more options you may refer the original post How to Add Official Twitter Button in WordPress Blog.

    Facebook Like Button

    [php]
    <iframe src="http://www.facebook.com/plugins/like.php?href=<?php echo urlencode(get_permalink($post->ID)); ?>&amp;layout=standard&amp;show_faces=false&amp;width=450&amp;action=like&amp;colorscheme=light" scrolling="no" frameborder="0" allowTransparency="true" style="border:none; overflow:hidden; width:450px; height:60px;"></iframe>
    [/php]

    Above code will add Facebook Like Button, make sure that you add the code in WordPress Post Loop. There are also different layouts to configure Facebook Like Button, which you can find in the original post How to Add facebook Like button in Website.

    LinkedIn Share Button

    [php]
    <script type="text/javascript" src="http://platform.linkedin.com/in.js"></script>
    <script type="in/share" data-url="<?php the_permalink(); ?>" data-counter="right"></script>
    [/php]

    Above code will add LinkedIn Button, make sure that you add the code in WordPress Post Loop. There are also different layouts to configure Linked Button, which you can find in the original post How to Add LinkedIn Share Button in WordPress Blog.

    Google Like +1 Button

    [php]
    <script type="text/javascript" src="https://apis.google.com/js/plusone.js"></script>
    <g:plusone></g:plusone>
    [/php]

    Above code will add Google Like Button, make sure that you add the code in WordPress Post Loop. Google Plugin button can be configured in three ways, for which you can refer to the original post How to Add Google +1 Like Button in WordPress Blog.

    Is that it ?

    Well yes, these were some popular social count buttons which I shared above, for a WordPress blog. If you think I missed any other share button, then you can share with us by posting a comment below, respecting the fact that Sharing is Caring. 😉

  • How to crop image and resize image using WordPress Image editor ?

    Are you looking for Image editor online to crop images for WordPress blog ? Well, I would like to tell you that WordPress 3+ version has its own image editor which can be used to crop images, rescale images and resize images from the Dashboard Admin Panel.

    WordPress Image EditorIn this article we will learn, how to crop image and resize image using WordPress Image Editor. The Tutorial has been divided into two sections, one explains about cropping an image while other explains about resizing an image in WP Admin.
    How to Crop Image in WordPress ?

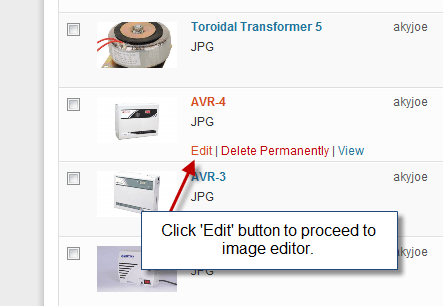
    Image Cropping tool in WordPress just makes it handy for to handle your huge 4000×2500 pixel digital camera snapshot. WordPress Crop tool allows you to select vital area in image and resize it automatically. To crop an image:

    • Login to WordPress Admin and Navigate to Dashboard > Media .
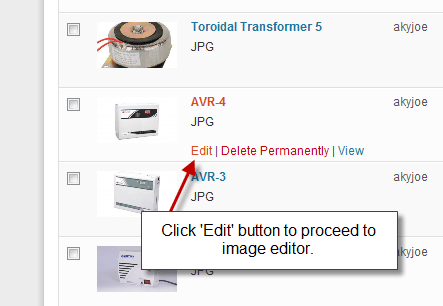
    • Select any existing image from media or you can also upload new image from computer. (Refer to screenshot below)
    Select Edit image from media
    Select Edit image from media (Click to Zoom)
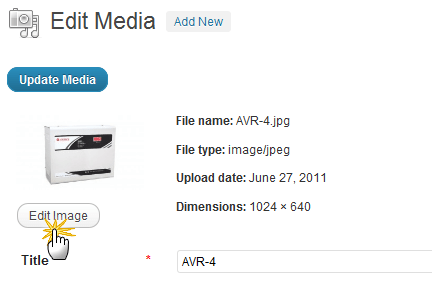
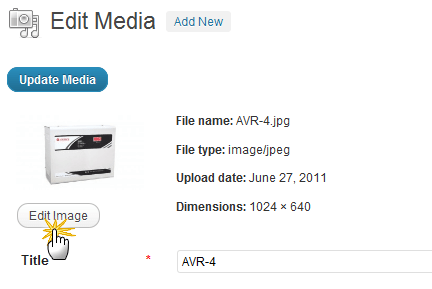
    • Further it will open Edit Image media, and under the thumbnail image click the Edit Image button to open WordPress Image Editor. (Refer to screenshot below)
    Select Edit image button
    Select Edit image button (Click to Zoom)
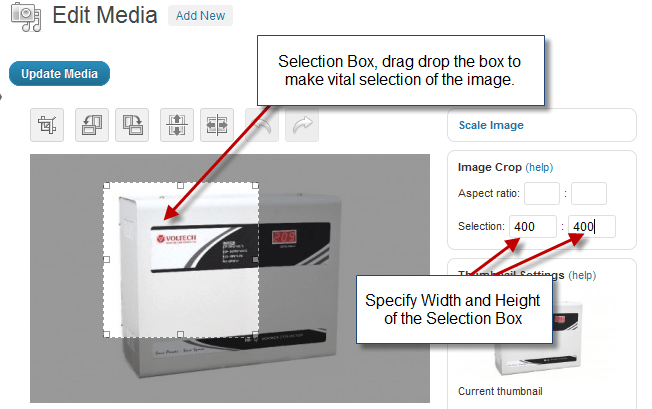
    • Next you will see the Image Editor page, where cropping of images can be done. Refer to screenshot below.
    Crop Image using WordPress Editor
    Crop Image using WordPress Editor (Click to Zoom)

    In the above screenshot you can simply Drag the selection on the image visible on left pane and click Update Media Button to apply changes, if you are not satisfied use Undo Button and crop image again.

    (Note: Once the Media has been updated you can revert back.)

    How to Resize Image in WordPress ?

    Image resizing for blog is tough to fit image as per the size. But with WordPress everything is like easy, click a away.  With WordPress image editor you can rotate, flip and scale your image without any extra efforts. To resize an image:

    • Login to WordPress Admin and Navigate to Dashboard > Media .
    • Select any existing image from media or you can also upload new image from computer. (Refer to screenshot below)
    Select Edit image from media
    Select Edit image from media (Click to Zoom)
    • Further it will open Edit Image media, and under the thumbnail image click the Edit Image button to open WordPress Image Editor. (Refer to screenshot below)
    Select Edit image button
    Select Edit image button (Click to Zoom)
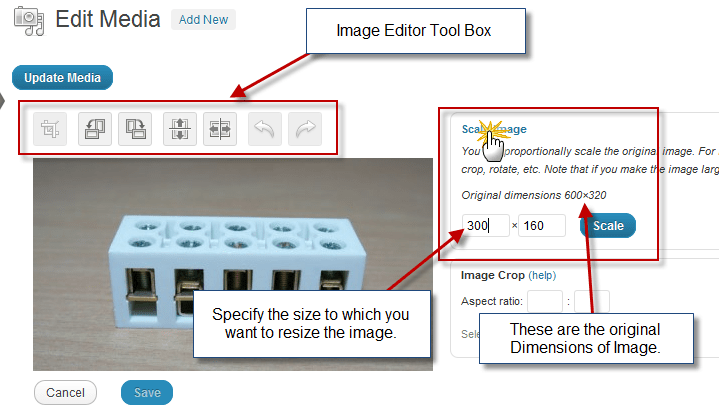
    • Next you will see the Image Editor page, where you can Resize and Rescale your Image using WP Image Editor. Refer to screenshot below.
    Resize Image using WordPress Editor
    Resize Image using WordPress Editor (Click to Zoom)

    In the above screenshot you can specify width height parameters on right pane and click Scale Button to apply changes, if you are not satisfied use Undo Button and rescale image again.

    (Note: Once the Media has been updated you can revert back.)

    We Are Done

    Image editing is easy within WordPress and you don’t have to install plugins or use any Image Editor online, but use WordPress image editor. Share with us How did you like WordPress Image Editor ?

    If you have any queries or further assistance is required, you can post feedback as comment below.

  • Tutorial to add CAPTCHA in Contact Form 7 Plugin to block Spam on WordPress Blog

    Spamming on WordPress blogs has become vital, just kidding, increasing day-by-day. You must be here looking up for solution to stop spam on your blog as well. To stop spam comments,  I have covered two articles on How to Block Spam using HTACCESS and using Akismet Plugin. But these tutorials will only help you to stop spam commenting on your blog but not on contact forms. For a spammer, it’s just a Submit button required to do all the action.

    Spam MessageIf your WordPress Blog is using Contact Form 7 plugin, then beware that you can be spammer’s next target. Recently, I received few spam comments on my Email via Contact form 7 on thecreatology and it got worst with count of 50+. Annoying! Below is screenshot of the Inbox:
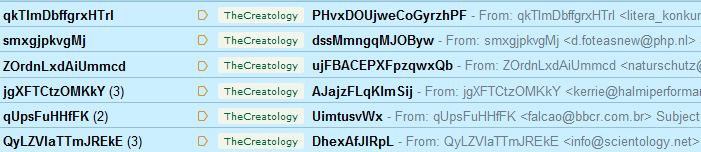
    Spam Messages from Contact Form 7
    Spam Messages from Contact Form 7

    I tried tracking IP Address of all emails and the origin, but it was hard to block spammer access because they used a random IP Address every time. So, I had to install CAPTCHA in Contact Form 7 settings. In this tutorial, you will learn how to add CAPTCHA in Contact Form 7 Plugin to block Spam on Website.

    Block Spam using CAPTCHA

    CAPTCHA is an automated scripts made to validate forms submission. CAPTCHA reforms a word every time it refreshes. This makes it complex for spam bot to read CAPTCHA letters and auto submit form. To add CAPTCHA in WordPress Contact form, you will be required to install Really Simple CAPTCHA plugin. Below is stepwise procedure to add CAPTCHA in Contact form 7.

    Step 1: Install Really Simple CAPTCHA Plugin

    To install WordPress CAPTCHA plugin, login to WordPress dashboard:

    • Navigate to Dashboard > Plugins > Add new Plugin.
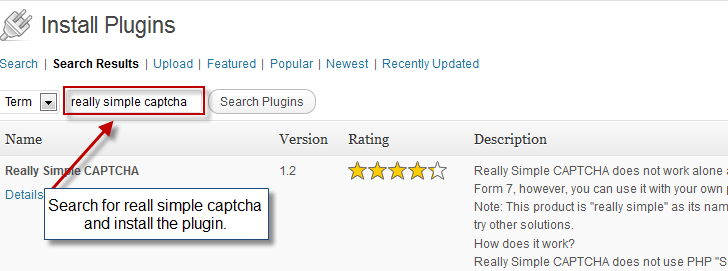
    • Search for Really Simple CAPTCHA plugin and click to install it. Refer to screenshot below.
    install really simple captcha plugin
    Install CAPTCHA plugin
    • One the plugin is installed, activate it.

    Are done with installation of plugin? Move on to configure Contact Form 7.

    Step 2: Add CAPTCHA to Contact Form 7

    You can add CAPTCHA in contact form in few easy clicks. Follow the procedure below:

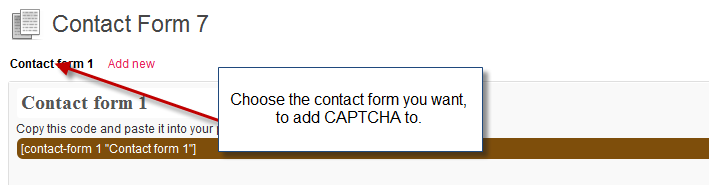
    • Login to WordPress Dashboard and navigate to Dashboard > Contact.
    • Select the contact form to edit it, refer to the screenshot below.
    Select Contact Form To add CAPTCHA
    Select Contact Form To add CAPTCHA
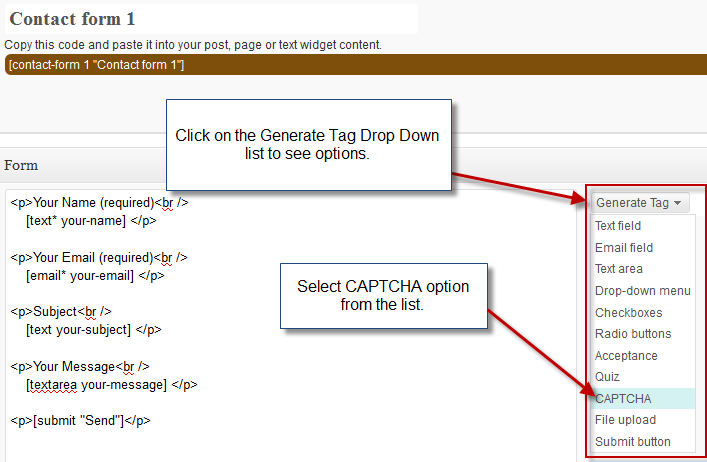
    • To add CAPTCHA, click on the Generate Tag drop down list on right, and select CAPTCHA option in the list, just like in the screenshot below:
    Generate CAPTCHA Tag for Contact Form
    Generate CAPTCHA Tag for Contact Form
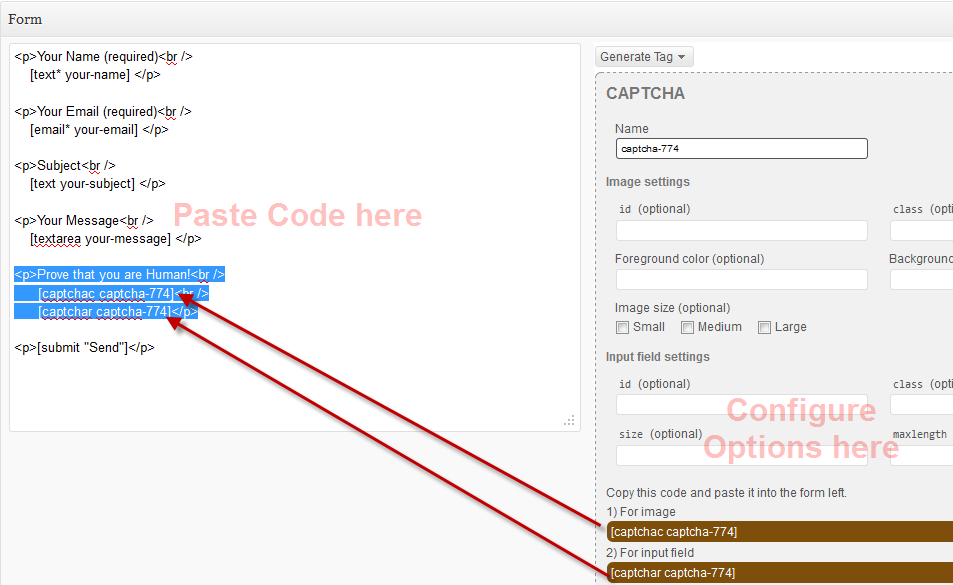
    • After you click on the CAPTCHA option, CPATCHA setting options will appear under the Generate Tag drop down list. Now, configure the options and copy-paste the code on the left side of the window. Refer to screenshot below:
    Add CAPTCHA to contact form code
    Add CAPTCHA to contact form code
    • Once done, hit the Save button on top right and We’re Done! 😉

    We’re Done

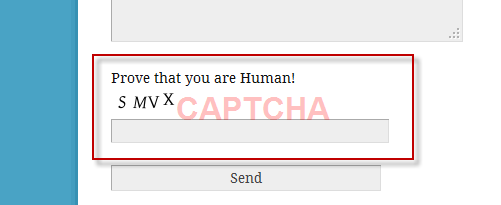
    Now that you have added the code, refresh the contact form page and check it out, it will look similar to screenshot below:

    CAPTCHA on WordPress Blog
    Demo: CAPTCHA on WordPress Blog

    Adding CAPTCHA will violate bots to submit spam on website. In a way you can focus more on blogging rather administering your blog.

    In this article, we learned to add CAPTCHA in Contact Form 7 WordPress Plugin to block spam. If you have any queries or require any assistance, you can post a feedback using  comment form below.

  • Tutorial to change Excerpt Length Size of Teaser in Thesis Theme

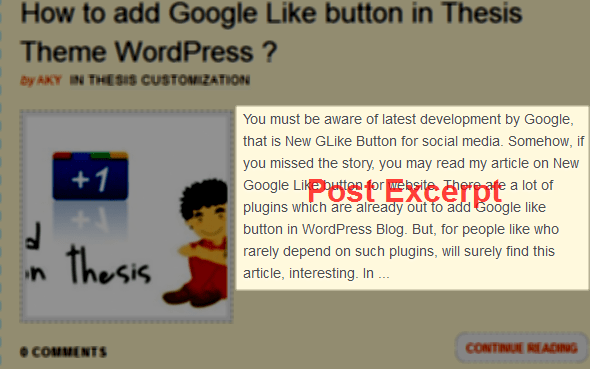
    You must be wondering when Thesis Theme offers great features, why there is no feature to adjust excerpt length on homepage ? Same question knocks my mind too, but I couldn’t find a good reason to it. Instead, I found an alternative to adjust teaser post length and in this article we will learn how to change excerpt length of teaser in thesis theme.

    Change Teaser length in Thesis Theme
    Post Excerpt of Teaser in Thesis Theme

    But before we go ahead with the tutorial, I recommend you to update Thesis Theme. Don’t know how to do that ? Well, it is simple, just refer to article Safely upgrade to latest version Thesis 1.8 ? If you don’t have Thesis Theme Copy then you can also Download Thesis Theme.

    Analogy behind Excerpt Length of Teaser

    One thing I like about customizing WordPress, is its filter feature, with which you can override any default function of WordPress. So, analogy behind adjusting excerpt length is too using WordPress filter and overriding it with another filter with new parameters.

    Change Excerpt Length in Thesis Theme

    To change excerpt length on homepage, add the below code in custom_functions.php in Thesis Theme.

    NOTE: Make sure you take full backup of custom_functions.php file using FTP before modifying it or you can also refer to the article about how to safely edit custom_functions.php

    [php]
    // Teaser Length
    function teaser_length($length) {
    return 70;
    }
    add_filter(‘excerpt_length’, ‘teaser_length’);
    [/php]

    Once you have added above code in custom functions, refresh the website homepage and look for the teaser length. If it doesn’t satisfy you, simply adjust value on line number 3 of above code depending on your need.

    With this we come to end of this simple tutorial where we learned how to adjust excerpt length in Thesis Theme. If you have any query or further assistance is required, post your feedback as comment below.

  • How to add Google Like button in Thesis Theme WordPress ?

    You must be aware of latest development by Google, that is New GLike Button for social media. Somehow, if you missed the story, you may read my article on New Google Like button for website. There are a lot of plugins which are already out to add Google like button in WordPress Blog. But, for people like who rarely depend on such plugins, will surely find this article, interesting. In the following article we will learn to add Google Like button in Thesis Theme WordPress.

    But before we go ahead with the tutorial, I recommend you to update Thesis Theme. Don’t know how to do that ? Well, it is simple, just refer to article Safely upgrade to latest version Thesis 1.8 ? If you don’t have Thesis Theme Copy then you can also Download Thesis Theme.

    Google Like Button for Thesis Theme

    google-like-button-on-thesis theme
    Add Google Like Button On Thesis Theme

    When we talk of the custom coding, there are four variations of Google Like button developed to fit-in every layout of website. Google Like button in Thesis Theme can be added using thesis-hooks, the overriding functions. To show GLike button in single post, simply add  below code snippet in the custom_functions.php.

    NOTE: Make sure you take full backup of custom_functions.php file using FTP before modifying it or you can also refer to the article about how to safely edit custom_functions.php

    [php]

    function joe_adds_glike_btn ()  {
    if (is_single()) { ?>
    <div style="float:right;">
    <script type="text/javascript" src="https://apis.google.com/js/plusone.js"></script>
    <g:plusone></g:plusone>
    </div>
    <div style="clear:both;"></div>
    <?php
    }}
    add_action(‘thesis_hook_before_headline’,’joe_adds_glike_btn’);

    [/php]

    We’re Done

    Once you have added above code in custom functions, you can now refresh your post page, where you will see Google like button in single post similar to screenshot below:

    Google-like-button-on-thesis theme
    Google Like button in Single Post

    For any social media button, I really like this placement and believe me it is effective. Now that we have added Google Like button in Thesis Theme, we are done with the tutorial. If you have any query or further assistance is required, post your feedback as comment below.

  • How to block spam comments on blog using htaccess ?

    If someone is continuously spamming on your website, you feel like hitting that spammer with baseball bat. Relax! Don’t do that as I have an easy way to block spam on website for you.

    Block SpammerRecently, I shared an article on to block spam using Akismet Plugin on WordPress. Akismet plugin’s Spam filter is though very strong but sometimes people submit spam comments in genuine way to get back links. Being dependent on the Plugin, we are left with nothing to do but manually delete spam comments or you can use htaccess to block user to comment.
    Why htaccess is useful ?

    As we all are aware of htaccess file which adds security attributes to web directory where every browser reads htaccess file before loading website on client end. For instance if you want to disable web directory or password protect web directory is possible using Htaccess method. Similarly if you want to block IP Address to restrict visiting website, we will have to use htaccess method. And in this scenario we will be using htaccess code to block comment.

    htaccess code to Block Spam Comment

    When someone comments on your website, you can trace that person using IP Address. And if someone is spamming on website, then you can simply restrict user to access website using IP Address. Below is a simple procedure to block spam comment using htaccess.

    • Login to your WordPress Admin Area and Navigate to Dashboard > Comments.
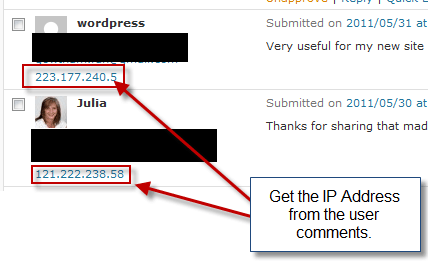
    • In the list of comments you can get the IP Address of the users, just like in the screenshot below.
    Get IP Address from User comment
    IP Address from User comment
    • Once we have the IP address, we are ready to create htaccess file.
    • Go to root directory of website using FTP and look for HTACCESS file. (In some hosting it is hidden, so make sure you tweak the visibility in your FTP Client)

    NOTE: Make sure you take backup of htaccess before modifying it.

    • If there is no HTACCESS file present, then you can simply create a new text file and rename it as “.htaccess”.
    • Now open HTACCESS file in any text editor and add below code to block spam comment user.

    [php]

    order allow,deny
    deny from 121.222.238.58
    deny from 223.177.240.5
    allow from all

    [/php]

    The above code will block two IP Address that is 121.222.238.58 and 223.177.240.5. Sometimes, spammers use a whole of a series like 121.222.238.23, 121.222.238.24 and so on. In this case you can simply use the below code.

    [php]

    order allow,deny
    deny from 121.222.238.
    allow from all

    [/php]

    Now, the above code will block whole series of IP address starting from 121.222.238.2 to 121.222.238.254

    • Once you have added the code in HTACCESS file, save it and we are done.

    We’re Done!

    Stopping spam comments on website has always been a challenge for administrator and it will always be a ping-pong game. Let us know what measures do you use, to stop spam comments on website ? by posting a comment below.

    If you have any query or further assistance is required, you can post comment as your feedback.

  • How to safely edit Custom Functions file in Thesis Theme ?

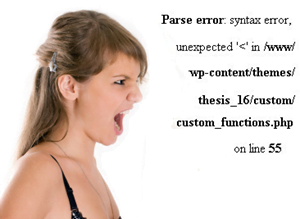
    I have already shared many Thesis Theme Tutorials here, but the most common feedback received is “My website crashed while editing custom functions file, Please help!” which I believe is a Human error. While Acknowledging those comments, sometimes get so redundant and leaving me with no other choice.

    Thesis Custom Function error
    Thesis Custom Function error

    DIY Thesis Theme offers flexibility of customizing to meet your requirements. Editing Custom_Function.php features to customize layout of website and functionality while Custom.css take cares of the look and feel of the website. Custom Functions is very sensitive file of Thesis Theme as any wrong code may result to fatal error, hence crashing your website. In the article we will learn how to safely edit custom_functions.php file in Thesis Theme.

    The tutorial requires updated versions of WordPress and Thesis Theme. If you are using old version of Thesis then you can refer to article Safely upgrade to latest version Thesis 1.8 ?

    Where is Custom Functions file located ?

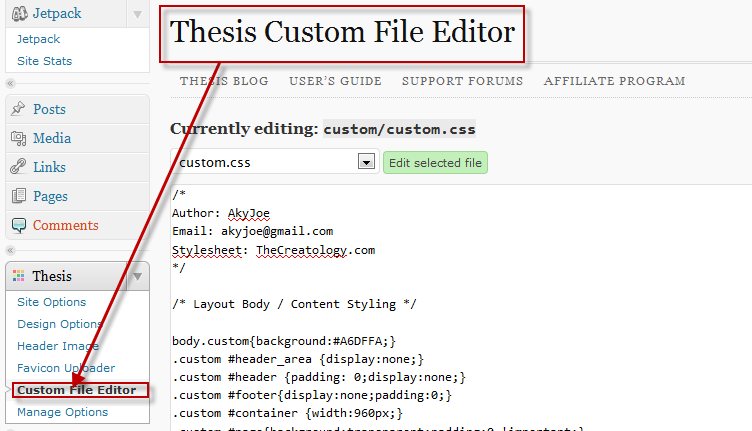
    As mentioned above Thesis Theme is a raw theme and offers flexibility to customize as per your requirements. Custom Functions file is located in Custom Folder of Thesis Theme Directory. You can simply edit custom function file using the Thesis Custom File Editor. Refer to the screenshot below:

    Thesis Custom File Editor
    Thesis Custom File Editor

    How to edit Thesis Custom_Functions.php file ?

    Editing custom functions is easy just like bread-butter with some vegetables and mayonnaise. But if you miss something, it will not taste good, on the complimentary, adding wrong code or missing any operator will lead to fatal error and crashing your website. Below is a handy procedure to safely edit custom functions file:

    • Login to WordPress Dashboard and navigate to Thesis > Custom File Editor.
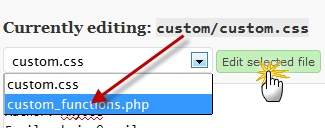
    • In the drop down list under “Current editing text:” Choose custom_functions.php and click Edit Selection button next to it. Refer to screenshot below:
    Edit Custom Functions Thesis
    Edit Custom Functions Thesis
    • After clicking the edit selected button, you will be redirected to edit Custom Function file. Now that was easy, isn’t it ? Play safe. 🙂

    Safely Edit the custom_functions.php

    To be on the safe side, you can refer to below set of points which are regard to avoid common error while editing Custom_Functions.php file.

    • Make sure to take backup of custom folder using FTP before making changes.
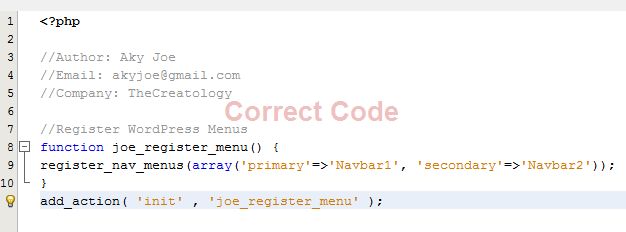
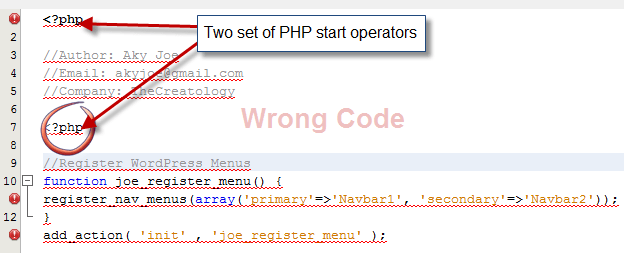
    • Make sure you don’t miss any php operator. Check out the screenshot below:
    Wrong PHP Code
    Wrong PHP Code
    Correct PHP Code
    Correct PHP Code
    • Make sure you don’t use redundant function names or thesis hooks.

    These are some common mistakes which we commit and that you are aware, it can be taken care of. With this, we come to the end of tutorial How to safely edit Custom Functions file in Thesis.

    If you think I missed any point here, you can share here with us by posting a comment below. Sharing knowledge can only make you and me perfect. 😉

  • How to install Akismet to block spam comments on blog

    WordPress has some great features and plugins to maximize blogging potential. You can also read Why you should prefer WordPress for your website ? to know more about WordPress. In that article, one extended feature of WordPress is to block spam on blog. For spam protection, there are many WordPress plugins available which help restrict spammers to comment on your blog.

    No-Spam using akismet
    No Spam Comments Anymore

    Akismet is one great Plugin which comes by default in all WordPress installations. But Akismet is not capable of working of its own, so you will have to install and configure Akismet plugin. In the article we will guide you how to install Akismet to protect your blog against spam.

    Below is a simple procedure, you just need to focus a bit.

    Step 1: Install-Activate Akismet Plugin

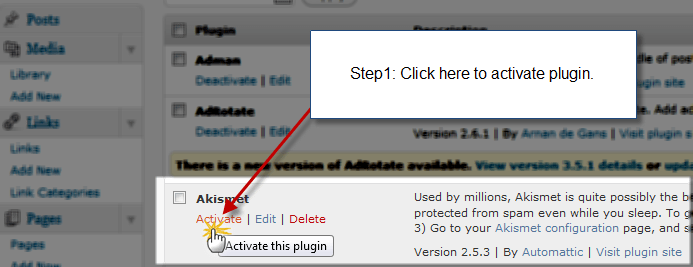
    As mentioned above, Akismet plugin comes pre-installed with the WordPress Installations. So we are just required to Activate the Plugin, and you can do so by Navigating to WP Dashboard > Plugins. You will find Akismet Plugin in All listed Plugins, Click the Activate button, similar to screenshot below.

    step1-activate akismet plugin on wordpress
    Activate Plugin

    Great! You have now activated the plugin.

    Step 2: Get Akismet API Key

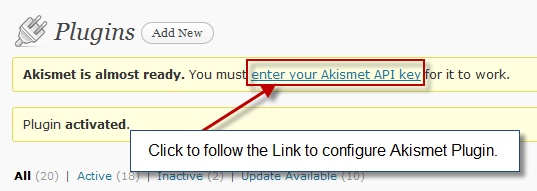
    On activating the Plugin, you will see a Yellow highlighted message on the top of the Dashboard saying “Enter you WordPress.com API Key”, very similar to screenshot below.

    step1-configure akismet plugin on wordpress
    Akismet Configuration Alert

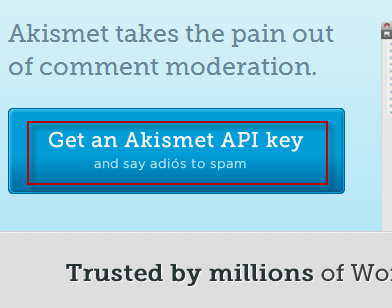
    Click on the link, an it will direct you to Akismet Configuration where you will be required to enter API key. You can get API key from Akismet by registering an account with them. It’s free for personal blogs! 🙂

    Get Akismet API key
    Get Akismet API key

    Alternative way is if you have saved your old WordPress.com API key then you can use that as well. Once you have the API key, proceed to Step 3.

    Step 3: Configure Akismet to Block Spam

    Now that we have the API key, we are all set to configure Akismet to Block spam commenting.

    • Click on the “Enter you Akismet API key” highlighted message, once again.
    • On Akismet Configuration Page, paste your Akismet Key in text box, and click Update Options button.
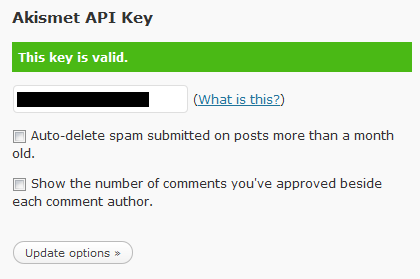
    • Now, once the options are saved, your API key will be verified, and if API key is valid you will see Green Signal, similar to screenshot below.
    step3-API key Valid akismet plugin on wordpress
    API key is Valid, Akismet Configured!
    • If Akismet key is not valid, then you go to Step 2 and get a valid API key.

    Congrats, we have successfully configured Akismet on WordPress blog.

    We’re Done!

    Setting up Akismet Plugin is though easy task, but Akismet is a powerful plugin to block spam comments. Installation of Akismet and other essential plugins for WordPress, we offer to setup for you in WordPress Free Setup package.

    Which plugin are you using to protect spam on your blog ? If you have any query with the article, you can send you feedback by posting comment below.

  • How to add Twitter @Anywhere Hovercard on WordPress Blog ?

    Keeping itself active in Social Media World, Twitter has its development kit ready for your WordPress Blog. Just like the facebook like button, twitter now allows to integrate their features on WordPress website. The feature is known as @Anywhere, and can be implemented using a few lines of JavaScript Code.

    anywhere twitter hovercard for wordpress
    @Anywhere Twitter Features

    In the article, we will learn to implement @Anywhere feature and add twitter hovercard on WordPress blog. I should not make you wait, just follow the simple steps below:

    Step1: Register Twitter Application

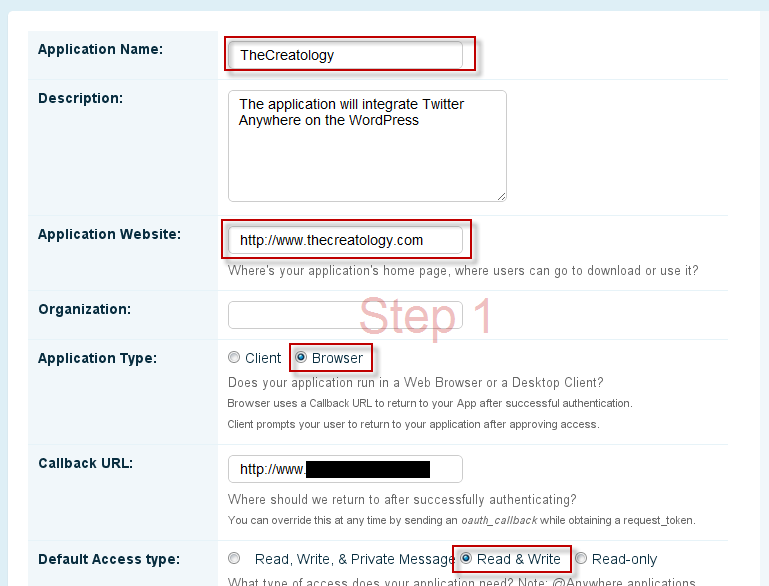
    In order to integrate @anywhere feature on website, you will be required to register an application. On register an @Anywhere application page you will have to fill-in details for Name of the Application, Website URL etc. You can also refer to the screenshot below:

    step1-create application
    Step1: Register an Application

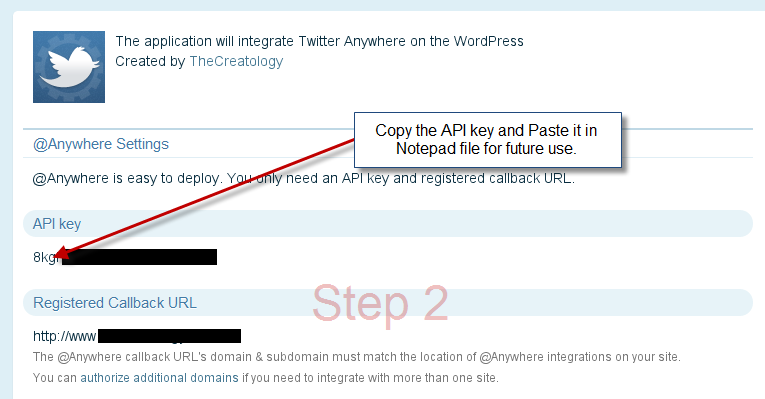
    Submit the Application by clicking Register Application button, and further it will be redirected to the application page. In this page, you will find all details about the Application like API key and Registered Callback URL, similar to the screenshot below.

    step2-get api key
    Step2: Get Twitter API key

    Keep the API key of twitter application handy, as we will be using it in Step2.

    Step2: Adding @Anywhere in WordPress

    To add @Anywhere feature in WordPress blog, twitter provides a Javascript code which should be placed in HEAD Tag in header.php file. Incase you are using Thesis Theme then you can add the code using Thesis Site Options. (If you are concerned about Page Load time, then you can also add code right before the closing of BODY Tag in footer.php file.)

    Below is the twitter @anywhere code snippet, which you can add it in your Custom Theme or Thesis WordPress theme. Make sure you take backup of Header.php or Footer.php before adding the code snippet.

    [php]

    &amp;amp;lt;script src=&amp;amp;quot;http://platform.twitter.com/anywhere.js?id=YOUR-API-KEY-GOES-HERE&amp;amp;amp;amp;v=1&amp;amp;quot;&amp;amp;gt;&amp;amp;lt;/script&amp;amp;gt;
    &amp;amp;lt;script type=&amp;amp;quot;text/javascript&amp;amp;quot;&amp;amp;gt;
    twttr.anywhere(function (T) {
    T.hovercards({ expanded: true });
    });
    &amp;amp;lt;/script&amp;amp;gt;

    [/php]

    For Thesis Theme you and paste the above code in Site Options under “Stat and Tracking Scripts”.

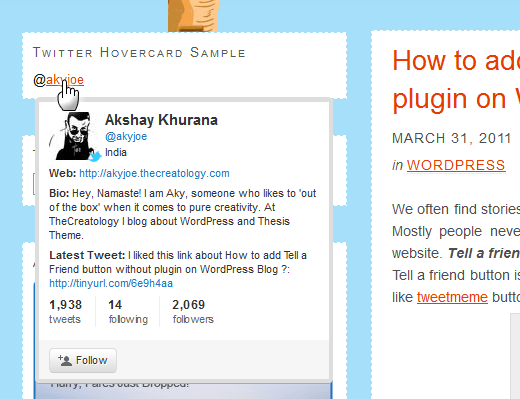
    Once you have added the code, it will enable Twitter username Auto linking and Hovercard feature on your website, that is, it will auto link Twitter usernames anywhere on website, to their twitter profiles. For instance, you can add Text Widget and put twitter username  with “@” symbol just like this “@akyjoe”. Once done, refresh the website and you will find something similar to the screenshot below:

    Twitter Hovercard Demo
    Demo: @Anywhere Hovercard Feature

    We’re done

    @Anywhere Hovercard feature can be effective, if there is a twitter feed on your website. As twitter feed will contain usernames which will be auto linked and will display twitter profile by Hovercard feature.

    What do you think about @Anywhere Hovercard feature ? You can share your opinions here by posting a comment below.

    If you have any query or further assistance is required, post comment as your feedback.

  • Style post tags in single post WordPress to decrease bounce rate of blog

    I have already covered few articles to decrease bounce rate of blog, like by creating 404 error pages or styling previous next links in WordPress. In the following article I will explain how beneficial Post Tags are in WordPress and how we can style tags in single posts to decrease bounce rate of blog.

    Why WordPress Tags are useful ?

    TheCreatology Post Tags
    Image Credit: AkyJoe

    Post Tags play a vital role in WordPress as they group similar articles together. Tags works as multiple categories for a blog entry which can be reused in future as an archive of articles. Another reason why I say why WordPress tags are important, is that they describe a visitor, what the article is about.

    How to Style Post Tags in WordPress?

    Usually every WordPress Theme like Thesis Theme has Post Tags enabled in Single Post Entries. You can always style Post Tags using CSS to increase Call to Action. For Instance, you can see the screenshot below, where you can see the post tags in blue.

    TheCreatology Post Styling on WordPress
    TheCreatology Post Styling on WordPress

    Below is the post tags style code which you can add it in style.css or custom.css in case of Thesis Theme.

    Make sure you take backup of style.css or custom.css using FTP, before adding the code in it.

    [css]

    .custom .post_tags a {
    background-color: #e33e00 !important; /*Change Background Color*/
    color: #FFFFFF; /*Change Text Color*/
    line-height: 40px;
    margin: 2px;
    padding: 7px !important;
    text-decoration: none !important;
    }

    [/css]

    The above code is for Thesis Theme Post Tags Styling only. In case of custom WordPress Theme you can simply replace the class according to your Theme. You can play around with the background color and text color, as I have mentioned in the code.

    We’re Done!

    Once you have added the code, refresh on any single post entry to see the effect and you will find something like the screenshot below:

    Style Post Tags for WordPress
    Demo: Post Tags

    WordPress post tags though are optional, but I would recommend people to use WordPress to its best. Winking smile Do you use Post Tags ? Let us know with a simple feedback, by posting comment below.