Author: Aky

  • Hands on Thesis 2: Head Editor, Skin Editor, Boxes & Packages

    Thesis 2.0 theme is unique and highly inflammable interactive. I say this, ’cause of its navigation menu covers every bit of your WordPress template. But, guess what? There is no proper Thesis 2 documentation available/ready yet, so end-user is not aware of theme capabilities.

    Hands on Thesis 2 is a series of articles and requests from potential clients who are eager to handle new Thesis Theme. This tutorial explains about Thesis Head Editor, Skin Editor, Boxes & Packages which will help you build even better websites. I strongly recommend this article to people, who are new to Thesis 2.0 theme.

    Thesis 2 Navigation Menu
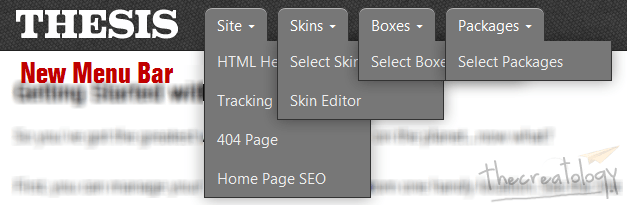
    New Thesis 2 Menu Bar
    New Thesis 2 Navigation Menu

    The new Thesis 2 navigation menu consists of 4 major items, that is Head Editor, Skin Editor, Boxes and Packages. Let’s learn about these in detail, below:

    Website HTML Head Editor

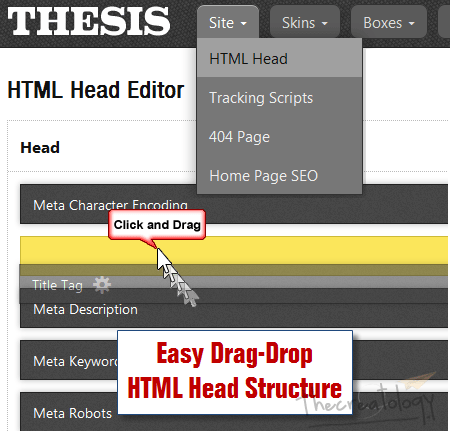
    HTML Head editor lets you manage < head > output of the website. HTML Head section is responsible for Website SEO, Page loading & other web analysis.
    Thesis html Head Editor
    Thesis HTML Head Editor

    Thesis HTML Head Editor lets you manage, the following:

    • Add / Upload Favicon
    • Set RSS feed link
    • Webmaster Site Vertification
    • Google Rel Authorship
    • Embed Header Scripts

    Thesis 2 Skin Editor

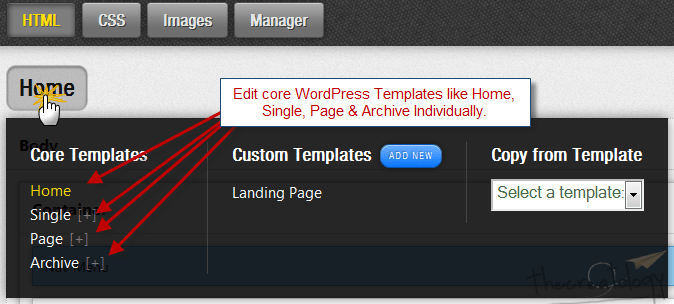
    Skin editor is the most important, Ajax-Driven component of Thesis 2. New Thesis framework works on Parent-Child architecture where we work upon child themes, also known as skins. Skin editor lets you manage core WordPress templates, like index.php, single.php, archive.php etc. with drag-drop feature. You can now customize a WordPress website without writing any PHP code.
    Thesis Skin Editor Part 1
    Skin Editor: Edit Core Templates from WP-Admin

    On any selected template, for instance Home, drag-drop boxes in Skin editor to create HTML structure of website. Drag-drop what? Arrrh! I know Skin editor is a bit tricky to grab in one-go. But, if you understand this, then things will be really handy.

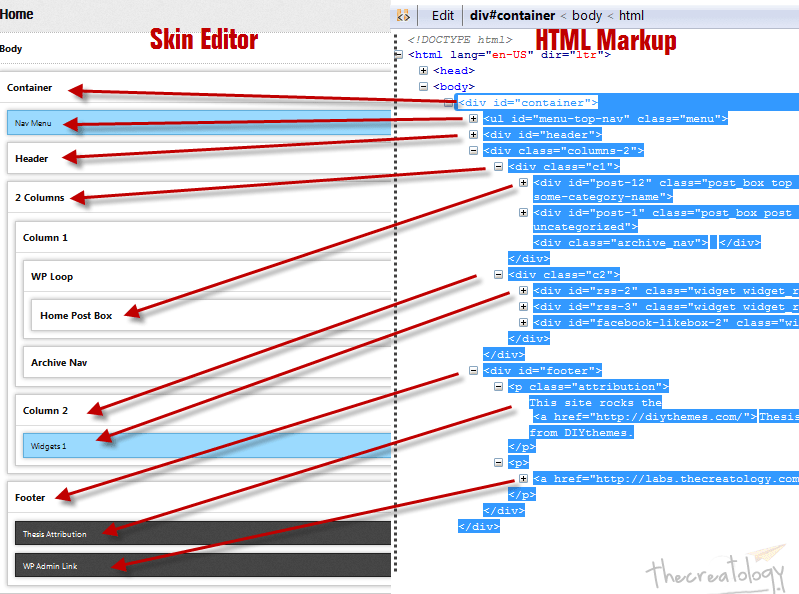
    Check out the info-graphic, explaining about Thesis Skin Editor – HTML Markup Structure, below:
    Thesis Skin Editor Working Part 2
    Thesis Skin Editor – HTML Markup Structure

    In the above image, left pane shows the hierarchy of boxes in skin editor, where right pane shows HTML output generated by Thesis (view from firebug). Moreover, arrow points to a respective box in Skin editor, which is responsible for its HTML output.

    To understand better, you should play around with default Thesis Classic skin which loads automatically when you install Thesis 2.

    Thesis 2 Amazing Boxes

    Thesis theme can extended by means of small modules, called boxes. Thesis Box functions like a plugin which can be reused anywhere in the website with drag-drop ease.

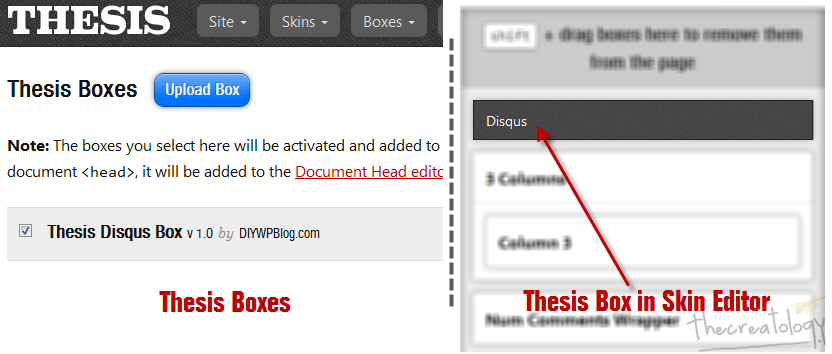
    For instance, we have uploaded a Disqus Comment Thesis Box in the example below:
    Thesis Amazing Disqus Comment Box
    Thesis Disqus Comment Box

    If we upload or select a box, it automatically gets added in Template editor. In this example, Disqus Comment box designed is for use in single template and hence it appears as a black-box in the skin editor’s sidebar. This is also a bug fix for Thesis 2 + Disqus Comment System.

    Thesis CSS Packages

    Packages, works similar to Boxes, are modules which help you to style font-family, width, height, background, color etc. Basically, Thesis boxes are PHP modules, where Thesis Packages are CSS modules. To be frank, Thesis Packages are required for advanced level blog development and multiple WordPress sites.

    There are many other features in Thesis 2 which will be covered in Hands on Thesis 2 series of articles, so keep in touch via Twitter, Facebook or RSS updates.

    That’s all folks!

    For any query or further help required post your feedback as comments below.

  • Use HTML5 Pattern to Input Specific URL using Regular Expression

    HTML5 Pattern works on the principle of regular expression, set of code defining a pattern.This htm5 pattern attribute helps in form validation and 99% accurate data input from user. In this tutorial, we will create a regular expression to validate URL field.

    learn-html5-to-create-websi.jpg
    Html5 Pattern Attribute

    What is Regular Expression?

    Regular expression is a set of characters which defines pattern to validates an expression. It helps in searching a word/character/letter in a given expression and returns true or false. For instance, a regular expression can extract “feel” word or “very lucky” words from “I am feeling very lucky today”.

    In this tutorial, we will validate various input fields to accept Youtube, Facebook, Twitter urls.

    Validate Input Field with Regex

    Here is a syntax for regular expression:

    Validating Youtube URL

    [code]
    <input type="url" pattern="http://www\.youtube\.com\/(.+)|https://www\.youtube\.com\/(.+)" />[/code]

    Validating Facebook URL

    [code]
    <input type="url" pattern="http://www\.facebook\.com\/(.+)|https://www\.facebook\.com\/(.+)" />
    [/code]

    Validating Twitter URL

    [code]
    <input type="url" pattern="http://\.twitter\.com\/(.+)|https://\.twitter\.com\/(.+)" />
    [/code]

    Above expression checks for a valid Youtube, Facebook & Twitter URL with protocols, either http or https.

    Demo

    Valid:

    Invalid:

    What’s Next?

    If you are looking to validate a custom name, then simply replace the words Youtube with your custom name. Such kinda validations are helpful for precise data input such as registration forms or contact forms.

    If you have any queries or need any assistance, then post them using the comment form below.

  • New Thesis Update Service: Upgrade Old Thesis 1.x to New Thesis 2.x Theme

    Good News, TheCreatology now adds Upgrade to Thesis 2.0 in the service list, especially for people afraid of updating thesis. Using this service you will be able to restore previous Thesis 1.x design in new Thesis 2.x environment.

    But, before that you should understand why a WordPress website needs Thesis 2 update.

    Thesis 2 Theme Benefits

    No doubt thesis theme has always been a killer WordPress theme. Read below to know why you should upgrade to thesis 2:

    • Code Optimization: Each HTML,PHP & CSS code is efficiently complied and optimized for faster page loading.
    • No FTP: Design and customize skins using Thesis Skin editor.
    • No Coding: Ease of Dragging HTML structure & Built-in CSS Packages.
    • Doggie style: Missieur (Chris’s dog), tips you about SEO, broken links & 404 error pages.

    Wanna Upgrade to Thesis 2.0 Theme?

    It is a tricky process to update old thesis 1.x, but our team is ready to take that challenge. To get started:

    Upgrade to Thesis 2.0
    Upgrade to Thesis 2.0
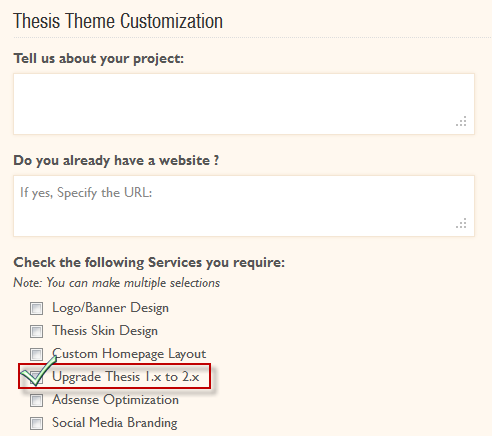
    • Select Customize Thesis image in yellow box and a Thesis Customization form will appear.
    • Fill in the required details and services you wish to select.
    • If you want to upgrade your old thesis theme, then select “Upgrade Thesis 1.x to 2.x” option and press Submit.
    Upgrade to Thesis 2 Service
    Upgrade to Thesis 2 Service
    • On receiving your inquiry and depending upon the requirement, it shall take us at least 6-18 hours to revert back.

    Why Hire TheCreatology?

    • We understand your concerns and high risks involved in the upgrade process.
    • Our team is testing Thesis 2.0 since day 1 and every project adds a new experience.
    • We are getting familiar to its new architecture and environment.
    • Till date, we have crafted 3 projects using Thesis 2 which will be added in our portfolio shortly.

    So, if you want to upgrade Thesis 2 without any pain, then consider us working on it.

    Confused? Feel free to Consult Us

    If you have questions then direct them to us by using contact form below or email on help [at] thecreatology [.] com

  • Jetpack 2.0 Post by Email: Quickly Publish Article on WordPress using Email

    Have you ever heard of Publishing article directly from email? Sounds crazy, ‘eh? Well, a new feature of Jetpack plugin, Post by Email, allows you to publish articles on WordPress Blog  just by sending email.

    Jetpack 2 Post by Email Feature
    Jetpack 2 Post by Email Feature

    WordPress Mobile App is limited only to IOS and Android supported devices. Whereas, with Post by Email feature, you can quickly post articles from any mobile device supporting email. Double benefit for smart phones!

    In this article, we will learn to Publish article by Email on WordPress blog.

    Jetpack 2: Post by Email Working Analogy

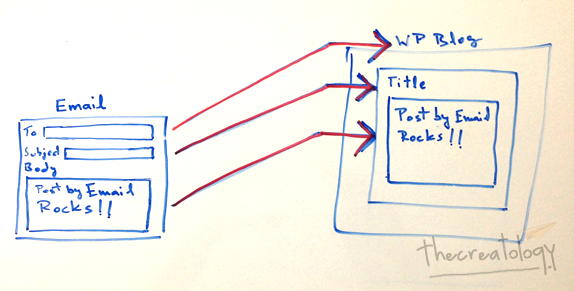
    Check the illustration explaining post by email feature working, below:

    Jetpack Post by Email Analogy
    Jetpack Post by Email feature working explained

    Above illustration explains the following:

    • To field containing Secret Email Address points to WordPress Blog
    • Subject field points to Title of WordPress Post
    • Body field points to Content of WordPress Post

    Generate Secret Email Address for Blog

    Secret email address bridges between Email client and WordPress blog. A special email address generates every time you enable Post by Email feature on your Blog. It is an unique email address and must be kept secret unless you want other people to publish articles on your blog.

    Below is procedure to generate secret email address:

    Note: Make sure you have enabled Post by Email feature under Jetpack Dashboard settings.

    • Navigate to Dashboard > Users > Your Profile.
    • Scroll down till you see Post by Email.
    Jetpack 2 Enable Post by Email Feature
    Enable Post by Email Feature
    • Click the Enable Post by Email button. Once done, you will see something similar to screenshot below.
    Jetpack 2 Secret Email Address
    Secret Email Address
    • Don’t disclose your Secret Email Address with anyone.
    • Whereas, if you experience any fraud then use Regenerate Address button or Disable Post by Email button.

    Compose Email to Post on WordPress

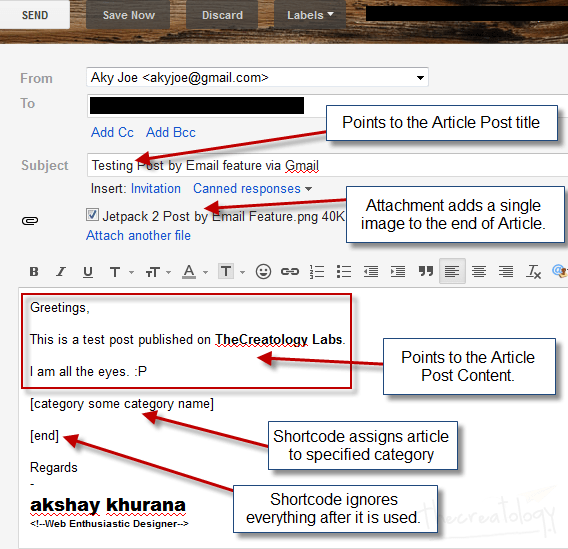
    Now that we have generated secret email address for blog, let’s get started. Check out the info graphic about writing an email to publish article on WordPress, below:

    Compose Email to Post on WordPress
    Compose Email to Post on WordPress

    Refer to Post by Email working analogy explained above. Also, there are some post formatting options and short-codes available here, for advanced blogging.

    Note: Make sure you proof-read before sending email, as there is no option to update post.

    Once done, send email to the secret email address.

    Post Published from Email

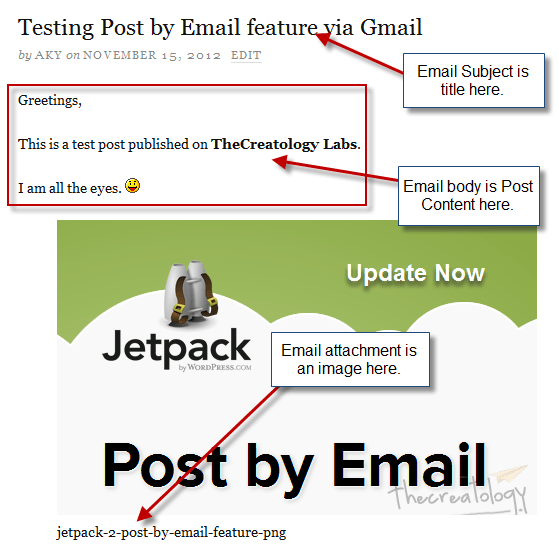
    Let’s see the post published via email on WordPress test site.

    Post Published by Email
    Post Published by Email

    Looks good!

    What else?

    Post by Email feature can be effective for bloggers covering news, live events and press conferences etc. They can draft email templates before hand to save more time for proof-reading content.

    What do you think about Jetpack Post by Email feature? Do let us know by posting a comment below.

  • No Post Sharing Hassle Now as Jetpack Plugin 2.0 Updates

    No need to copy/paste links on Social media sites as Jetpack Plugin 2.0 will do it for you. Few moments ago, Automatic team released 10th update of Jetpack plugin with next-generation features. Jetpack 2.0 Plugin can publicize to Facebook, Twitter etc. and also allows you to Post article on WordPress by Email. Some catchy features like Photon and Infinite Scroll are also packed with new Jetpack update.

    Jetpack Plugin 2.0 Update
    Jetpack Plugin 2.0 Update

    Jetpack 2.0 Features

    • Publicize on Facebook, Twitter, LinkedIn & Tumblr
    • Post by Email
    • Photon – Faster Image Caching
    • Infinite Scroll

    Auto Share Post on Social Media using Publicize Feature

    Jetpack 2.0 allows your to share content on Facebook, and other social media sites, as soon as you hit publish button. You don’t have to manually share links on Twitter or Facebook when WordPress Jetpack Plugin does it with ease.

    Enable Publicize Feature

    Make sure that Publicize Feature is enabled under Jetpack Dashboard.

    • Navigate to Dashboard > Settings > Sharing.
    Publicize using Jetpack 2
    Publicize using Jetpack 2
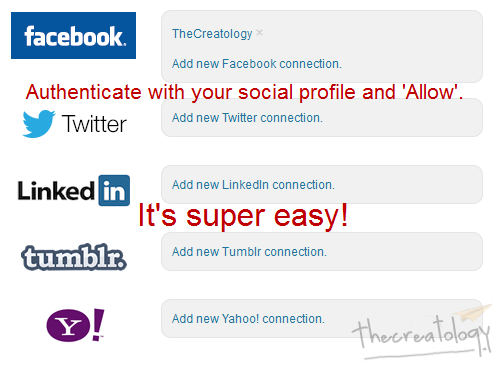
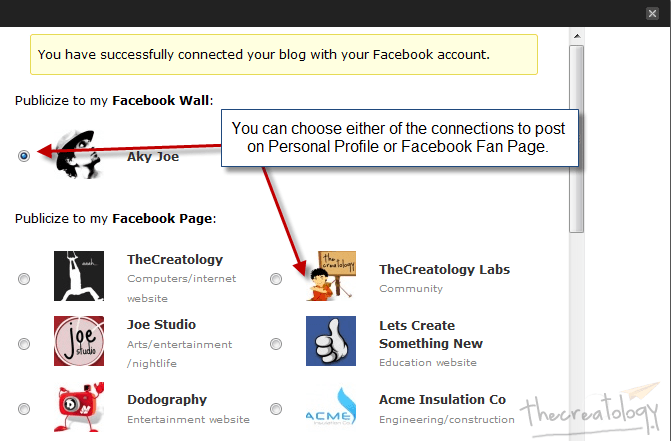
    • Choose your connection type and click on Add new connection. For Instance, we added a Facebook connection in the screenshot below:
    Publicize on Facebook using Jetpack 2
    Publicize on Facebook using Jetpack 2
    • Once done, click on the Ok button. Done?
    • Cool, we have a Facebook Connection now. You can try by adding more connections in similar fashion.

    Your Thoughts?

    Let us know, if Publicize to Facebook, Twitter, LinkedIn and Tumblr feature helpful or not.

  • Hands on Thesis 2: How to Get Started with New Thesis Theme 2.0?

    Thesis 2 theme on WordPress blog will drive you & me crazy. Yes, it has newly constructed engine and thrilling dynamics which will make you feel like riding a 1000 cc super-bike. So, much power man!

    I like the fact that Thesis 2.0 no longer support hooks and filters, as it is hard to remember all of them at once.

    How to Install Thesis 2 on WordPress
    How to Install Thesis 2 on WordPress

    Hands on Thesis 2 is a series of articles and also request from my potential clients who wish to experience new Thesis Theme. This article explains How to Get Started with New Thesis Theme for WordPress in easy steps below.

    Download New Thesis Theme

    We have already covered this in our previous article. Click here to read, if you missed it somehow.

    Get Started with New Thesis 2

    If you are new to Thesis Theme then your journey will be amazing. Whereas, if you choose to upgrade old Thesis theme to Thesis 2, then you should consider my suggestions below.

    Do Not Install Thesis 2, if

    • Thesis 1.x theme designed using custom skin, then DO NOT INSTALL!
    • Thesis website developed using Open Hook plugin, then DO NOT INSTALL!
    • You like mountains but not hiking, then DO NOT INSTALL!

    Are you confused? Well, reverting back to old Thesis 1.x from Thesis 2.0 is absolutely normal.

    Install Thesis 2.0 Theme

    Now that you are logically ready, lets kick-start your Thesis 2.0 journey. Follow quick steps to install Thesis 2:

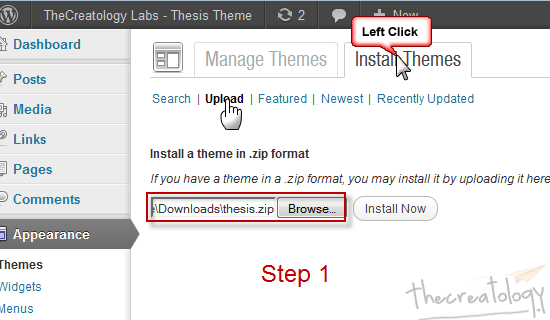
    • Navigate to Dashboard > Appearances > Themes.
    • Select Install Themes Tab and click on Upload text link visible in blue just like in screenshot below.
    Step1-Upload Thesis 2 Theme
    Step1: Upload Thesis 2 Theme
    • On hitting Install Now button, will take you to theme activation status screen. You can either click to activate theme or choose to do it later.
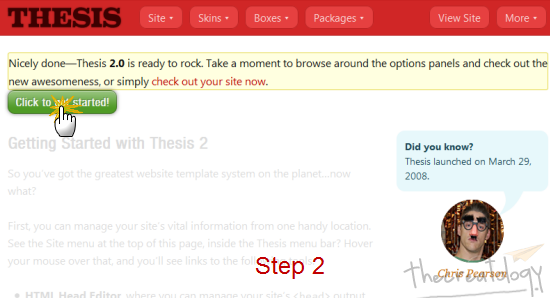
    • On activating Thesis 2, you will see a welcome page with greeting message. This page is personally designed for Chris Pearson and Missieur (his dog). 😛
    Step2- Thesis 2 Welcome Page Get Started
    Step2- Thesis 2 Welcome Page Get Started
    • Click green Get Started Button as soon as you activate thesis theme, else your website will show nothing but a white blank template.
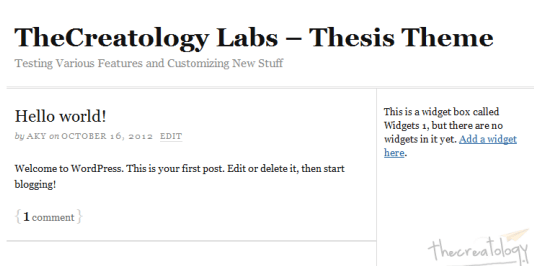
    • Once done, refresh your website and you will see something similar to screenshot below.
    Thesis Theme with Classic Skin
    Thesis Theme with Classic Skin
    • Tada…here it is, the new Thesis Theme loaded with classic skin.

    What’s Amazing about Thesis 2?

    New Thesis looks similar to older one, but is 10 times powerful in terms of flexibility and extensibility. Check out something amazing about Thesis 2.0, especially for lazy bloggers:

    • Design skins and customize from WordPress admin panel. No FTP!
    • Ease by Drag-drop HTML structure. No Coding!
    • Built-in CSS Packages. No Coding!
    • Missieur (Chris’s dog) tips about SEO, broken links & 404 error pages. The doggie style!

    There are many other features in Thesis 2 which will be covered in Hands on Thesis 2 series of articles, so keep in touch via Twitter, Facebook or RSS updates.

    That’s all folks!

    For any query or further help required post your feedback as comments below.

  • Thesis 2.0 – Killer WordPress Theme Updates – Available for Download

    Its been a good morning so far, especially when you wake up with cool updates. One was my sister giving birth to a girl child and other coming from Chris Pearson, giving birth to Thesis 2.

    Phew, long time for Thesis fans ‘eh? Well your wait is over as Thesis 2.0 is available for download now.

    thesis-2-theme-download
    Download Thesis 2 Now!

    How to Download Thesis 2.0?

    No big deal seriously, but this blog is not just limited to geeks. Check below to get new Thesis theme update:

    • Login to DIYThemes.com using the credentials provided to you after purchase.
    • Next screen will be the Download Thesis page. Alternative, you can use the top navigation.
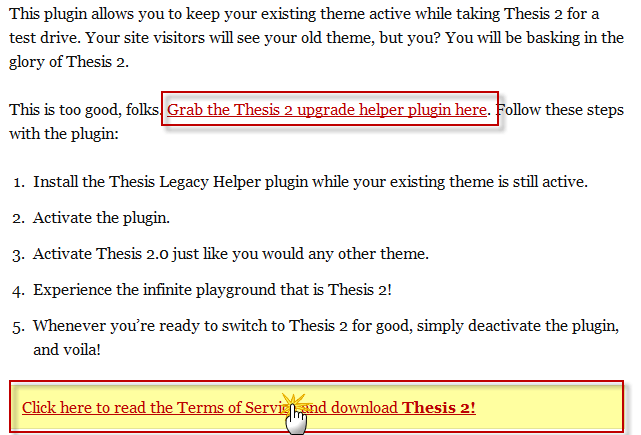
    • In the Downloads Page you will find two links, one for a Thesis Switcher Plugin and other to Download Thesis 2. (refer to screenshot)
    thesis-2-download-steps
    Steps to Download Thesis 2
    • As mentioned, Switcher Plugin will help you preview new thesis theme, whereas your visitors will see the old theme. (Recommended).
    • Thesis 2 download comes with new set of terms & conditions and you have no choice but to accept it like an old Microsoft Windows screen. 😛
    • Accept TOS and Thesis 2 file downloading will start. (file size: 414kb; file type: .ZIP)

    Upgrade Thesis 1.x to Thesis 2

    We are still testing the new version of Thesis and a link to upgrade thesis 2 will appear here shortly.

    That’s all folks!

    What are you waiting for? Go and get new Thesis 2 power! Of course, you can come back here to share your views about Thesis 2.0 by posting a comment below.

  • Get Free Mobile WordPress Theme using JetPack Plugin 1.8.1 [Bug Fixed]

    Almost everybody is using smart phones and are surfing websites though that medium. But mobile phones have comparatively smaller resolution than a laptop or desktop computer screen and hence it either break a website layout or make it hard for user to zoom in and out. Unacceptable? Yes, indeed! But, if your website is running WordPress then Jetpack Plugin 1.8.1 update features a mobile optimized website.

    Jetpack PLugin Mobile Theme Update Now
    Mobile Theme: Jetpack Plugin 1.8 Update

    What’s New in Jetpack 1.8 Update?

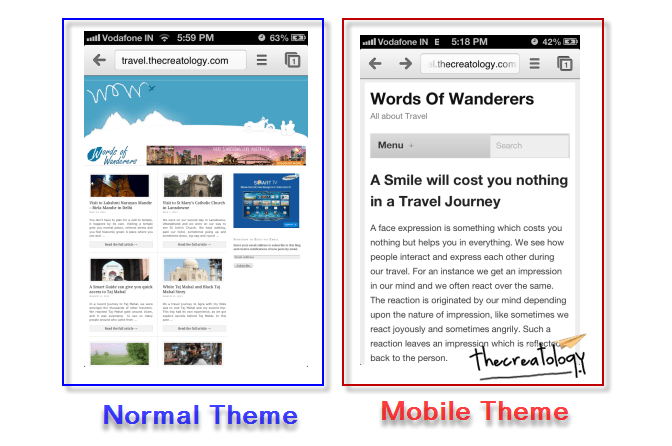
    Mobile Theme Jetpack plugin update proclaims to deliver better mobile browsing interface making content more readable with less cluttered layout. We tried testing this plugin update on a travel blog to see its effect. Well, we found it working fine and content looks neat and readable. Got a screenshot of the difference showing one with Normal WordPress and other having Jetpack enabled Mobile Theme. Check below:

    JetPack Mobile Theme Update Difference
    Jetpack Mobile Theme vs Normal WordPress Theme (IOS 6  | Chrome Browser)

    I hope that says it all.

    How to get Jetpack Mobile Theme Feature ?

    To get mobile theme feature on blog, you will have to install/update Jetpack plugin. Not sure about how to update Jetpack Plugin, follow this procedure below:

    • Login to WordPress Admin Panel and Navigate to Dashboard > Plugin.
    • Find Jetpack Plugin listed and click on Update Automatically link in orange.
    • You will get redirected to update plugin status page.
    • Done? Now navigate to Dashboard > Jetpack  and Activate Jetpack Mobile Theme Widget.

    Pros & Cons for Jetpack Mobile Theme

    Wondering if it is worth installing on WordPress Blog or not? Here is a list of Pros & Cons for you to figure out, read below:

    PROS FOR INSTALLING MOBILE THEME

    • Better readability on Mobile Devices.
    • Less Cluttered and 1-Column mobile layout
    • Option to toggle on/off mobile theme.
    • Option to show full post or excerpt post content.

    CONS FOR INSTALLING MOBILE THEME

    • Doesn’t work with custom page layouts.
    • No option to customize theme colors.
    • Menu Drop Button could have been better, as nobody will bother to click it.

    What do you think?

    Are you getting Jetpack Mobile theme? I believe it is worth a try, after all it comes with toggle option. 😉

    Share your thoughts about this New Jetpack Mobile Theme feature introduced with Plugin Update 1.8 and you can do so by posting a comment below.

  • Easily Customize Website Header using Thesis Theme Hooks

    Most WordPress themes come with nice header layout design where some theme frameworks, like Thesis Theme have a sketched layout printed on white screen. Such themes allow N number of customizing options totally depending on the need.

    If you are a developer then you can easily customize the website header, but what if it’s not your cuppa tea. Either you will hire a developer or look up online for some WordPress tutorials and try to fix website header. Don’t worry if you are using WordPress Thesis Theme, as in this tutorial you will learn to customize website header using basic thesis hooks.

    Getting Started: Update Thesis Theme

    To make sure that we are sailing on the same ship, I recommend you to update Thesis Theme. No sure about it,  refer to article Safely upgrade to latest version Thesis 1.8. If you don’t have Thesis Theme Copy then you can also Download Thesis Theme.

    Thesis Header Hooks

    Thesis theme framework has been strongly build leaving many options to override default functions, we call these functions as thesis hooks. You can play around with these hooks to customize different blocks (header, content, sidebar or footer) in website . But, be careful while editing custom_functions.php file, as any wrong code can crash your website.

    To customize thesis header you may need the following hooks:

    1. thesis_hook_before_html
    2. thesis_hook_before_header
    3. thesis_hook_header
    4. thesis_hook_after_header

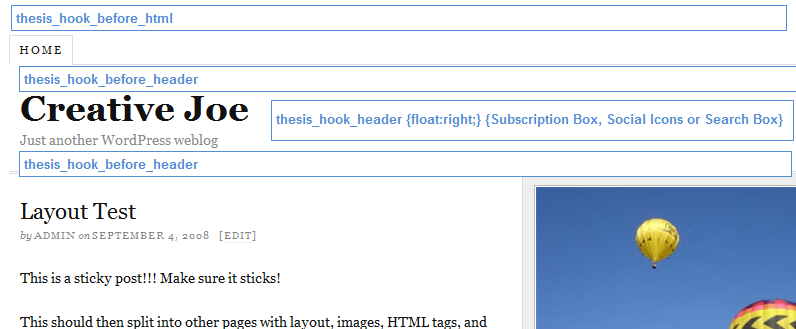
    Here is a quick visual reference of the above mentioned hooks:

    thesis header hook implementation
    Thesis header hooks implementation

    Add Thesis Hook in Custom_Functions.php

    You can take control of your website using Thesis hooks but before that you should know how to implement thesis hooks. Each Thesis installation has a custom directory in Thesis Theme. Custom directory, is where you do all thesis customizations, has the following files:

    1. custom.css (where we style and override default stylesheet)
    2. custom_functions.php (where we define hooks and override default functions)

    To define a basic Thesis header hook, open custom_functions.php in editor use the following code snippet:

    [php]
    function first_hook_before_header() { ?>
    <p style="border:1px solid #ddd;color:#d00; margin:5px; padding:3px;">This is Thesis Hook Before Header</p>
    <?php }
    add_action(‘thesis_hook_before_header’,’first_hook_before_header’);
    [/php]

    The above code adds a paragraph styled in a grey border box before thesis theme header. In similar way you can implement other hooks to define your actions as needed.

    Cool Thesis Header Examples

    Here are few inspiring header designs customized using Thesis theme:

    Cool Website Header Dodography
    Cool Website Header – Dodography
    Cool Website Header ImieBelanger
    Website Header – ImieBelanger
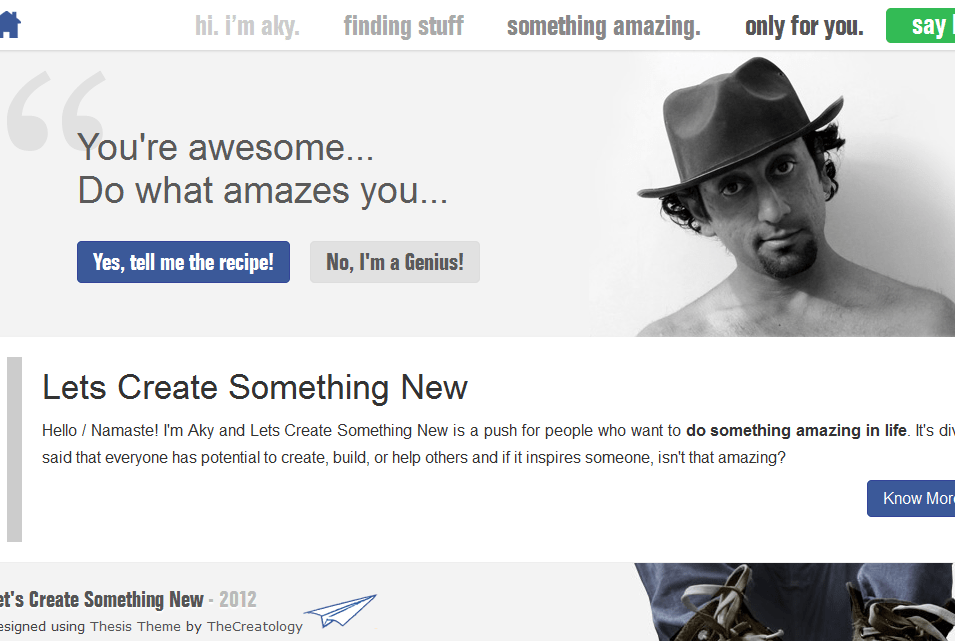
    Cool Website Header LetsCreateSomethingNew
    Website Header – LetsCreateSomethingNew
    Cool Website Header ShoutMeLoud
    Website Header – ShoutMeLoud

    What’s Next?

    You must be excited now to customize your website header after this handy tutorial. If you have any queries or need any assistance,  then post it using comment form below.

  • Upgrade Thesis Theme to Kill WordPress 3.4 Image Caption Bug

    Upgrade Thesis Theme to Kill WordPress 3.4 Image Caption Bug

    Few days back, I mentioned about Image Caption Problem with WordPress 3.4 upgrade and about release of Thesis 1.8.5. Well, Chris Pearson, is a man of his words and has released a Bug Fix Version of Thesis Theme. According to Chris, this version has not only fixed image captions but has also resolved Multisite Installation bugs.

    Thesis 1-8-5 bug fix release
    Get Thesis Theme 1.8.5

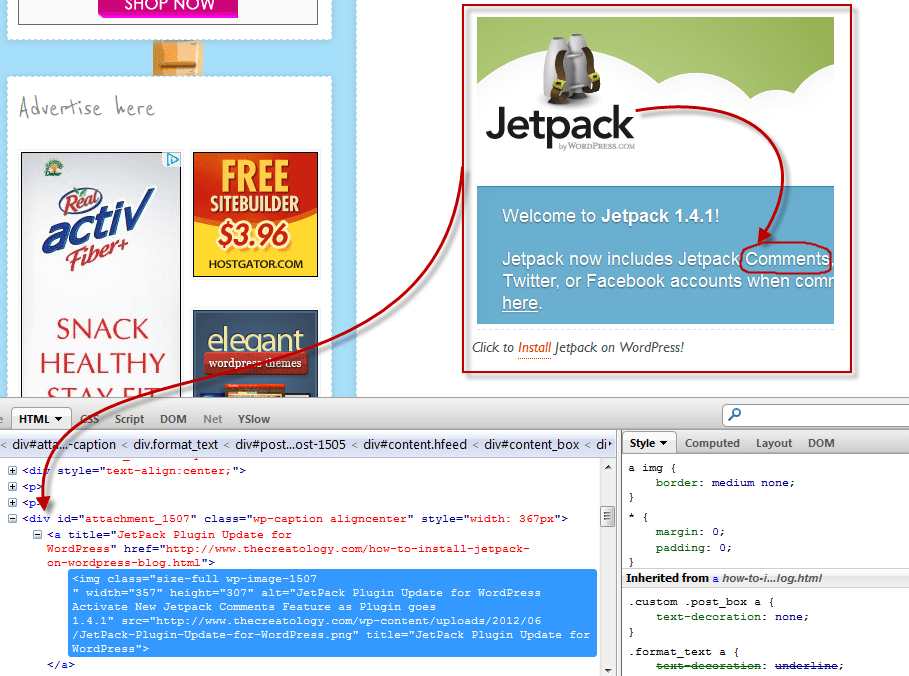
    I figured that out myself, after upgrading to latest version of thesis theme and found all images boxes aligned properly, way they were before upgrading to WordPress 3.4. I did check the post markup, and it was neat, where all image captions were properly wrapped inside the div tags. Check out the screenshot for the same:

    Image Captions Fixed WordPress 3-4
    Image Captions Fixed (Click to Zoom)

    How to Upgrade Thesis Theme

    It’s recommended to keep your Thesis Theme updated to have maximum efficiency from your one-time investment. Follow this easy tutorial to Upgrade Thesis Theme.

    Thesis 1.8.5 Release Notes

    Check out, official release notes for Thesis 1.8.5, here.

    That’s it, ‘eh?

    Yes! Upgrading to Thesis Theme 1.8.5 will certainly resolve, image caption issue and all other problems with WordPress 3.4, hopefully.

    If you still have problems with Thesis or WordPress 3.4, then you can share them with us, by posting a comment below.