Author: Aky

  • Add Slim Subscription Box in Header to Increase Blog Readers

    Not getting enough readers for your blog ? It doesn’t matter if blog content is unique or covers latest news, tRUth is that, a reader will come, read the content or will exit away and never return. While going through thecreatology stats, I analyzed that RSS Subscription was not performing well because of its placement in footer. Guess what, you can now see another slim subscription box above content box on thecreatology blog. It looks similar to the screenshot below:

    Slim Subscription Box TheCreatology
    Slim Subscription Box TheCreatology

    The point is that, if you offer FREE Subscription of Blog Updates and maintain a subscriber list then it will certainly help you to get loyal visitors on blog. Well, if you want to add attractive subscription box in WordPress blog, then you can follow rest of the article.

    In this article, we will learn to Add Slim Subscription Box in Header to Increase Blog Readers. Below are quick steps for the same:

    Getting Started

    Before we start with the tutorial, I want you to make sure that your WordPress, Plugins and Theme are updated with latest versions. If you are using Thesis Theme then you can Safely upgrade to latest version Thesis.

    Add Subscription Box in Header

    In this example, we are going to add RSS Subscription box which I believe is most commonly used and FREE too. Find the code for RSS Subscription box below and paste in single.php or  header.php file of the currently activated theme. If you are using Thesis Theme, then paste the code in custom_functions.php file using thesis hook before content. PHP code is as under:

    NOTE: Make sure you take full backup of functions.php file or custom_functions.php file using FTP before modifying the original file or you can also refer to the article about how to safely edit custom_functions.php.

    [php]
    <!–Do not remove this line
    Designed by TheCreatology–>
    <div id="slim-subscribe">
    <span>Need Blog Updates?</span>
    <form action="http://feedburner.google.com/fb/a/mailverify" method="post" target="popupwindow" onsubmit="window.open(‘http://feedburner.google.com/fb/a/mailverify?uri=thecreatology’, ‘popupwindow’, ‘scrollbars=yes,width=550,height=520’);return true">
    <h4>Subscribe to TheCreatology via <a href="http://feeds.feedburner.com/thecreatology" target="_blank" rel="nofollow">RSS</a> | <a href="http://feedburner.google.com/fb/a/mailverify?uri=thecreatology">Email</a></h4>
    <input type="text" name="email" value="Your e-Mail address…" onblur="if (this.value == ”) {this.value = ‘Your e-Mail address…’;}" onfocus="if (this.value == ‘Your e-Mail address…’) {this.value = ”;}">
    <input type="hidden" value="thecreatology" name="uri"/>
    <input type="hidden" name="loc" value="en_US"/>
    <input type="submit" value="Subscribe">
    </form>
    </div>
    <!–Designed by TheCreatology, Author: Aky Joe–>
    [/php]

    Style Subscription Box CSS Code

    After adding the HTML part, we definitely require to add CSS code to make it look attractive. Subscription box style code is as under:

    NOTE: Make sure you take full backup of style.css or custom.css file using FTP before modifying the original file.

    [css]

    /*
    Author: Aky Joe
    URL: http://akyjoe.thecreatology.com
    */
    #slim-subscribe{ background:#E2F7A8; border: 1px dashed #A6DFFA; height: 70px; margin: 20px 0 0; font-family: Arial;}
    #slim-subscribe span{color: #f60; text-decoration: none; font-family: comic Sans MS; font-size: 26px; line-height: 65px; margin: 0 0 0 20px;}
    #slim-subscribe h4{font-size: 12px; margin:5px 0;}
    #slim-subscribe h4 a:hover{text-decoration: underline;}
    #slim-subscribe form{float: right; margin: 5px 20px 5px 0;}
    .txt-blog,.txt-blog:focus{background:#fff; border: 1px solid #b7cb80; border-radius:5px; padding: 6px 10px; width: 180px; font-size: 15px; color: #888;}
    .btn-blog,.btn-blog:focus{background:#555; border: 0; border-radius:5px; padding: 6px 10px; font-size: 15px; color: #fff; text-shadow:1px 0 2px #333;}
    .btn-blog:hover{background:#333;}

    [/css]

    Did you Play with the Code ?

    Did you copy the code as it is ? Well, if yes then I recommend you to replace HTML part saying “thecreatology” with your RSS feedburner ID. Also you can play with the CSS to change background color of box and font color matching blog theme. Don’t change its size as fat body covers a lot of space, so let it be slim like me mine. 😉

    We’re Done!

    Wow subscription box looks good now, ‘eh ? If not, I would say NEVER STOP PLAYING. And here we come to the end of tutorial add subscription box in header to increase blog readers. I hope it was easy, if not? you can also hire me to add-style subscription box for you. If you have any query or further assistance is required, post your feedback as a comment below.

  • Create Google+ Fan Page for your Website or Blog

    The wait is over now, as Google has used their trump card by launching Google+ Pages for Business. Yes, you can now create Google+ Pages for your websites, blogs, local business, brands and etcetera. Creating a Google+ Fan Page is, quite similar to a Facebook Fan Page, that you just need to login to your profile and get started. Not that easy ? Or doesn’t make sense to you ? Not a problem, you can simply follow rest of the article. 😉

    google-plus-pagesIn the article, we will learn how to create Google+ page for your blog or website. For your ease, I have divided this article into three easy steps, that is, Getting Started, Setup Info and Publish & Share.
    Getting Started: Create Google+ Page

    Let us get started with the creation of your first Google+ Page, follow the quick steps below:

    • Login to your Google+ Profile.
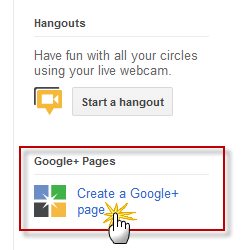
    • On the right pane look for Create a Google+ Page and click on the link or you can simply click here.
    create new google plus page
    Create new google plus page
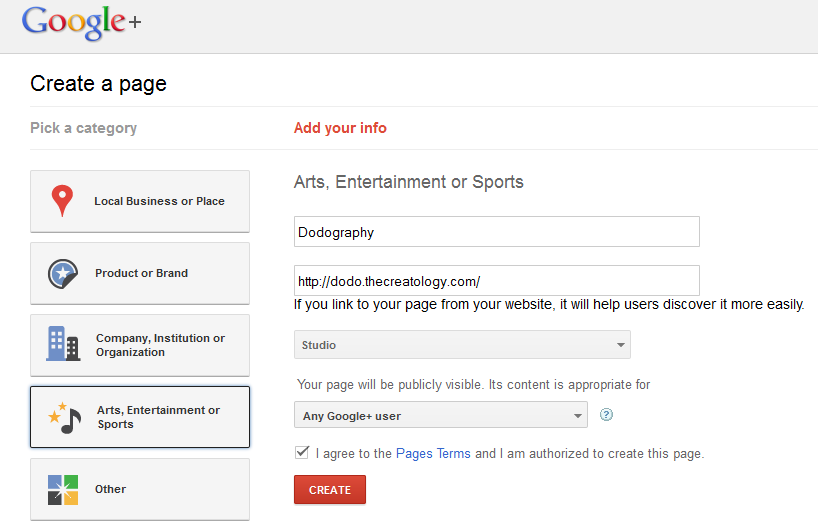
    • After clicking the link, you will be redirected to a page similar to screenshot below:
    setup new google page
    Screen 1: Create a page
    • Enter the required details, for instance Name of the Page, Category, Website Link and privacy. Privacy is beneficial if you want to make your page private or limit page scope to people who connect the circle. Once done, click the red CREATE button and your page will be created.
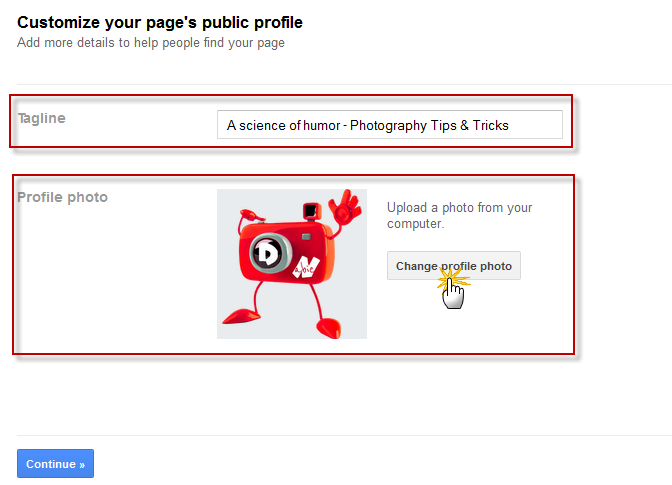
    • In next screen, you will be prompted to add a tagline and add image to Google Page, just like in the screenshot below:
    customize google page
    Screen 2: Customize Google Page
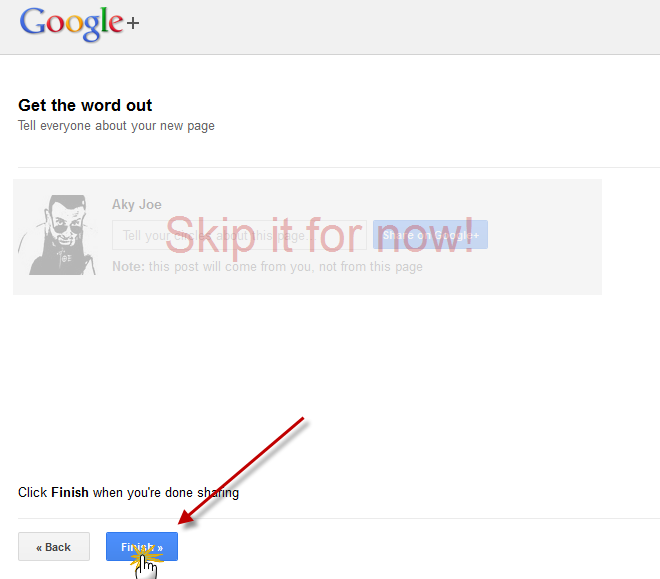
    • Once done, click Continue Button to save changes and move to next screen. In the next screen, Google will ask you to publish this page, but I recommend you to skip this step as it will share incomplete page to your fans. Click the Finish Button to complete Getting Started step. (refer to screenshot below)
    save google page changes
    Screen 3: Share Google Page

    Setup Info: Configure Google+ Page

    So now that you have created new Google Fan Page for website, we will have to setup few things before we publish or share it with your fans. Below are quick steps to setup profile of Google Fan Page:

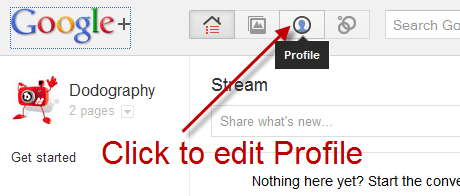
    • On the home screen, click the profile button as shown in the screenshot below.
    edit profile google fan page
    Edit Google Page profile
    • On the profile page, click the About Tab and press blue Edit Profile Button on top right.
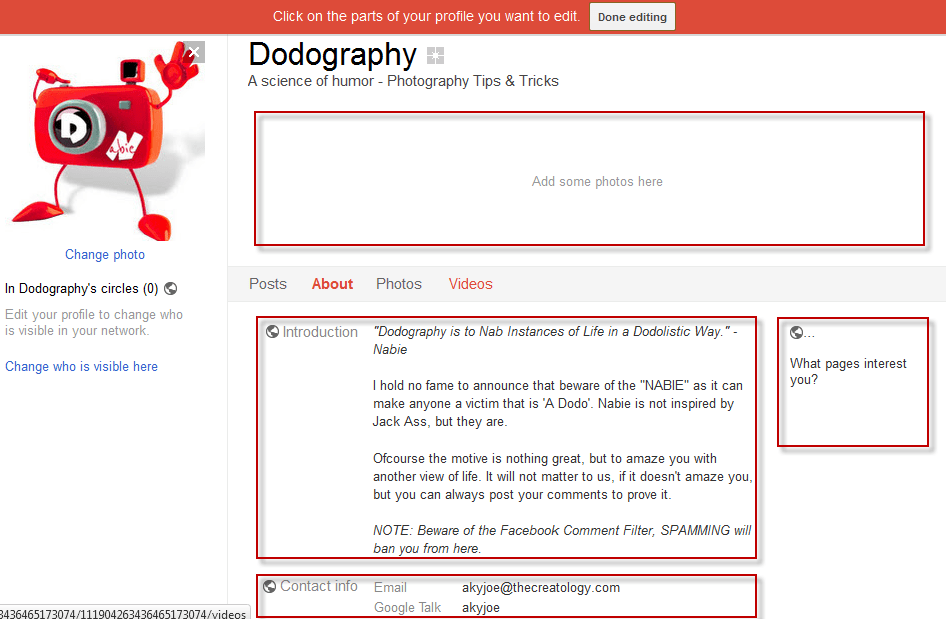
    • In the edit profile screen, you can change profile picture, add description, custom link on right pane and so on. (refer to the screenshot below)
    google fan page description
    Add profile information
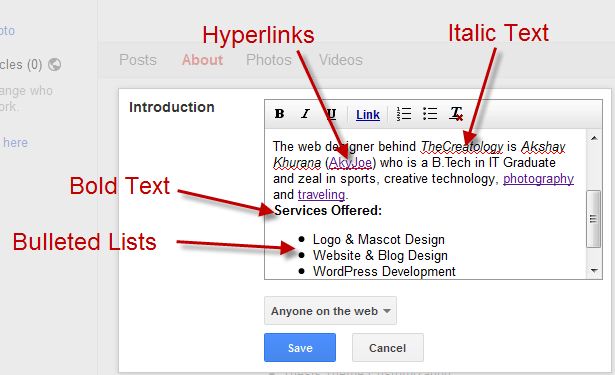
    • In Google+ Fan Page description has rich text editor, which also allows you to insert links, format text for bold, italics & underline, and bulleted & numbered list items. (refer to the screenshot below)
    format google page description
    Format Profile Description with Rich Text Editor

    Google Fan Page looks good ? Don’t miss to use rich text editor to format your description.

    • Once done, click the Save button and also the red top bar Done Editing button, when you finish editing the profile.

    Publish & Share Google+ Page with Friends

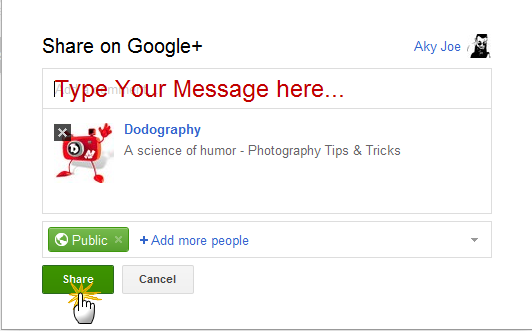
    Ready with your Google+ Fan Page ‘eh ? If so, then without any further delay we should promote the Google+ Fan Page with your friends. In the profile page itself hit the green Share your page Button, which you will see right below the profile picture. On clicking the green button, a window will open similar to screenshot below.

    share google fan page with friends
    Share Google Page with your friends

    In the share window, type your message, set the privacy level and hit the Share Button. Done ? GREAT! You have now successfully shared Google Page with your friends and with this we come to the end of this tutorial.

    Did you like Google+ Fan Page for your Blog ? Let us know by posting a comment below and you can also add TheCreatology on Google+.

  • How to Extend Contact Details of Author Profile in WordPress

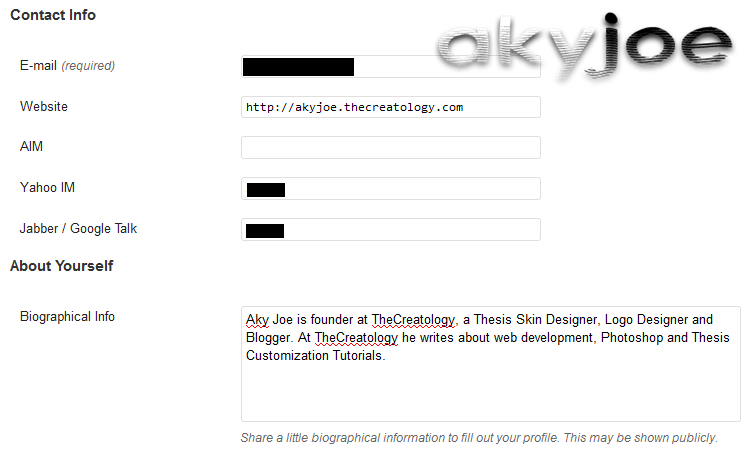
    Do you think WordPress has a user-friendly interface ? Of-course I do, not just because of its interface, but its ability to extend features to meet the required needs. For instance, in WordPress user profile editor under Contact Info section you can add E-mail, Website, AIM, Yahoo IM & Google Talk.

    wordpress admin default contact details
    Default Contact Options in WordPress

    WAIT! What if you need to add Twitter account in user profile or may be Facebook account in WordPress user profile ? Well, by default there is no space made by WordPress developers yet. I really wonder why do they ignore Twitter and Facebook or may be they don’t bother. Anyway, you don’t have to worry as WordPress is capable of extending its features, hence you can extend Contact Info of author profile. In this article, we will learn How to Extend Contact details of Author Profile in WordPress blog.

    Getting Started

    Before we start with the tutorial, I want you to make sure that your WordPress, Plugins and Theme are updated with latest versions. If you are using Thesis Theme then you can Safely upgrade to latest version Thesis.

    Add Contact Options in User Profile

    WordPress uses filters to override its default functions, and to extend WordPress Contact options it requires to create a filter. Find the code below and paste contact info filter in function.php file of the currently activated theme. If you are using Thesis Theme, then paste the code in custom_functions.php file. PHP code is as under:

    NOTE: Make sure you take full backup of functions.php file or custom_functions.php file using FTP before modifying the original file or you can also refer to the article about how to safely edit custom_functions.php.

    [php]
    /*
    * Author: Aky Joe
    * Edit Custom Author Fields
    */
    function extend_author_profile_joe( $joefields )
    {
    $joefields[‘twitter’] = ‘Twitter’;
    return $joefields;
    }
    add_filter(‘user_contactmethods’,’extend_author_profile_joe’,10,1);
    [/php]

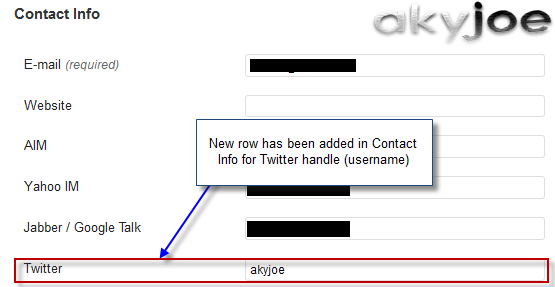
    Above code will add Twitter option field in user profile under Dashboard Admin. Once you have added the code, save the file and upload it to server using FTP. Navigate to Dashboard Admin > Users > Your Profile and look for Twitter under contact info, similar to the screenshot below:

    extend wordpress contact option twitter
    Twitter Option added in User Profile

    Embed Contact option in Theme

    In a WordPress blog, Contact Info options are often used in Single Posts, for instance in Author Bio, Bylines & etcetera. To show Contact Info option in Theme requires, a PHP code to be added within the Post Loop in Single.php. Thesis Theme users can refer to Add Author Bio below single post in Thesis WordPress Theme. PHP Code to embed contact option is as under:

    [php]
    < ?php the_author_meta( ‘twitter’ ); ?>
    [/php]

    Was that easy ?

    I hope it was and in similar fashion you can extend contact details in WordPress. You can play or innovate the above code to meet your requirements, like adding facebook account in user profile, custom image urls in user profile and so on.

    Can’t figure out a word above ? then you can also hire me to do extend Contact Options for WordPress. Else if you have any query or further assistance is required, post your feedback as a comment below.

  • How to style Sidebar Widget with different color in Thesis Theme ?

    Couple months back, a blogger friend who is also thecreatology blog follower, requested a Thesis Theme tutorial for styling sidebar widgets. As we all know that sidebar is an important element of blog, where we put advertisements, social media promotions and subscriptions. Hence, by making sidebar widgets eye catchy will increase blog hits and decreases bounce rate. For instance, you can check out the screenshot below (click to enlarge the image):

    thecreatology sidebar widget design
    TheCreatology Widget Styling

    As you can see in the above screenshot, the sidebar is on left side, whereas in most blogs you will find it one on right side. But doesn’t matter if it is on left or right, all what matter is that sidebar should be made eye catchy. In this article you will learn how to style sidebar widget with different color in Thesis Theme.

    Getting Started: Update Thesis Theme

    To make sure that we are sailing on the same ship, I recommend you to update Thesis Theme. Don’t know how to do that ? Well, just refer to article Safely upgrade to latest version Thesis 1.8 ? If you don’t have Thesis Theme Copy then you can also Download Thesis Theme.

    How to style sidebar widget ?

    Thesis Theme is no ghost, so you can always play around with its customization. Customizing sidebar in thesis theme can be done by applying CSS code, rest I leave it on your skills. I know you will not let me down. (Giggle)

    A sidebar may contain different types widgets, for instance a text widget or a recent post list widget and etcetera. So, make sure you analyze your need, before copying the code.

    CSS Code to Style Thesis Sidebar

    Hmm! So we have reached the ammunition, where will not find any armory or magazine, but the CSS code to style sidebar widget. Find the CSS code below:

    Make sure you take full backup of custom.css file using FTP before modifying the original file.

    Sidebar List Widget  CSS Code

    [css]

    .custom .sidebar ul li ul li a{background:#E5ECF9;border: 1px solid #AABCE0;border-radius: 7px; color: #FFF; display: block;font-size: 13px; padding: 4px 10px; margin:2px 0;}

    .custom .sidebar ul li ul li a:hover{background:#D3DCED;}

    [/css]

    Thesis Killer Recent Entries CSS Code

    [css]

    .custom #widget_killer_recent_entries-2{background:#BFE2F2; border:10px solid #77D6FF;}
    .custom #widget_killer_recent_entries-2 h3{padding: 5px 0; margin: 10px 0; font-size: 18px; font-weight: bold; text-align: center; color:#fff;}
    .custom #widget_killer_recent_entries-2 ul { font-size: 14px; font-weight: bold; list-style: decimal; margin: 0 0 0 20px;}
    .custom #widget_killer_recent_entries-2 ul li { border-bottom: 1px solid #ddd;margin: 0; padding: 5px 0;}
    .custom #widget_killer_recent_entries-2 ul li a { color: #333; display:block; font-size: 12px; font-weight: normal; background: transparent; padding: 0;}
    .custom #widget_killer_recent_entries-2 ul li a:hover {color:#e33e00;}

    [/css]

    Did you copy the right code ? This is just to remind you about the code which you analyzed before coming to this step.

    We’re Done!

    After that you have copied the correct code, save custom.css file and upload it on server. And if, you are using custom file editor from your dashboard admin then just hit Big Ass Save Button. Once done, refresh the website and check out sidebar styling and if you are not satisfied then you can play around with CSS code.

    With this we come to the end of tutorial to style sidebar widgets in Thesis Theme. I hope it was easy, if not? you can also hire me to do style sidebar widgets for you. If you have any query or further assistance is required, post your feedback as a comment below.

  • Easy way to add MailChimp Subscription Form on WordPress Blog

    If you are an Email Marketer then you must be knowing about MailChimp, no big deal if you don’t know What MailChimp is ? MailChimp is one of the best Email marketing service on web, which helps you to circulate Newsletters, Notices & other promotional media amongst your subscriber list. Doesn’t flatter your mind ? Go ahead and sign up for MailChimp for FREE Trial Account Now! 🙂

    Free-MailChimp-AccountOnce you have MailChimp account, you would want to see things in action, probably by embedding MailChimp form on WordPress Blog/website. MailChimp features you to embed form in two ways either using Html/JS code or using WordPress Plugin. Out of these two option, I found WordPress Plugin to be the easier way to integrate MailChimp form on website. Hence, in the article we will learn how to add MailChimp subscription form using WordPress plugin.

    I have divided this tutorial into four sections that is Installation, Configuration, Styling and Embedding form in Sidebar.

    Install MailChimp Plugin in WordPress Blog

    As MailChimp plugin is free to use, so our basic step will be to install MailChimp Subscribe List Plugin.

    • Login to WordPress Admin and Navigation to Dashboard > Plugins > Add New Plugin.
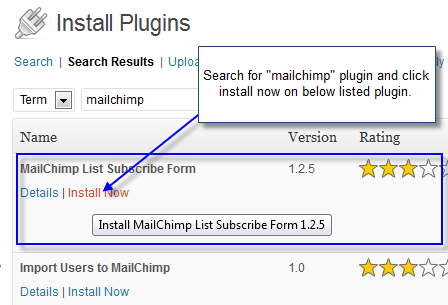
    • Search with “mailchimp” keyword and find “MailChimp List Subscribe Form” and click Install Now.
    MailChimp-Install-Plugin
    Install MailChimp Plugin
    • Once the plugin is installed, click activate button.

    Configure MailChimp Plugin Settings

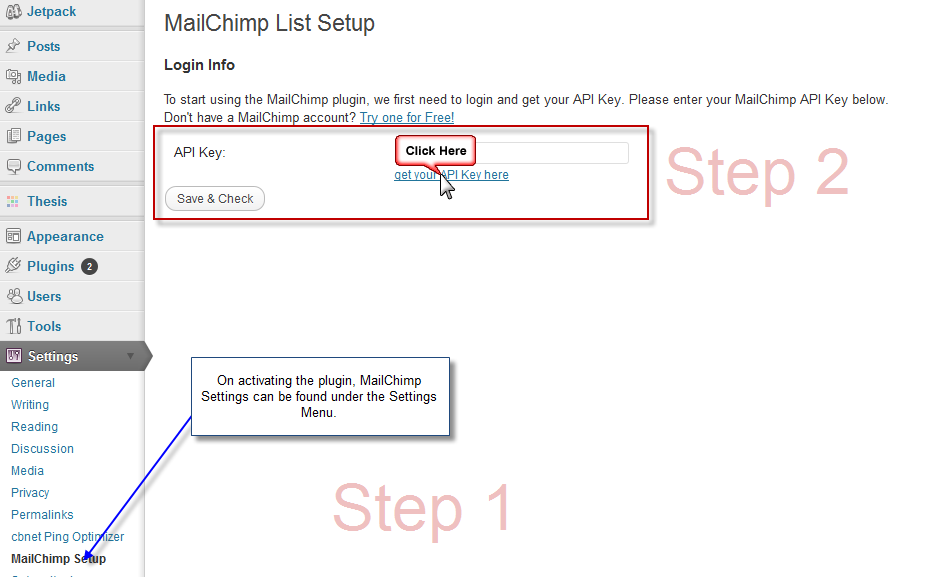
    When you will activate the plugin, MailChimp Settings will appear in Settings tab.

    • Click on MailChimp Settings to configure Subscription form settings, similar to screenshot below.
    MailChimp-Settings-Plugin
    MailChimp Plugin Settings

    Note: In above screenshot Step 2: Plugin prompts to synchronize MailChimp account with WordPress, which requires a secret API key.

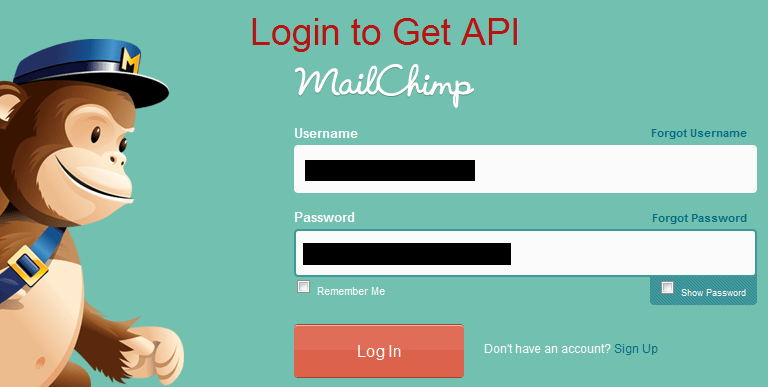
    • Click on the blue link which says “get your API key here” and you will be directed to MailChimp login screen, similar to screenshot below.
    Get-API-Key-Screen-1
    MailChimp Login Screen
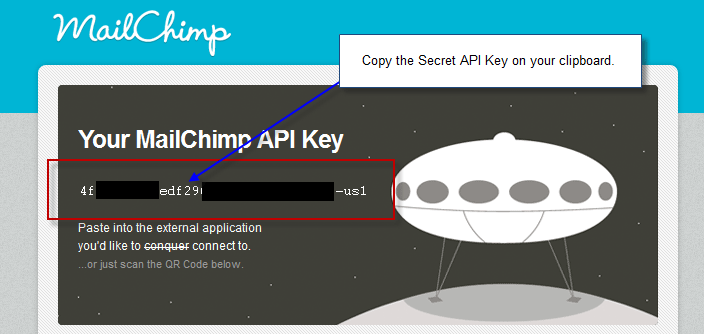
    • On successful login, you will get to see Your MailChimp API Key. Copy the key and save it for future usage.
    Get-API-Key-Screen-2
    MailChimp API Key Screen
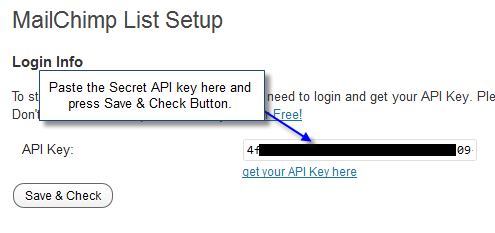
    • Once you have the key, go back to MailChimp Plugin Settings window and paste API key in text-field. Also press Save & Check Button to see some action.
    Save-API-Key-WordPress
    Save MailChimp API Key
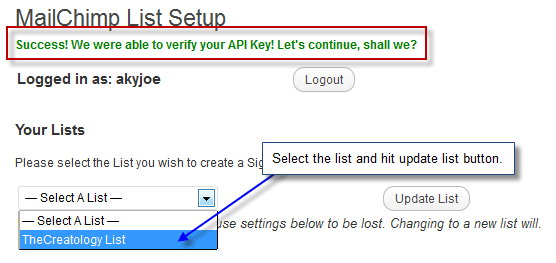
    • If API key gets validated, you will see Green Text saying “Success! We were able to verify your API Key! Lets continue, shall we?”.
    • Further, with successful synchronization, plugin will list all mailing lists created under that MailChimp account. You can select any one list from the dropdown and hit the Update List button on right. (Refer to the below screenshot)
    Valid-MailChimp-API-Key-Message
    Valid MailChimp API Key Message
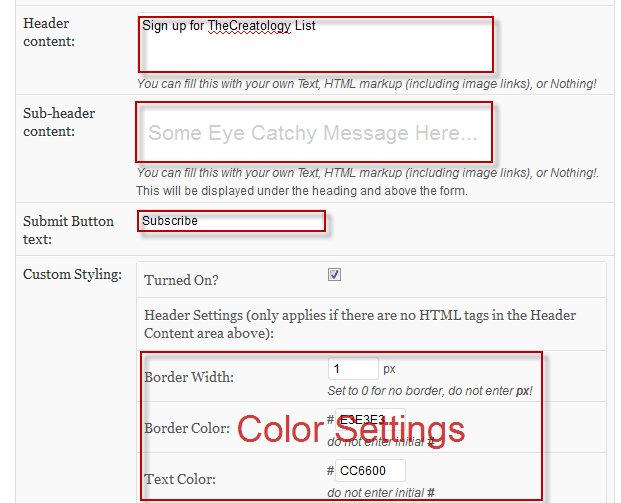
    • On updating the list, you will see a lot of options below to customize and style the subscription form.

    How to style MailChimp form in WordPress ?

    As we know subscription forms should be eye catchy to attract more subscribers. You can do so by using the MailChimp Settings to style MailChimp subscription form.

    • Refer to the screenshot below which explains about styling and customization of MailChimp form.
    MailChimp-Configuration-Plugin
    Customize Subscription Form
    • Once done, click on Update List Form Settings Button to save all changes. We are now all set to display subscription form in Sidebar.

    How to Embed MailChimp form in Sidebar ?

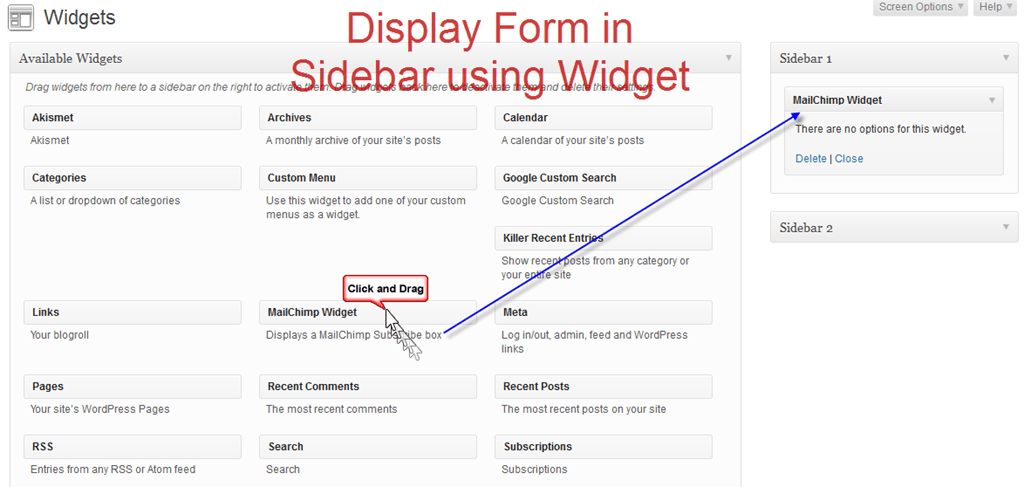
    MailChimp Subscribe List Plugin creates a widget, which can be found in Appearances > Widgets.

    • Simply drag from the MailChimp Widget to the desired position in the sidebar, you can also refer to the screenshot below.
    Display MailChimp Form in Sidebar
    Embed MailChimp form in sidebar
    • Once done, refresh the website to check MailChimp form in sidebar of WordPress Site.

    MailChimp Form Sidebar WordPressSomehow if you don’t like your MailChimp form styling, you can go back to the Step-3 and redesign subscription form again, with some new colors, till you satisfy yourself. 🙂


    Seems to be Easy ‘eh ?

    Well, this tutorial may look too lengthy, but believe me it just saved you from the Nightmares and Ghosts Coding and CSS Styling. LOL! Secondly, MailChimp power ease in managing Email subscription list and builds database of your contacts.

    With this we come to the end of this tutorial on Easy way to add MailChimp Subscription Form on WordPress Blog. If you have any query or further assistance is required, you can post comment below as your feedback.

  • Update Timthumb.php File in WordPress Theme Vulnerable to Hackers

    I am wondering why there is no update from DIY Themes about new version of Thesis Theme as timthumb file is making Thesis Theme Websites vulnerable to hackers. It has been reported that certain version of Timthumb script http://code.google.com/p/timthumb/issues/detail?id=212 holds security hole and Thesis Theme uses Timthumb.php file for re-sizing an image. I have no clue when new Thesis version will arrive, hence being on safer side why don’t we just update Timthumb file manually. 😉

    timthumb-hacked
    Timthumb file prone to hackers

    Therefore this vulnerability may also exist in your WordPress Theme or a Thesis Theme. For people who have followed this article How to auto generate thumbnail in Thesis Theme without Plugin, I strongly recommend you to update timthumb.php file, before a hacker ruins your morning, or make your sleepless nights.

    In this article, you will learn how to update TimThumb file in WordPress Theme.

    Step 1: Get Latest Timthumb.php for WordPress

    As mentioned about the security flaws with the timthumb.php, so our first step will be to get the latest version thumb file. You can download Timthumb.php source code from here. Another option, is to copy entire source code and edit existing Timthumb.php file. Move on to the next step which is to find timthumb file location.

    Step 2: How to find Timthumb file location ?

    As mentioned above about timthumb.php, which is a script used by developers to resize post images / slider images, so it can be found within the Theme/Plugin Directory. Depending upon various plugin and theme developers, name of the file can be either thumb.php or timthumb.php.

    For Thesis users, location of timthumb file in thesis theme is wp-content/thesis_18/lib/scripts/thumb.php

    Step 3: Why wait, replace new timthumb file asap!

    If you know the location of timthumb.php file, without any further delays, just  replace timthumb with its newer version and upload it on server using ftp. Once done, take a breather and relax! What next ?

    Did you check  other web directories ?

    timthumb-update-we are not done yet
    Analyse all web directories

    Well, I just told you to relax but we are not done yet. Make sure that you have not skipped any inactive themes directory or plugins, as this vulnerability applies to each timthumb file, regardless of whether it is active or executed by the server. I recommend you to delete all inactive themes and update existing ones to the latest versions.

    Phew! And with this you have saved your valuable asset from being hacked, but not until next time. 😛

    If you have any query or further assistance required then you can leave your comments below.

  • Google +1 button Update for Faster Page Load Time

    Something which reflects in using a Google Product is its performance. Google offers a lot of webmaster tools, which allows you to track page load time such as by using Google Analytics Code in WordPress. But launch of Google +1 Like button was not that effective, rather it couldn’t perform well in terms of speed and efficiency. If you have a set of Social media count buttons on website, Google +1 button is the last one to load. Wake up Google, you are not one of the Lazy asses. 😛

    google plus one button update

    Well, finally we have an update from Google, The Faster +1 Button. The following article is about the new Google +1 button update and why it loads 3 times faster now.

    Google Plus One Button Update

    After getting feedback and a lot of complaints such as, +1 button takes long time to load, Google released this update for plus one button. Google claims that they have improved +1 button code and now it will load 3 times faster than the old +1 button.

    How New Google Plus Button Loads Faster ?

    new plus one button update
    New Plus One Button Update

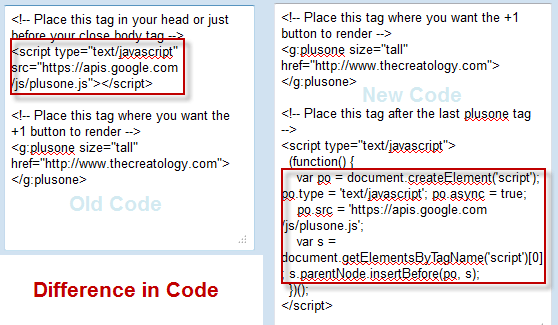
    When a page is loaded on browser, JavaScript loads itself synchronously and causing page load delays. But if we use Asynchronous JavaScript, also knows as AJAX, which lets browser to download JS file, while in parallel the page continues to load on browser and we don’t experience delays. Google has also introduced asynchronous snippet as improvement in new code and claims 3 times faster speed. You may refer the screenshot below which shows you the difference between old +1 button code and new +1 button code.

    difference between new plus code and old code
    Difference between New plus code and old code

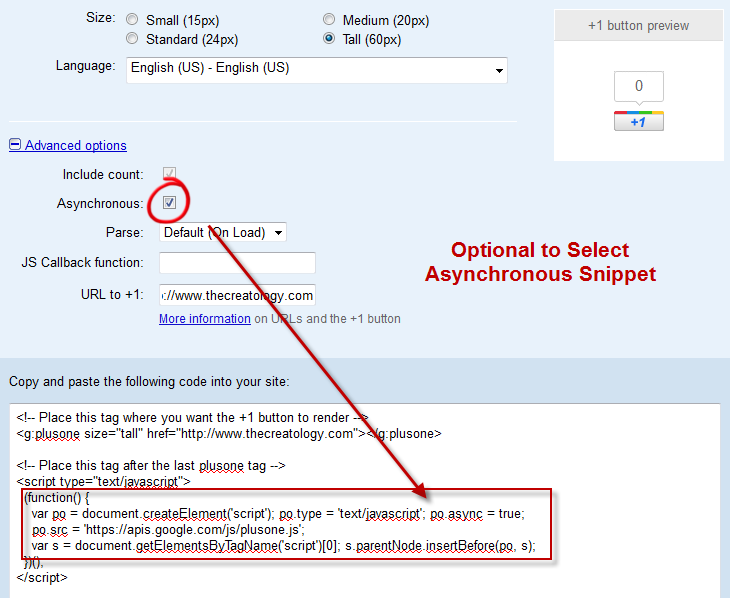
    The above screenshot explains the difference of old code and the new +1 code with Asynchronous Snippet. Google Plus has a configuration tool which allows you to select between old code and new code. Refer to the screenshot below.

    configuration tool google plus one button
    Configuration tool google plus one button

    Once you grab your code from the configuration tool, check out below how to add new plus one button in WordPress.

    Add fast Google +1 button in WordPress

    Procedure to add new +1 button is similar but somehow if you missed it, you can read it here. Below is Google like button code for WordPress which you can add it in Single.php file.

    Make sure you take full backup of single.php file using FTP before modifying it.

    [php]
    <g:plusone></g:plusone>
    <script type="text/javascript">
    (function() {
    var po = document.createElement(‘script’); po.type = ‘text/javascript’; po.async = true;
    po.src = ‘https://apis.google.com/js/plusone.js’;
    var s = document.getElementsByTagName(‘script’)[0]; s.parentNode.insertBefore(po, s);
    })();
    </script>
    [/php]

    Once you have added the code, check load time of Google +1 button on your website. Do let us know your feedback about your experience with new Google Plus Button, by posting a comment below.

    With this we come to the end of this article and I hope you and your folks will enjoy faster browsing experience with Google +1 button Update.

  • How to add Social Media Share Count Buttons in WordPress Blog ?

    If you are looking forward to boost blog traffic then make sure that you have Social media buttons on your blog. When we talk about the Web2.0, social media buttons have been replaced by the new share count buttons trending Facebook Like Button, Tweetmeme, Twitter Share button and etcetera. In this article, we will learn to add different social media button in WordPress.

    social-share-count-button
    Social Share Count Button for WordPress

    Different Social Share Buttons

    As mentioned above, social share buttons on website is like a car with wheels, and you cannot move ahead without them. I have already covered some Social media buttons in my previous articles, whereas if you have missed any then you can find them below:

    Share Button Codes for WordPress

    For ease of access I have complied all social share button codes in this article so that you can simple add share count button in WordPress Website.

    Make sure you take full backup of single.php file using FTP before modifying it.

    Retweet Button

    [php]
    <script type="text/javascript">
    tweetmeme_source = ‘thecreatology’;
    </script>
    <script type="text/javascript" src="http://tweetmeme.com/i/scripts/button.js"></script>
    [/php]

    Above code is for the Retweet Button, make sure to change the tweetmeme_source @thecreatology with your twitter handle. To see more options you may refer the original post How to Add ReTweet Button in WordPress Blog.

    Official Twitter Button

    [php]
    <a href="http://twitter.com/share" data-url="<?php the_permalink(); ?>" data-count="vertical" data-via="thecreatology" data-related="Aky Joe:He is Cool!">Tweet</a>
    <script type="text/javascript" src="http://platform.twitter.com/widgets.js"></script>
    [/php]

    Above code is for the Official Twitter Button, make sure to change the data-via @thecreatology & data-related with your twitter handle. To see more options you may refer the original post How to Add Official Twitter Button in WordPress Blog.

    Facebook Like Button

    [php]
    <iframe src="http://www.facebook.com/plugins/like.php?href=<?php echo urlencode(get_permalink($post->ID)); ?>&amp;layout=standard&amp;show_faces=false&amp;width=450&amp;action=like&amp;colorscheme=light" scrolling="no" frameborder="0" allowTransparency="true" style="border:none; overflow:hidden; width:450px; height:60px;"></iframe>
    [/php]

    Above code will add Facebook Like Button, make sure that you add the code in WordPress Post Loop. There are also different layouts to configure Facebook Like Button, which you can find in the original post How to Add facebook Like button in Website.

    LinkedIn Share Button

    [php]
    <script type="text/javascript" src="http://platform.linkedin.com/in.js"></script>
    <script type="in/share" data-url="<?php the_permalink(); ?>" data-counter="right"></script>
    [/php]

    Above code will add LinkedIn Button, make sure that you add the code in WordPress Post Loop. There are also different layouts to configure Linked Button, which you can find in the original post How to Add LinkedIn Share Button in WordPress Blog.

    Google Like +1 Button

    [php]
    <script type="text/javascript" src="https://apis.google.com/js/plusone.js"></script>
    <g:plusone></g:plusone>
    [/php]

    Above code will add Google Like Button, make sure that you add the code in WordPress Post Loop. Google Plugin button can be configured in three ways, for which you can refer to the original post How to Add Google +1 Like Button in WordPress Blog.

    Is that it ?

    Well yes, these were some popular social count buttons which I shared above, for a WordPress blog. If you think I missed any other share button, then you can share with us by posting a comment below, respecting the fact that Sharing is Caring. 😉

  • How to crop image and resize image using WordPress Image editor ?

    Are you looking for Image editor online to crop images for WordPress blog ? Well, I would like to tell you that WordPress 3+ version has its own image editor which can be used to crop images, rescale images and resize images from the Dashboard Admin Panel.

    WordPress Image EditorIn this article we will learn, how to crop image and resize image using WordPress Image Editor. The Tutorial has been divided into two sections, one explains about cropping an image while other explains about resizing an image in WP Admin.
    How to Crop Image in WordPress ?

    Image Cropping tool in WordPress just makes it handy for to handle your huge 4000×2500 pixel digital camera snapshot. WordPress Crop tool allows you to select vital area in image and resize it automatically. To crop an image:

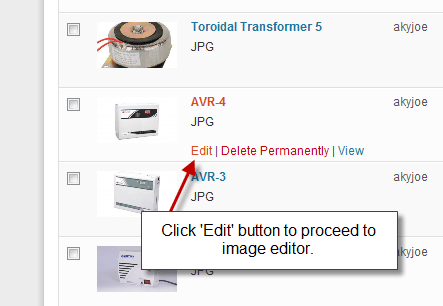
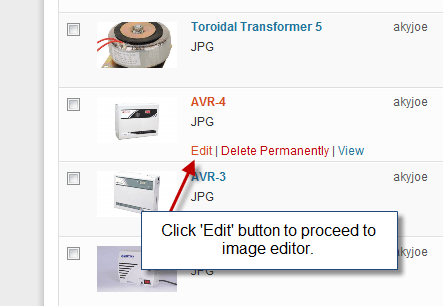
    • Login to WordPress Admin and Navigate to Dashboard > Media .
    • Select any existing image from media or you can also upload new image from computer. (Refer to screenshot below)
    Select Edit image from media
    Select Edit image from media (Click to Zoom)
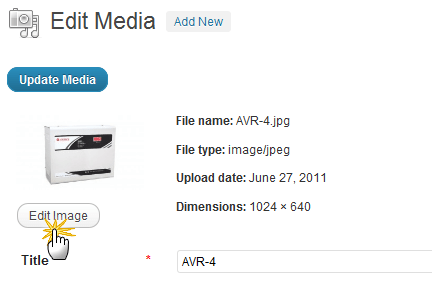
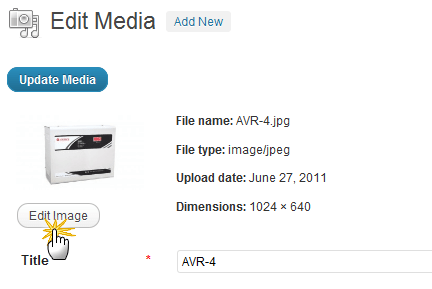
    • Further it will open Edit Image media, and under the thumbnail image click the Edit Image button to open WordPress Image Editor. (Refer to screenshot below)
    Select Edit image button
    Select Edit image button (Click to Zoom)
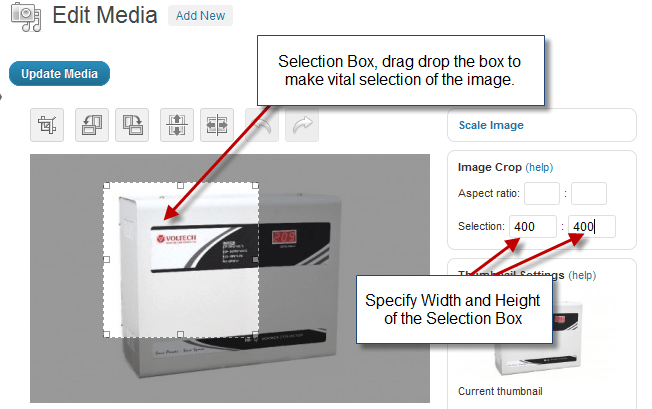
    • Next you will see the Image Editor page, where cropping of images can be done. Refer to screenshot below.
    Crop Image using WordPress Editor
    Crop Image using WordPress Editor (Click to Zoom)

    In the above screenshot you can simply Drag the selection on the image visible on left pane and click Update Media Button to apply changes, if you are not satisfied use Undo Button and crop image again.

    (Note: Once the Media has been updated you can revert back.)

    How to Resize Image in WordPress ?

    Image resizing for blog is tough to fit image as per the size. But with WordPress everything is like easy, click a away.  With WordPress image editor you can rotate, flip and scale your image without any extra efforts. To resize an image:

    • Login to WordPress Admin and Navigate to Dashboard > Media .
    • Select any existing image from media or you can also upload new image from computer. (Refer to screenshot below)
    Select Edit image from media
    Select Edit image from media (Click to Zoom)
    • Further it will open Edit Image media, and under the thumbnail image click the Edit Image button to open WordPress Image Editor. (Refer to screenshot below)
    Select Edit image button
    Select Edit image button (Click to Zoom)
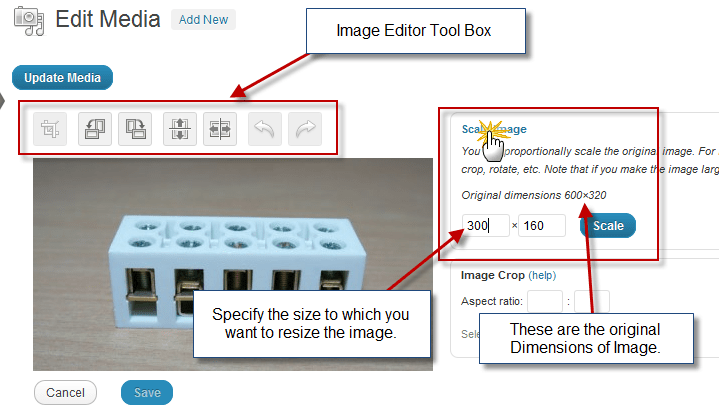
    • Next you will see the Image Editor page, where you can Resize and Rescale your Image using WP Image Editor. Refer to screenshot below.
    Resize Image using WordPress Editor
    Resize Image using WordPress Editor (Click to Zoom)

    In the above screenshot you can specify width height parameters on right pane and click Scale Button to apply changes, if you are not satisfied use Undo Button and rescale image again.

    (Note: Once the Media has been updated you can revert back.)

    We Are Done

    Image editing is easy within WordPress and you don’t have to install plugins or use any Image Editor online, but use WordPress image editor. Share with us How did you like WordPress Image Editor ?

    If you have any queries or further assistance is required, you can post feedback as comment below.

  • Tutorial to add CAPTCHA in Contact Form 7 Plugin to block Spam on WordPress Blog

    Spamming on WordPress blogs has become vital, just kidding, increasing day-by-day. You must be here looking up for solution to stop spam on your blog as well. To stop spam comments,  I have covered two articles on How to Block Spam using HTACCESS and using Akismet Plugin. But these tutorials will only help you to stop spam commenting on your blog but not on contact forms. For a spammer, it’s just a Submit button required to do all the action.

    Spam MessageIf your WordPress Blog is using Contact Form 7 plugin, then beware that you can be spammer’s next target. Recently, I received few spam comments on my Email via Contact form 7 on thecreatology and it got worst with count of 50+. Annoying! Below is screenshot of the Inbox:
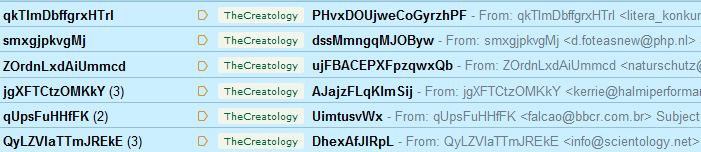
    Spam Messages from Contact Form 7
    Spam Messages from Contact Form 7

    I tried tracking IP Address of all emails and the origin, but it was hard to block spammer access because they used a random IP Address every time. So, I had to install CAPTCHA in Contact Form 7 settings. In this tutorial, you will learn how to add CAPTCHA in Contact Form 7 Plugin to block Spam on Website.

    Block Spam using CAPTCHA

    CAPTCHA is an automated scripts made to validate forms submission. CAPTCHA reforms a word every time it refreshes. This makes it complex for spam bot to read CAPTCHA letters and auto submit form. To add CAPTCHA in WordPress Contact form, you will be required to install Really Simple CAPTCHA plugin. Below is stepwise procedure to add CAPTCHA in Contact form 7.

    Step 1: Install Really Simple CAPTCHA Plugin

    To install WordPress CAPTCHA plugin, login to WordPress dashboard:

    • Navigate to Dashboard > Plugins > Add new Plugin.
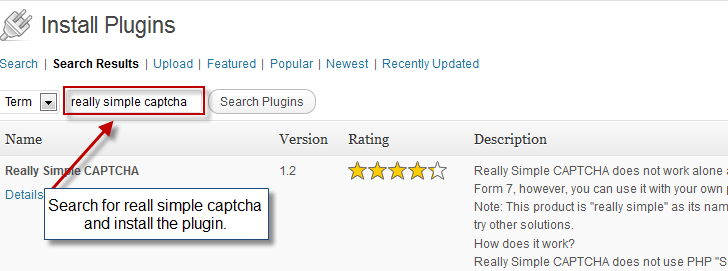
    • Search for Really Simple CAPTCHA plugin and click to install it. Refer to screenshot below.
    install really simple captcha plugin
    Install CAPTCHA plugin
    • One the plugin is installed, activate it.

    Are done with installation of plugin? Move on to configure Contact Form 7.

    Step 2: Add CAPTCHA to Contact Form 7

    You can add CAPTCHA in contact form in few easy clicks. Follow the procedure below:

    • Login to WordPress Dashboard and navigate to Dashboard > Contact.
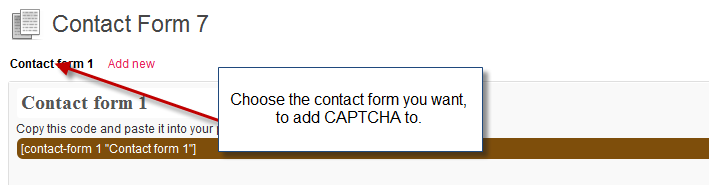
    • Select the contact form to edit it, refer to the screenshot below.
    Select Contact Form To add CAPTCHA
    Select Contact Form To add CAPTCHA
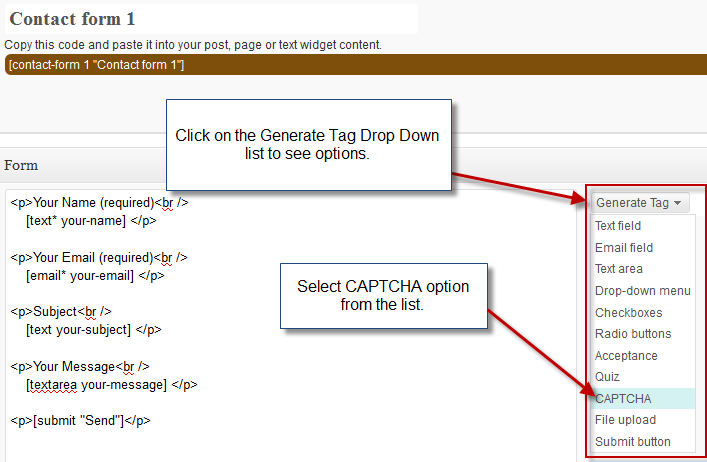
    • To add CAPTCHA, click on the Generate Tag drop down list on right, and select CAPTCHA option in the list, just like in the screenshot below:
    Generate CAPTCHA Tag for Contact Form
    Generate CAPTCHA Tag for Contact Form
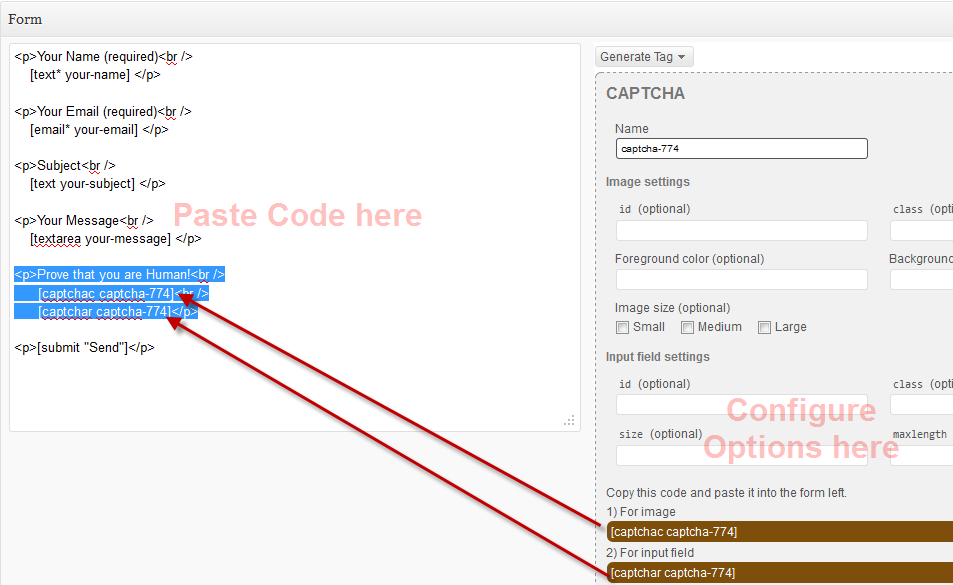
    • After you click on the CAPTCHA option, CPATCHA setting options will appear under the Generate Tag drop down list. Now, configure the options and copy-paste the code on the left side of the window. Refer to screenshot below:
    Add CAPTCHA to contact form code
    Add CAPTCHA to contact form code
    • Once done, hit the Save button on top right and We’re Done! 😉

    We’re Done

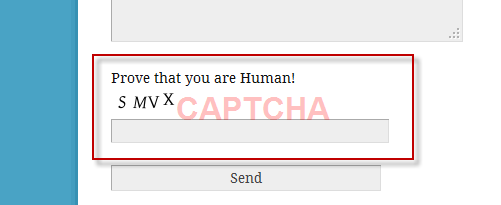
    Now that you have added the code, refresh the contact form page and check it out, it will look similar to screenshot below:

    CAPTCHA on WordPress Blog
    Demo: CAPTCHA on WordPress Blog

    Adding CAPTCHA will violate bots to submit spam on website. In a way you can focus more on blogging rather administering your blog.

    In this article, we learned to add CAPTCHA in Contact Form 7 WordPress Plugin to block spam. If you have any queries or require any assistance, you can post a feedback using  comment form below.