Author: Aky

  • Image Caption Box Alignment Problem after WordPress 3.4 Update [With Thesis Fix]

    Images not aligning properly in article after upgrading to WordPress 3.4 ? If Not, then you are lucky and can skip this post. If Yes, then it is because of a recent WordPress 3.4 update which came out  few days back. Even, I got aware of this issue after posting an article earlier today, where I found all images aligned to left automatically with a broken caption box.
    Image Alignment in WordPress 3-4

    Though WordPress 3.4 Update has some nice improvements, but it has affected a lot of WordPress themes and frameworks. Here is what WordPress 3.4 Codex for image caption shortcode states… (important for developers)

    Change the image caption shortcode format to {caption shortcode}{anchor tag}{image tag}caption text + html{close anchor tag}{close caption shortcode} that way HTML tags in captions are better supported and the shortcode wouldn’t break when using the wrong quotes.

    When I saw markup in firebug, of a recently posted article after upgrading to WordPress 3.4, I found that image caption shortcode didn’t generate the div tag to form caption box. Check out the screenshot below:
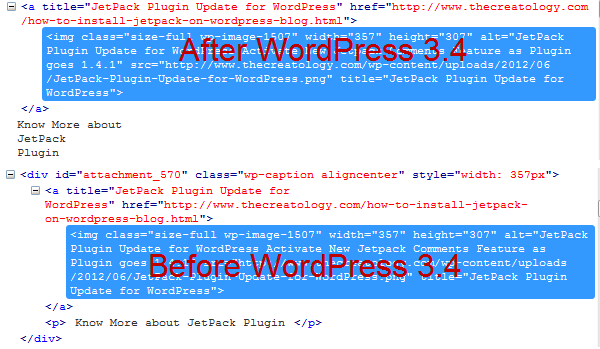
    Markup Difference in WP 3-4
    Markup Difference in WordPress 3.4 Version

    Got the difference? Yes, the div tag is missing in after WordPress 3.4 clipping and hence breaking image caption box.

    How to fix Image Caption Issue

    There hasn’t been a proper solution to overcome image caption box issue, but you can:

    • Makes changes in Theme CSS file,
    • Manually add caption html tags or
    • Avoid usage of image caption shortcode

    Thesis Theme Users – Update to Thesis 1.8.5

    An update for Thesis Theme will be available for its users by next week, as said by Chris Pearson. He has also suggested 2 options for Thesis users which you can check out in a Conversation with Chris on Twitter, in screenshot below:
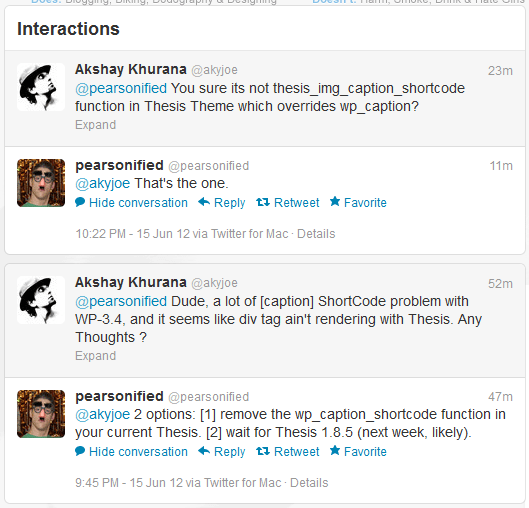
    chat with chris thesis owner
    Interaction with Chris for Thesis Update

    I chose to wait for Thesis 1.8.5, as it’s not recommended to mess with Thesis core files.

    Thesis 1.8.5 is Available now ?

    Yes, new version of Thesis Theme is available for download now. Click here or the image below saying Thesis 1.8.5
    Thesis 1-8-5 bug fix release
    Get Thesis Theme 1.8.5

    (Post Updated on 19/06/2012)

    Whats next ?

    Have a similar problem with Image Caption Box Alignment after WordPress 3.4 Update ? Ask your theme developer now, for a fix. Whereas if you have a proper solution to it, then share it with us here, by posting a comment below.
  • Activate New Jetpack Comments Feature as Plugin goes 1.4.1

    It is amazing how Jetpack Plugin is improving day-by-day and introducing new features. Last Jetpack Plugin update was about new contact form option for Feedbacks and this time its enhanced Commenting System for WordPress. Arrh…that wasn’t loud! Let me say that again… Jetpack has added New JetPack Comments Feature, with its new version 1.4.1.

    Not sure what is Jetpack all about ? Click here to know more about Jetpack Plugin or click the JetPack picture below:

    JetPack Plugin Update for WordPress
    Click to Install Jetpack on WordPress!

    Whats New in Jetpack Plugin ?

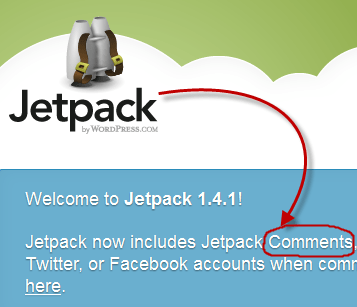
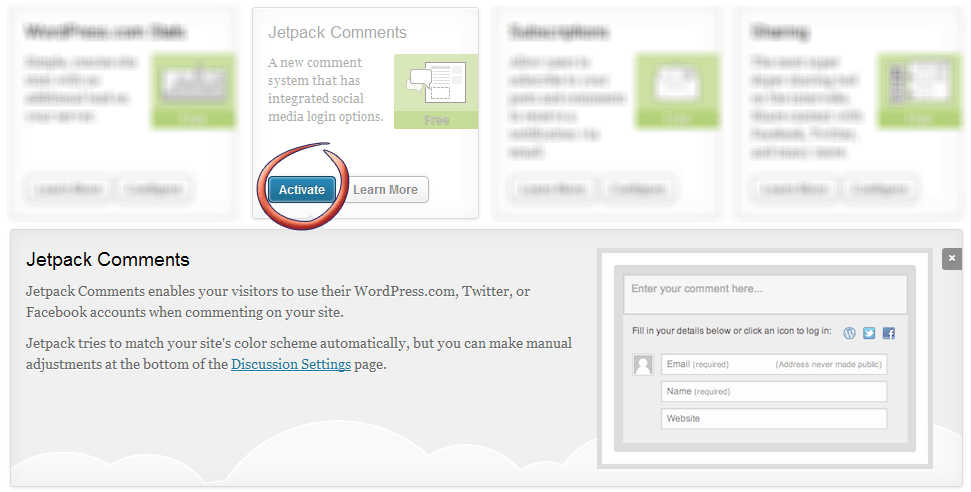
    The new JetPack Commenting System  extends capabilities of conventional WordPress comments. You will find JetPack Comment widget in Dashboard once you have updated the plugin. It looks like below screenshot:

    JetPack Plugin update for New Commenting System
    Jetpack Comments Widget in Dashboard

    How to get Jetpack Comments Feature ?

    To get Comments Feature in blog, you will have to update Jetpack plugin. If don’t know how to update Jetpack Plugin follow a quick procedure below:

    • Login to WordPress Admin Panel and Navigate to Dashboard > Plugin.
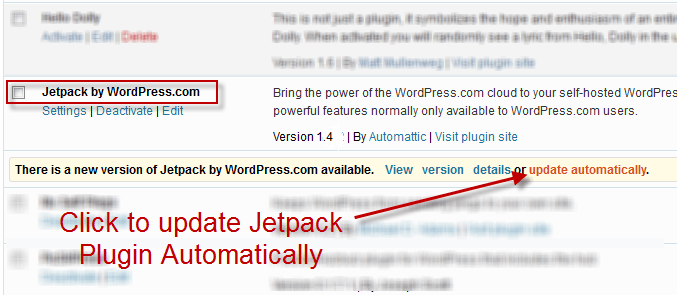
    • Find Jetpack Plugin Listed with other plugins. Click on Update Automatically link in orange, just like in the screenshot below:
    JetPack Version Update 1-4-1
    Click on Update Automatically Link
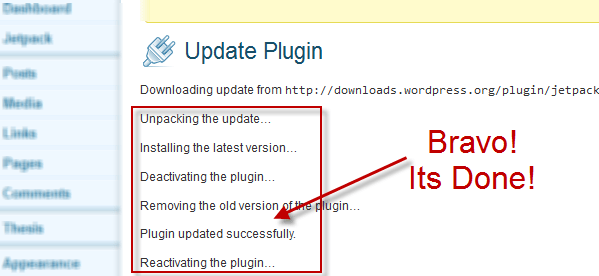
    • After clicking the link you will get redirected to update plugin status page and you will see something similar as below screenshot.
    Update Jetpack Plugin step2
    Plugin Updated Successfully!
    • Done? Now navigate to Dashboard > Jetpack to see JetPack Comment Widget.

    Pros & Cons for JetPack Comment

    Hah…you must be wondering about whether its worth installing on your WordPress Blog or it is not. Hmmmm…the list of Pros & Cons is especially for you to figure out, read below:

    PROS FOR INSTALLING JET PACK COMMENTS

    • Allows a commenter/visitor to use WordPress.com, Facebook or Twitter Account while posting a Comment on your site.
    • Enhanced Comment Form with jQuery Animation
    • 3 different Themes for Comment Form: Light, Dark & Transparent.
    • jQuery Validation for required Fields.

    CONS FOR INSTALLING JET PACK COMMENTS

    • Still using div html tags which states it is not on HTML5 completely.
    • Doesn’t work with Thesis Theme or other frameworks.
    • Increases page load time by 0.5-1 second/s.

    Here is how a JetPack Comment Form looks like, on Twenty Eleven Theme:

    JetPack Comment Form on Twenty Eleven Theme
    Jetpack Comment Form on Twenty Eleven Theme

    What do you think ?

    Isn’t it feel good to have your WordPress Blog up-to-date & with latest features ? I believe nothing can beat that feeling, so what do you think about it? Share your thoughts with us about this New Jetpack Comments Feature introduced with Plugin Update 1.4.1. Of course, you can post a comment below. 😉

  • How to Add New Ad Slot in WordPress Theme using Adrotate Plugin

    An Advertisement-Ready Website, a recent project by TheCreatology, was configured with Adrotate Plugin. The plugin has extensive features for Ad management, Click Tracking & Campaign Management etc. with detailed reporting, which also we will be using in our Tutorial. This tutorial is a request from a client, which is Quick-n-Easy tutorial, as we will learn to add new advertisement slot using adrotate in WordPress theme.

    Get Started - Add Ad Slot Using Adrotate
    Add New Ad Slot Using Adrotate

    For your ease, I have divided this tutorial into three sections: 1) Add/Install Adrotate Plugin, 2) Add/Create New Ads with Adrotate & 3) Display Ad Slot Code in Theme

    Step 1: Add/Install Adrotate Plugin

    To install WordPress Adrotate plugin, login to WordPress dashboard:

    • Navigate to Dashboard > Plugins > Add new Plugin.
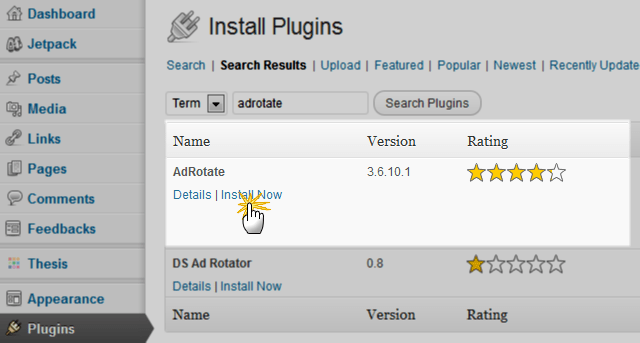
    • Search for Adrotate plugin and click to install it.(Refer to screenshot below)
    Step1 Install adrotate plugin
    Install Adrotate WordPress Plugin
    • Once the plugin is installed, click on Activate link to complete the installation of plugin.

    Now that we are done with the installation of plugin, we can move on to create new ad banners.

    Step 2: Add/Create New Ad Banner with Adrotate

    Adding new ads is just a click-a-way thing and a bit of focus is required. Follow quick steps below:

    • Login to WordPress Dashboard and navigate to Dashboard > Adrotate
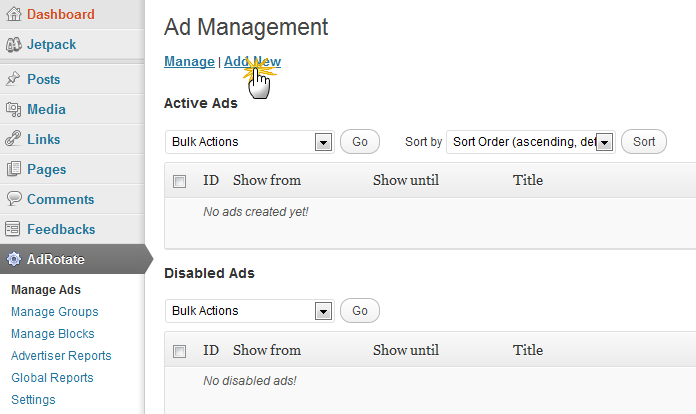
    • Click on Add New to add ad banner just like in the screenshot below.
    Step2-1 Add New Ad in Adrotate
    Navigate to Adrotate Management Screen
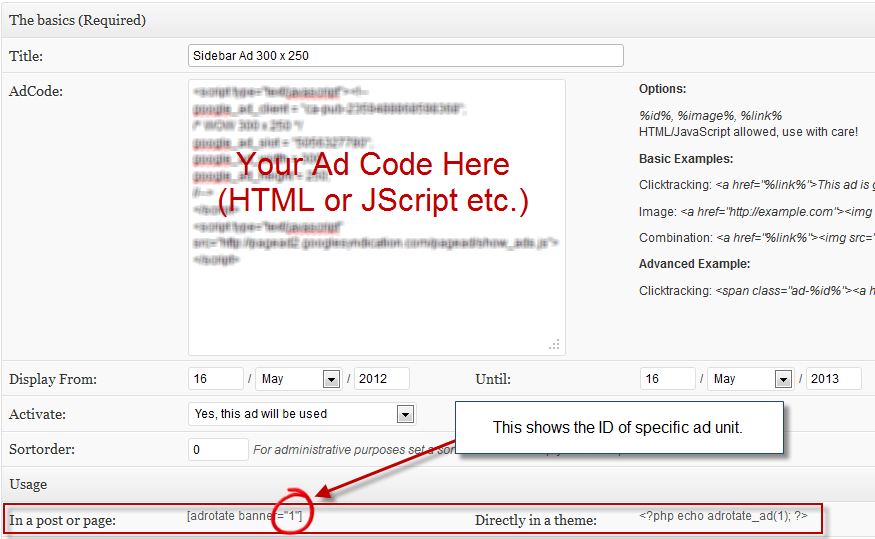
    • In next screen, you will see a form prompting about new Ad details. Fill the required fields that is Title, Ad Code & Display Period. (Note: Advance Settings are optional, depending upon your requirement.)
    • For your reference, you can memorize Ad unit ID, which will be required in Step 3 (refer the screenshot).
    Step2-2 Add New Ad in Adrotate
    Add new Ad unit
    • Hit Save Ad button once done.

    Step 3: Display Ad Slot in Theme

    In our previous step, we added Ad Unit, where as this step will integrate Ad Code in theme. Adrotate Ad Unit can be displayed in two ways: 1) Using Adrotate Widget & 2) Using Short Code or PHP Code

    USING ADROTATE WIDGET

    This is an easy method and recommended option for people who don’t like to code. Follow simple steps below to display ad slot using adrotate widget:

    • Login to WordPress Admin and Navigate to Dashboard > Appearances > Widgets.
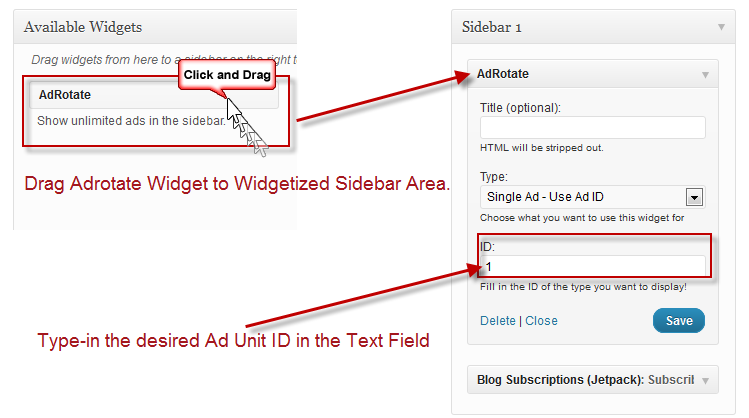
    • In the available widgets, Drag Adrotate Widget to the Widgetized Area, just like in screenshot below.
    Step3-1 Display Ad Using Adrotate Widget
    Display Ad in Sidebar using Adrotate
    • Type-in, the desired Ad unit ID, which you memorized while creating Ad Unit in Step 2. If you are not sure about the ID, simply Navigate to Dashboard > Adrotate and find the Ad Slot ID
    • Hit Save button to update the changes.

    USING pHp CODE

    A bit complex method, as you either need to have developer skill-set or a developer to fix it, as a slight mistake may end up breaking theme layout or crash the website. The method comparatively is more flexible than Adrotate Widget method, as you can display any size Ad Unit anywhere in your Theme. To do so, follow steps below to display ad slot using php code:

    • Login to WordPress Admin and Navigate to Dashboard > Adrotate.
    • Click the desired Ad unit you want to embed in your Theme.
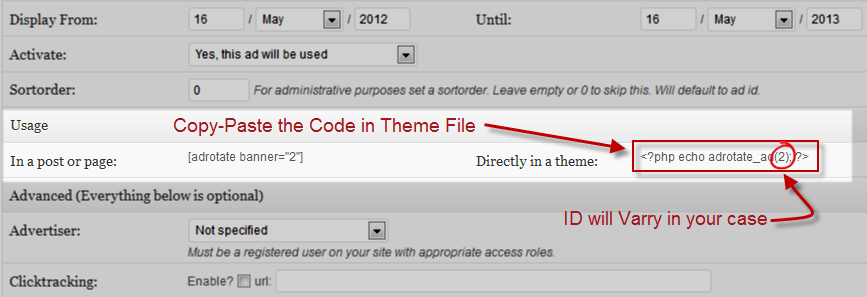
    • Scroll down a bit till you see Usage section similar to screenshot below.
    Step3-2 Display Ad Using PHP Code
    Adrotate Ad unit PHP code
    • Copy the php code <?php echo adrotate_ad(#WILL VARY IN YOUR CASE#); ?>
    • Paste, the code in your theme layout file, for instance header.php or single.php as desired.
    • Save & upload file to server using FTP.

    We’re Done

    Now that you have added ad unit code in the theme, refresh webpage to preview the ad slot. Works fine ? Bravo, we are done with the tutorial.

    Not Working ‘eh ? Recheck the codes, make sure you have uploaded the right file and clear cache, in case you are using cache plugins. Go through the Step 2 & Step 3 again, till you see the ad unit live in action. 😉

    In this tutorial we learned about adding a new ad slot in WordPress Theme using Adrotate Plugin. If you have any queries or further assistance is required, post us your feedback using the comment form below.

  • Add Multiple Image Upload Button using WordPress Uploader in Theme

    WordPress core development is real learning and challenging especially when needed for an internal or a client project. I came across to this requirement of adding Media Upload Button in Metabox, while working on a client’s project. Hereby sharing my first Core WordPress Development Tutorial  to Add Multiple Image Upload Button using WordPress Uploader in Theme.

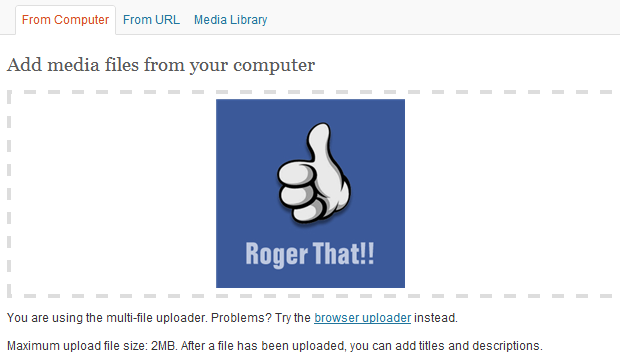
    Use Default WordPress Uploader

    WordPress Media Upload Box
    WordPress Media Upload Box

    No doubt, WordPress has an awesome media upload thickbox, in which you can even drag-drop images. In this tutorial we will use default WordPress Uploader to insert link in Metabox. For your ease, I have divided this article into three steps: 1) Multiple Image Upload Button Code, 2) Custom Uploader jQuery Code & 3) Call WordPress Media Upload Function.

    Here we go:

    Step1: Multiple Image Upload Button Code

    It is though easy to implement the code if you are familiar with WordPress Basics. No worries, if you are a beginner, just add below code snippet in functions.php or  custom_function.php file if you are using Thesis Theme.

    NOTE: Make sure you take full backup of functions.php file or custom_functions.php file using FTP before modifying the original file or you can also refer to the article about how to safely edit custom_functions.php.

    [php]

    <div style="margin:10px;">
    <label style="float:left; margin: 5px 5px 0 0;">Image 1:</label>
    <input type="text" id="image_1" name="image_1" value="" style="width: 550px; float:left; margin:0 5px;"/>
    <input id="_btn" class="upload_image_button" type="button" value="Upload Image" />
    </div>
    <div style="margin:10px;">
    <label style="float:left; margin: 5px 5px 0 0;">Image 2:</label>
    <input type="text" id="image_2" name="image_2" value="" style="width: 550px; float:left; margin:0 5px;"/>
    <input id="_btn" class="upload_image_button" type="button" value="Upload Image" />
    </div>
    <div style="margin:10px;">
    <label style="float:left; margin: 5px 5px 0 0;">Image 3:</label>
    <input type="text" id="image_3" name="image_3" value="" style="width: 550px; float:left; margin:0 5px;"/>
    <input id="_btn" class="upload_image_button" type="button" value="Upload Image" />
    </div>

    [/php]

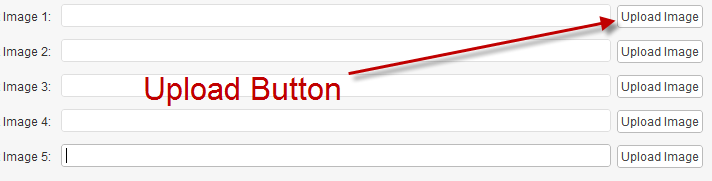
    After adding multiple upload image buttons, save the file and you will see something similar to screenshot below:

    Multiple Image Upload Buttons
    Multiple Image Upload Buttons

    Step2: Custom Uploader jQuery Code

    Now that our HTML part is ready, its time to do some action. Create a new JS file custom_uploader.js and insert the below code snippet in it.

    [php]

    jQuery(document).ready(function() {
    var formfield;
    jQuery(‘.upload_image_button’).click(function() {
    jQuery(‘html’).addClass(‘Image’);
    formfield = jQuery(this).prev().attr(‘name’);
    tb_show(”, ‘media-upload.php?type=image&amp;TB_iframe=true’);
    return false;
    });
    window.original_send_to_editor = window.send_to_editor;
    window.send_to_editor = function(html){
    if (formfield) {
    fileurl = jQuery(‘img’,html).attr(‘src’);
    jQuery(‘#’+formfield).val(fileurl);
    tb_remove();
    jQuery(‘html’).removeClass(‘Image’);
    } else {
    window.original_send_to_editor(html);
    }
    };
    });

    [/php]

    Above code will invokes the WordPress Uploader function, so make sure you copy the code very precisely.

    Step3: Call WordPress Media Upload Function

    Action time, as we will trigger Media Upload Button function en-queuing some default scripts. So, copy/paste the code in functions.php or  custom_function.php file, in case if its Thesis Theme.

    NOTE: Make sure you take full backup of functions.php file or custom_functions.php file using FTP before modifying the original file or you can also refer to the article about how to safely edit custom_functions.php.

    [php]
    function joe_admin_scripts() {
    wp_enqueue_script(‘media-upload’);
    wp_enqueue_script(‘thickbox’);
    wp_register_script(‘my-upload’, ###ADD JAVASCRIPT LOCATION HERE###/custom_uploader.js’, array(‘jquery’,’media-upload’,’thickbox’));
    wp_enqueue_script(‘my-upload’);
    }
    function my_admin_styles() {
    wp_enqueue_style(‘thickbox’);
    }
    add_action(‘admin_print_scripts’, ‘joe_admin_scripts’);
    add_action(‘admin_print_styles’, ‘joe_admin_styles’);
    [/php]

    Above code will get Media Upload Box Stylesheet and jQuery files. Don’t forget to insert the location of custom_uploader.js file which we created in Step 2 in line number 4.

    Once done, try inserting/uploading files by clicking respective upload buttons use insert into post to fill input field with and you will find similar to screenshot below:

    Image Upload Button Demo
    Image Upload Button Demo

    We’re Done

    I hope it wasn’t drain bamaging! Lol!  Its your time to do some action and make the most of this cool development, as you can add Multiple Image Upload Buttons in Gallery Themes or Portfolio Themes.

    Any queries for further assistance, kindly use the comment box below for your feedback.

  • New Contact Form Feature in Jetpack Plugin Update

    Few hours back, WordPress notified to update Jetpack Plugin, which made me curious about new features. In last Jetpack Plugin update, New Subscription option was added with Extra Sidebar Widgets making easy for lazy bloggers. Hmmm…what we have now ? Well, Jetpack has added New Contact Form Feature, as they say its time to trash all other contact form plugins. 😛

    Not sure what is Jetpack all about ? Click here to know more about Jetpack Plugin.

    Jet Pack New update TheCreatology
    Know more about JetPack Plugin ?

    Whats New in Jetpack Plugin ?

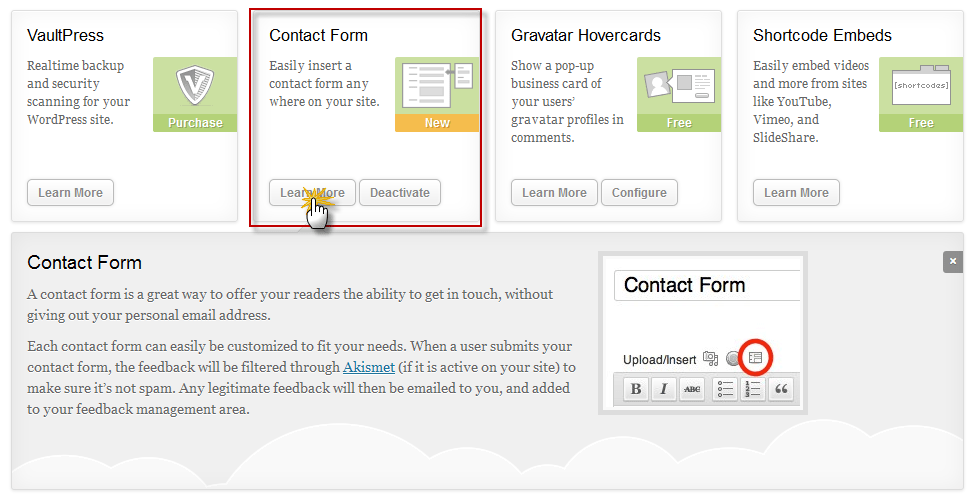
    Contact Form widget is what you will find in Jetpack Dashboard after updating the plugin. It looks similar to below screenshot:

    Contact Form Jetpack Plugin Update
    Contact Form Widget

    Get Contact Form Feature Jetpack Plugin

    To get Contact Form Feature in blog, you will have to update Jetpack plugin. If don’t know how to update Jetpack Plugin follow a quick procedure below:

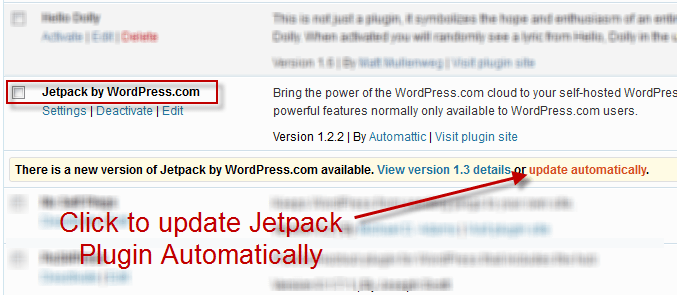
    • Login to WordPress Admin Panel and Navigate to Dashboard > Plugin.
    • Find Jetpack Plugin Listed with other plugins. Click on Update Automatically link in orange, just like in the screenshot below:
    Update Jetpack Plugin step1
    Click Update Automatically Link
    • After clicking the link you will be redirected to update plugin status page. If you have good web hosting, then it will not take more than 5 seconds to update Jetpack Plugin and you will see something similar as below screenshot.
    Update Jetpack Plugin step2
    Jetpack Update Status
    • Well, we are done. Navigate to Dashboard > Jetpack to find Contact Form Feature Widget.

    Share Your Views

    I am sure this new update excites you as well, don’t forget to share your thoughts with us about New Contact Form Feature in Jetpack Plugin, by posting a comment below. 😉
  • Add Social Share Count Buttons in Thesis Theme Teaser without Plugin

    Share Count buttons are tires on website, giving its content a smooth ride around the world. If don’t have social share buttons yet on your WordPress Blog, then I strongly recommend you to have them right away. Best way to add social button is either on the Article Landing Page or on the Blog Summary Page which we also call them as post teasers. Check out the screenshot below showing share button on teaser post.

    teaser-share-count-buttons
    Share Button in Thesis Theme Teaser

    I have already written an article about Social Media share buttons for WordPress. If you haven’t read it, then you can check it out here. There are also plugin available for adding share count buttons, but if you are Thesis Theme owner then its far easier and no plugin dependency, ofcourse.

    Here is a quick tutorial which will help you to add share count buttons in without plugin in Thesis Theme.

    Step 1: Update Theme Theme

    Before we begin with the article, I recommend you to safely upgrade thesis theme, whereas if you don’t have a copy of Thesis Theme then you can download thesis theme here. Move to next step, if you already have updated Thesis Theme Version.

    Step 2: Share Button Code

    Already decided which all Share button to add in blog summary page ? If not, then you can visit the link below to do so:

    Social Share Button Code for WordPress Blog

    In this example, we will add Facebook Like button and Twitter Share Button in Thesis Teaser. If you have selected button codes, then move to Step 3.

    Step 3: Add Share Button in Thesis Teaser

    All set for the action, below code will add social button in thesis teaser, copy-paste the code snippet in the custom_functions.php file.

    Make sure you take full backup of custom_functions.php file using FTP before modifying it.

    [php]

    /*
    Code: Share Buttons in Thesis Teaser
    Author: Aky Joe
    URL: cms.thecreatology.com/
    */
    function share_button_joe(){?>
    <?php if(!is_single() || !is_page()){?>
    <div class="share-button">
    <div data-href="<?php the_permalink(); ?>" data-send="false" data-layout="button_count" data-width="100" data-show-faces="false" data-action="like" data-font="verdana"></div>
    <a href="https://twitter.com/share" data-url="<?php the_permalink(); ?>" data-via="thecreatology" data-related="akyjoe">Tweet</a>
    </div>
    <?php }}
    add_action('thesis_hook_after_teaser','share_button_joe');

    function footer_scripts_joe(){ ?>
    <div id="fb-root"></div>
    <script>(function(d, s, id) {
    var js, fjs = d.getElementsByTagName(s)[0];
    if (d.getElementById(id)) return;
    js = d.createElement(s); js.id = id;
    js.src = "//connect.facebook.net/en_GB/all.js#xfbml=1&appId=390363454310194";
    fjs.parentNode.insertBefore(js, fjs);
    }(document, 'script', 'facebook-jssdk'));</script>
    <script>!function(d,s,id){var js,fjs=d.getElementsByTagName(s)[0];if(!d.getElementById(id)){js=d.createElement(s);js.id=id;js.src="//platform.twitter.com/widgets.js";fjs.parentNode.insertBefore(js,fjs);}}(document,"script","twitter-wjs");</script>
    <?php }
    add_action('thesis_hook_after_html','footer_scripts_joe');

    [/php]

    Note: Make sure you replace @thecreatology with your twitter account.

    Function name share_buttons_joe() embeds share buttons in Thesis Teaser whereas the function name footer_scripts_joe() are html5 scripts for share buttons.

    In case you have your own list of share buttons, then simply put the code between the div container class tag share-button.

    We’re Done

    Once done updating custom_functions.php file, refresh your blog page to see the effect. You can also see demo site below.

    Demo Site: Lets Create Something New

    With this we come to end of this quick tutorial to add social share count buttons in Thesis Theme without Plugin. If you have any query, then post your feedback as comments below.

  • Design a Creative Facebook Business Cover page with Exact Dimensions [Updated]

    Facebook updated it’s Business Page Cover dimensions and they are 828 X 351 pixels.

    Last year December, Facebook Timeline was announced/launched for its users. Facebook Timeline organizes your profile just like a vertical scrapbook. It displays, a reverse chronological order of your statuses, photos, videos and links posted by you or tagged by your friends. I really like this feature overruling the thought, a lot of people not liking it. Duh! A change would do you good! 🙂

    design facebook business cover page
    Draw Facebook Cover Page

    Few days back, Facebook updated Timeline feature on Business Page as well, which actually made me think of this article. Well, creating a Facebook cover is no Big Deal if you upload a sunset, a pet or bunch of gorillas. Such casual and lazy efforts looks good on Personal Pages but talking of a business page, you might have to screw keep pets, nature and folks aside. Yes, to impress facebook page fans, you will have to draw some straight lines. Mmmm… we have an objective here to design Facebook business cover page precisely.

    Lets quickly summarize this article for better understanding. The article has been divided into three parts: Basic Requirement, Set Cover Page Layout and Design Business Cover Page. And here we go…

    Basic Requirement

    Here is a list of items you need, to design Facebook Cover Page:

    • Image Editor (We will be using Photoshop in this tutorial)
    • Business Page Theme (Business Website, Graphic Banner or Company Logo)
    • Cool Fonts (optional)

    Set Facebook Cover Page Layout

    In this step,  we will prepare Cover Page Layout to match exact dimension and it is recommended for Best results. Follow a simple procedure below:

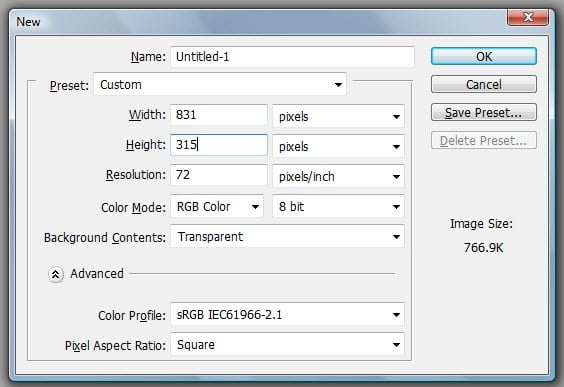
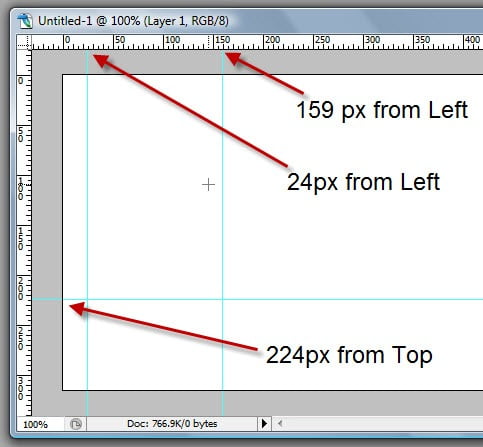
    • Open image editor and Create a New PhotoShop Document with Width: 851 pixels and Height: 315 pixels. For Facebook cover page exact dimensions refer to screenshot below.
    Set Facebook Cover Page Layout
    Set Facebook Cover Page Layout
    • Cover page requires three guidelines for accurate layout. Set first guideline at 24 pixels from Left, set the second guideline at 159 pixels from Left and set the third guideline at 224 pixels from Top. (Refer to screenshot below)
    Set Guidelines Cover Page Layout
    Set Guidelines Cover Page Layout
    • Save the Document and we are all set with the Cover Page Layout.

    Design Facebook Business Cover Page

    We are just a step away from your Awesome Business Page Design. Are you ready with your Theme ? If not, then give it a thought or you can also refer our article to Create Twitter Background. Once ready with Business Theme, with no further delay lets go ahead with Facebook Cover Page design.

    1. PLACE THEME ELEMENTS – BE CREATIVE

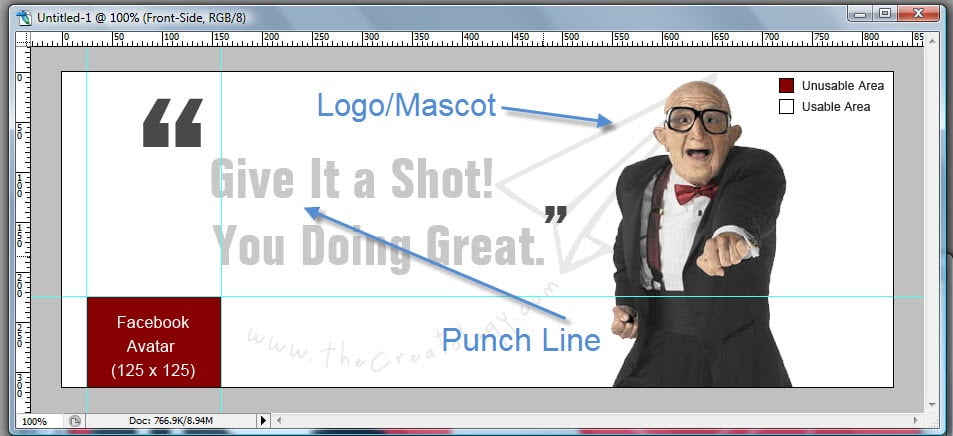
    Depending upon our Business place elements, like banner, slogan, punch line, logo or services in the Cover page. Feel free to express your creativity in this step, don’t forget to refer screenshot for usable and unusable area.

    Place Facebook Cover Elements
    Place Facebook Cover Elements

    2. FACEBOOK AVATAR SIZE

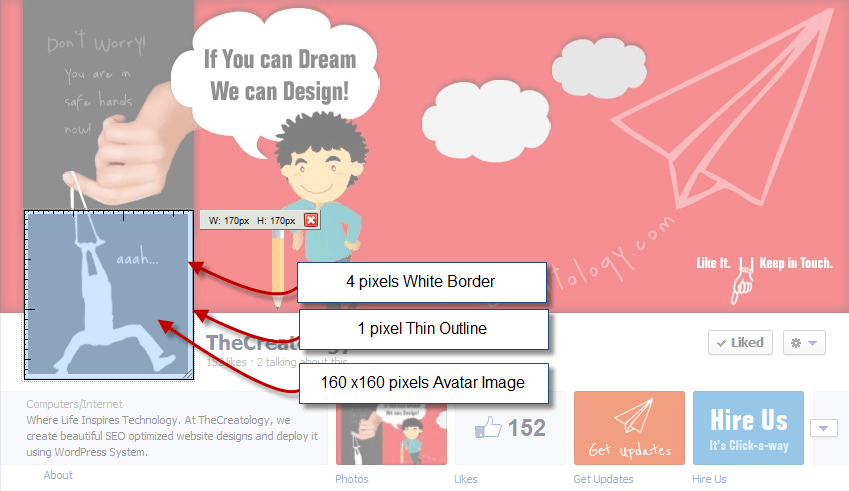
    Facebook avatar, so called Profile Picture is also part of Facebook Cover page. Facebook Avatar Image size is 160 x 160 pixels along with 4 pixels white border and dark 1 pixel outline around, making the Avatar Image Box as 170 x 170 pixels. (Refer to the screenshot)

    Facebook Avatar Image Sizes
    Facebook Avatar Image Sizes

    Already done with above two steps ? Yes: Bravo, No: Keep Working! Designing is a never ending activity and should never stop, until you are done.

    You can see a Demo TheCreatology Facebook Page.

    Wasn’t It fun?

    I am sure it was, but its your time to express now and think with creative mind. What do you think about this article ?

    Share it with friends, if it was helpful! Any doubts, use the comment box below. 😉

    Why this update?

    This post is updated with new Facebook Fan Page Cover Size and Dimensions, as Facebook changed Cover page dimensions.

    Published on: Apr 07, 2012
    Revised on: Aug 03, 2012
    Revised on: Aug 17, 2016

  • Quick-n-Easy way to Create Twitter Background – Part 1 [Design Layout]

    You must be thinking why am I writing this article, when Mashable already has explained about Twitter Backgrounds 2.5 years back. Well, reply to this thought, is this article in which you will learn Quick way to create custom Twitter Background. If you are tired of changing or have spent a lot of bucks in getting a Custom Twitter Background, then this article is for you.

    Twitter-Custom-Background-TheCreatology

    Last December 2011, Twitter changed its User Interface layout for the second time. Well, it happened for good, as Twitter adapted new html5 features. It sure is surprising for Tweeple (people who tweet), whereas annoying for few, who paid so much to get Custom Twitter Background done and it needs rework again.

    Don’t worry, I have a tutorial for you below which will help you to create twitter background easily. The tutorial is divided into three parts: Basic Requirements, Prepare Theme & Design Twitter Background Layout.

    Basic Requirements

    Here is a list of items you need, to create custom Twitter background:

    • Image Editor (eg. Photoshop)
    • Internet Browser with screenshot plugin (optional)
    • Cool Fonts to Impress (optional)

    Prepare Theme

    This is an important part of the tutorial, where we will prepare and collect information to design custom twitter page. To do so, lets go through few points below:

    • Expression: The page should reflect Who You Are? a blogger, a photographer or a biker. What You Like? a Apple iPhone or a Ducati 848. It should reflect your interest and help people to know more about you.
    • Branding: The social branding conforms to have your bio, photo or avatar and contact information.
    • Show Time: After all its your page, so give it a shot. Of-course use your mad skills here. 😉

    Design Twitter Background Layout

    Now that we know what we want in our theme, lets start with the layout design. Check out easy steps below:

    Create Latest Twitter Layout. Best way to find out the latest twitter background layout is itself twitter, check how…

    • Set your monitor resolution for the most optimized version, For Instance, in this tutorial we will be using 1366px X 768px screen resolution which also is commonly used resolution.
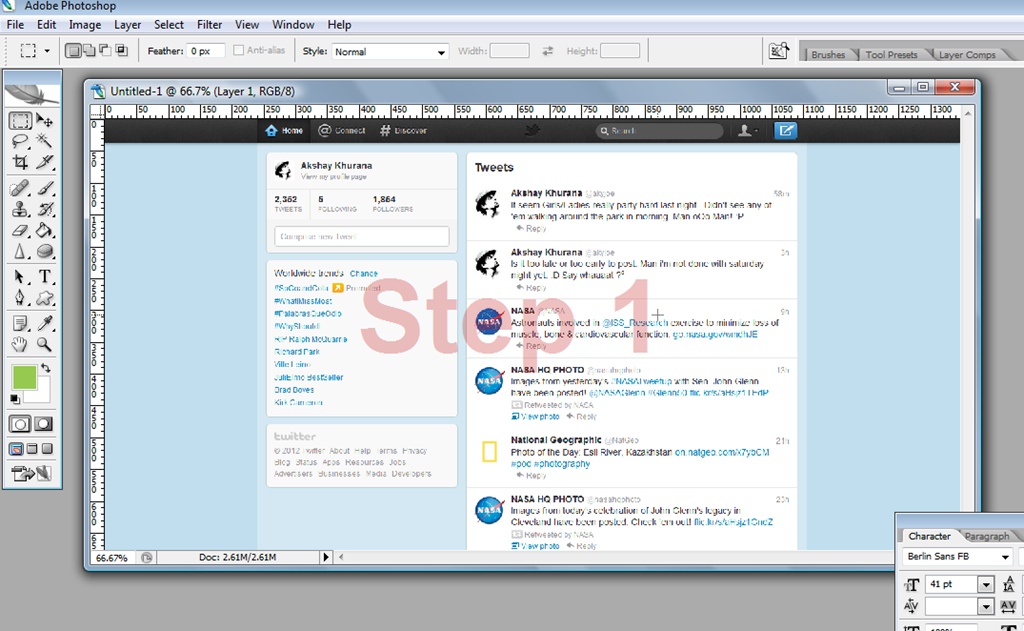
    • Once done, open your twitter page in any browser and Press “Prnt Scrn” on your keyboard. In case if you have a screenshot plugin installed in your browser then quickly take a rough screenshot of the visible area of your twitter page.
    • Next, open Adobe Photoshop and paste/import the screenshot file, just as in the image below.
    Create-Twitter-New-Layout-Step1
    Step 1 – Latest Twitter Screenshot
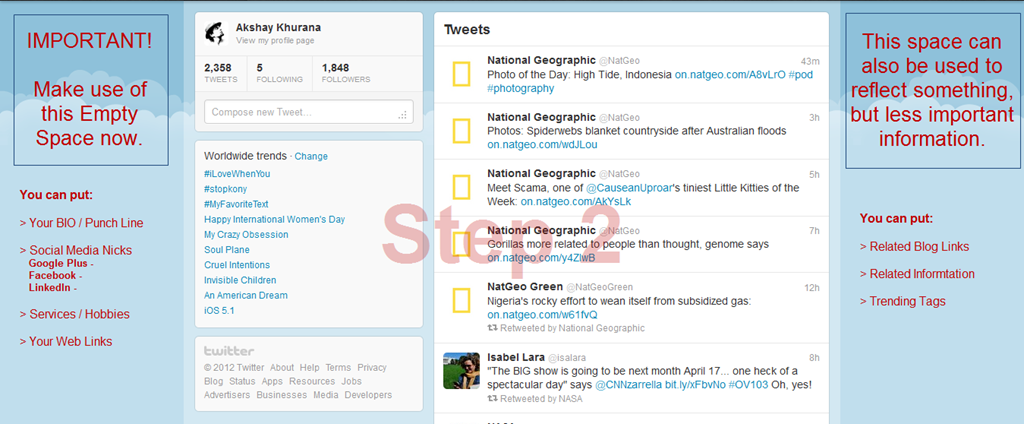
    • Now that you can easily make out in the screenshot above, usable area which is in blue color background as shown in the screenshot below.
    Create Twitter New Layout-Step2
    Step 2 – Prepare Twitter Theme
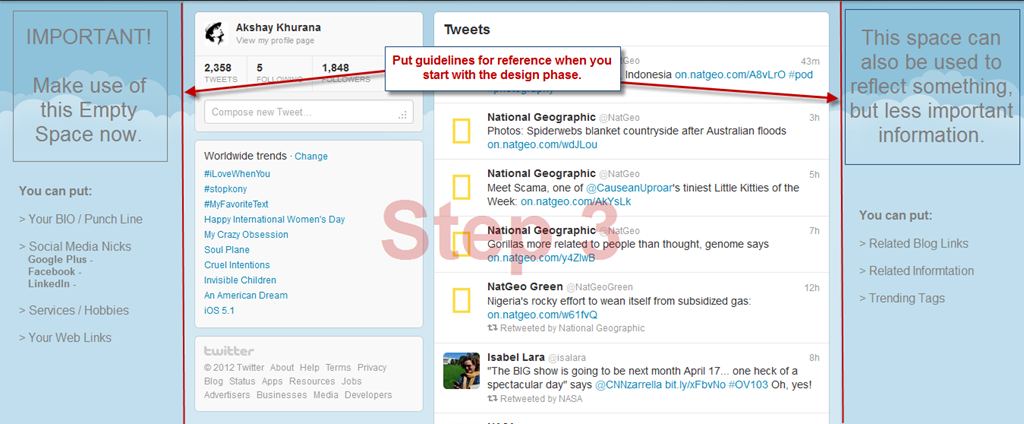
    • Next step is to setup guidelines, which will be a reference, when we will start with the design phase in tutorial [Part 2]. (Refer the screenshot below)
    Create Twitter New Layout-Step3
    Step 3 – Setup Guidelines for Design Phase
    • Save the PSD file, once you are done with setup of guidelines for new twitter background.
    • Take a break, for the work accomplished, Yes I am Serious we are done!

    Now wasn’t that easy of a tutorial, just with hit of “PrntScrn” key and here we got latest twitter layout ready. Well now that we are all set with new twitter background layout and we shall proceed for the design phase. Leave your comments, incase you have any feedback, queries or doubt in your head.

    PS. > Design Phase Article Link will be available shortly here. (Keep in touch via twitter or subscribe to our blog)

  • Learn HTML5 to Create Interactive Website on Web – [Introduction]

    You must be looking for some latest Twitter , Facebook or WordPress updates, guess what ? Its time for the Web HTML updates now. Yes, HTML5 is the next generation of HTML. If you haven’t heard about HTML5 at all or if you are curious to know about it, then this post is for you.

    learn-html5-to-create-website
    Create New Web using HTML5

    This article, Learn HTML5 to Create Interactive Website on Web – [Introduction] covers the basic elements of HTML5 and new features added in HTML5. I have divided this post into three parts – What is HTML5?, Reason behind HTML5 Concept and What’s New about HTML5?

    What is HTML5?

    A new version of HTML which is still a work-in-progress, is supported by a lot of modern browsers like Mozilla 4+, Google Chrome & Opera. Previous version of HTML was launched in year 1999 and since then a lot of refinements were made in terms of HTML, XHTML and HTML DOM.

    Well, HTML5 will be the mixture all these three versions of HTML which were launched over the time and it will be an awesome improvement for page speed, browser compatibility and error handling. I am anxious to see this new web version, are you not ? Read below why we need HTML5 ?

    Reason behind HTML5 Concept

    A collaboration of different minds, W3C and WHATWG, decided to create new and a better version of HTML. And the major factors considered for this revised version of HTML are as under:

    • New Features based (mostly on HTML, CSS 3.0 and JavaScript/jQuery)
    • Open Source Code (Development will be visible to everyone)
    • Robust Error handling (For Quick bug fix and resolution)
    • Device Independent (Doesn’t matter if its iMac, Windows, Android or iPhone)
    • No third party plugins like Flash or Quick Time Players (Thats understood, isn’t it ?)

    What’s New about HTML5?

    Already excited to create with HTML5, check out some new features of HTML5 below:

    • Canvas Element for Drag Drop, Wrap Text, Drawing
    • Form Controls for calendar, date/time, email, search
    • Audio and Video Elements for playback
    • Content Elements like article header/footer, nav, section

    Is that all ?

    Neah, its just that I am so lazy to type that long list of new features in HTML5 for you. 😛 Perhaps, the above mentioned features are the vital ones, while I will elaborate these features in detail with my future posts. So keep in touch with us to learn HTML5 to Create Interactive Website on Web. 😉

  • Thesis Tutorial: Disable right click to Protect Content Copying on WordPress

    Are you afraid of Content Thieves or your WordPress blog has a lot of copyrighted images and you don’t want just people to copy content. Believe me there is no full proof way to stop stealing stuff, however you can still lock the doors for people. Doesn’t Amaze you ? Here check out this tutorial to disable right click on website.

    disable-right-click-on-wordpress
    Disable Right Click on WordPress

    You must have tried your luck with a lot JavaScript solutions and plugins, but they didn’t work with your WordPress Blog. Hmmm! Don’t worry, follow this 2-step thesis tutorial to disable right click on WP blog:

    Step1: Update WordPress & Thesis Theme

    Before we go ahead with the tutorial, its recommended to update latest version of WordPress and Thesis Theme. Don’t know how to do that ? Well, it is simple, refer to article Safely upgrade to latest version Thesis 1.8 ?

    Already updated? Go to Step2.

    Step2: JavaScript Code to Protect Content

    Below is the working JS code to disable right click on WordPress blog. Add the code snippet in custom_functions.php in Thesis Theme.

    NOTE: Make sure you take full backup of custom_functions.php file using FTP before modifying it or you can also refer to the article about how to safely edit custom_functions.php

    [php]

    /*
    TheCreatology Tutorial – Disable Right Click
    Author: Aky Joe
    Email: help@thecreatology.com
    */
    function joe_disable_right_click(){ ?>
    <script language="Javascript">
    /*<![CDATA[*/
    document.oncontextmenu = function(){return false;};
    /*]]>*/
    </script>
    <script type="text/javascript">
    /*<![CDATA[*/
    document.onselectstart=function(){
    if (event.srcElement.type != "text" && event.srcElement.type != "textarea" && event.srcElement.type != "password") {
    return false;
    }
    else {
    return true;
    }
    };
    if (window.sidebar) {
    document.onmousedown=function(e){
    var obj=e.target;
    if (obj.tagName.toUpperCase() == "INPUT" || obj.tagName.toUpperCase() == "TEXTAREA" || obj.tagName.toUpperCase() == "PASSWORD") {
    return true;
    }
    else {
    return false;
    }
    };
    }
    /*]]>*/
    </script>
    <script type="text/javascript" language="JavaScript1.1">
    /*<![CDATA[*/
    if (parent.frames.length > 0) { top.location.replace(document.location); }
    /*]]>*/
    </script>
    <script language="Javascript">
    /*<![CDATA[*/
    document.ondragstart = function(){return false;};
    /*]]>*/
    </script>
    <?php
    }
    add_action( ‘wp_head’, ‘joe_disable_right_click’ );

    [/php]

    Done adding above code? Save the custom_functions.php file and upload it to server using FTP. The above code will not only disable right click but will also disable highlight text on WordPress Blog.

    Disable Right Click Demo

    I hope you are not waiting for some fireworks, TRY TO RIGHT CLICK anywhere on your WordPress Page. 😉

    Are we done ?

    Yes, I hope the above demo made your mind.

    One of my client’s requirement was to disable right click only on single posts. In such cases, you can use WordPress Conditional Tags with Code above in Step2.

    With this we come to end of this article to disable right click to protect content copying on WordPress blog using Thesis Theme. If you have any query or further assistance is required, post feedback as comment below.