Tag: tutorials

  • How to increase upload media file size limit in WordPress

    Are you unable to upload media file in wordpress ? Well, you don’t have to worry about this common limitation set by wordpress. Usually, upload file size error occur when we try to upload a heavy file like a video, or a PDF file, or any other media, exceeding the upload file limit. WordPress throws an exception saying “This file exceeds the maximum upload size for this site”, a similar can be seen in screenshot below.
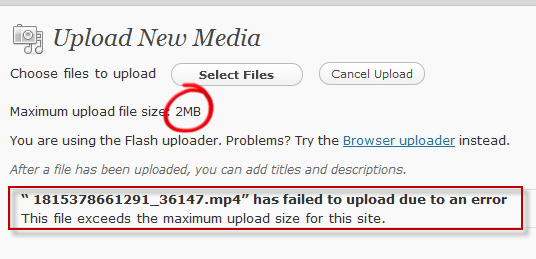
    Error increase upload media file size limit in WordPress
    Error Media file size exceeds limit

    For different web hosting like hostgator or bluehost , WordPress sets different upload file size limit depending upon the PHP configuration on server. For instance, hostgator sets the default limit to 64MB. But there are many more web hosting, which set default limit to only 2MB. In this article we will learn to increase upload media file size limit in wordpress.

    How to increase file upload limit in wordpress?

    • Login to CPanel of your website hosting, for instance hostgator or bluehost etc…
    • Navigate to /public_html/wp-admin using the file manager.
    • In the wp-admin directory look for php.ini file and if found then right-click to edit php.ini file in text editor. But if not found, then create a new file and name it as “php.ini” and then open it in the code editor.
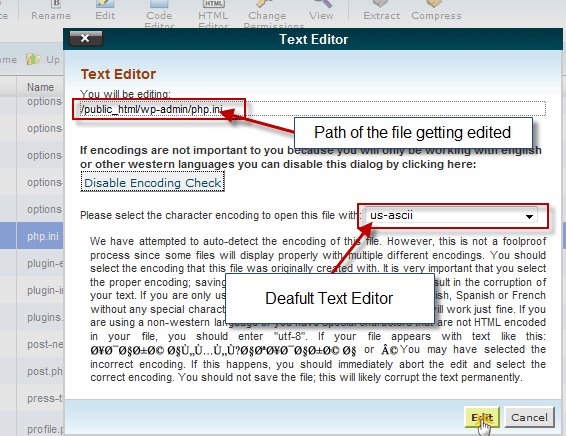
    Edit increase upload media file size limit in WordPress
    Edit Php.ini File
    • When you click the edit button, as in the screenshot above, it will open the php.ini file in text editor. If you have just created new a file php.ini file, then simply copy-paste the below code and save it.

    [php]

    upload_max_filesize = 32M
    post_max_size = 32M

    [/php]

    • But if you have edited the already existing php.ini file then, search for “upload_max_filesize” line and change the numeric value to 32M, or as desired, 64M, 128M etc…
    • Click save button and close the file.
    • Now login to WordPress Admin panel and navigate to Media > Add new media.
    • Now you will notice the maximum upload file size has been increased to the value we just set in the php.ini file, just like in the screenshot below.
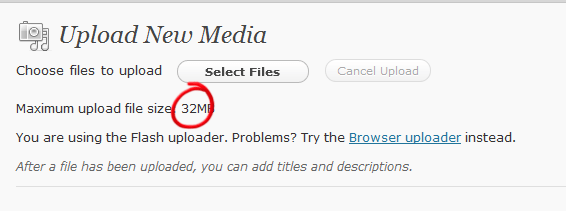
    Increase upload media file size limit in WordPress
    Upload Media Size Increased
    • Now you can upload your media with file size up to 32MB, but if you want to increase the limit then you again edit php.ini file and change its desired value.

    I hope this tutorial was not that complex as it seemed initially, but all’s well, that ends well. If you have any query or any further assistance required, then you can post comments as your feedback.
  • WP Stats not working on WordPress Blog says not authorized to view the stats

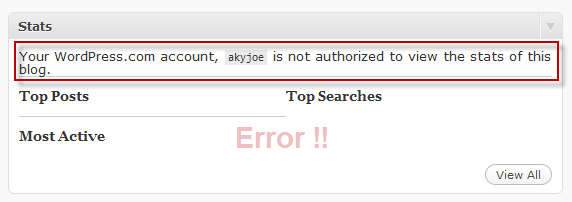
    A recent update from the Automatic company which runs WordPress is innovating its cloud architecture day by day. Today, when I logged in my Dashboard, I found that my WordPress Stats not working, as it said “Your WordPress.com account, akyjoe is not authorized to view the stats of this blog.”

    WordPress Stats not working error
    WP Stats error on Blog

    I logged in my WordPress account to check my WordPress API key, but everything seemed to be fine. Then I looked up on web and found couple of announcements from the WordPress regarding WP Stats plugin issue. In this article we will learn to fix wp stats problem on wordpress blog.

    How to fix WP Stats issue ?

    Since WordPress Stats plugin has been updated with the launch of latest plugin by Automatic, is JetPack. So, in order to fix wp-stats plugin, refer to the article to install jetpack plugin for wordpress.

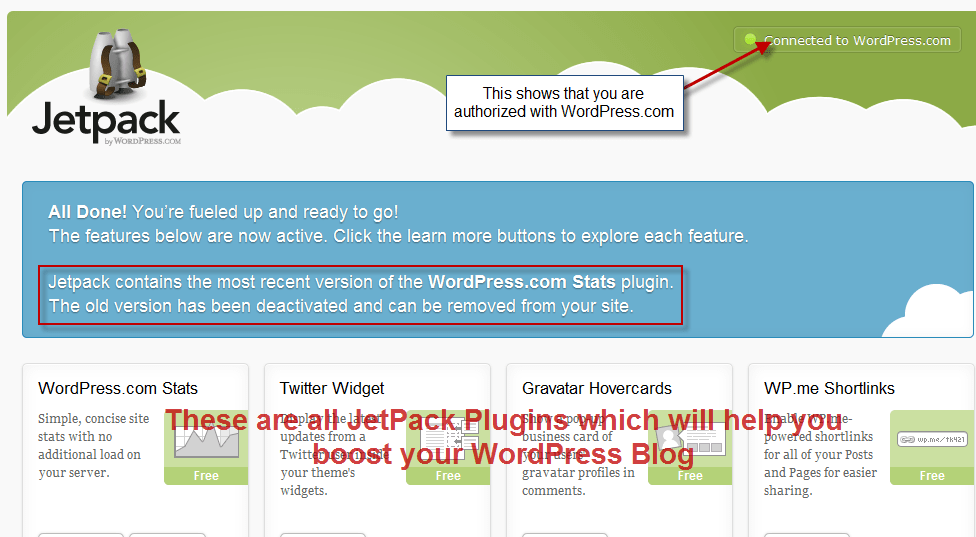
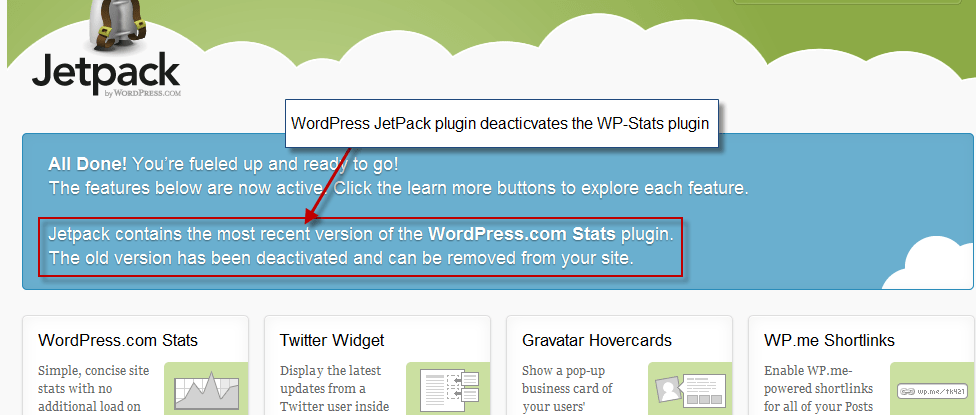
    After you install jetpack plugin for wordpress, you will see the a message saying that “Jetpack contains the most recent version of the WordPress.com Stats plugin. The old version has been deactivated and can be removed from your site.” You can refer to the screenshot below.

    WordPress jectpack plugin installation
    JetPack Plugin Welcome Message!

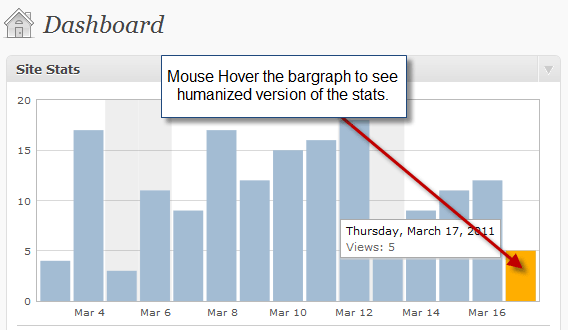
    Now once the plugin is installed you will notice that the old wordpress stats plugin will be deactivated and the stats will be replaced by the new wp stats by jetpack, as you can see the screenshot below.

    New-wp-stats-jetpack-plugin
    New WpStats by JetPack

    When I fixed this issue and I found that the latest version of stats is more precise and it gives more detailed reports about the site visits and hits. I hope this tutorial will fix problem of wp stats easily.

    If you have any query or need any further assistance, you send us feedback by posting a comment below.

  • How to install JetPack on WordPress blog ?

    JetPack plugin is latest by Automatic which improve wordpress blog performance. Jetpack plugin comes with lots of feature like site stats, twitter widget, gravtar hovercard, sharedaddy and many more. WordPress is trying to cover the market, and making blogger to minify third party plugins dependency. I really admire this thought and I don’t depend on third party plugins, as you never know when they make you land in deadlock situations.

    jetpack-new-update-thecreatology
    JetPack Plugin for WordPress

    In this tutorial, we will learn to install jetpack plugin on wordpress blog. Below is a 3-step  procedure which will help you achieve the objective.

    Step 1: Install JetPack Plugin on WordPress

    • In order install jetpack plugin, login to your dashboard admin of wordpress.
    • Navigate to Dashboard > Plugins > Add New Plugin.
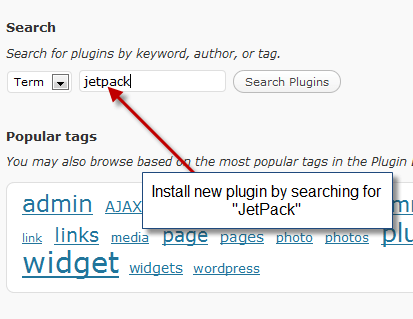
    • Type “jetpack” in the search box and press search button. Refer to the screenshot below.
    step1- searchl-jetpack-plugin-on-wordpress
    Search for JetPlugin
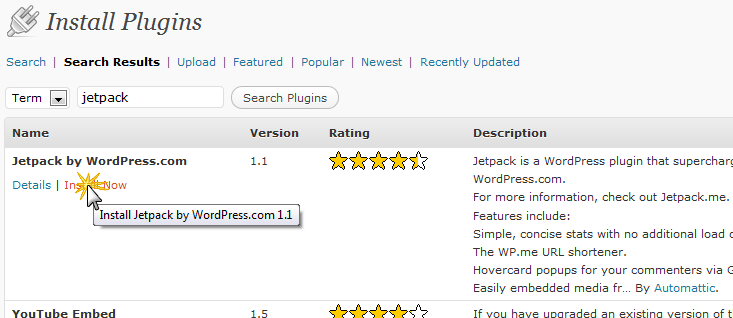
    • As the search results get listed, Click on Install Now button which says “JetPack by wordpress.com”. Refer to the screenshot below.
    step2- install-jetpack-plugin-on-wordpress
    Install JetPack Plugin
    • Once installed, click on activate button and we are done with the installation of JetPack Plugin. Proceed to next step to authorize jetpack plugin.

    Step 2: Authorize JetPack with WordPress.com

    Since JetPack is a wordpress.com plugin, it needs authorization. Make sure you login to your wordpress.com account before you proceed further. If you don’t have one, then you will require to create one.

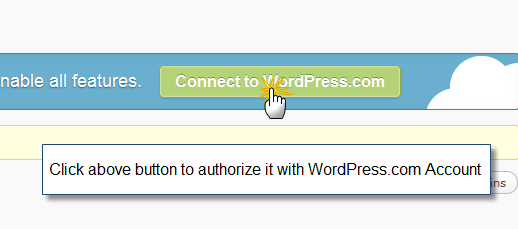
    • On activating the jetpack plugin you will notice a message above the list of plugin saying “Connect to WordPress.com”, just like the screenshot below.
    step3- authorize-jetpack-plugin-on-wordpress
    Connect to WordPress.com
    • Click on green button to authorize it and you will be asked to authorize it in next screen similar to one below:
    step3-1 authorize-jetpack-plugin-on-wordpress
    Authorize JetPack Plugin
    • Click on the Authorize JetPack button, in order to connect with wordpress.com
    • Once don, you will be redirected to JetPack Dashboard, where you can configure jetpack plugin.

    Step 3: JetPack Plugin Dashboard

    JetPack has its own admin panel which allows you to configure various options like site stats, twitter widget etc. You can refer to the screenshot below which shows jetpack admin panel.

    step4 configure-jetpack-plugin-on-wordpress
    JetPack Dashboard

    We are done!

    We are done with the installation of jetpack plugin and you can now play around with its features and I will come up with more articles soon, to configure jetpack plugin. Do let us know, how did you find the jetpack plugin, by posting a comment below.

  • How to add scrolling text in header to increase blog hits ?

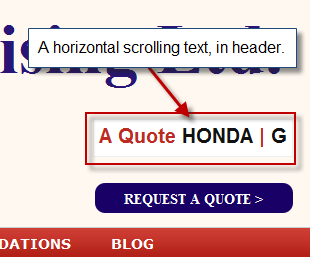
    Moving Objects and animating text looks fascinating on a website and it increases number of hits on website. You must of seen websites with moving text in header, which contains latest news, or product offers, or some alert etc. In my recent project, a client just demanded to add text scrolling in header, just like you can see in the screenshot below:

    horizontal text scrolling in header
    Screenshot showing Text Scrolling

    Few days back I wrote about How to add alert bar to grab reader attention in Thesis Theme which grabs visitor attention and increase clicks on blog. In this article we will learn to scrolling text in header, which I believe is another way to increase hit on website.

    How to add Scrolling Text in Blog ?

    We are using a simple and smart concept here and the analogy behind is by registering scroll text widget in wordpress and further displaying it  by function call in the header. You can follow the procedure below to add scrolling text in wordpress:

    • Login to Dashboard Admin of WordPress blog.
    • Navigate to Appearance > Editor and select functions.php of your WordPress Blog Theme.
    • Now scroll to the end of the file and add the following code in it.

    Make sure you take full backup of functions.php file using FTP before modifying it.

    [php]

    //Author: Aky Joe
    //Email: akyjoe@thecreatology.com

    function joe_scroll_text() { ?>
    <div class="text-flash">
    <marquee behavior="scroll" direction="left" onmouseover="this.stop();" onmouseout="this.start();" >
    <?php if (!function_exists(‘dynamic_sidebar’) || !dynamic_sidebar(‘ScrollText’) ) { ?>

    <?php } ?>
    </marquee>
    </div>
    <?php }
    register_sidebar(array(‘name’=>’ScrollText’, ‘before_title’=>”, ‘after_title’=>”));

    [/php]

    • Once done adding the code in file, click on the update button to save the file. Since we added the function now, now in order to display the scrolling text, we will have to make a function call.
    • Navigate to Appearance > Editor and select header.php and add the below code snippet where you want to display scrolling text.

    Make sure you take full backup of header.php file using FTP before modifying it.

    [php]

    <?php
    //Function call to display Scroll Text
    joe_scroll_text();
    ?>

    [/php]

    • After adding the above code, you see text scrolling in header by, it looks broken. We will have to add stylesheet code.
    • Navigate to Appearance > Editor, select style.css file and copy paste the below code snippet.

    [css]

    .text-flash {
    width:188px;
    height:32px;
    background:#fff;
    float:right;
    margin:30px 20px 20px;
    font-size: 15px;
    color:#bc2b21;
    padding: 2px 5px;
    line-height: 30px;
    border: 1px solid #eee;
    font-family: Arial;
    list-style: none outside none;
    }

    [/css]

    • Above code will style scrolling text for background color and text color. As installation is done, now we have to display some text and see how it goes live on the website.
    • Navigate to Appearance > Widgets and you will see ScrollText slot in right pane.
    • Now drag a “Text Widget” to the newly created slot ScrollText. Add some  text in widget and save it (Make sure you don’t add the title).
    • Once done, refresh the website and see the effect. It will look similar to the screenshot below:
    Add Scrolling text in header
    Demo: Scrolling Text in Header

    The scrolling text uses an old school html code “marquee” which scrolls from left to right and vice-versa. Using this tutorial, you will be able move dynamic texts of blog like latest post, news and offers with ease. If you are you using scroll text for your blog then you can share with us here by leaving a comment below.

  • How to add tweetmeme button on post page in Thesis Theme ?

    I have already mentioned about twitter share count button for wordpress and in this article we will learn to add twitter button in thesis theme.

    thesis-theme-twitter-button
    Get Thesis Theme Now

    As we know that Thesis Theme is capable of content management and efficient SEO. Though it is a raw wordpress theme but it allows endless customization for your blog. If you don’t have a copy of Thesis Theme then you can download thesis theme here.  If you are using an old version of Thesis Theme then I recommend you to safely upgrade thesis theme.

    Add Twitter button in Single post

    As we are know that Thesis customization is done using thesis hooks which are overriding functions. To show twitter button in single post, copy-paste the code snippet in the custom_functions.php.

    Make sure you take full backup of custom_functions.php file using FTP before modifying it.

    [php]

    function joe_adds_twitter_btn ()  {
    if (is_single()) { ?>
    <div style="float:right; margin:0 10px;"><script type="text/javascript">tweetmeme_source = ‘thecreatology’;</script>
    <script type="text/javascript" src="http://tweetmeme.com/i/scripts/button.js"></script></div>

    <?php
    }
    }
    add_action(‘thesis_hook_before_headline’,’joe_adds_twitter_btn’);

    [/php]

    Note: Change the ‘twittermeme_source’ which will be your twitter username, in above code.

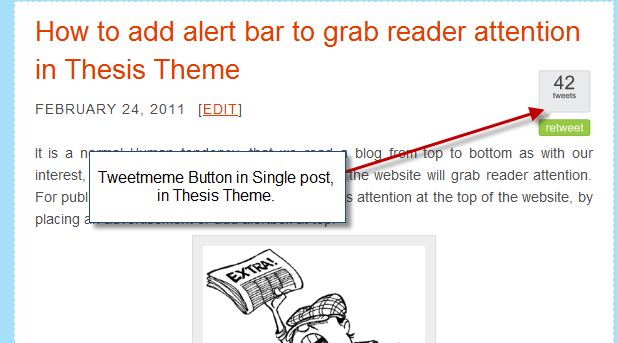
    Save the custom_functions.php file, once you are done adding the above code. Now upload the edited file on server using ftp client and when you will refresh website, you will find something like in screenshot below.

    add-twitter-button-in-single-post-thesis-theme
    Twitter Share button in Single Post

    As we have added twitter button in thesis theme, we come to the end of this article. If you have any queries then you can post comment below as your feedback.
  • Official LinkedIn Share button for WordPress Blog

    As we all are aware of the professional network LinkedIn, which is a business adapted social networking website. With the growing network on social media websites like Twitter and Facebook, LinkedIn has also launched its official share button.

    Add Official LinkedIn Share button for WordPress
    Share on LinkedIn

    LinkedIn share button works same as Twitter Share button, Tweetmeme and Facebook Like Button which help bloggers to share articles around the network. In this post we will learn to add official linkedin button for wordpress blog.

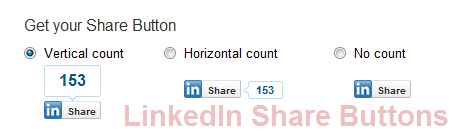
    LinkedIn buttons are simple to use and need not require any configurations. There are three types of LinkedIn buttons, developed to fit with different layouts schemes, they are Vertical Count, Horizontal Count and No Count.

    Official LinkedIn Share button for WordPress Blog
    Different LinkedIn Buttons

    Below are different buttons with the respective code snippets:

    Vertical LinkedIn Button

    Vertical Count button displays the counter above the button as you can see the image above. The code for vertical button is as under:

    [php]

    &amp;amp;lt;script type=&amp;amp;quot;text/javascript&amp;amp;quot; src=&amp;amp;quot;http://platform.linkedin.com/in.js&amp;amp;quot;&amp;amp;gt;&amp;amp;lt;/script&amp;amp;gt;
    &amp;amp;lt;script type=&amp;amp;quot;in/share&amp;amp;quot; data-url=&amp;amp;quot;&amp;amp;lt;?php the_permalink(); ?&amp;amp;gt;&amp;amp;quot; data-counter=&amp;amp;quot;top&amp;amp;quot;&amp;amp;gt;&amp;amp;lt;/script&amp;amp;gt;

    [/php]

    Horizontal LinkedIn Button

    Horizontal Count button displays the counter on right of the button, as you can see it in the picture above. The code for horizontal button is as under:

    [php]

    &amp;amp;lt;script type=&amp;amp;quot;text/javascript&amp;amp;quot; src=&amp;amp;quot;http://platform.linkedin.com/in.js&amp;amp;quot;&amp;amp;gt;&amp;amp;lt;/script&amp;amp;gt;
    &amp;amp;lt;script type=&amp;amp;quot;in/share&amp;amp;quot; data-url=&amp;amp;quot;&amp;amp;lt;?php the_permalink(); ?&amp;amp;gt;&amp;amp;quot; data-counter=&amp;amp;quot;right&amp;amp;quot;&amp;amp;gt;&amp;amp;lt;/script&amp;amp;gt;

    [/php]

    No Count

    This is a simple linkedin button which doesn’t display any counter. You can see this button in above image preview. The code for simple LinkedIn button is as under:

    [php]

    &amp;amp;lt;script type=&amp;amp;quot;text/javascript&amp;amp;quot; src=&amp;amp;quot;http://platform.linkedin.com/in.js&amp;amp;quot;&amp;amp;gt;&amp;amp;lt;/script&amp;amp;gt;
    &amp;amp;lt;script type=&amp;amp;quot;in/share&amp;amp;quot; data-url=&amp;amp;quot;&amp;amp;lt;?php the_permalink(); ?&amp;amp;gt;&amp;amp;quot;&amp;amp;gt;&amp;amp;lt;/script&amp;amp;gt;

    [/php]

    Add LinkedIn button in WordPress

    Make sure you take backup before editing the code.

    Choose the appropriate button above for your Theme and simply open up your theme file, for instance Single.php and add linkedin button code within post loop. Once done, upload the file server and refresh the blog to see the effect.

    There are also plugins developed for LinkedIn button, but in order avoid plugin dependency, one should prefer adding the codes manually. You can also visit Official LinkedIn resources for Publishers.

    This ends a simple tutorial to add linkedin button in wordpress. If you have any query or further assistance is required, post comment as your feedback.
  • How to reduce page load time of blog using Thesis WordPress Theme ?

    Wesite Load Time is Annoying
    Wesite Load Time is Annoying

    Is your blog using Thesis Theme, takes a lot of time while loading a page or homepage ? If you are not sure, then you can check page load time for your website page using Pingdom Tools. These tools helps you in analyzing resources that are causing page loading. Usually Images and JavaScript are the major factor behind page load time on Website or on Blog.

    How to Optimize Image ?

    Pingdom Tools test will help you create a list of Images which are causing page load time and then you can use Smush It tool by Yahoo! to optimize images on website.

    How to Optimize JavaScript ?

    There are many JavaScript compression tools available online, which reduces the JavaScript code size. One of the tools, which I prefer is JavaScript Compressor. This tool till help you reduce the size of your JavaScript code, by truncating spaces and other used lines. But in case JavaScript is causing the delay in page loading, then it is a major concern as JavaScript is declared in the Head Section which loads before the body, hence causing delay. But if you are using Thesis WordPress Theme then you don’t have to worry about it. In this article, we will learn about how you can reduce load time using Thesis Theme.

    Before we proceed with the tutorial, I want to make sure that you are using latest version of thesis, if not then you can refer to article and Safely upgrade to latest version Thesis 1.8

    Thesis Theme has an advanced control panel featuring a lot of options to optimize SEO, typography and layout design. I have already mentioned the Design Options in an article Ease with Thesis WordPress Theme Design options panel. We will use design options to embed code in footer which will reduce page load time.

    How to add Script using Thesis Options ?

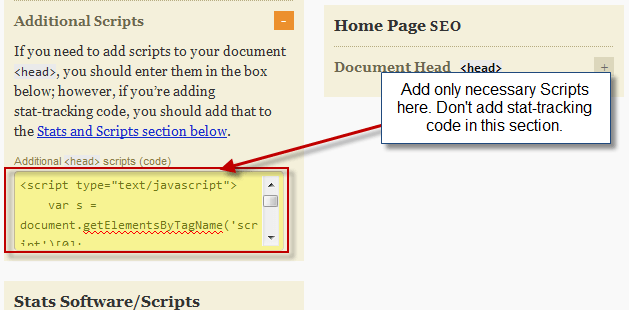
    I have seen many bloggers using JavaScript in head section, and even which is not mandatory. For instance, many people add stats-tracking code or other third party media codes in head section and causes delay in page loading.

    add script using thesis options
    Additional Scripts: Thesis Site Options

    In order to overcome page loading issues, simply add the code after footer section. Here is a simple procedure to move scripts from head section to footer section (If there is no code in head section, then you can simply skip this procedure):

    • Login to WordPress Admin panel and navigate to Thesis > Site Options.
    • Click on the Additional Scripts to expand.
    • Copy the unnecessary JavaScript code on Clip Board or on a Notepad for safer side.
    • Click Big Green Save Button.
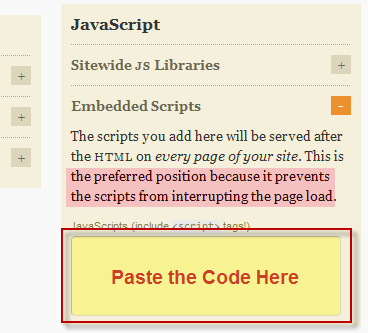
    • Now, navigate to Thesis > Design Options and expand JavaScripts.
    • Paste the code in the text area, you can refer to the screenshot below.
    add script thesis design options
    JavaScripts: Thesis Design Options
    • Now click Big Green Save Button and you are done.

    Refresh the site, and test it out using the Pingdom Tools again. Let us know your page load time after using this tutorial, by posting a comment below.

    Page load time should not be more than 10-15 seconds, as accordingly to Google terms, your website can be black listed. But you can surely optimize website using thesis, and I hope this tutorial get productive for you. If you have any query or further assistance is required, you can simply post a comment below as your feedback.
  • Add Facebook Like Button to Increase traffic on blog

    Social market is growing with web major dominants Twitter and Facebook. With increasing traffic on websites around the globe everyday, millions of people are reading and sharing articles on these social markets. Like the tweetmeme button on twitter, Facebook has “Fshare” and “Like” button.

    Add Facebook Like Button to Increase traffic on blog
    Facebook Like button

    Most of the blogs are using “like” and “recommend” button, which helps in increasing blog traffic and social media promotion. In this article, we will learn that by adding facebook like button can increase blog traffic and how to add like button on wordpress blog.

    How Facebook Like Button Increase Blog Traffic ?

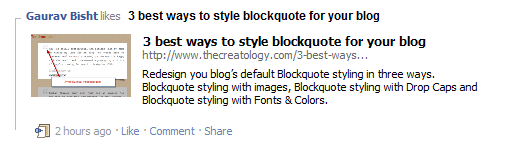
    Facebook is the most visited website in the online world where people with age 8-80 exists. Each user has news feed and has ability to see updates of their connections and vice-versa. Now for instance, a user Gaurav with 500 friends, when clicks a “like” button on a blog, its News Feed gets updated. When news feed is updated for a user, it automatically update it for each of the 500 friends News Feed. You can also see a screenshot below of a user Gaurav  liking a post.

    News Feed to Increase traffic on blog
    News feed preview of User liked the post

    This cycle continues to function when any friend of 500 connections again clicks the “like” button on its wall. And then it gets updated on its news feed and it goes on. Have you ever heard of free automatic social promotion of blog ? Well, adding like button on blog, is what is the answer to this question. Learn how to integrate like button on wordpress below.

    How to add Facebook Button on WordPress Blog ?

    I hope now you know the advantages of facebook “like” button and how useful is for your blog. Adding “like” button on post, will require to edit single.php like we did in our article to add Official Twitter Button Count on WordPress Blog. Paste the code snippet below and add it in single.php located in Theme Template Directory.

    Make sure you backup file before you paste the code below.

    [php]
    <iframe src="http://www.facebook.com/plugins/like.php?href=<?php echo urlencode(get_permalink($post->ID));?&amp;layout=standard&amp;show_faces=false&amp;width=450&amp;action=like&amp;colorscheme=light" scrolling="no" frameborder="0" allowTransparency="true" style="border:none; overflow:hidden; width:450px; height:60px;"></iframe>
    [/php]

    After adding the code in single.php, upload file on server, and you will be done. In order to adhere functionality for facebook like button, configure it using the following parameters:

    show_face=true (true/false):- Enable friend icons below like button.

    layout=button_count (standard/box_count/button_count):- Choose the layout suits best for your scenario.

    Facebook button layout to Increase traffic on blog
    Different Facebook button layout

    colorscheme=light (light/dark):- You can choose the color scheme as per your blog theme.

    action=like (like/recommend):- You can select between “like” and “recommend” button, though functionality is the same.

    The above code uses iframe tag, which can be customized further by css styling for width and height.

    With this we come to the end of this tutorial, and we have added Facebook Like button on wordpress blog. If you have any queries or need any assistance, post comment as your feedback.

  • How to add Official Twitter Button Count on WordPress Blog ?

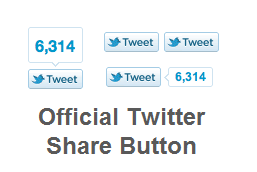
    Twitter announced an official share button, which works same as a Tweetmeme button, but it is developed by twitter. You can see the screenshot below with different types of twitter button shapes to fit best for your layout. As mentioned above twitter button is similar to  Tweetmeme button which I explained in Tutorial to add Twitter Share Retweet Button on WordPress Blog.

    Official Twitter Button Count
    New Twitter Share

    The new twitter button features to have better customization and in addition to it includes account recommendation. For instance if you have two different twitter handles, you can customize new twitter button in a way, a vistor can share post using one handle, and recommend with the another handle.

    In this tutorial, we will learn to add new twitter button on wordpress blog.

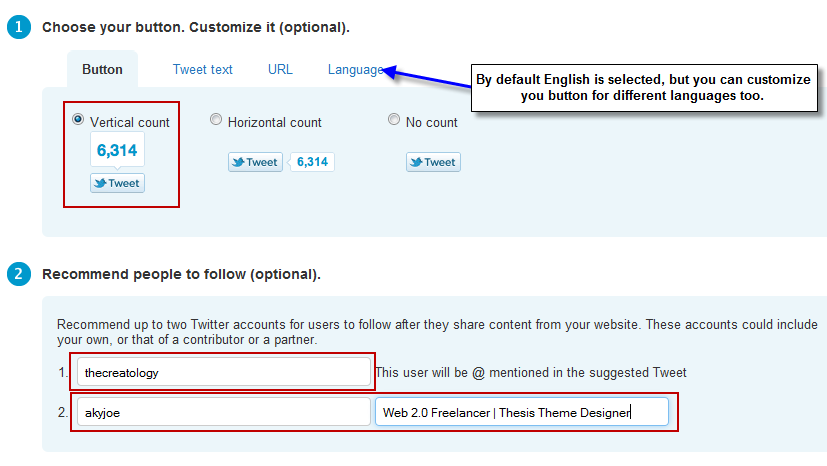
    Step 1: Configure twitter button

    Go to Twitter Button Page and configure the twitter button for size, url and twitter handle. (Refer to the screenshot below)

    Configure Official Twitter Button Count
    Customize Twitter button

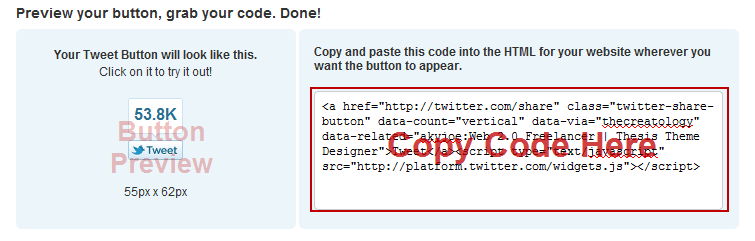
    Step 2: Get Twitter Button Code

    Once you are done with the configuration of twitter button, scroll down and get twitter button code for your blog integration. (Refer to screenshot below)

    get official twitter button code
    Twitter Button Code

    You can also copy the code below directly into theme file, and make sure you change the twitter handles. Here is the code below:

    [php]
    &lt;a href=&quot;http://twitter.com/share&quot; data-url=&quot;&lt;?php the_permalink(); ?&gt;&quot; data-count=&quot;vertical&quot; data-via=&quot;thecreatology&quot; data-related=&quot;Aky Joe:He is Cool!&quot;&gt;Tweet&lt;/a&gt;
    &lt;script type=&quot;text/javascript&quot; src=&quot;http://platform.twitter.com/widgets.js&quot;&gt;&lt;/script&gt;
    [/php]

    Make sure you take backup before editing the code.

    Now that you have the twitter button code, add twitter code in single.php or custom_fucntions.php in case of Thesis Theme. Use any FTP client and upload file on server. Refresh website to see the effect.

    With this we are done adding new twitter button on blog, and come to the end of the tutorial. A lot of people have already switched with new twitter button, I hope this tutorial will be easy for you. If you have any query or need assistance post comment, as your feedback, I will get back to you asap!

  • Tutorial to add Twitter Share Retweet Button on WordPress Blog

    Twitter has been statistically growing with social media market, and allowing bloggers to share article on twitter. I believe adding social share buttons on blog is as vital as oxygen and water for survival. I’m sure you must have seen a popular blogs with share count buttons, and if you haven’t then you are certainly missing something on your blog.

    add-retweet-button-for-wordpress
    Retweet Button for WordPress Blog

    After reading an article or post on blog, if visitor finds it interesting can share it on social media like twitter, facebook etc… For an effective placement of share button, a retweet button should be placed before the post page. In this article, we will learn to add retweet button on wordpress Blog.

    Choose your Retweet Button!

    There are two types of retweet button depending upon the size, one is large retweet button and other one is compact retweet button. You can choose the button which fits best for your layout of the website. Desired Code for the both buttons are as under:

    Add large retweet button:

    [php]
    <script type="text/javascript">
    tweetmeme_source = ‘thecreatology’;
    </script>
    <script type="text/javascript" src="http://tweetmeme.com/i/scripts/button.js"></script>
    [/php]

    Add compact reweet button:

    [php]
    <script type=’text/javascript’>
    tweetmeme_style = "compact";
    tweetmeme_source = ‘thecreatology’;
    </script>
    <script type="text/javascript" src="http://tweetmeme.com/i/scripts/button.js"></script>
    [/php]

    In the above code make sure you change tweetmeme_source with your twitter username or twitter handle. You can add the above code snippet in your Theme file, for instance for post page you can add the above code by editing single.php file.

    I’m sure retweeting will give your blog a great exposure which will increase visits and hits on your blog. If you have any query or need further assistance, you can post comment below as your feedback.